![]()

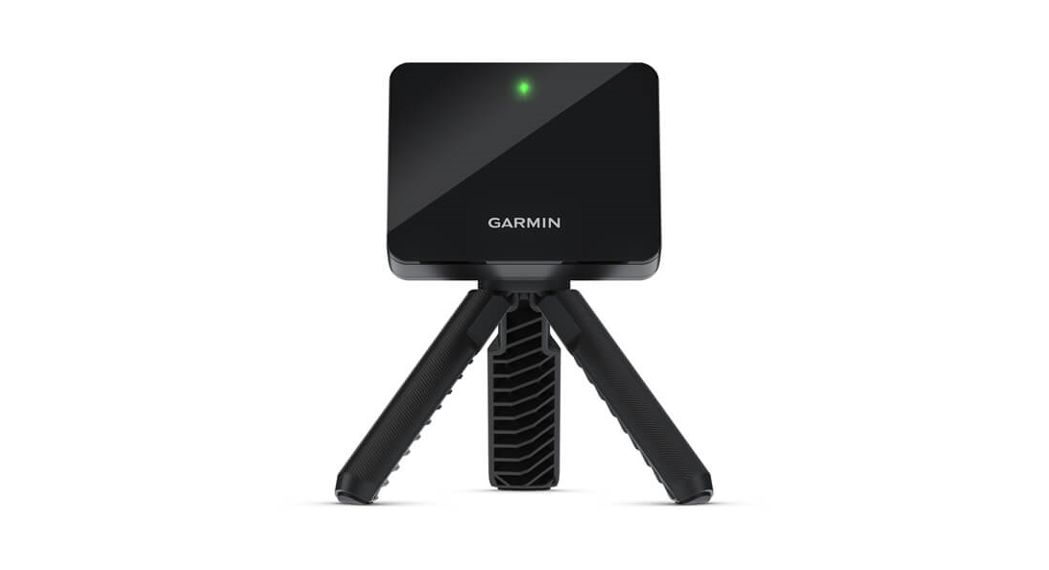
APPROACH® R10Owner’s Manual
© 2019 Garmin Ltd. or its subsidiariesAll rights reserved. Under the copyright laws, this manual may not be copied, in whole or in part, without the written consent of Garmin. Garmin reserves the right to change or improve its products and to make changes in the content of this manual without obligation to notify any person or organization of such changes or improvements. Go to www.garmin.com for current updates and supplemental information concerning the use of this product.Garmin®, the Garmin logo, and Approach® are trademarks of Garmin Ltd. or its subsidiaries, registered in the USA and other countries. Garmin ConnectTM, Garmin ExpressTM, and Garmin GolfTM are trademarks of Garmin Ltd. or its subsidiaries. These trademarks may not be used without the express permission of Garmin.AndroidTM is a trademark of Google Inc. The BLUETOOTH® word mark and logos are owned by Bluetooth SIG, Inc. and any use of such marks by Garmin is under license. iOS® is a registered trademark of Cisco Systems, Inc. used under license by Apple Inc. Other trademarks and trade names are those of their respective owners.
Introduction
![]() WARNINGSee the Important Safety and Product Information guide in the product box for product warnings and other important information.
WARNINGSee the Important Safety and Product Information guide in the product box for product warnings and other important information.
Device Overview
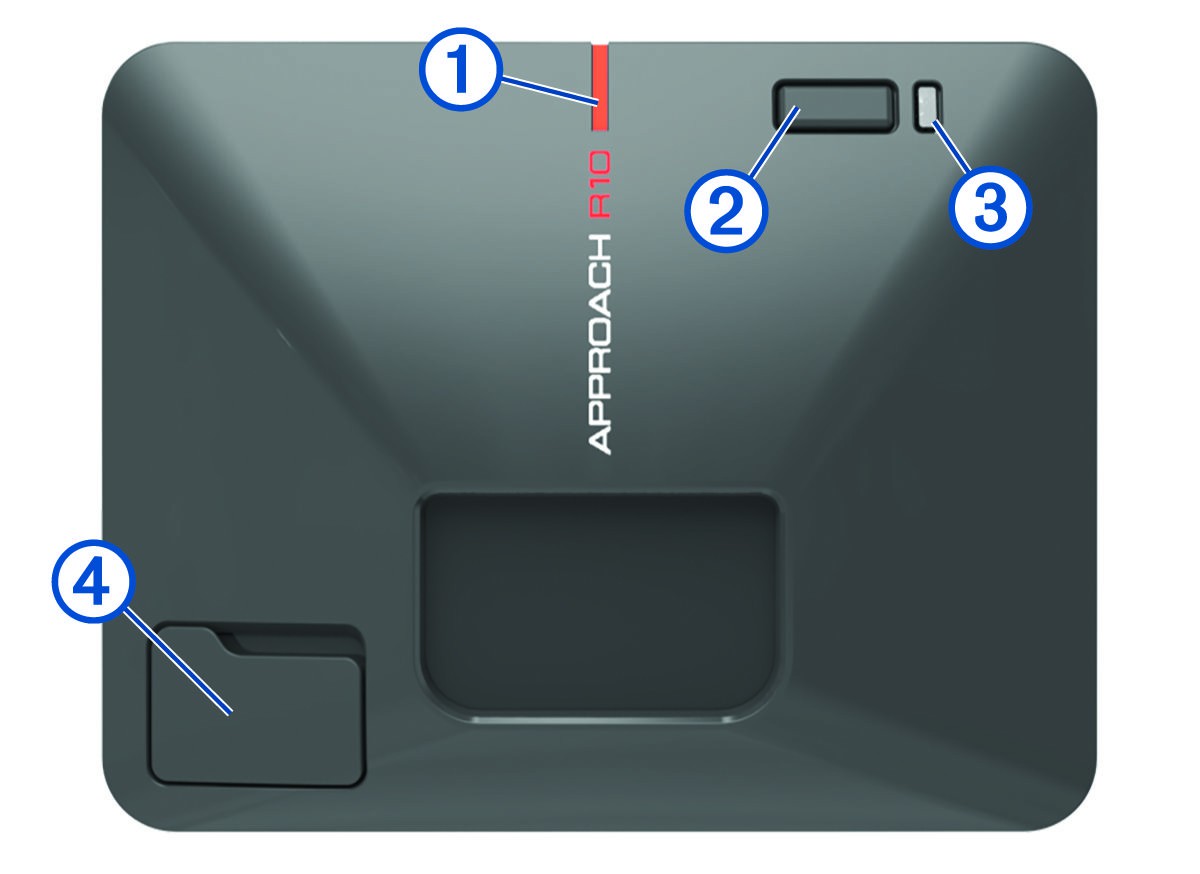
 Alignment line: Align with the ball and shot target to set the target line.
- Button: Press to turn the device on. Hold for one second to turn the device off. With the device turned off, hold until the status LED turns blue to enter pairing mode.
- Charge LED: Indicates the battery status (LED Statuses, page 2).
- USB port (under weather cap): Connect the USB cable to charge the device or download software updates using your computer.
 Alignment line: Align with the ball and shot target to set the target line.
LED Statuses
The status LED ![]() indicates the device status. The charge LED
indicates the device status. The charge LED ![]() indicates the battery status.
indicates the battery status.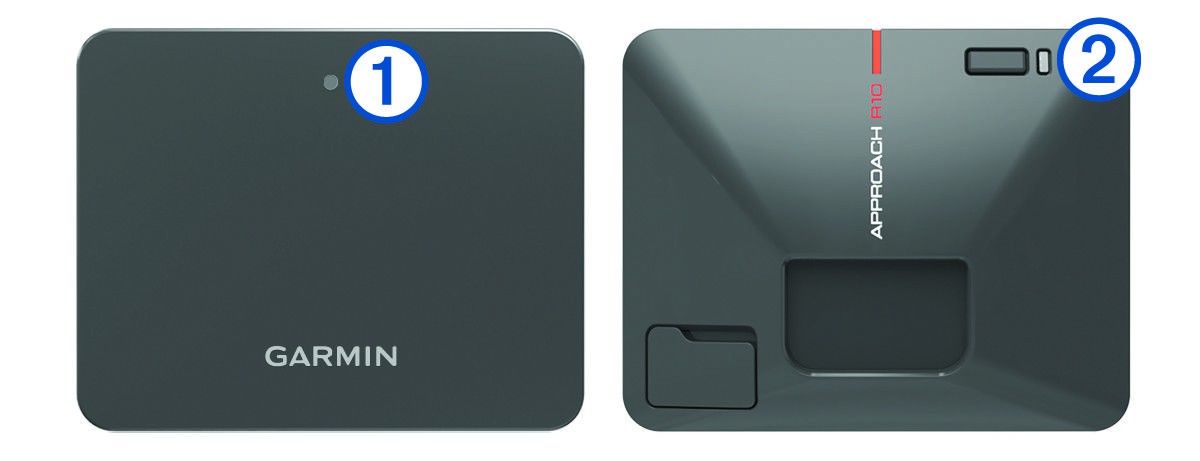
| Status | |
| Solid blue | The device is in pairing mode. |
| Flashing blue | The device is reconnecting to the previously connected smartphone. |
| Solid white | The device is in mass storage mode. |
| Flashing white | The device is in standby mode. |
| Flashing green | The device is ready for a shot. |
| Solid red | The device is busy. |
| Flashing purple | A software update is in progress. |
| Status | |
| Flashing red | The battery is charging. |
| Solid red | The battery is fully charged. |
| Rapidly flashing red | The device is unplugged and the remaining battery power is low.
NOTE: The LED flashes rapidly for five seconds after the device is turned on if the battery is low. |
Pairing Your Smartphone
To use this device, you must pair it with the Garmin GolfTM app.
- From the app store on your smartphone, install and open the Garmin Golf app.
- Bring your smartphone near your device.
- Press the button to turn on your device.The first time you turn on the device, it automatically enters pairing mode, and the status LED is solid blue.TIP: You can hold the button while the device is off until the status LED turns solid blue to manually enter pairing mode.
- From the instructions. menu in the app, select Garmin Devices > Add Device, and follow the on-screen
Garmin Golf App
The Garmin Golf app allows you to view detailed statistics and shot analyses that are recorded on your Approach device. For viewing on a larger display, you can mirror the Garmin Golf app to a compatible smart TV using the screen mirroring function on your smartphone. With a Garmin Golf subscription, golfers can compete with each other at over 42,000 virtual courses and participate in a weekly virtual tournament. The subscription can be purchased through the app.The Garmin Golf app syncs your data with your Garmin ConnectTM account. You can download the Garmin Golf app from the app store on your smartphone.
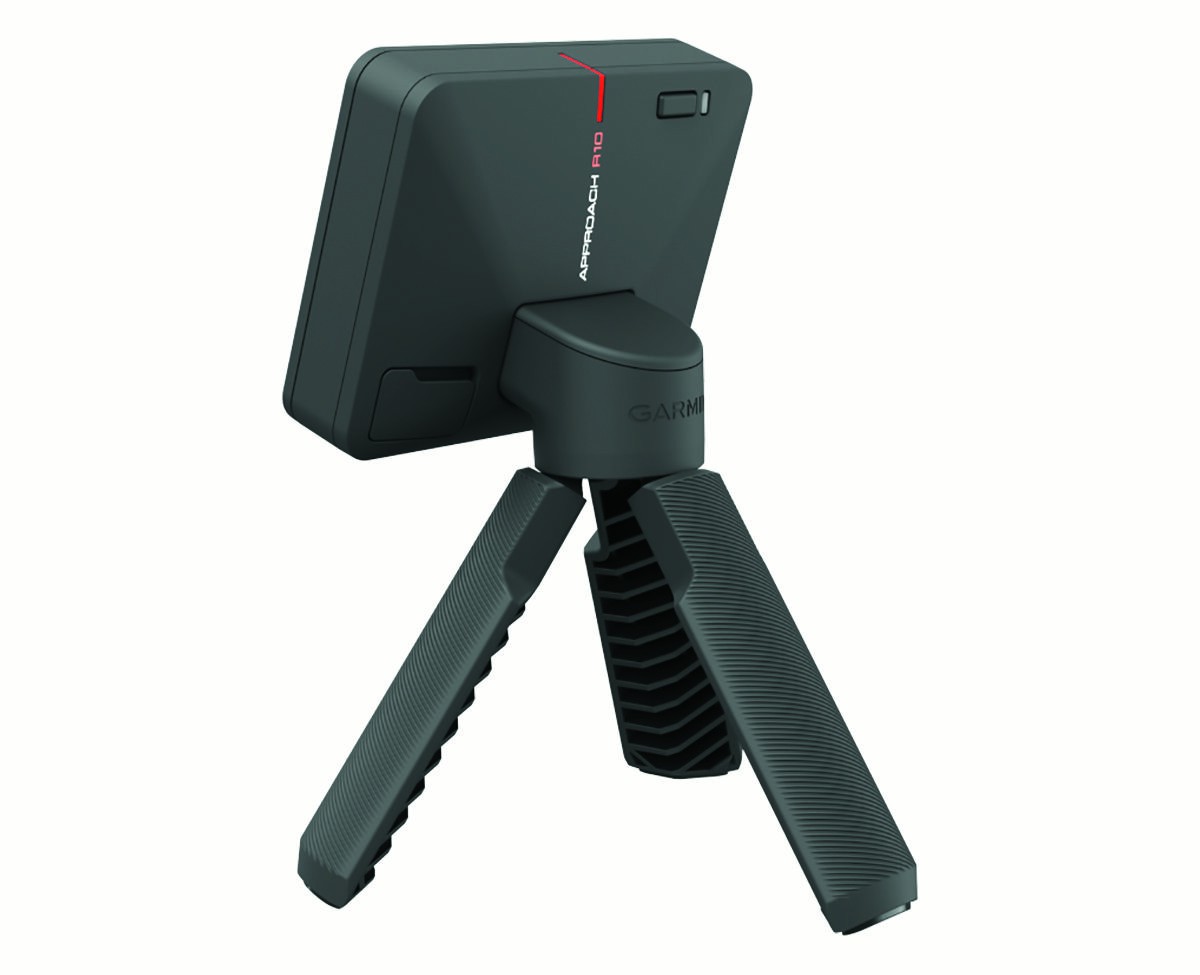
Installing the Magnetic Tripod Mount
![]() WARNINGBoth the device and its mount may contain magnets. Under certain circumstances, magnets may cause interference with some internal medical devices, including pacemakers and insulin pumps. Devices and mounts that contain magnets should be kept away from such medical devices.
WARNINGBoth the device and its mount may contain magnets. Under certain circumstances, magnets may cause interference with some internal medical devices, including pacemakers and insulin pumps. Devices and mounts that contain magnets should be kept away from such medical devices.
NOTICEThe mount contains a magnet. Under certain circumstances, magnets may cause damage to some electronic devices, including hard drives in laptop computers. Use caution when the mount is near electronic devices.
- Ensure the tripod mount is free of any debris.
- Insert the top of the tripod mount into the back of the device.The tripod mount is magnetic and holds the device in place.NOTE: The tripod mount can only be installed one way. If it is not fully seated in the back of the device, you have installed it using the wrong orientation.
- Open the tripod legs so they are fully extended.

Preparing for a Shot
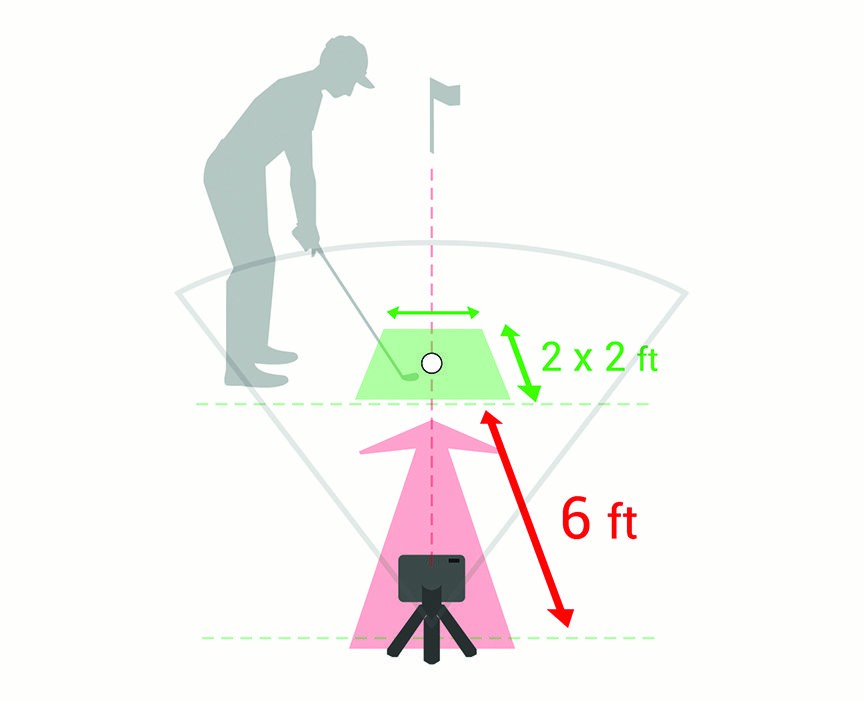
- Place the ball at the desired tee location.NOTE: The tee location must be at least 8 ft. (2.4 m) away from the net when playing indoors.
- Attach the device to the tripod mount (Installing the Magnetic Tripod Mount, page 4).
- Place the device on the ground between 6 ft. and 8 ft. (1.8 m and 2.4 m) behind the tee location.NOTE: If you are using a golf mat, make sure the bottom edge of the device sits above the mat.
- Adjust the device so the red alignment line is aligned with the tee location and the target of the shot.TIP: You can lay a golf club on the ground between the alignment line and tee location to confirm they are lined up.
- If necessary, you can move the tee location up to 1 ft. (0.3 m) on either side of the target line, within a 2 x 2 ft. (0.6 x 0.6 m) hitting area that begins 6 ft. (1.8 m) from the device. This may be helpful if your tee location becomes worn during a golf simulator game mode session.NOTE: The ball and club angles are measured parallel to the target line.
- Press the button to turn on the device.
- Start a golf simulator game mode (Using the Golf Simulator Features, page 5).
- Wait for the status LED to begin flashing green, and take a shot.
Using the Golf Simulator Features
You can use the golf simulator features in the Garmin Golf app to test your skills and help you have fun on the driving range. These features use the internal device radar to take measurements that help you analyze your practice.
- Open the Garmin Golf app on your paired smartphone.
- Select an option:• If you are using an iOS® device, select Golf Sim.• If you are using a device with AndroidTM, select > Golf Sim.
- Select a game mode.
- Follow the on-screen instructions.
Home Tee Hero Mode
The Home Tee Hero mode allows you to play a virtual round of golf at a course rendered with 3D technology. There are over 42,000 courses available.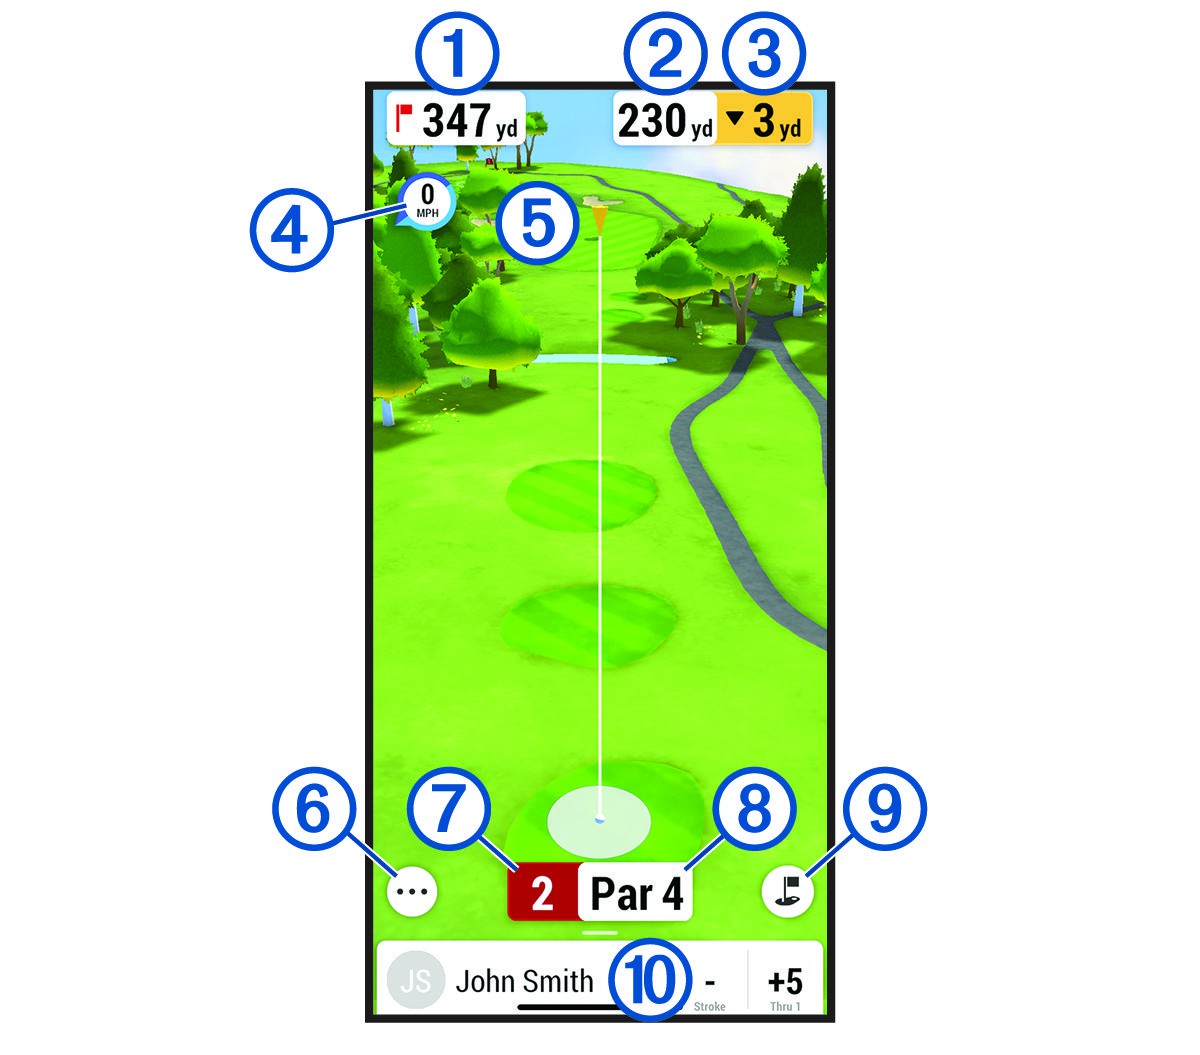
| 1 | Displays the distance to the hole. |
| 2 | Displays the distance to the shot target. |
| 3 | Displays the elevation difference between the location of the ball and the shot target. |
| 4 | Displays the wind speed and direction. |
| 5 | Displays the shot target.TIP: You can move the shot target by dragging it to the desired location on the course. |
| 6 | Select to open the menu. |
| 7 | Displays the current hole number. |
| 8 | Displays the par for the current hole. |
| 9 | Select to toggle to an overhead camera view. |
| 10 | Displays the scorecard for the current player. |
Virtual Round Scoring
During a virtual round, the Garmin Golf app calculates your score using a method similar to stroke play. Each shot you take counts as one stroke. Hitting the ball into the water or out of bounds adds a penalty stroke. Because there is no putting in a virtual round, additional strokes are added based on how accurate you are with your approach shot. You can receive 0 to 3 additional strokes depending on how close your approach shot is to the hole.
Driving Range Mode
The Driving Range mode allows you to practice on a virtual driving range, and provides detailed metrics for every shot.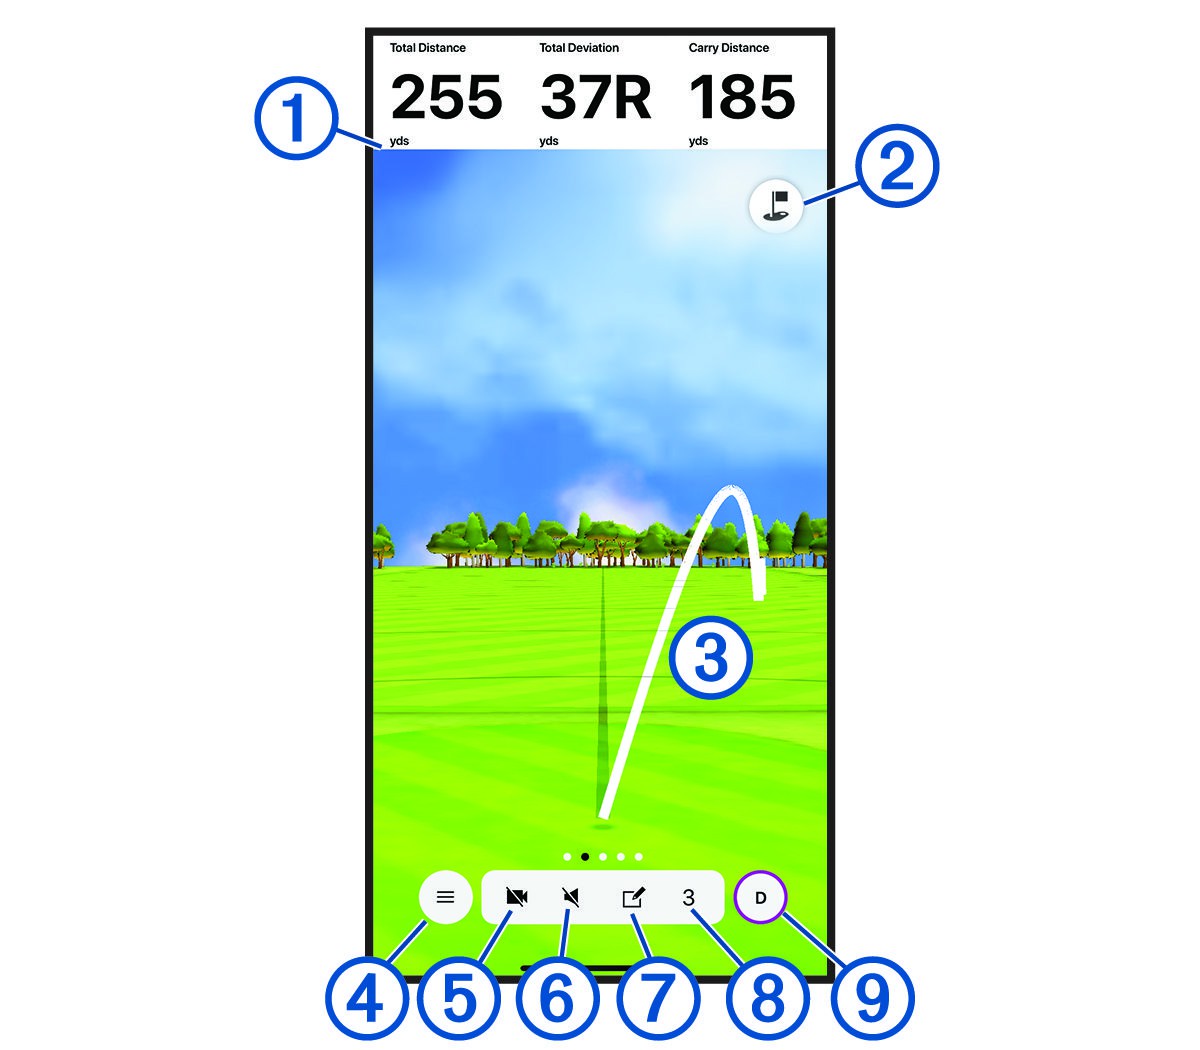
| 1 | Displays swing metrics for the selected shot.TIP: You can change the swing metrics that are displayed by selecting the swing metric fields. |
| 2 | Select to toggle to an overhead camera view with distance markers. |
| 3 | Displays the trajectory of the shot. |
| 4 | Select to open the menu. |
| 5 | Select to enable the Swing Capture feature. |
| 6 | Select to enable spoken audio metrics and to choose the metric that is spoken after each shot. |
| 7 | Select to tag the shot and write a note about it. |
| 8 | Displays the shot number. |
| 9 | Displays the club for the shot. |
Swing Capture
The Swing Capture feature allows you to use your paired smartphone’s camera to automatically record videos of your swings during a Driving Range session. You can view the recorded swings and associate them with the advanced swing metrics recorded for that shot.
Enabling the Swing Capture FeatureBefore you can enable the Swing Capture feature, you must allow the Garmin Golf app to use the camera on your paired smartphone.
- During a Driving Range session, select .
- Select the Swing Capture toggle switch.
Viewing Your Recorded Swings
- During a Driving Range session, select > Session Stats.
- Swipe up from the bottom of the screen.
- Select a shot from the shot list.
- Swipe right.
Viewing Your Driving Range Session Statistics
- During a Driving Range session, select > Session Stats.
- Swipe up from the bottom of the screen.Statistics for each shot and club appear.TIP: You can filter out a club from the club and shot lists by selecting the club at the top of the screen.
Editing a ShotYou can edit a previous shot.
- During a Driving Range session, select > Session Stats.
- Swipe up from the bottom of the screen.
- Select Edit.
- Select a shot.
- Select an option:• To change the club for the shot, select Change Club, and select a club.• To delete the shot, select Delete.
- Select Save > Save.
Viewing Advanced Swing MetricsYou can view advanced swing metrics for any shot from a Driving Range session.
- During a Driving Range session, select > Session Stats.
- Swipe up from the bottom of the screen.
- Select a shot from the shot list.
- Swipe left to scroll through advanced metrics for the shot.
Viewing Swing Metric DescriptionsDuring a Driving Range session, hold your finger on a swing metric field for one second.A description and illustration of the swing metric appears.
Viewing Saved Driving Range Sessions
- From the menu in the app, select Golf Sim Sessions.
- Select a Driving Range session.
Deleting Saved Driving Range Sessions
- From the menu in the app, select Golf Sim Sessions.
- Select > Edit Sessions.
- Select at least one Driving Range session.
- Select Delete > Delete.
Ending Your Driving Range Session
- During a Driving Range session, select > End Session.
- Select an option:• To save the session, select Save.• To delete the session, select Delete.
Weekly Tournament
You can compete in a virtual tournament against other golfers around the world on different courses each week. You can play in each weekly tournament as many times as you want. All scores are posted on the leaderboard.
TruGolf E6 Connect
You can view all of your recorded shots in detailed, high-definition graphics on your E6 Connect software. Go to https://e6golf.com/ for more information about purchasing a subscription, downloading the desktop application, and installing the mobile app on your compatible smartphone.
Connecting Your Device to the E6 Connect Desktop Application
- In the Garmin Golf app, select Golf Sim > TruGolf E6 Connect > Play on PC.
- Follow the on-screen instructions.
Connecting the Device to the E6 Connect Mobile App
You can connect the device to the E6 Connect mobile app on your compatible iOS device.
- In the Garmin Golf app, select Golf Sim > TruGolf E6 Connect > Play on iOS.
- Follow the on-screen instructions.
Appendix
Charging the Device
![]() WARNINGThis product contains a lithium-ion battery. To prevent the possibility of personal injury or product damage caused by battery exposure to extreme heat, store the device out of direct sunlight.
WARNINGThis product contains a lithium-ion battery. To prevent the possibility of personal injury or product damage caused by battery exposure to extreme heat, store the device out of direct sunlight.
NOTICETo prevent corrosion, thoroughly dry the USB port, the weather cap, and the surrounding area before charging or connecting to a computer.The device is powered by a built-in lithium-ion battery that you can charge using a standard wall outlet or a USB port on your computer. You can use the device radar features while the device is charging.
NOTE: The device will not charge when outside the approved temperature range (Specifications, page 12).
- Pull up the weather cap from the USB port.
- Plug the small end of the USB cable into the USB port on the device.
- Plug the large end of the USB cable into an external power source, such as an AC adapter or a USB port on your computer.
- Charge the device completely.TIP: You can turn off the device or connect it to an AC adapter to charge it faster.
Viewing Battery Power
You can view the remaining battery power of the device when it is connected to the Garmin Golf app.
- From the menu in the app, select Garmin Devices.
- Select your device.NOTE: A message appears when the remaining battery power is below 10%.Viewing Battery Power During a Golf Simulator SessionYou can view the remaining battery power of the device during a golf simulator session. In the Garmin Golf app, select .A battery gauge appears in the menu.
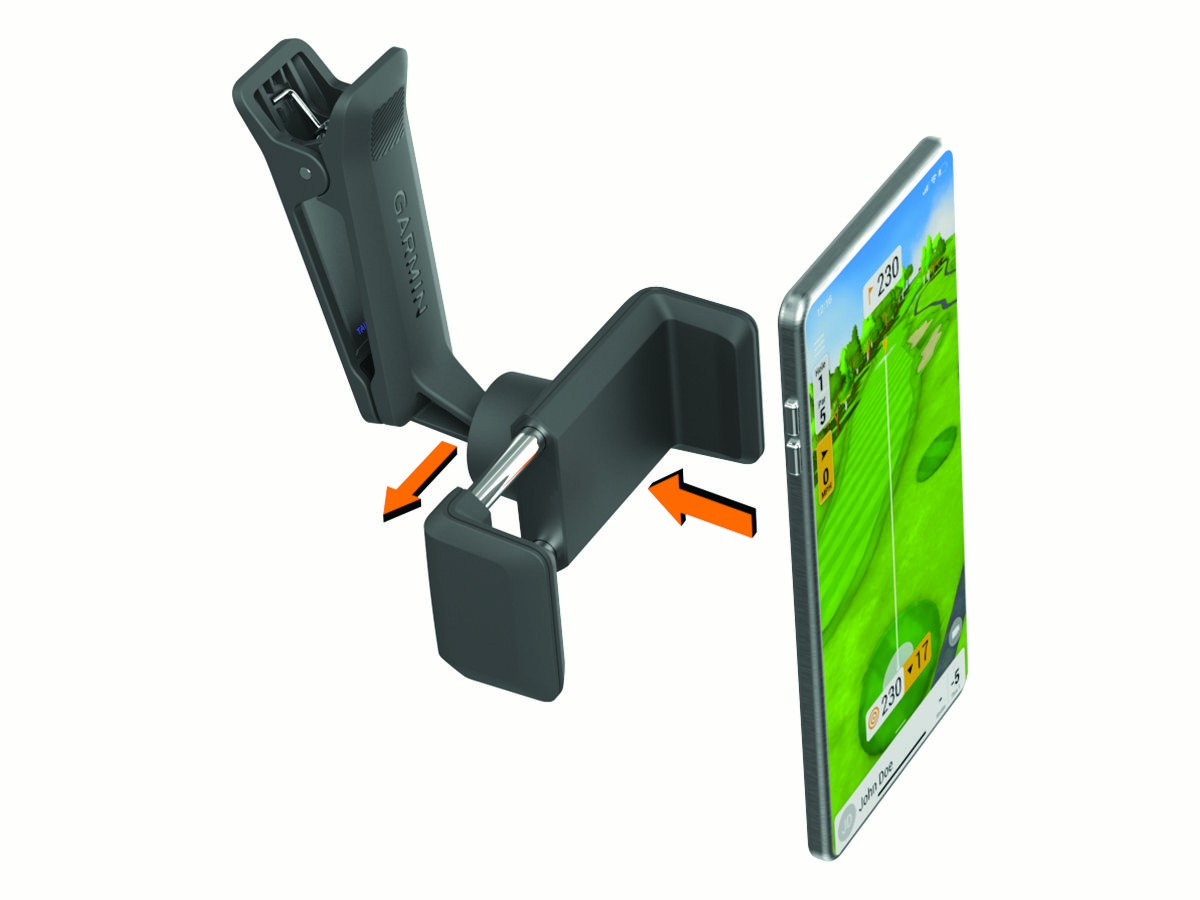
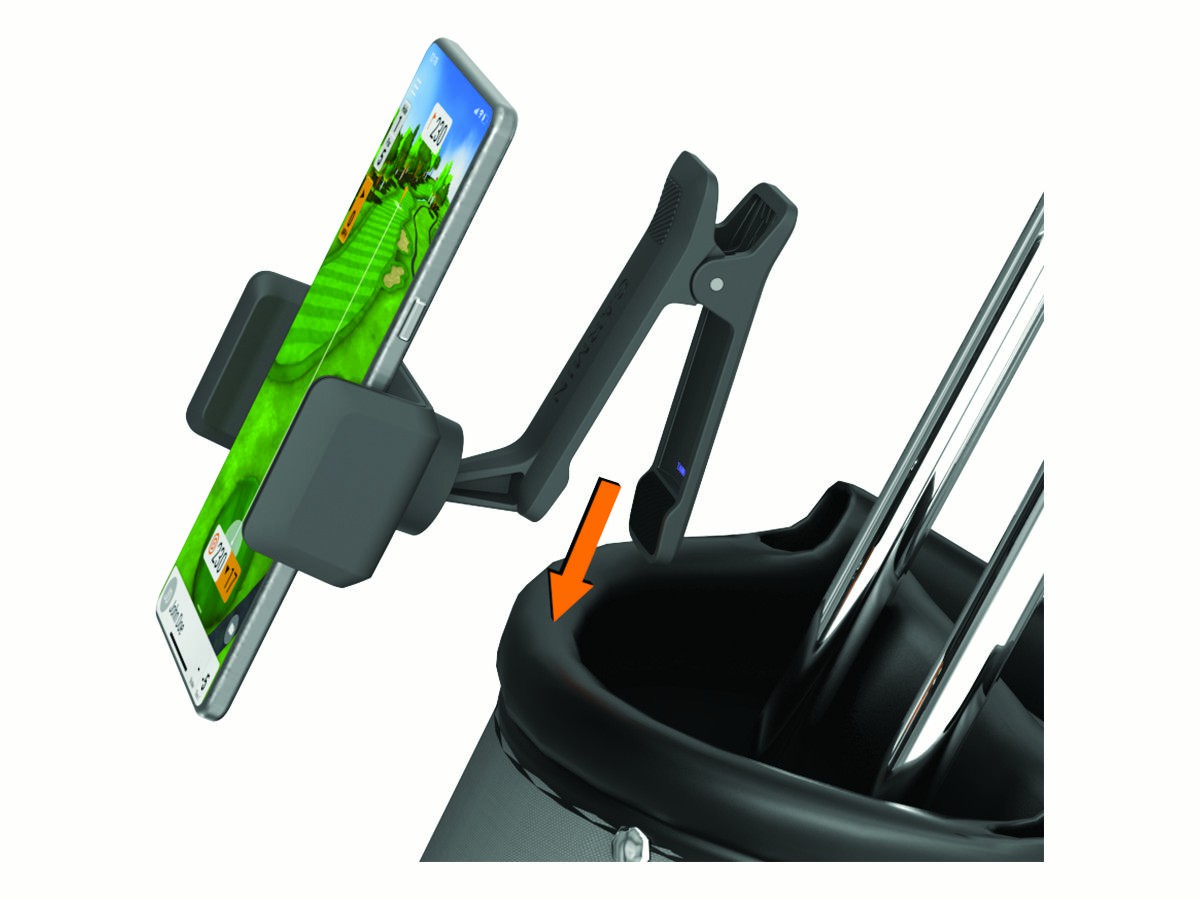
Using the Phone Mount
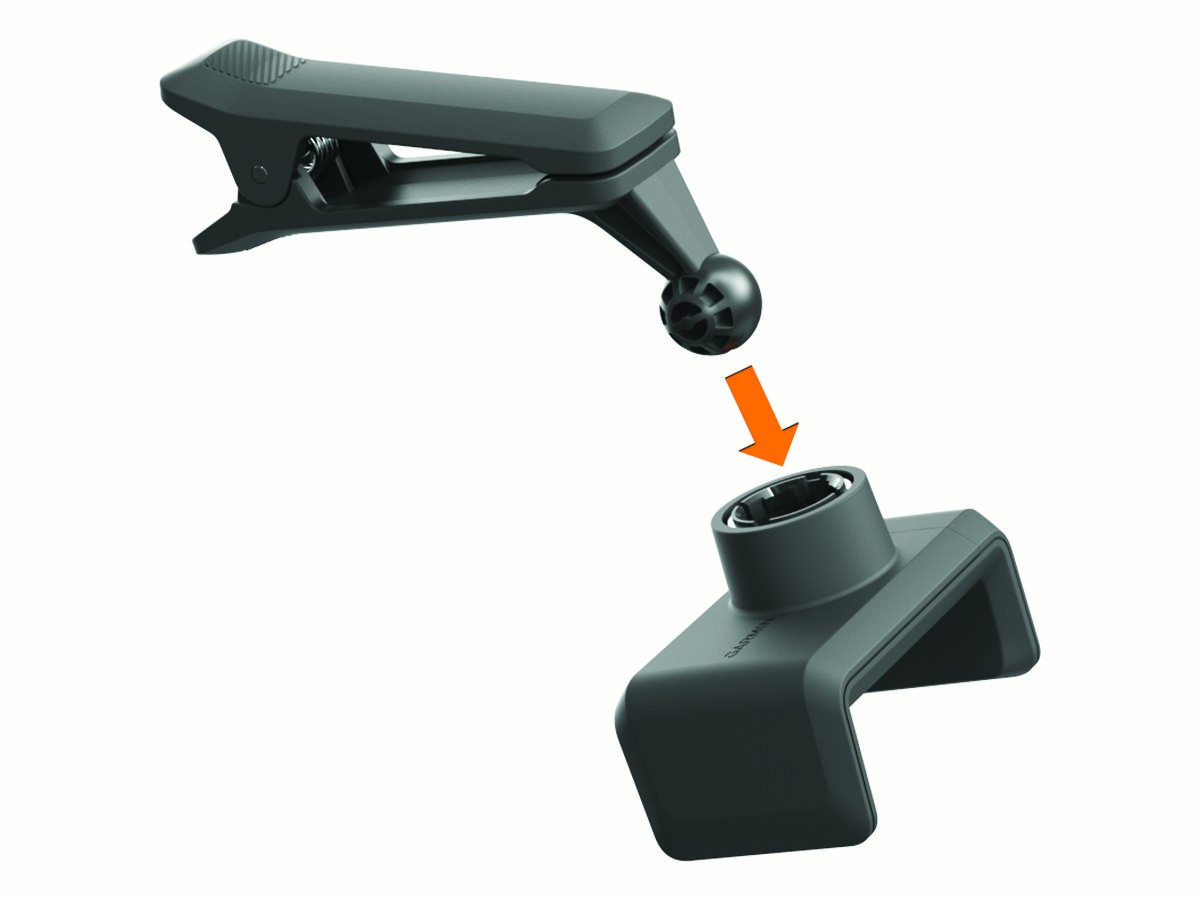
You can use the phone mount and bag clip to attach your paired smartphone to your golf bag for convenient viewing and interaction with the Garmin Golf app. The phone mount is compatible with smartphones in portrait view with widths between 58 mm (2.3 in.) and 90 mm (3.5 in.). The phone mount should only be attached when your golf bag is stationary.
- Insert the bag clip ball mount into the back of the phone mount until it clicks into place.
- Pull the adjustable side of the phone mount outward.
- Position your smartphone within the phone mount.
- Release the adjustable side of the phone mount to secure your smartphone in place.
- Clip the bag clip to the top of your golf bag.NOTE: Your smartphone should sit below the top of the bag to avoid making contact with your golf clubs.
Product Updates
On your computer, install Garmin ExpressTM (www.garmin.com/express). On your smartphone, install the Garmin Golf app. This provides easy access to these services for Garmin® devices:
- Software updates
- Product registration
Setting Up Garmin Express
- Connect the device to your computer using a USB cable.
- Go to www.garmin.com/express.
- Follow the on-screen instructions.
Specifications
| Battery type | Rechargeable, built-in lithium-ion battery |
| Battery life | Up to 10 hr. |
| Operating temperature range | From -10º to 55ºC (from 14º to 131ºF) |
| Charging temperature range | From 0º to 45ºC (from 32º to 113ºF) |
| Wireless frequencies/protocols | 2.4 GHz @ 6.2 dBm maximum24 GHz @ 20 dBm maximum |
| Water rating | IEC 60529 IPX71 |
Getting More Information
You can find more information about this product on the Garmin website.
- Go to support.garmin.com for additional manuals, articles, and software updates.
- Go to buy.garmin.com, or contact your Garmin dealer for information about optional accessories and replacement parts.
1 The device withstands incidental exposure to water of up to 1 m for up to 30 min. For more information, go to www.garmin.com/waterrating.
Device Care
NOTICEAvoid extreme shock and harsh treatment, because it can degrade the life of the product. Do not use a sharp object to clean the device. Avoid chemical cleaners, solvents, and insect repellents that can damage plastic components and finishes. Do not store the device where prolonged exposure to extreme temperatures can occur, because it can cause permanent damage. Secure the weather cap tightly to prevent damage to the USB port.
Cleaning the Device
- Clean the surface of the device using a cloth dampened with a mild detergent solution.
- Wipe the device dry.
Long-Term Storage
When you do not plan to use the device for several months, you should charge the battery to at least 50% before you store the device. You should store the device in a cool, dry place with temperatures around the typical household level. After storage, you should fully recharge the device before using it.
Troubleshooting
My device is tipped too farIf an error message appears in the Garmin Golf app indicating your device is tipped too far, you can try these tips.
- Verify the tripod mount is properly installed on the device.
- Move the device to a more level surface.
- Move the device to a more stable surface.
- Move the device to a surface that is more in line with the ball.
Adjusting the Device Alignment
If the device is misaligned, your swing metrics while using the golf simulator features will not be accurate. For example, if the alignment is off by several degrees, the metrics will also be off by several degrees. If your swing metrics seem to be inaccurate, you can adjust the alignment.
- Hit a short, straight shot using a high loft club, such as a sand wedge.
- Compare the shot to the ball launch direction in the Garmin Golf app.If the device is misaligned, the ball launch direction in the app will not match your shot. For example, if the device is facing too far to the left of your target line, the launch direction shown in the app will be farther right than your shot.
- Adjust the alignment of the device as needed.
- Repeat this process until the ball launch direction in the app matches your shot.
Tips for Using the Carrying Case
- Place the device in the carrying case with its front-facing down to avoid pressing the button.
- Leave the bag clip and phone mount attached when placing them in the carrying case.
Resetting the Device
If the device stops responding, you may need to reset it. This does not erase any of your data. Hold the button until the status LED turns off. The device resets.
My phone will not connect to the device
If your phone will not connect to the device, you can try these tips.
- Bring the device within range of your smartphone.
- Turn off your smartphone and your device, and turn them back on again.
- Make sure Bluetooth® technology is enabled on your smartphone.
- Make sure the status LED on the device is flashing blue.
- Update the Garmin Golf app to the latest version.
- If your device is already paired to your smartphone, turn Bluetooth technology off on your smartphone, and turn it back on.
- Remove your device from the Garmin Golf app and the Bluetooth settings on your smartphone to retry the pairing process.
- If you bought a new smartphone, remove your device from the Garmin Golf app on the smartphone you intend to stop using.
- On your smartphone, open the Garmin Golf app, select , and select Garmin Devices > Add Device to enter pairing mode.
- With your device turned off, hold the button until the status LED turns solid blue to enter pairing mode.
Index
Aaccessories12applications3, 9apps9smartphone2
Bbattery10charging10storage13
Ccleaning the device13clear, history9courses, playing6
Ddatastoring3transferring3device cleaning13resetting13
E editing8GGarmin Express12updating software12
Hhistory8, 9sending to computer3
Kkeys1
Mmountsoptional11tripod4
Ppairing,smartphone2, 14
Rradar7, 9resetting the device13
Sscoring7smartphone3pairing2, 14software, updating12specifications12statistics8status LED2storing data3swing analysis5, 79
Ttips13troubleshooting1214
UUSB, connector1
Vvirtual course7virtual tournament9
July 2021
 GUID-E2BBF6BE-4276-436F-B697-59ABEFD61933 v1
References
[xyz-ips snippet=”download-snippet”]