
![]()
GARMIN BC 40 Wireless Camera Owner’s Manual

Introduction
![]() WARNING
WARNING
See the Important Safety and Product Information guide in the product box for product warnings and other important information.
These installation instructions do not apply to a specific vehicle type, and are meant as a guide when installing this product on your vehicle. For questions specific to your vehicle, you should contact the vehicle manufacturer.
Installation
Vehicle Mount Installation for North America
Installing the Mount on Your Vehicle
- Remove the license plate screws from the rear of your vehicle, and remove the license plate, vanity frames, and license plate covers.NOTE: The camera mount is intended to be installed onto the bare license plate, and it is not compatible with vanity frames or license plate cover.
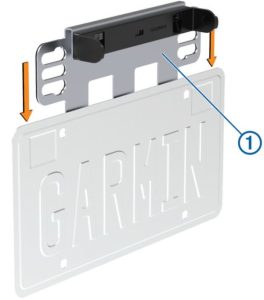
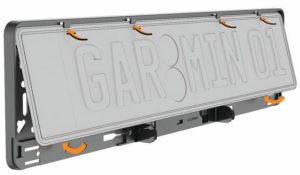
- Slide the metal bracket over the top or bottom of the license plate.The flat metal plate (1) on the bracket slides behind the license plate. NOTE: It is recommended to install the camera above the license plate, if possible. If there is not enough room above the license plate on your vehicle, you can configure the mount for installation below the license plate (Installing the Camera at the Bottom of Your License Plate, page 1).

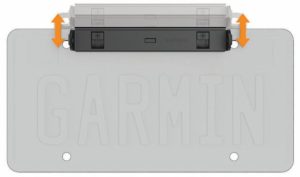
- Hold the license plate and mount up to the license plate area on your vehicle, and slide the mount up or down to align one set of mounting holes with the holes in the license plate.You should use the mounting position that fits your vehicle and covers the smallest portion of the license plate. You must avoid covering any text or numbers on the license plate. Some jurisdictions prohibit covering any portion of the license plate. It is your responsibility to follow license plate mounting regulations.
- Insert the license plate screws through the top of the license plate and mount, and into the license plate mounting holes on your vehicle.
- Fully tighten the license plate screws.
- Install license plate screws through the bottom holes of the license plate, and tighten (optional).
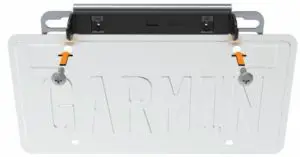
This option is not available for all vehicles or for all mounting bracket positions.
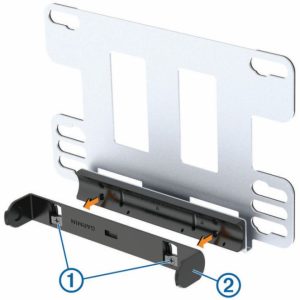
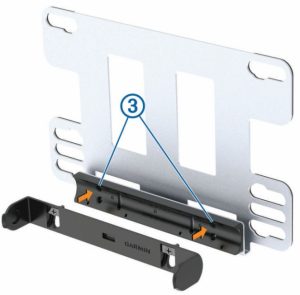
Installing the Camera at the Bottom of Your License PlateTo allow for proper camera angle adjustment, the Garmin® logo on the camera clip must be right-side up when the mount is installed on your vehicle. Out of the box, the camera mount is assembled for installing the camera at the top of your license plate. When installing the camera at the bottom of your license plate, you must remove, rotate, and reattach the camera clip. This allows you to properly adjust the camera angle.
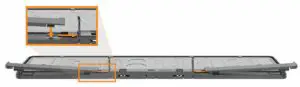
- Using a Phillips screwdriver, fully loosen the two camera clip screws (1) , and remove the camera clip (2) from the metal bracket.
- Rotate the camera clip 180 degrees, so the Garmin logo is facing right-side-up.
- Insert the two camera clip screws into the holes labeled BOTTOM OF PLATE(3) .
- Tighten both screws.
- Apply one or two layers of the included adhesive mounting tape to the back of the flat mounting bracket, near the bottom (optional).The mounting tape secures the back of the mounting bracket to your vehicle using double-sided adhesive. This helps reduce camera vibration, especially if your vehicle does not provide mounting holes at the bottom of the license plate. You can stack two layers of mounting tape if one layer is not thick enough to stick to your vehicle.NOTE: The mounting tape does not replace the license plate screws. You must fasten the mount and license plate to the vehicle using at least two license plate screws, whether or not you attach the mounting tape.
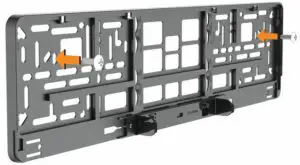
Vehicle Mount Installation for EuropeInstalling the Mount on Your Vehicle
- Remove the rear license plate and license plate holder from your vehicle, and retain the license plate screws to install the camera mount.
- Place the camera mount against your vehicle, and align the holes in the mount with the license plate mounting holes in your vehicle.The camera mount provides a variety of holes and slots for universal vehicle compatibility.NOTE: You can install the mount in either orientation. If you are installing the mount with the camera at the top of the license plate, you must remove, rotate, and reattach the camera clip (Installing the Camera at the Top of Your License Plate, page 2).
- Insert the license plate screws through the mount and into the mounting holes in your vehicle.
- Fully tighten the screws.
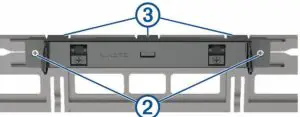
Installing the Camera at the Top of Your License PlateWhen the mount is installed on your vehicle, the Garmin logo on the camera clip must be right-side up. Out of the box, the mount is assembled for installing the camera at the bottom your license plate. When installing the camera at the top of your license plate, you must remove, rotate, and reattach the camera clip. This allows you to properly adjust the camera angle.
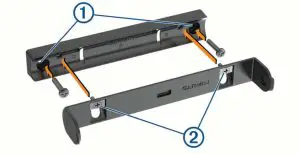
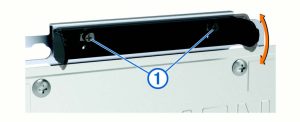
- If you have already installed the license plate fasteners, remove them by prying up the end of each clip using the notches (1) and sliding them outward.
- Using a Phillips screwdriver, fully loosen the two camera clip screws (2) .
- Gently pry open the tabs (3) along the outer edge of the camera clip, and remove the camera clip from the mount.
- Rotate the camera clip 180 degrees, so the Garmin logo is facing right-side-up.
- Snap the camera clip back into the mount, and tighten both screws.

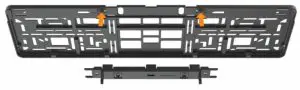
Installing Your License Plate into the MountThe camera mount assembly comes with two sets of retainer clips. You should use one set of retainer clips that match the size of your license plate. The license plate size is printed on each set of retainer clips.
- Insert the edge of the license plate behind the tabs along the narrow edge of the holder, and swing the bottom edge of the plate into the mount.
- Insert the two license plate retainer clips into the slots in the holder, and slide them toward the middle.
- Press the ends of the retainer clips until they click into the holder.

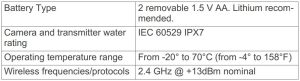
Installing AA BatteriesThe device operates on two 1.5 V AA batteries (not included). For the best results, you should use lithium batteries, which provide extended battery life and better performance at low temperatures.
NOTICE
Do not use AA batteries with a voltage specification higher than 1.5 V. Higher voltages will cause permanent damage to the camera. Do not use lithium-ion rechargeable AA battery cells. Lithium-ion batteries use a different technology than non-rechargeable lithium batteries and may permanently damage the camera.
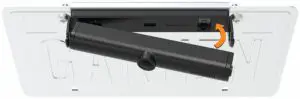
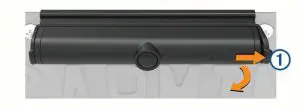
- Rotate both battery covers (1) toward the front of the camera, and remove the battery covers.
- Insert a AA battery into each end of the camera, with the positive pole facing outward.
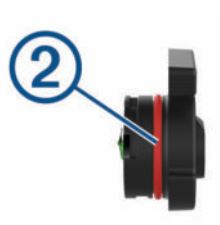
- On each battery cover, verify the gasket (2) is clean and fully seated in the groove.
- For each battery cover, place the cover into the camera, press it tightly into the camera, and rotate it toward the back of the camera to lock it into place.NOTE: Although the battery covers are interchangeable, it is recommended to install the covers as shown in the illustrations. NOTICE The camera is not water resistant if the gaskets are not clean and properly seated, and the covers are not properly locked into place.
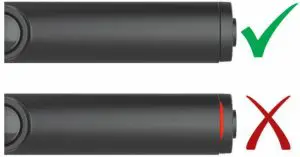
- Verify each cover is fully sealed and no part of either gasket is protruding between the cover and the camera.


Installing the Camera in the Mount
- Place one side of the camera into the mount, with the lens facing outward.
- Press the other side into the mount until it clicks.
- Pull gently on the camera to verify both sides are locked into the mount.
Camper Mount Installation Considerations
NOTICE
Garmin strongly recommends having an experienced installer with the proper knowledge of camper installations and waterproofing install the mount. Incorrectly installing the mount can result in damage to the vehicle or the camera.
Failure to heed the installation considerations could result in damage to the camera or the vehicle. Garmin is not responsible for any damage caused to the camera or vehicle during installation or as a result of the camera mount detaching from the vehicle.
You can use the optional camper mount accessory to install the camera on your camper in an area other than the license plate. When selecting a mounting location and installing the camper mount, observe these considerations.
- You must choose a suitable mounting location for the camera before drilling holes in the vehicle. You should verify the camera view from the mounting location provides the desired visibility. You must also verify the mounting surface allows the mount to be securely connected and the mounting screws will not interfere with interior wiring or camper features.
- You must use proper mounting screws for your vehicle’s external mounting surface. The included mounting screws are intended for installation only on campers with a fiberglass exterior, and they should not be used for campers with an aluminum exterior, or any other material. Before installing the screws, you must verify the screws are the correct length and will not damage any interior components.
- You must fully seal the screws, holes, and mount with outdoor waterproofing sealant to prevent water from entering the vehicle or the vehicle shell.
Installing the Camper Mount on Your Vehicle
NOTICEGarmin strongly recommends having an experienced installer with the proper knowledge of camper installations and waterproofing install the mount. Incorrectly installing the mount can result in damage to the vehicle or the camera.
Failure to heed the installation considerations could result in damage to the camera or the vehicle. Garmin is not responsible for any damage caused to the camera or vehicle during installation or as a result of the camera mount detaching from the vehicle.
To install the mount, you need a drill with a 3.2 mm (1/8 in.) drill bit, a pencil, a Philips screwdriver, outdoor waterproofing sealant, and two M4 screws (included for some vehicles).
- Place the mount base against the mounting surface in the location where you want to mount the camera, and mark the location of the two mounting holes (1) using a pencil or other writing instrument.You should ensure the mount is level and correctly positioned.
- Remove the mount base from the mounting surface, and use a 3.2 mm (1/8 in.) drill bit to drill pilot holes in the two locations you marked.NOTICEIf you are drilling into a fiberglass surface, you may need to use a specialized drill bit or drill counter-clockwise to avoid damaging the fiberglass. For more information, contact your vehicle manufacturer or a professional installer.
- Apply waterproofing sealant around the drilled pilot holes, and all the way around the edge of the back surface of the mount base, where it will contact the vehicle.You must use an outdoor waterproofing sealant that will bond with your vehicle’s exterior surface and not damage it. For more information, contact your vehicle manufacturer or a professional installer.
- Place the mount base against the surface, aligning the mounting holes in the base with the drilled pilot holes.
- Fasten the mount base to the vehicle using two M4 screws.NOTE: The included screws are intended for installation on a camper with a fiberglass shell. You must verify the screws are the correct length and appropriate for the exterior mounting surface of your vehicle. For more information, contact your vehicle manufacturer or a professional installer.
- Fasten the camera clip to the mount base using the two pre-installed screws (2).
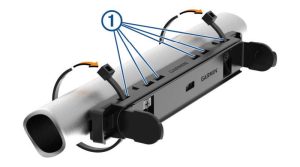
Installing the Tube MountYou can use the optional tube mount accessory to mount the camera on a roll bar or parts of the vehicle frame.
- Using the included zip ties, secure the mount to a roll bar using any of the slots on the mount.
- Tighten the zip ties to ensure the mount does not move during use.
Surface Mounting ConsiderationsNOTICEGarmin strongly recommends having an experienced installer with the proper knowledge of installations and waterproofing install the mount. Incorrectly installing the mount can result in damage to the vehicle or the camera.
Failure to heed the installation considerations could result in damage to the camera or the vehicle. Garmin is not responsible for any damage caused to the camera or vehicle during installation or as a result of the camera mount detaching from the vehicle.
You can use screws to secure the camera to your vehicle in areas other than a roll bar.
When selecting a mounting location and attaching the mount with screws, observe these considerations.
- You must choose a suitable mounting location for the camera before drilling holes in the vehicle. You should verify the camera view from the mounting location provides the desired visibility. You must also verify the mounting surface allows the mount to be securely connected and the mounting screws will not interfere with interior wiring or vehicle features.
- You must use proper mounting screws for your vehicle’s external mounting surface. The included mounting screws are intended for installation only on vehicles with a fiberglass or plastic exterior, and they should not be used for vehicles with an aluminum exterior, or any other material. Before installing the screws, you must verify the screws are the correct length and will not damage any interior components.
- For some vehicles, you must fully seal the screws, holes, and mount with outdoor waterproofing sealant to prevent water from entering the vehicle or the vehicle shell.
Securing the Mount with Screws
NOTICEGarmin strongly recommends having an experienced installer with the proper knowledge of installations and waterproofing install the mount. Incorrectly installing the mount can result in damage to the vehicle or the camera.
Failure to heed the installation considerations could result in damage to the camera or the vehicle. Garmin is not responsible for any damage caused to the camera or vehicle during installation or as a result of the camera mount detaching from the vehicle.
To install the mount, you need a drill with a 3.2 mm (1/8 in.) drill bit, a pencil, a Philips screwdriver, outdoor waterproofing sealant, and two M4 screws (included for some vehicles).
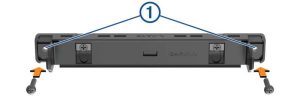
- Place the mount base against the mounting surface in the location where you want to mount the camera, and mark the location of the two mounting holes (1) using a pencil or other writing instrument.You should ensure the mount is level and correctly positioned.
- Remove the mount from the mounting surface, and use a 3.2 mm (1/8 in.) drill bit to drill pilot holes in the two locations you marked.NOTICEIf you are drilling into a fiberglass surface, you may need to use a specialized drill bit or drill counter-clockwise to avoid damaging the fiberglass. For more information, contact your vehicle manufacturer or a professional installer.
- If necessary, apply waterproofing sealant around the drilled pilot holes.You must use an outdoor waterproofing sealant that will bond with your vehicle’s exterior surface without damaging it. For more information, contact your vehicle manufacturer or a professional installer.
- Place the mount base against the surface, aligning the mounting holes in the base with the drilled pilot holes.
- Fasten the mount base to the vehicle using two M4 screws.NOTE: The included screws are intended for installation on a vehicle with a fiberglass or plastic shell. You must verify the screws are the correct length and appropriate for the exterior mounting surface of your vehicle. For more information, contact your vehicle manufacturer or a professional installer.
You can pair the camera with a compatible Garmin navigation device. For more information about compatible Garmin devices, go to the product page at garmin.com/bc40.
- Update your navigation device to the latest software.Your device may not support the BC 40 camera without the latest software. For more information about updating the software, see the owner’s manual for your navigation device.
- Install batteries in the camera.The camera enters pairing mode automatically, and the LED flashes blue while the camera is in pairing mode. The camera remains in pairing mode for two minutes. If pairing mode expires, you can remove and reinstall the batteries.
- Bring the compatible Garmin navigation device outside your vehicle and within 1.5 m (5 ft.) of the camera, and turn on the navigation device.The device detects your camera automatically and prompts you to pair with it.
- Select Yes.TIP: If the navigation device does not detect the camera automatically, you can select > Wireless Camera > Add New Camera to pair with it manually. The location of the pairing menu may vary by device model. See the owner’s manual for your navigation device for additional pairing instructions.The device pairs with your camera.
- Enter a name for the camera (optional).You should use a descriptive name that clearly identifies the location of the camera.
- Select Done.
Pairing Additional Cameras with a Garmin Navigation Device
You can pair up to 4 BC 40 wireless backup cameras with a compatible Garmin navigation device.
- Install batteries in the camera.The camera enters pairing mode automatically, and the LED flashes blue while the camera is in pairing mode. The camera remains in pairing mode for five minutes. If pairing mode expires, you can remove and reinstall the batteries.
- Bring the compatible Garmin navigation device outside your vehicle and within 1.5 m (5 ft.) of the camera, and turn on the navigation device.
- On the Garmin navigation device, select > Wireless Camera > Add New Camera.The device pairs with your camera, and the guidance line configuration screen appears.
- Use the on-screen arrows to position the guidance lines, and select (Aligning the Guidance Lines, page 6).If the camera or vehicle is not ideally positioned to complete the guidance line alignment, you can complete the alignment later from the camera settings.
- Enter a name for the camera (optional).You should use a descriptive name that clearly identifies the location of the camera.
- Select Done.
After you pair multiple cameras, you can switch between cameras from the camera view (Switching Cameras, page 6) and set the order in which the cameras appear (Changing the Camera Order, page 7).
Viewing the Backup Camera
![]() WARNINGThis device is intended to enhance your situational awareness when used properly. If used improperly, you could become distracted by the display, which could lead to an accident causing serious personal injury or death. Only access the information displayed on the device with a glance. Always maintain awareness of your surroundings and do not stare at the display or become distracted by the display. Focusing on the display could prevent you from avoiding obstacles or hazards.
WARNINGThis device is intended to enhance your situational awareness when used properly. If used improperly, you could become distracted by the display, which could lead to an accident causing serious personal injury or death. Only access the information displayed on the device with a glance. Always maintain awareness of your surroundings and do not stare at the display or become distracted by the display. Focusing on the display could prevent you from avoiding obstacles or hazards.
After you pair your camera with a compatible Garmin navigation device, the camera view appears automatically when you turn on your navigation device, and you can manually show the camera at any time.
- If your navigation device is connected to an ignition-switched power outlet (recommended), turn on your vehicle.
- If your navigation device is connected to an always-on power outlet, turn on the navigation device.
- To show the camera manually, select / .
- To show or hide the camera using voice commands, say Show Video or Hide Video.NOTE: Voice commands are not available on all navigation devices. The voice commands may vary based on your navigation device model. This feature is not available for all languages or may require additional navigation device setup for some languages. For more information, see the Voice Command app or the Voice Control app on your navigation device, or the navigation device owner’s manual.
The camera view appears. When the camera detects the vehicle is moving forward, the camera automatically stops sending video, and the navigation device returns to normal operation. The camera video is dismissed automatically after 2 minutes and 30 seconds, whether or not your vehicle has moved forward.
Switching CamerasYou can cycle through the video feeds from all paired cameras.From the camera view, select ![]() .The video feed from the next camera appears, and the camera name appears at the top of the screen.
.The video feed from the next camera appears, and the camera name appears at the top of the screen.
Adjusting the Camera Angle
You can adjust the camera angle up and down to provide the best view for your vehicle.
- Drive to a level area with a clear view behind the vehicle.
- Remove the camera from the mount (Removing the Camera from the Mount, page 6).
- Use a Phillips screwdriver to loosen the two adjustment screws (1).
- Tilt the mount up or down.For most vehicles, the camera should face straight out or slightly downward.
- Tighten the adjustment screws to lock the mount in the new position.
- Install the camera into the mount.
- View the camera using your Garmin navigation device (Viewing the Backup Camera, page 5), and verify the camera angle.When the camera is angled correctly, the bottom edge of the video frame should align with the rearmost part of the vehicle, such as the bumper or trailer hitch. Objects above the horizon should appear in the top one-quarter to one-third of the frame.
- If necessary, repeat this procedure until the camera angle is correct.
![]() WARNINGAfter you adjust the camera angle, you must align the guidance lines (Aligning the Guidance Lines, page 6). If you previously set up guidance lines, they are not accurate after the camera angle changes. Failure to properly align the guidance lines could result in an accident or collision, resulting in death, serious injury, or property damage.
WARNINGAfter you adjust the camera angle, you must align the guidance lines (Aligning the Guidance Lines, page 6). If you previously set up guidance lines, they are not accurate after the camera angle changes. Failure to properly align the guidance lines could result in an accident or collision, resulting in death, serious injury, or property damage.
Removing the Camera from the MountGently press the tab (1) on one side of the mount outward, and pull that side of the camera out of the mount.
Backup Camera Settings
Select ![]() > Wireless Camera, and select the backup camera name.
> Wireless Camera, and select the backup camera name.
Flip Video: Allows you to flip or mirror the video.
Guidance Lines: Sets preferences for guidance lines displayed on the camera video.
Rename: Allows you to rename the paired camera.
Set Default Camera: Sets the order in which cameras appear in the camera view. The camera at the top of the list is the default camera and appears first each time the camera view appears.
Unpair: Removes the paired camera.
Automatic Activation: Enables the Garmin navigation device to display the default camera view automatically each time the navigation device is turned on. If the navigation device is connected to an ignition-switched power outlet, this feature allows you to view the backup camera automatically when you start your vehicle.
Video Resolution: Allows you to set the quality of the camera video. Higher resolution settings provide a more detailed image but use more battery power.
NOTE: This setting is not available for all navigation device product models.
Showing or Hiding Guidance LinesYou can enable guidance lines if you choose to use your device as a backup camera.
NOTE: Guidance lines are enabled by default on some navigation devices.
- Select > Wireless Camera.
- Select the paired camera name, and select Guidance Lines > Show Guidance Lines.
Aligning the Guidance LinesFor the best reference, the guidance lines should be aligned to reflect the outside edges of the vehicle. You should align the guidance lines separately for each backup camera. When you change the camera angle, you should immediately align the guidance lines again.
- Position your vehicle with the driver’s side closely aligned to a curb, driveway, or parking stall lines.TIP: It can be helpful to position the vehicle in the center of a parking stall, and then pull forward into the next stall. This allows you to use the parking stall lines at the rear of the vehicle as reference points for alignment.
- From the paired Garmin navigation device, select > Wireless Camera.
- Select the paired camera name, and select Guidance Lines > Adjust Guidance Lines.
- Use the arrows in the corners of the screen to move the ends of the white, driver’s-side guidance line. The guidance line should appear directly on top of the curb, driveway, or parking stall line.
- Use the arrows in the center of the screen to move the colored distance guidance lines up or down. The red guidance line should be aligned with the rearmost part of your vehicle. This could be the rear bumper, a trailer hitch, or another object protruding from the rear of the vehicle.
- Reposition the vehicle with the passenger side closely aligned to a curb, driveway, or parking stall lines, and use the arrows to align the white, passenger-side guidance line.The guidance lines should be symmetrical.
Changing the Camera OrderYou can change the order in which cameras appear when you switch cameras.
- Select Settings > Wireless Camera.
- Select a camera.
- Select Set Default Camera.A list of paired cameras appears.
- Drag each camera to the desired location in the list.When you switch cameras from the camera view, the cameras appear in the listed order, from top to bottom. The camera at the top of the list is the default camera and appears first each time the camera view appears.
Renaming a CameraYou can change the name that appears above a camera in the camera view. You should use a descriptive name that clearly identifies the location of the camera.
- Select Settings > Wireless Camera.
- Select a camera.
- Select Rename.
Removing a Paired CameraYou can pair up to 4 wireless cameras with a compatible Garmin navigation device. If you have already paired the maximum number of cameras, you must unpair one before you can pair another one.
- From a paired Garmin navigation device, select > Wireless Camera.
- Select a camera.
- Select Unpair.
Device Information
Software UpdatesSoftware updates for your camera are received automatically from the paired Garmin navigation device. You should update your Garmin navigation device software regularly to keep both it and the camera up to date. For more information about updating software, see the owner’s manual for your Garmin navigator.
Updating the Camera SoftwareBefore you can update the camera software, you must pair the camera with a compatible Garmin navigation device (Pairing the Camera with a Garmin Navigation Device, page 5).On the paired Garmin navigation device, select an option:
- Connect to a Wi‑Fi® network, and select > Updates > Install All.
- Install all available updates using the Garmin Express™application.See the owner’s manual for your Garmin navigation device for more information.
The navigation device downloads updates for itself and updates for your BC 40 camera, if available. The next time the device connects to your camera, it sends the update to the camera automatically. A message and progress indicator appear on the navigation device screen while the camera is updating. It takes about one minute to install the camera update.
Checking the Camera Software VersionBefore you can check the camera software version, you must pair the camera with a compatible Garmin navigation device (Pairing the Camera with a Garmin Navigation Device, page 5).
- On the paired Garmin navigation device, select > Device > About.The device displays version information for all software on the device.
- Locate the camera name in the list.The software version number appears next to the camera name.
Specifications
Troubleshooting
The camera takes a long time to connect or does not connectYour camera may have a weak wireless connection to your navigation device if it takes a long time to display video on the navigation device, if the video frequently pauses or buffers, or if the camera does not display video at all on your navigation device. Interference with the connection can be caused by other wireless signals, vehicle wiring, or structural elements of your vehicle.
You can try these options to help improve the stability of the wireless connection between your camera and your navigation device.
- Move the navigation device to a different location on your dash or windshield.
- Remove the camera from the mount, flip it upside down, and place it back into the mount.When mounted with the Garmin logo upside-down, the camera automatically flips the video the next time it connects to your navigation device to provide a correctly oriented image. Flipping the camera upside down changes the position of the wireless antenna and can improve the connection quality in some cases.
- Mount the camera at a different location on your license plate.
For example, if your camera is mounted at the top of your license plate, you can try moving it to the bottom of the license plate, or vice-versa.
Try one or more of these options to reduce sources of Wi‑Fi interference:
- Set the wireless router in your home to use a channel other than channel 11.The camera communicates with your navigation device using a 2.4 GHz Wi‑Fi signal on channel 11. Reducing the number of nearby devices using the same channel can improve the wireless connection.
- Turn off the Wi‑Fi radio on other devices in your car, such as your smartphone or mobile Wi‑Fi hotspot.
The camera does not work well in cold weatherIf you experience problems with the wireless camera connection or video stability in cold weather, you should verify you are using lithium AA batteries in the device. Alkaline and NiMH batteries lose power quickly at low temperatures, and even brand-new Alkaline or NiMH batteries may not function at all in extremely cold environments. Lithium AA batteries provide longer battery life and more consistent power, especially in cold environments.
Index


References
[xyz-ips snippet=”download-snippet”]