
GARMIN Group Ride Instructions
Mounting the Antenna
NOTE: The mounted antenna must be at least 4 cm (1.57 in.) away from the nearest roll bar or metal surface to avoid radio interference.
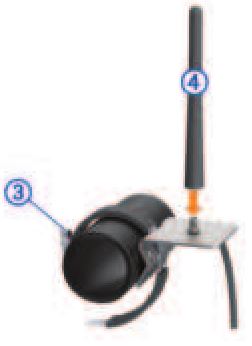
You can use the external antenna mount to mount your antenna in a more suitable location for your vehicle, such as a roll bar at the rear of your vehicle, to receive better radio reception. For the best results, use this method for vehicles that have a roll cage.
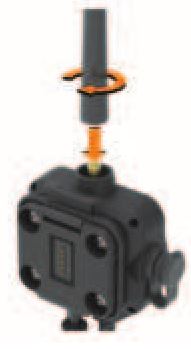
- Screw down and tighten the antenna cable (1) onto the Group Ride mount (2).

- Find a suitable location for the antenna.
- Using a flat head screwdriver or 5/16 in. (8 mm) nut driver, loosen the bolt (3) on the external antenna mount until the ring separates.
- Place the mount around the roll bar.
- Tighten the bolt on the mount until the ring is secure.
- Screw down and tighten the antenna (4) onto the external antenna mount plate.
- Route the antenna cable along a suitable path in your vehicle, and secure it using the included zip ties.
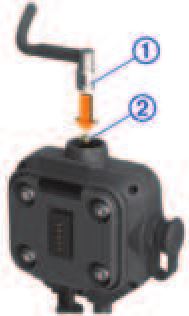
Installing the Antenna on the Group Ride Mount
NOTE: The mounted antenna must be at least 4 cm (1.57 in.) away from the nearest roll bar or metal surface to avoid radiointerference.
For the best range performance, use the external antenna mount. You can mount the antenna directly onto the Group Ride mount when it is not possible to use the external antenna mount.
Screw down and tighten the antenna onto the Group Ride mount.
Installing the Fist Microphone and Mount
Before you can attach the fist microphone mount to your dashboard, you must select a suitable location on the dashboard.
WARNINGIt is your responsibility to ensure the mounting location complies with all applicable laws and ordinances, and does not block your view of the road during the safe operation of your vehicle.
NOTICEAvoid wires, gauges, air bags, air bag covers, HVAC, and other items when drilling pilot holes and attaching the mount to the vehicle. Garmin® is not responsible for any damages or consequences arising from the installation.
NOTE: This feature is not available on all product models.
- Align and insert the connector on the fist microphone onto the Group Ride mount.
- Tighten the collar around the connected cable.
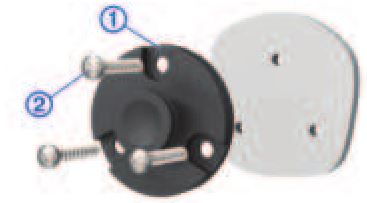
- Place the mount (1) on the selected location.
- Using the mount as a template, mark the three screw locations.
- Drill pilot holes (optional).For some types of mounting material, drilling pilot holes is necessary.
- Securely fasten the mount to the surface using the supplied screws (2).
- Slide the fist microphone (3) onto the mount.


Group Ride
The Group Ride app allows you to coordinate rides and communicate with nearby riders using preset text messages, live map locations, and voice communications.
Starting a Group RideYou can create a group ride that allows you to choose the group radio channel, view and remove riders who join your group ride, and set the group ride name.
NOTE: For some product models, the Group Ride app is located in the apps menu.
- From the main menu, select Group Ride > Start a Group Ride.
- Enter your rider name, and select Done.
- If necessary, select the radio channel, and select Next.
- Enter the ride name, and select Done.As riders join your group ride, their names appear on the list.
- Select Start.The group ride begins after all riders sync with the group ride.
Joining a Group RideYou can join a nearby group ride that was created by another rider.
NOTE: For some product models, the Group Ride app is located in the apps menu.
- From the main menu, select Group Ride > Nearby Group Rides.
- Select a nearby group ride, and select Join.
Radio
NOTE: This feature is not available on all product models. You can use the radio app to create radio presets, select a radio channel, and select squelch codes. To use this feature, you must connect the device and the antenna to the Group Ride mount. The Garmin device configures radio settings automatically when you join or create a group ride.
Selecting a Preset
NOTE: For some product models, the Radio app is located in the apps menu.
- From the main menu, select Radio.
- Select an option:
- To move through available presets, select ∧ or ∨.
- To select a preset from the menu, select Preset.
Transmitting Your VoiceBefore you can transmit your voice, you must pair your Garmin device with a compatible Bluetooth® headset or connect the fist microphone.
You can transmit your voice over the radio using the connected fist microphone or a compatible Bluetooth headset.
NOTE: For some product models, the Radio app is located in the apps menu.
Select an option:
- Hold the push-to-talk button on the side of the connected fist microphone.
- From the main menu, select Radio > Push to Talk . · Use the voice dial feature on your connected Bluetooth headset.TIP: You can press the pause or stop button to manually close the radio.NOTE: You must enable the Push to Talk with Headset setting to use this feature.
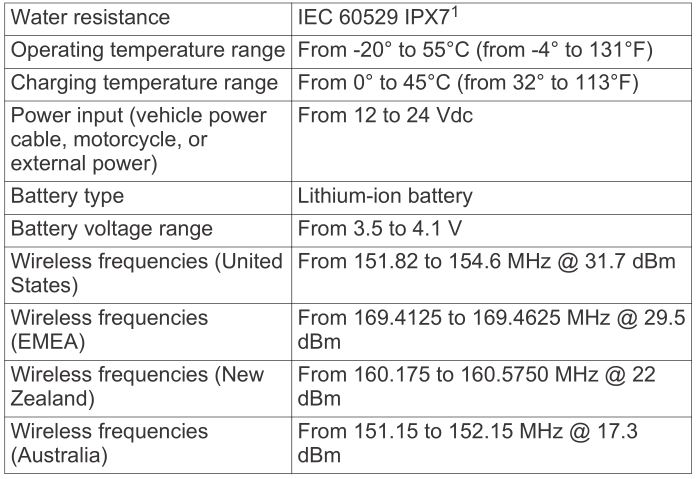
Group Ride Specifications
© 2021 Garmin Ltd. or its subsidiariesGarmin® and the Garmin logo are trademarks of Garmin Ltd. or its subsidiaries, registered in the USA and other countries. These trademarks may not be used without the express permission of Garmin.
The BLUETOOTH® word mark and logos are owned by the Bluetooth SIG, Inc. and any use of such marks by Garmin is under license. WiFi® is a registered mark of Wi-Fi Alliance Corporation.
1 The device withstands incidental exposure to water of up to 1 m for up to 30 min. For more information, go to www.garmin.com/waterrating.
References
[xyz-ips snippet=”download-snippet”]