
![]()
STRIKER™PLUS ICE FISHINGOwner’s Manual
© 2020 Garmin Ltd. or its subsidiariesAll rights reserved. Under copyright laws, this manual may not be copied, in whole or in part, without the written consent of Garmin. Garmin reserves the right to change or improve its products and to make changes in the content of this manual without the obligation to notify any person or organization of such changes or improvements. Go to www.garmin.com for current updates and supplemental information concerning the use of this product.
Customizing the STRIKER Plus for Ice Fishing
Adjusting the Backlight Brightness
From any screen, press ![]() repeatedly to scroll through the backlight brightness levels. When you are on the ice, a 100% level is recommended. When in a shelter, a 40% to 60% level is recommenced. TIP: A lower backlight brightness level helps extend the battery life.
repeatedly to scroll through the backlight brightness levels. When you are on the ice, a 100% level is recommended. When in a shelter, a 40% to 60% level is recommenced. TIP: A lower backlight brightness level helps extend the battery life.
Adding the Flasher to the Home Screen
The flasher shows sonar information on a circular depth scale, indicating what is beneath your transducer. It is organized as a ring that starts at the top and progresses clockwise. Depth is indicated by the scale inside the ring. Sonar information flashes on the ring when it is received at the depth indicated. The flasher colors indicate different strengths of the sonar return. The default color scheme follows a traditional sonar color palette, in which red indicates the strongest return, orange indicates a strong return, yellow indicates a weaker return, and light blue indicates the weakest return.
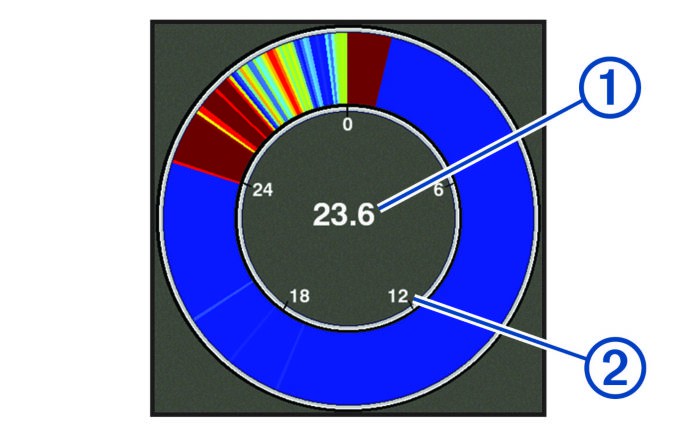
| 1. | Depth at your present location |
| 2. | Depth scale |
- From the Home screen, select Customize Home > Add >Flasher.
- Use the arrow keys to select a location.
- Select

Editing the Overlay Numbers on the Flasher PageYou can add and change the overlay numbers on each page.
- From the Flasher page, select> Overlay Numbers >Hide to show the overlay numbers.
- Select Edit Layout > Water Temp.TIP: The Water Temp. the field will always be blank when ice fishing. If necessary, you can replace this field with a different field when you are ice fishing.
- Select another item to display.
- Repeat the previous two steps for all items you want to change.
Optimizing the Sonar Screen for Ice Fishing
Selecting the Transducer Type
If you are connecting a transducer that was not included with the device, you may need to set the transducer type to make the sonar function properly. Before connecting the transducer, you should select the transducer type. The transducer name should be listed on the label on the transducer cable, near the connector.
This device is compatible with a range of accessory transducers,including the Garmin ClearVü™transducers, which are available at garmin.com/transducers.
- Select Settings > My Vessel > Transducer Type.
- Select an option:• If you have a Dual Beam-IF ice fishing transducer or a 200/77 kHz dual-beam transducer, select Dual Beam (200/77 kHz).• If you have a GT8HW-IF ice fishing transducer or a 200/50 kHz dual-frequency transducer, select Dual Frequency (200/50 kHz)• If you have another type of transducer, select it from the list.
Turning on the A-Scope
The a-scope is a vertical flasher along the right side of the fullscreen sonar view. This feature expands the most recently received sonar data so that it is easier to see. It can also be helpful for detecting fish that are close to the bottom.NOTE: This feature is not available on all sonar screens.From the full screen page, select ![]() > Sonar Setup >Appearance > A-Scope.
> Sonar Setup >Appearance > A-Scope.
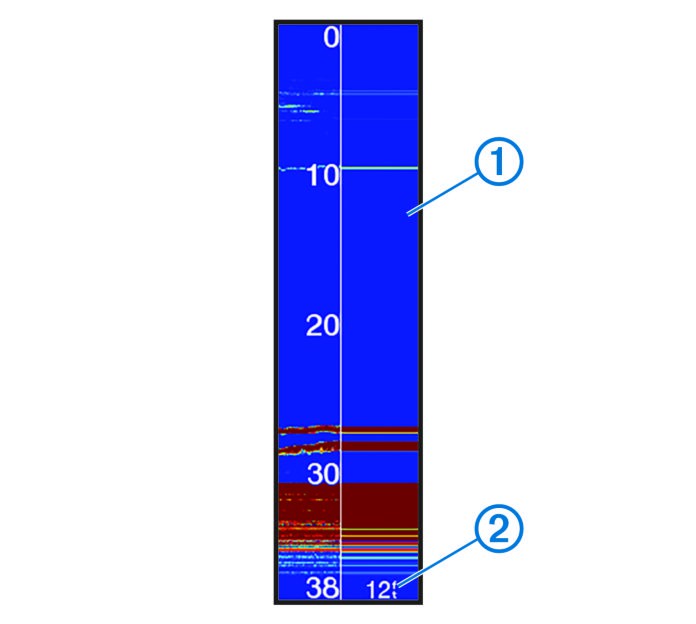
| 1. | A-Scope |
| 2. | Diameter of the sonar cone at the present depth |
Setting Up and Using Split-Zoom View
On the split-zoom page, you can see a full-view graph of sonar readings on the right side of the screen with a zoom window, and a magnified view of that zoom window on the left side of the screen.
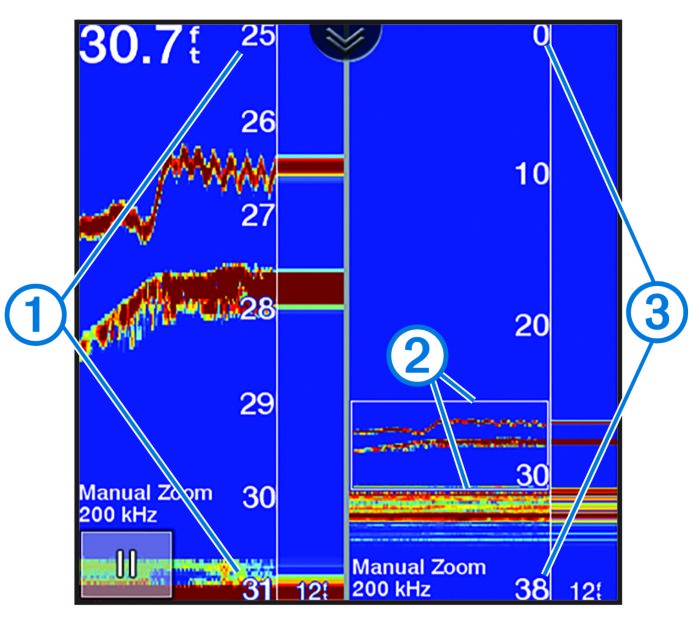
| 1. | Zoomed depth scale |
| 2. | Zoom window |
| 3. | Depth range |
- From the Traditional view, select > Zoom > Split Zoom> Off to turn on split zoom.
- If necessary, select > Sonar Setup > Appearance > AScope >Off to turn on theA-scope.
- Select> Zoom > Manual.
- Use the arrow keys to adjust the zoom and depth.
- From the Traditional view, use the up and down arrow keys to move the zoom window.The window on the left magnifies the contents of the zoom window.
Setting the Gain Manually
- From a sonar screen, select> Gain.
- Select or until you begin to see noise in the water portion of the screen.
- Select or to decrease the gain.
Adjusting the Range of the Depth Scale
You can adjust the range of the depth scale that appears on the right side of the screen. Manually adjusting the range allows you to view a specified depth range, which is preferred when ice fishing. The bottom is shown on the screen as long as the bottom is within the specified depth range. Setting the range on one screen applies that setting to all screens. Setting the range on one sonar view applies that range setting to all the sonar views.
- From a sonar screen, select> Range.
- Select an option:• To increase the range manually, select or.• To decrease the range manually, select or.TIP: From a sonar screen, select +and–to quickly adjust the range.
Setting the Scroll Speed to Ultrascroll®
You can set the rate at which the sonar image moves across the screen. A higher scroll speed shows more detail, especially while moving or trolling. A lower scroll speed displays sonar information on the screen longer. When ice fishing, the Ultrascroll option is recommended. Setting the scroll speed on one sonar view applies that scroll speed to all the sonar views. From a sonar view, select ![]() > Sonar Setup > Scroll Speed > Ultrascroll®.
> Sonar Setup > Scroll Speed > Ultrascroll®.
Reducing Interference
You can adjust the sensitivity to reduce the effects of interference from nearby sources of noise, such as other sonar and flasher devices.
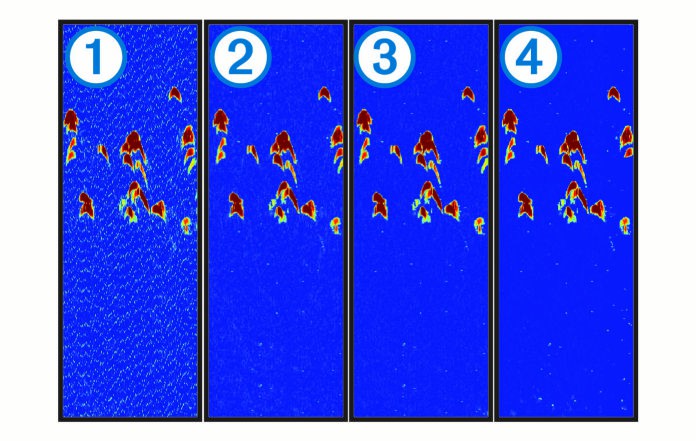
When you adjust the interference setting from off 1through low 2, medium 3, and high 4, noise is gradually removed, but there is little effect on the strong target returns. You should use the lowest interference setting that achieves the desired improvement to remove interference from the screen. When ice fishing, the Low option is recommended. From a sonar view, select![]() > Sonar Setup > Noise Reject > Interference > Low.
> Sonar Setup > Noise Reject > Interference > Low.
![]()
July 2020GUID-D56B46E6-8CB6-4E20-8766-24B457C792FA v1
References
Garmin International | Home
Garmin Customer Support
Transducers for Boats | Thru-hull & In-hull | Garmin
Transducers for Boats | Thru-hull & In-hull | Garmin
Transducers for Boats | Thru-hull & In-hull | Garmin
Garmin International | Account
Water Rating Definitions | Garmin
Garmin Customer Support
Transducers for Boats | Thru-hull & In-hull | Garmin
What is GPS? | Garmin
Garmin International | Home
[xyz-ips snippet=”download-snippet”]