GASLAND chef Built-in Gas Oven Instruction Manual
SAFETY Instructions
- The use of a gas cooking appliance results in the product on of heat and moisture in the room n which it is installed.Ensure that the kitchen is well ventilation keep natural ventilation holes open or install a mechanical ventila· lion device(mechanical extractor hood).
- The appliances will become hot during use. Please take care to avoid touching the heating elements inside the oven.
- Accessible parts may become hot during use.Young children should be kept away.
- Do not use harsh abrasive cleaners or sharp metals crapers to clean the oven door glass since they can scratch the surface, which may result in shattering of the glass. e)If the supply cord is damaged, it must be replaced by a qualified persons in order to avoid a hazard
- The appliance is not intended for use by persons( including children) with reduced physical,sensory or mental capabilities,or lack of experience and knowledge,unless they have been given supervision of instruction.
- Children should be supervised to ensure that they do not play with the appliance.
- Children less than 8 years of age shall be kept away unless continuously supervised.
- This appliance can be used by children aged from 8 years and above and persons with reduced physical, sensory or mental capabilities or lack of experience and knowledge if they have been given supervision or instruction concerning use of the appliance in a safe way and understand the hazards involved.Children shouldn’t play with the appliance.Cleaning and user maintenance shall not be made by children without supervision.
- Ensure that the appliance is switched off before replacing the lamp to avoid the possibility of electric shock.
- Disconnection the supply after installation by remove the plug or turn off the switch on the socket.
- Steam cleaner is not allow to use in the oven.
How To Save Energy
Using energy in a responsible way not only saves money but also helpsthe environment. So let’s save energy!And this is how you can do it:
- Do not uncover the pan too often(a watched pot never boils!)
- Do not open the oven door unnecessary often. Switch off the oven in good time and make use of residual heat.For long cooking t me,switch off heating zones 5 to 1O minutes before finishing cooking. This saves up to 20% on energy.Only use the oven when cooking large dishes.Meat of up to 2.21b/ 1kg can be prepared more economically in a pan on the cooker hob.
- Make use of residual heat from the oven.If the cooking time is much longer than 40 minutes,switch off the oven 1O minutes before the end time. Important! When using the t merset appropriately shorter cooking t me according to the dish being prepared.
- Make sure the oven door is properly closed.Heat canleak through spillages on the door seals .Clean up any spillages immediately.
- Do not install the oven in the direct vicinity of refrigerators/freezers.Otherwise energy consumption increases unnecessarily.
Unpacking![]() During transportation, protective packaging was used to protect the appliance against any damage.After unpacking,please dispose of al elements of packaging in a way that will not cause damage to the environment. All materials used for packaging the appliance are environmental friendly; they are 100% recyclable and are marked with the appropriate symbol. Caution! During unpacking, the package pieces.etc.should be kept away from children.Disposal Of The Appliance
During transportation, protective packaging was used to protect the appliance against any damage.After unpacking,please dispose of al elements of packaging in a way that will not cause damage to the environment. All materials used for packaging the appliance are environmental friendly; they are 100% recyclable and are marked with the appropriate symbol. Caution! During unpacking, the package pieces.etc.should be kept away from children.Disposal Of The Appliance![]() Electrical and electronic devices may not be disposed of with domestic waste.Consumers are obliged bylaw to return electrical and electronic devices at the end of their service lives to the public collecting points set up for this purpose or point of sale.Details to this are defined by the national law of the respective country.This symbolon the product,the instruction manual for the package indicates that a product is subject to these regulations.By recycling,reusing the materials or other forms of utilizing old devices, you are making an important contribution to protecting our environment.Specification Of The Appliance
Electrical and electronic devices may not be disposed of with domestic waste.Consumers are obliged bylaw to return electrical and electronic devices at the end of their service lives to the public collecting points set up for this purpose or point of sale.Details to this are defined by the national law of the respective country.This symbolon the product,the instruction manual for the package indicates that a product is subject to these regulations.By recycling,reusing the materials or other forms of utilizing old devices, you are making an important contribution to protecting our environment.Specification Of The Appliance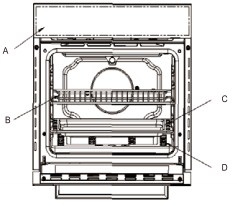
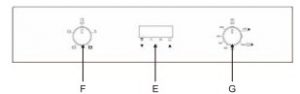
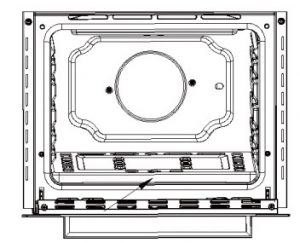
- Control Panel
- Dripping Pan Or Baking Sheet
- Timer
- valve KnOl>(Gas)
- 0v Rack
- Flame Covel
- Switch Knob
Installation
The appliance must be installed only by qualified person in compliance with instruction provided.The manufacturer declines all responsibility for improper Installation which may harm pets.ons and animals and damage property. Important: The power supply to the appliance must be cul off before any adjustments or maintenance work done on it Important This appliance may be installed and used only in permanently ventilated rooms In Compliance with current National Norms..The following requirements must be observed:
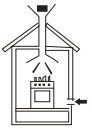
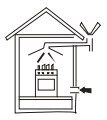
- The room must be equipped with an exhaust system that vents the combustion fumes to the outside.It may consist of a hood or/and electric fumes that automatically starts each lime the appliance is turned on.

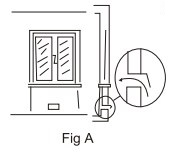
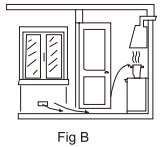
- The flow of air needed for combustion must not be less than 2 m th per KW of ( installed power. The air circulation system may take air directly from the outside by means of a pipe with an inner cross section of at least 100 cm’. The opening cannot under any circumstances be blocked accidenta y(Fig A). The system can also provide the air needed for combustion by indirect means. i.e.from adjacent rooms fitted with air cirCtJ ation tubes as described above. However,these rooms must be common rooms.bedrooms or rooms with a fire hazard(Fig.B)
- Liquefied petroleum gas is heavier than air and, therefore,settles downwards. Thus, rooms containing LPG cylinders must also be equipped with apertures to the outside for ventilation of gas in the event of leaks.LPG cylinders must not,therefore,be installed or stored in rooms or storage areas that are below ground level(cears,etc.) whether they are partially or completely full.IIis a good idea to keep only the cylinder being used in the room. positioned so that it is not subject to heat produced by external sources(ovens, fireplaces, stoves,etc.) which could raise the temperature of the cylinder to the above 122’F(SO’C) Prior To installation,ensure that the local distribution conditions(nature of the gas and gas pressure),and the adjustment of the appliance are compatible.The adjustment conditions for this appliances are stated on the label(or data plate). This appliance is not connected to a combustion products evacuationdevice.It shall beinstalle<l and connected in accordance with current installation regulations.Particular attention shall be given to the relevant requirement regarding ventilation.
Installation of Built-in Ovens
In order to ensure the built in appliance functions properly. the cabinet containing it must be appropriate.The figures below give the dimensions of the cut-out for installation under the counter or in a wall cabinet unit.In order to ensure adequate ventilation, the back panel of the cabinet unit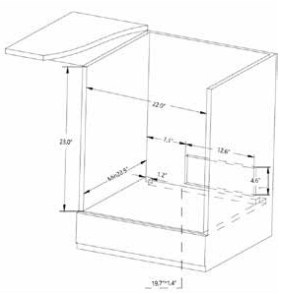
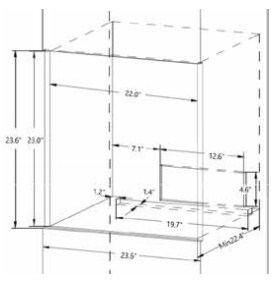 must be removed.Installing the oven so that it rests on two strips of wood is preferable.If the oven rests on a continuous, Hat surface, there must an aperture of at least 1.2 x 20 inch. The panels of the adjacent cabinets must be made of heat resistant material. In particular,cabinets with a veneer exterior must be assembled with glues with glues which can withstand temperature of up to 212 F(100 C) .In compliance with current safety standards,contact with the electrical parts of the oven must not be allowed onceit has been installed. To fasten the oven to the cabinet, open the door of the oven and attach it by inserting the 2 wooden screws into the 2 holes located on the perimeter of the frame.
 Electrical ConnectionThose ovens equipped with a three.pole cable are designed to operate with alternating current with the voltage and frequency indicated on the data plate (located on the appliance) and in the instruction manual.The wire for earthing the appliance is yellow.green in color.
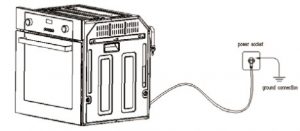 Only connecting the power supply complying to the mark on the rating label, the oven could be used.Note:
- Socket should be ground connection reliably.
- Voltage: 120V-
- Frequency:60Hz
Connection with rigid pipe(copper or steel) Connection to the gas system must be made in such a way so as not to cause any stress of any kind on the appliance.There is an adjustable L-shaped pipe fitting on the supply ramp to the appliance,whose watertightness is ensured by a seal.Should you need to tum the pipe fitting,you must in allcases replace the seal(provided with the appliance).The gas supply pipe fitting is a threaded 1/2 NPT gas cylindrical male attachment. Connecting a flexible jointless stainless steel pipe to a threaded attachment The gas supply pipe fitting is a threaded 1/2 NPT gas cylindrical male attachment. Only use pipe and seals that comply with the current National Norms. These pipes must be installed so that their length is never any longer than 6.SFt when fully extended.Once the connection has been made,ensure that the Flexible metal pipe does not touch any moving parts andis not crushed.Checking that the connection is tight When installation is complete, check the pipe fittings for leaks using a soapy solution.Never use a Harne. Technical Specifications Inner dimensions of the oven: Width: 17.5 inch Depth: 17.0inch Height: 12.0inchOverall Dimensions for oven volume:2.0Cu.f(58L) This appliance conforms with the following european economic community directives:
- 2009/95/EC(Low voltage)
- 2004/ 108/EC(Electromagnetic compatibility}
- 2009/142/EC{Appliances burning gaseous fuels):
Burner And Nozzle Characteristics
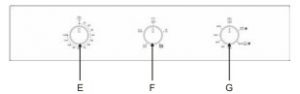
How To Use Your OvenThe various features of this oven are controlled via the knobs and buttons located on the control panels. Note: The first time you use your appliance, we recommend that you set the thermostat to the highest setting and leave the oven on for about half an hour with nothing in it,with the oven door shut. Then open the oven door and let the room air.The odour that is often detected during this initialize is due to the evaporation of substances used o protect the oven during storage and utility is installed. Attention:For safety, open the oven door when igniting the oven. Note: Place the dripping pan provided on the bottom shelf of the oven to preventany sauce and/or grease from dripping onto the bottom of the oven only when grilling food or when using the rotisserie.For all other types of cooking, never use the bottom shelf and never place anything on the bottom of the oven when it is in operation, because this could damage the enamel.Always place your cookware(dishes,aluminum foil ,etc) on the grid provided with the appliances inserted especially along the oven guides. The oven knob(G) This knob is used not only to select the different oven modes, but also to choose the right cooking temperature from among the temperatures shown on the knob itself(from 265°F to 485°F).The electronic ignition device of the oven is built into the control knob itself.To Light the oven burner, press the oven knob “G”in all the way and turn it anti-clockwise,setting it to the Max position(keeping the oven door shut).Since the oven is equipped with a safety device, after lighting the burner keep knob “G” pressedin for about 6 seconds to allow the gas to pass until the safety thermocouple is heated.The electronic ignition device of the oven burner must not be activated for more than 15 seconds.If the burner fails to light after 15 seconds, stop pressing knob “G”open the oven door and wait for at least one minute before you try to light the burner again. The cooking temperatures selected by matching the desired temperature with the reference mark on the control panel.The oven will automatically reach the temperature set,and the thermostat, which is controlled by the knob, will keep it constant.The valve ignition(G) This knob is used not only to select the different oven modes, but also to choose the right cooking temperature from among the temperatures shown on the knob itself .(from 265’F to 485’F) for the food to be cooked in the oven. The electronic ignition device of the ovenis build into the control knob itself. To light the oven burner.press the oven knob “G”in all the way and tum it,setting it lo the(:JorQ position,please refer to operation for “G”Knob. Lighting the oven manually In the event of a brief power failure,the oven burner can be lit manually:
- Open the oven door.
- Hold a match or lighter near the burner hold as shown in the figure, press knob “G”, in fully and turnit anticlockwise, setting tt to the Max position.Since the oven is equipped with a safety device, after lighting the burner keep knob “G”pressed in for about 6 seconds to allow the gas to pass until the safety thermocouple is heated.
- Once the burner Is lit,shut the oven door. Note: Should the burner flame accidentally go out, turn control knob “G” to the off position,open the oven door and wait for at least one minute before trying to light the burner again.
The rotisserieTo start the rotisserie, processed as follows:
- Place the dripping pan on the 1 rack;
- Insert the special rotisserie support on the 3rd rack and position the spit byinserting it through the specialholeinto the rotisserie at the back of the oven; Start the rotisserie using knob “F” to select setting. Note:The oven door will get hot during cooking. Please keep children away from it The switch knob(F) After plugging into an electric power supply,turning knob·e·should be accepted under any normal state.
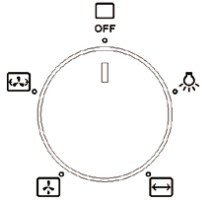 Light
Light![]() rotisserie
rotisserie![]() fan
fan![]() rotisserie and fan
rotisserie and fan![]()
The switch knob{F)After plugging into an electric power supply,turning knob “F” should be accepted under any normal state, turning on/off rotisserie and light of oven.Turning clockwise 90 degrees for turning the light on,turning anticlockwise 90 degrees for the rotisserie working,and the middle position is turn off state. Cooling ventilation In order to cooldown the temperature of their exterior, they are equipped with a cooling fan that comes on by turning the selector knob “G”During cooking,the fanis always on and a normal flow of air can be heard exiting between the oven door and the control panel. Note:When cooking is done,the fan stays on until the oven cools down sufficiently. Warning: Do not use the oven in the event of a prolonged power failure if the cooling fan does not work. The timer(E) for GS606DS/GS606DSLP/GS6 06DB/GS606 DBLPAbout symbol:
- Clock
- Heating
- Re-heat
- Timer
About function: Set up clock(0-24 hours). Timer(24hours). Oven continuance heating(0-10 hours). Auto function, set up continuance heating and finish heating time . Preheat range: Current time + continuance heating time s preheat time s current time + 23 hours 59 minutes.About key-press: All with touch control. Function selection/power on off. When connected to the electricity, the dock will not show time but only show (0:00).And heating function now is starting.When flicker, press the Tend A to set up clock;heating will continue after no operation for 3s, Disappear,and timer start working. When finish heaVy preheat, back to standby status,and press Bto restart.In turn on/working condition, press And activate to set up the function and clock, press Again,start heating time set up preheat time setup current time.After 5s, reminding to set up, it will back to current time. In function set up condition,press 0 for decrease the time and press A for increase the time.
- Function selection/power on.off
- When connected to the electricity,standby status, display with 12:00 on the timer display.Press to turn on the timer,display with 12:00 the first two number 12 flicker, show the time for hour, press orA.to adjust current hour time.After Ss no operating, backup the revised time and exit to current time,the second two number(minute) 00 nicker,the clock start to work
- When on working condition, press to select the function clock time heating time-finish heating time or preheat time current times circulation.
- After finish heatingpreheat time, back to standby status.
2 Adjust current hour time
In standby condition. pressOto turn on the timer, display with current time,press or A to adjust current hour time, after 5s no operating,backup the revised time and exit to current time. 3 Adjust the clock time
- When in working condition, pressO,and activate the function setting up status, clock symbolS will flicker, display with clock time.If set up dock before,it will show the remain clock time or it will show “0:00”
- When dock symboldisplay, press orA to adjust dock time,after 5s no operating rating,backup the revised time and exit to current time.
4 Heating time set up
- In standby condition,press To turn on,it will heat all the time if not set up the heating time. When In working condition. press 0.and activate the function setting up status, continue press till heating lime display,heating symbol flicker.If set up heating time before,it will show the remain heating time or it will show “0:00” At the same time, press Y or.A.to adjust heating time,after Ss no operating,backup the revised time and exit to current time. It Will Keep heating according to the set up time, and display with current remain heating time.You can also re-set a new heating time when working.
- Max heating time is 10 hours.when add to max heating time,continues .&is invalid.”
5 Preheat time set upWhen in wor1dng condition,press and activate the function setting up status, continue press til preheat time display, the symbol nicker. pressTor.& to adjust preheat time,after Ss no operating, backup the revised time and exit to current time. You can also re-set a new preheat time when in working.
- Preheat time range: Current time + heating time s preheat time s current + 23:59.
- For example,client need heating two hours. he could set up in two ways.
- Suppose current time is 12:00,use heating time function and set up heating time with 2 hours.
- Suppose current time is 12:00,use preheat function and set up preheat time with 14:00.
Remark:if set up heating time and preheat time at same time, before heating status,both symbols will indicate.When go to heating status, preheat time symbol will disappear. and indicate with heating time symbol,display with heating remain time.
- After finish each time setting,sound from buzzer(2minutes).display with flicker .Press any key-press or after 2 minutes. buzzer stop sounding and display changes from nicker o:oo·to next precedence(remain) time.If system finish all the set time, then tum to standby,display with current time. During the buzzer sounding, pressOto stop noise. The timer(E) for GS606MS/GS606MSLP/GS606MB/GS606 MBLP To use the timer, the buzzer “E” must be wound up by turning the knob one full tum clockwise, then turn it back to the desired time so that the number of minutes on the knob matches the reference mark on the panel.
Using the minute minder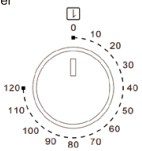 The minute minder can be used independently of an oven cooking function for a time period of up to 120 minutes.To set the timer,tum the knob fully clockwise until stops and then turns it back anticlockwise to the required time.The time period that has been set will expire when the control knob reaches zero,a brief audible signal will sound. Important: If you have the oven or grill in use whilst the timer is counting down. When the countdown ends,the oven will continue to heat. You must turn off the oven/grill using the oven function and temperature control knob. If you have the oven or grill in use whilst the timer is counting down.When the countdown ends,the oven or grill will stop to work, another will continue to heat. You must turn off the oven/grill using the oven function and temperature control knob. The gas oven must be turned off after they complete the working.
Practical Cooking Advice
The oven offers a wide range of alternatives which allow you to cook any type of food in the best possible way.With time you will learn to make the best use of this versatile cooking appliance and the following description are only a guideline which may be varied according to your own personal experience.Baking cakesWhen baking cakes. always place them in the oven after it has been preheated about 15 minutes.The temperature is normally around 320’F. Do not open the door while the cake is baking in order to prevent it from dropping.in general: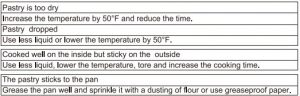 Cooking Pizza For tasty crispy pizzas, please preheat the oven for at least 15 minutes. Use alight aluminum pizza pan,placing it on the rack supplied with the oven.If the dripping pan is used, this will extend the booking time,making it difficult to get a crispy crust. Do Not open the oven door frequently while the pizza is cooking. If the pizza has a lot of toppings, recommend you addle mozzarella cheese on halfway through the looking process. Cooking Fish and Meat When cooking white meat,fowland fish, use temperature settings from 340°F to 375°F. For red meat that should be welldone on the outside while tender and juicy in the inside, It Is a good idea to start with a high temperature setting(395°F to 430°F) for a short time, then tum the oven down afterwards. In general. the larger the roast, the lower the temperature setting.Place tie meat on the centre of the grid and place the dripping pan beneath it to catch the fat. Make sure that the grid is inserted so that it is in the centre of the oven.
 Using The GrillImportant:Always use the grit! with the oven door shut. This will allow you both to obtain excellent results and to save on energy(approximately 10%). Use the R grill mode placing the food under the centre of the grill. Therefore the best results when using the grill modes are obtained by placing the grid on the lower racks then,to prevent fat and grease from dripping onto the bottom of the oven and smoke from forming, place a dripping pan on the 1st oven rack from the bottom.
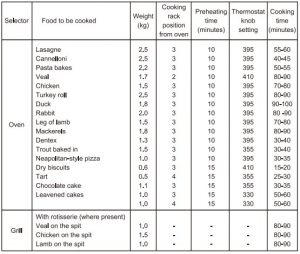 Note: Cooking times are approximate and may vary according to personal taste. When cooking using the grill,the dripping pan must always be placed on the 1st oven rack from the bottom. How to remove the oven door For a more thorough clean, you have to remove the oven door. Proceed asfollows:
- Open the door fully.
- Lift up and turn the small levers situated on the two hinges.
- Grip the door on the two external sides, shut it slowly but not completely.
- Pull The door towards you, pulling it out of its seat.Reassemble the door by following the above procedures backwards.

Replacing the oven lamp
- Disconnect the oven from the power supply by means of the ambipolar switch used to connect the appliance to the electrical mains or unplug the appliance if the plug is accessible.
- Remove the glass cover of the lamp-holder.
- Remove the lamp and replace with alamp resistant to high temperature 575°F with the following characteristics:• Voltage: 12ov-• Wattage: 1SW• Type E14
- Replace the glass cover and reconnect the oven to the mains power supply.
[xyz-ips snippet=”download-snippet”]