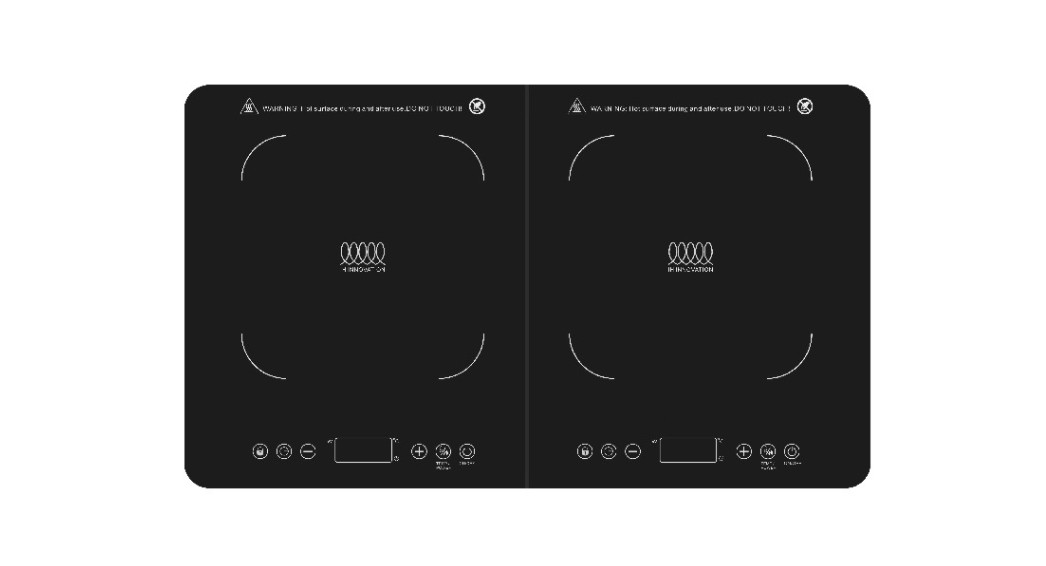
![]() IP-34DOUBLEInduction cooker
IP-34DOUBLEInduction cooker

INSTRUCTION MANUAL

We congratulate you on your purchase of GastroragInduction cooker. We are sure that our product will meet your highest demands and become a reliable assistant in your kitchen. Please read this manual carefully before operating.If you follow the instructions, our Induction cooker will serve you for a very long time.Thank you for your choice!Best wishes,GASTRORAG TEAM
 Please read the instruction manual carefully before using it and well keep this in a safe place for future reference. Some figures in this manual may not match with the real object, just for reference only.
Electrical parameters:110-120V, 60 HzPower: 1800 W
Product operating instructions
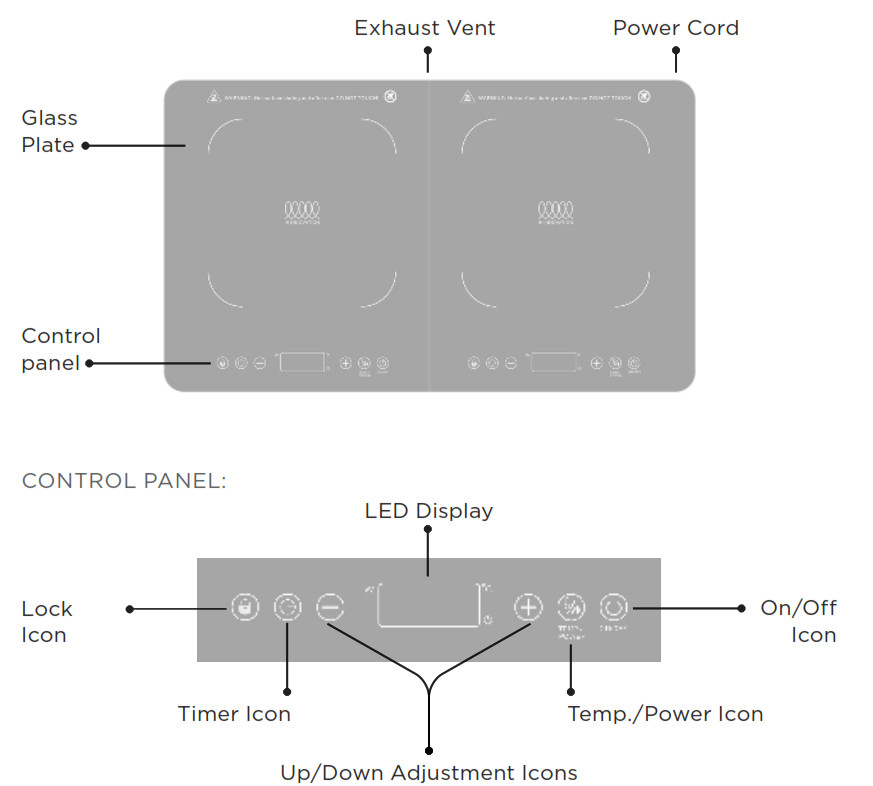
Insert the plug into the power socket. You will hear a beep sound and all indicators will flash once. After that both, [On/Off] indicators will continue flashing showing that the appliance is in connection with the power source and in “standby” mode.Place suitable cookware in the center of the cooking zone and press [On/Off] key once. The corresponding [On/Off] indicator will stop flashing and remain on, showing that the appliance is in “select” mode. Press one of the function keys to start the operation. To stop operation and switch to “standby” mode press the [On/Off] key again.
Cooking Modes
- Power:Press [Temp./Power] key once, [W] indicator will light up showing that the appliance is in power selection mode. The display will show [7] indicating that the default power is 7. Use [+] or [-] keys to select one of 10 power levels from 1 to 10. To exit this mode, press one of the other function keys. To stop operation and switch to “standby” mode, press [On/Off] key.
- Temp.:Press the [Temp./Power] key again, [°F] indicator will light up showing that the appliance is in temperature selection mode. The display will show [350°] indicating that the default temperature is 350°F. Use [+] or [-] keys to select one of 10 temperature levels from 140 to 460°F (140, 180, 210, 250, 280, 320, 350, 390, 420 or 460°F). To exit this mode, press one of the other function keys. To stop operation and switch to “standby” mode, press [On/Off] key.
Remarks: If the user operates one cooking zone (while the other cooking zone is turned off), there will be 10 power levels with 1800W max. power on the working cooking zone.If the user operates two cooking zones simultaneously, there will be 10 power levels on each zone, but the max. power 1800W will be shared between 2 working zones. One cooking zone will have 750W max. power, another cooking zone will have 1050W max. power. The required parameters should be set on each cooking zone separately.
TIMER FUNCTIONAfter choosing the necessary power or temperature level you can set operating time. Press [Timer] key once to access the timer function. The timer indicator will light up and [0] will flash on the display. Operating time can be adjusted from 0 to 180 minutes. Use [+] and [-] keys to set time in 1-minute increments. Press and hold [+] or [-] key to set time in 10-minute increments. After setting time press [Timer] key once to con firm the setting or wait until the display stops flashing. At the end of the countdown, you will hear a beep sound and the appliance will switch to “standby” mode automatically. To cancel timer function and resume power or temperature opera- on, press and hold [Timer] key for 3 seconds.LOCK FUNCTIONTo activate the lock, press [Lock] key once. This will block all function keys except [On/Off] key. Press and hold the key for 3 seconds to unlock the appliance.
How it works
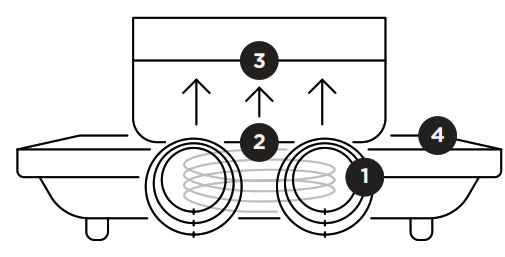
- The induction cooker generates a high-frequency magnetic field.
- The magnetic field heats up the bottom of the pan.
- The heat from the pan is transferred to the food.
- Glass ceramic cooking surface has no magnetic properties and can be heated up only by the cookware.
When the stove is turned on, an electromagnetic field is created. When objects marked with a special symbol (![]() ) are in this field, a closed-loop is formed which heats the bottom of the cookware.
) are in this field, a closed-loop is formed which heats the bottom of the cookware.
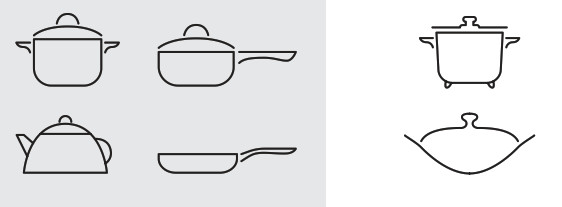
| √ SUITABLE | ×UNSUITABLE | |
| The shape of the heating surface |
Flat bottom Curved bottom
|
|
| Material | • Stainless steel• Cast iron• Aluminum with a special coating on the bottom | • Aluminum without special coating onthe bottom• Copper• Ceramics• Glass• other materials |
| Thickness | From 0,08 to 0,24 inches | Less than 0,08 or more than 0,24 inches |
| Diameter | 4,7 inches and more | Less than 4,7 inches |
Safety Caution
ELECTRICAL SHOCK HAZARD:
- Make sure that your outlet voltage corresponds to the voltage stated on the rating label of the Induction Cooker.
- Do not immerse the appliance and electric cord in water liquid, or allow liquid to go into the cabinet and get short/contact inner electrical parts, the power cord must be plugged out before cleaning.
- Be sure to use the power cord recommended by the appliance manufacturer after it is damaged
HEALTH HAZARD:
- Do not cover gas vent with anything during cooking, otherwise, it will cause danger.
- To avoid danger, please uncap the cover before heating tinned food.
- Do not let children operating alone to avoid getting burned or dangerous.
- Who with a cardiac pacemaker, please operating the unit after confirming with a doctor there’s no effect.
HOT SURFACE HAZARD :
- It would get dangerous when the metal gets heated directly or indirectly.
- Do not place any metal on the plate, also the nonmetal pad is within 4 inches.
- Do not cook with an empty pot, it will cause malfunction or danger.
- Do not touch the plate while the unit is working, to avoid getting burned.
- Do not operate the unit on the gas stove or metal surface to avoid any danger.
- Do not place any metal on the unit while operating.
IMPORTANT SAFETY INSTRUCTIONS:
- Do not place the unit in any place that is near gas or hot environment in order to avoid damages or malfunction.
- To reduce the risk and damage, this plug should be fit into an individual outlet. The rated electrical current is not less than 16A.
- Place the unit on a level surface, the distance between it and its background surrounding must be not less than 4 inches.
- If it is still not working after the inspection by self, please immediately contact with our service points, do not apart the unit to avoid any danger.
- Always clean the unit to avoid any dirt goes into the fan to affect normal working.
- Please do not place paper, cloth or other articles under the bottom of the pan to get heated, to avoid the danger of fire.
- Do not place the unit on the cloth, carpet to avoid blocking the gas vent.
ADDITIONAL SAFETY CONCERNS:
- Please kindly avoid hitting the plate of the unit, in case of getting cracked, should turn off the unit and plug out immediately, and then contact with service points of our company.
- Do not touch the control panel with any sharp implements.
Environment-friendly disposal
 You can help protect the environment!Please remember to respect the local regulations: hand in the non-working electrical equipment to an appropriate waste disposal center.
Warranty
ARE YOU SATISFIED WITH OUR PRODUCT?YESThat’s great to know. We would love to hear more from you. Please, share your feedback and post your reviews on Amazon to tell us what do you think about our product.Simply log into your account and leave a review.NOIf for any reason there is ANYTHING missing, incorrect, not fitting, different than you expected, PLEASE reach out to us. We’d love to have the opportunity to take care of you and provide total satisfaction. Simply go to your order page, and send us a message.WE PROVIDE 1 YEAR QUALITY WARRANTY FOR FREE If you have any questions about our after-sales warranty service please contact us on Amazon or via email [email protected].Free after-sale service won’t be provided under the following circumstances:
- Artificial damage;
- The damage caused by inappropriate preservation, maintenance, or the usage;
- The damage caused by the manipulation that has not followed the User Manual;
- The warranty period expired.
References
[xyz-ips snippet=”download-snippet”]