GATOR GDVR200 Dash Cam User Manual![]()
Product overview
Thank you for purchasing the Gator GDVR200 HD 720P Dash Cam. Please ensure that you have read the product manual and instructions in full, prior to installation and use.Failure to do so may result in product failure/damage or incorrect operation and therefore impact the product performance.
Product features
- :2.0″ High-resolution LCD screen
- 120 Degree HD wide angle lens
- Time and date stamp
- Mini USB interface
- G-Sensor function
- Seamless cycle loop recording
- Adhesive car mount
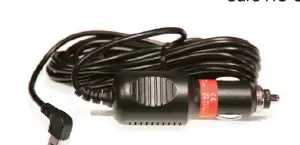
- DC 12/24V car charger
- 16GB Memory card included
- Supports Micro SD card class10 up to 32GB
System contents

GDVR200 Dash Cam Mounting Bracket USB to Mini USB

16GB Micro Memory Car ChargerCard HC C10
Optional accessories (Sold separately)

NOTE: The GUNIHWC Hardwire Kit is a simple plug and play solution to hardwire any Dash Cam or device using Mini or Micro USB for power. The GUNIHWC replaces the cigarette plug function and allows any unsightly cables to be hidden. The Hardwire Kit is compatible with 12V/24V DC for car or truck installations.
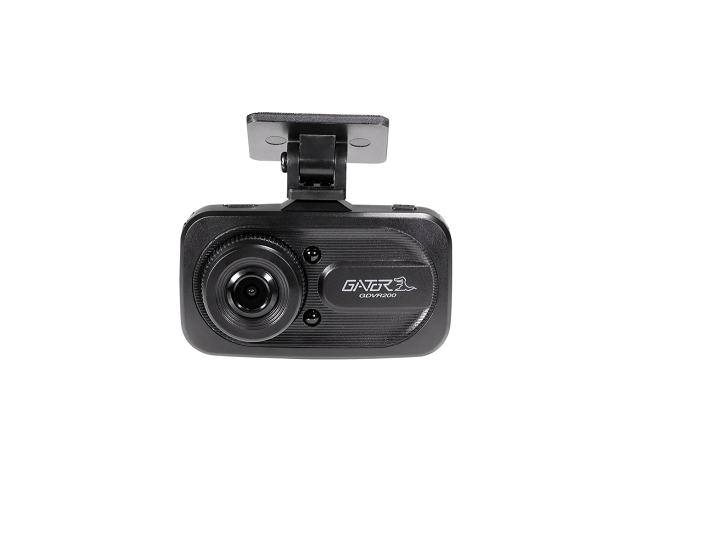
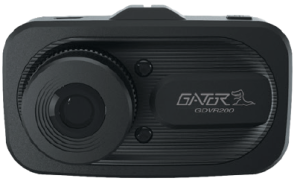
Product structure

- Power Button
- Screen
- Lens
- Mounting Slot
- Dummy IR lights (No function)
Product structure

- Mini USB input
- Power Button
- Micro SD Card Slot
- Reset hole
- Menu/Mode button
- Up arrow button
- Down arrow button
- OK Button

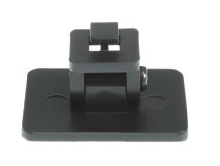
Fixing the Dash cam

Installation of Dash Cam
- Check orientation of the Dash Cam camera first before installation.
- Ensure windscreen is clean and free of debris. Use an Alcohol wipe to enhance adhesion.
- Place mounting bracket on Dash Cam. Remove backing off 3M tape and press & hold firmly to windscreen for 60 seconds.
- Fix where the vision is not blocked (Place close to rear-view mirror is recommended). Do not install the device on airbag or within its working range.
- Insert Micro SD card into the Dash Cam
- Insert Mini USB end of the power cord into the Mini USBinterface/ charging point of the Dash Cam. Connectcharging end of the cable into 12/24V power socket of vehicle.
- Adjust the mounting bracket and rotate the camera direction to get the best view. Ensure of the vehicles bonnet is visible from the bottom of the screen for alignment.
- Turn vehicles ignition to accessories and the Dash Cam will power ON and start recording automatically, you will hear an audible tone once powered.
- The recording indicator light will start flashing RED. A red circle will also flash on the screen and a red timer will appear when recording has started.
- For the Dash Cam to work it must receive power from the charging adapter. Once power is removed or turned off the Dash Cam will save the current file and turn off.
Video Recording mode
There is a video camera icon at the top left corner of the LCD to signify you are on video mode. The recording indicator will start flashing RED. A red circle will flash on the screen and a red timer will appear when recording has started. To stop the recording, simply press the [OK] button. To resume press recording press [OK] button. When recording press the [Menu/Mode] button to lock the recorded video. A key symbol will appear when activated.
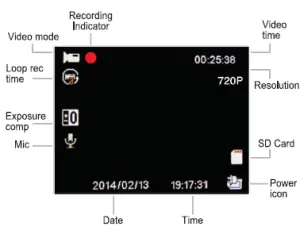
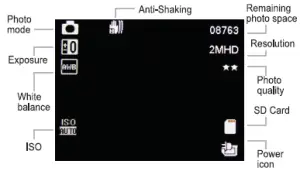
Photo mode
There is a photo camera icon at the top left corner of the LCD to signify you are on photo mode. To take a photo press the [OK] button and you will hear a shutter click sound. Briefly the photo will display on the screen.
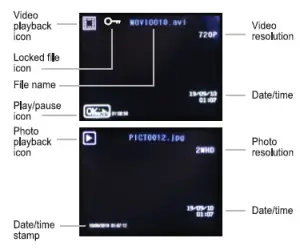
Playback mode
To switch between video, photo and playback modes, press [Power] button. Press the [Menu/Mode] button again to show Function and Settings menu for each mode. Press the [Menu/Mode] button to choose between Functions or Settings. Use [Arrow] buttons to move through menu, press [OK] button to confirm selections. Press [Menu/Mode] button to back track. Press [Power] button to exit.
Instructions for video and photo playback
- [OK] Button In playback mode, short press the [OK] button to play/pause the video.
- [Menu/Mode] Button In playback mode, short press the [Menu/Mode] button to display options to delete or protect (lock) the file.
- [Arrow] Buttons In playback mode, short press the [Arrow] buttons to increase and decrease playback volume.
Settings can only be accessed when not in recording mode.


Loop recording function
This feature allows you to set the size of the files your Dash Cam will record before saving and creating a new file. II allows the Dash Cam to record over the oldest recorded files once the card is full. This can be turned OFF, or record 1, 2, 3, 5 or 10 minute video files. If you want to keep any of the files ii is best to upload them to your computer. We recommend the Dash Cam to be set to ‘3’ minute files.Note: With this function turned off it may fill up the SD card as no files will be overridden. Once the card is full the Dash Cam will stop recording.
G-Sensor function
This function activates in the case of a car accident by determining the gravitational acceleration (1g = 9.8 meters/secondA2). When this function activates theDash Cam will automatically sync a 10 second video clip and save it to the Event folder on the SD card. We recommend Low Sensitivity to avoid false triggers.Note: With this function turned on It may fill up the SD card with locked video files. Re-format the SD card to create space. The device does NOT guarantee video recording of all accidents as built-In Impact sensor may not be activated due to combination of user settings and the level of impact during the collision.
Formatting the SD card
You should do this at least every 2 to 3 months It is recommended you do this to keep the card in good running order and to ensure you purge any locked footage that may have been saved in the past that you no longer need and is taking up space. Note: Back up files you wish to keep prior to formatting, as formatting will delete ALL files on the SD Card.
Internal battery
The internal battery is small and only designed to provide enough power to securely save the last recording when power is disconnected and to retain date and time settings.The Dash Cam is designed to be connected to power at all times when operating. If the Dash Cam is not used for an extended period of time the battery may become completely discharged which will cause the time and date on the device to default to the factory settings. If this occurs please completely recharge the Dash Cam before use.
Factory reset
To hard reset the device back to its original settings in the case of a system jam or crash. Insert a fine point paper clip into the reset hole next to Micro SD card input with the Dash Cam on.
Connecting to a PC
To access video and images from your Dash Cam, connect the USB cable to your computer. Two options will appear on the Dash Cam screen. Press the (OK) button select Mass storage and a folder called No-Name will appear on your computer. Select PC camera to use Dash Cam as a web cam. Or alternatively remove the SD card from the Dash Cam and the SD card into a card reader to connect to your computer. Again a folder called No-Name will appear on your computer. Inside this folder will be your recorded movie files (AVI), and picture files (JPG)
Locking video footage
Press [Menu/Mode] button on the side of the Dash Cam to activate the lock footage function. A key icon will display on the screen. This will lock the file currently being recorded to prevent it being recorded over. To remove locked footage from the Dash Cam you must format the card on the device or a computer.
Product specifications
- 2.0″ High-resolution LCD screen
- Video Resolution: HD 720P 1280×720 @30fps WVGA 846×480 VGA640x480
- Lens view angle Front: 120°
- G-sensor
- Video format AVI
- Loop recording
- Date stamp supported
- Frequency: 50Hz, 60Hz
- Photo Resolution 12M
- Photo format JPEG
- Micro SD SDHC/XC (Class 10 up to 32GB Max)
- MIC/ built-in speaker supported
- OSD Language: Multiple
- Input/ Output: Mini USB (Power)
- Battery: 150mAH built-in battery
- SOS lock function supported
- Input DC12-24V
- Output: 5V-1A
- Dimension: 45*78*26mm (H*W*D)
Trouble shooting guide
Under normal operating conditions, if there are problems with the device, please refer to the following methods to resolve them.Problem: Cannot take pictures or record video? Solution:• This kind of issue is almost ALWAYS an issue related to the Memory card. Please check whether there is enough space on the micro SD. As mentioned earlier some footage is write protected and accumulates on the SD card overtime.
- Format the SD card to be sure the card is no longer full of write protected footage.
- If the device keeps Stopping automatically while recording or it is recording Jumpy footage with dropped frames, this may be due to the SD cards write speed.
- You must use a high-speed micro SD card. To tell if you have the required high-speed card, check if it has the ‘Micro SDHC/XC’ logo on the SD card. Cards are often labelled as HD video capable but that is not always true. HD recording requires a Card with class 10, the card should have this printed on it somewhere.
Trouble shooting guide
PLEASE NOTE: SD cards have a finite life. Their life is based on the amount of times the card is written to. The SD card WILL eventual wear out over time. Dash Cams are very heavy users of the SD card because they are constantly writing to memory. Some cards have a longer life than others. The longest life cards are often labelled as “ENDURANCE” or “HEAVY DUTY”
Troubleshooting guide
Problem: The Dash Cam battery only lasts for a few minutes when power is disconnected Solution:• This is normal. Batteries in Dash Cams only hold enough power to safely shut down the Dash Cam, securely save the last file when power is disconnected and retain settings.• The Dash Cam is designed to be connected to power at all times while being used.
Problem: The lime & dale settings reset everytime the Dash Cam is powered on Solution• The time and date settings will reset when the Dash Cams battery is flat. Make sure the Dash Cams battery is fully charged in order to retain the lime and dale settings.
Problem: The Dash Cam menu cannot be accessedSolution: • While the Dash Cam is recording the Menu can not be accessed. Stop recording before pressing the Menu button.
Problem: The Dash Cam screen turns off after a few minutes when the Dash Cam is powered on Solution:• Dash Cams have an automatic screen saver feature. This helps reduce heat in the Dash Cam and also makes the Dash Cam less distracting to the driver. If you prefer the screen remain on, this can be changed in the Dash Cam settings under “Screen Saver”.
Troubleshooting guide
Problem: The Dash Cam feels warm when it is operatingSolution: • It is normal for the Dash Cam to feel warm to the touch during typical use, especially when it is recording HD video.
Problem: The Dash Cam stops automatically while recordingSolution: • Check to see whether there is enough space on the Micro SD card.• Ensure correct Micro SD card is being used, 8-32Gb Class 10 or above Micro SDHC is recommended. Other types of Micro SD cards may not be suitable for use in Dash Cams.• If the correct Micro SD Card is being used, format the Micro SD Card in a computer.• Micro SD cards have a limited lifespan and become corrupt after a period of time. This is due to the continuous loop recording function. If this has occured, you will need to replace you Micro SD Card. Problem: The Micro SD card is not recognised by the Dash CamSolution: • Format the Micro SD card before using. Be sure the Micro SD card is compatible with the device, see “Stops automatically while recording” fault.
Safety information & warnings
Do not use the Dash Cam in damp working conditions; theDash Cam is not waterproof.Do not try opening the shell or trying to repair the Dash Cam by yourself. If the Dash Cam or it’s accessories have any problems and is still under warranty, then take ii back to the place ofpurchase with the original purchase receipt. If out of warranty then contact the authorised repair agent, Gator Support. Do not use a chemical substance, cleaning solvent or cleaner to clean the Dash Cam, please use a moist soft cloth if you would like to clean the Dash Cam. Do not use the Dash Cam under conditions where dust is present.Please pay attention to cleaning the lens surface, use a moist soft cloth to clean the lens before use, to avoid poor video footage.
Infringement of copyright warning
Please note that this product is for personal use only, the method of use shall not violate the goods infringe on domestic or international copyright laws. Even recorded images for personal use only, please note that in some cases to use this product to record performances, exhibitions or business activities of the images may infringe the copyright or other legal rights and interests of others.
Technical assistance

For Australasian supportTEL: 03 – 8587 8898 FAX: 03 – 8587 8866Mon-Fri 9am – 5pm AESTEMAIL –
If you would like to download a digital copy of this manual, or other Gator manuals/software, please visit thehttp://gatordriverassist.com website and click on ‘Firmware & Manuals” for information on where to find the manuals/software.This manual is considered correct at time of printing but is subject to change. For latest manuals and updates refer to the website.Copyright© 2017 by TDJ Australia All rights reserved. No part of this publication may be reproduced, distributed, or transmitted in any form or by any means, including photocopying, recording, copying or other electronic or mechanical methods, without the prior written permission of the author. Please retain this user guide for future reference.
Read More About This Manual & Download PDF:
[xyz-ips snippet=”download-snippet”]