![]()
GHDVR85WENGLISH USER MANUAL

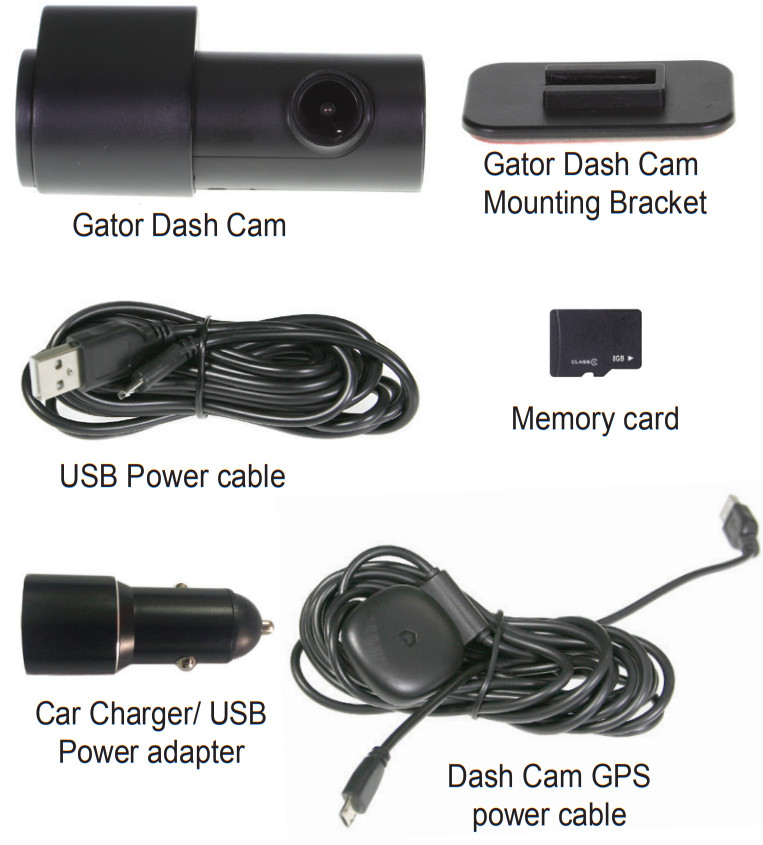
For more information on the Gator, range go to our websitegatordriverassist.com INCLUSIONS:Dash Cam, GPS Power Cable, Adhesive Surface Mount, 12/24V In-Car Charger, USB Power Cable, 16GB Micro SD Card
Introductory video user guideScan this QR Code to see an introductory video user guide. Alternatively you can search YouTube for “Gator Instructional presentation”https://www.youtube.com/watch?v=q213vb2EIMw
Please note that whilst the instructional video has good information on pairing and is often enough for most clients to get started, it does not cover some of the more complex details that we have added to this manual recently due to the iPhone and Android operating system changes that have altered the behavior of some phones recently. Please ensure that you have read the product manual and instructions prior to installation and use. Failure to do so may result in the product incorrectly operating or an installation that renders the device unusable.
Product overview
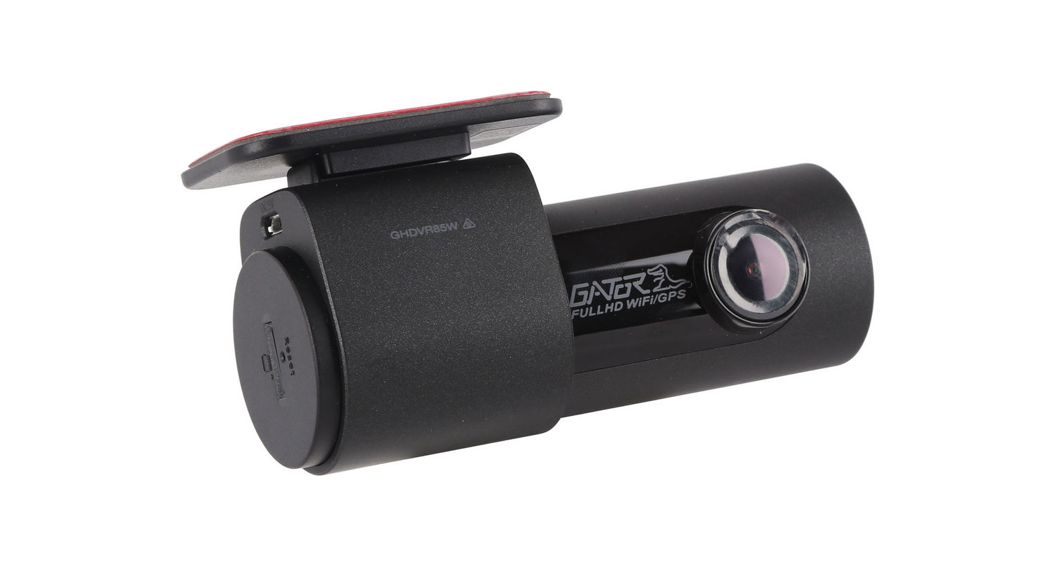
The Gator GHDVR85W Dash Cam has been designed to provide high-definition recordings of your road trips for security and evidence in the case of an accident. This Dash Cam mounts to the windscreen and records footage onto a memory card. It has a built-in WiFi interface that connects it wirelessly to your smartphone. This device operates through a user interface on your smartphone via the Gator Dash Cam App. (downloaded from the Apple App Store or Google Play Store).
Product features
- FULL HD 1920×1080 @ 30FPS
- 152 Degree HD wide-angle lens
- WiFi-enabled (2.4Ghz)
- WiFi Via free App to Smartphone
- Hand gesture photo / video function
- Time and date stamp
- G-Sensor function
- Parking Mode (optional GHWCUSB2 req)
- GPS data recording
- Supercapacitor
- Multi-language support|
- Seamless cycle loop recording
- Mini USB interface/ 12V in-car USB charger
- Adhesive car mount
- Built-in MIC
- 16GB Memory card (Supports Micro SD card class10 up to 256GB)
System contents
Optional accessories
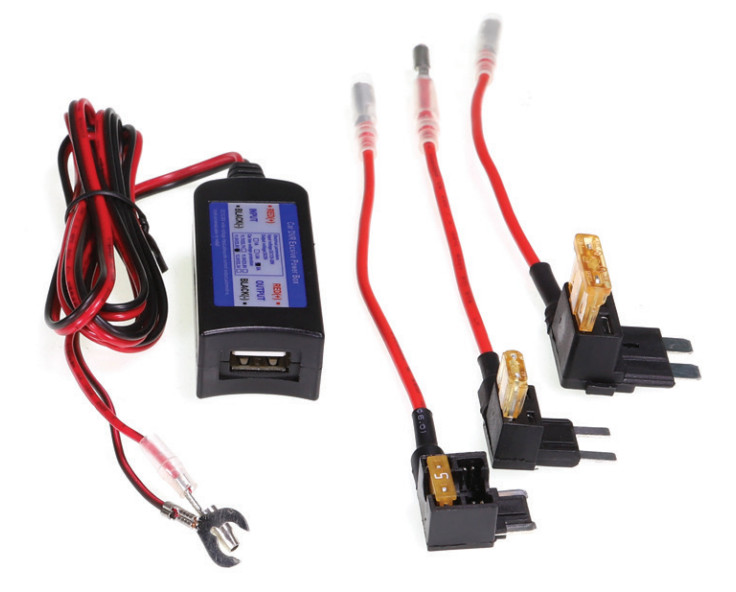
Hardwire Kit. (GHWCUSB2) Needed for Park Mode operation and to free up the vehicle’s 12V socket for another usage.
Product structure
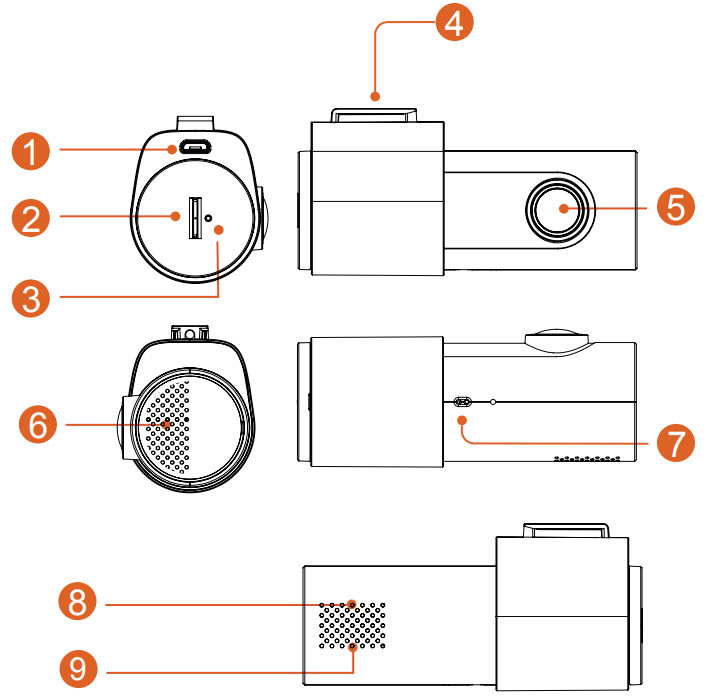
- Power socket
- Micro SD card slot
- Reset
- Fixing point for the mounting bracket
- Camera lens
- Speaker
- Hand gesture sensor
- Red light indicator (Recording)
- Greenlight indicator (WiFi connected)
Fixing the Dash Cam
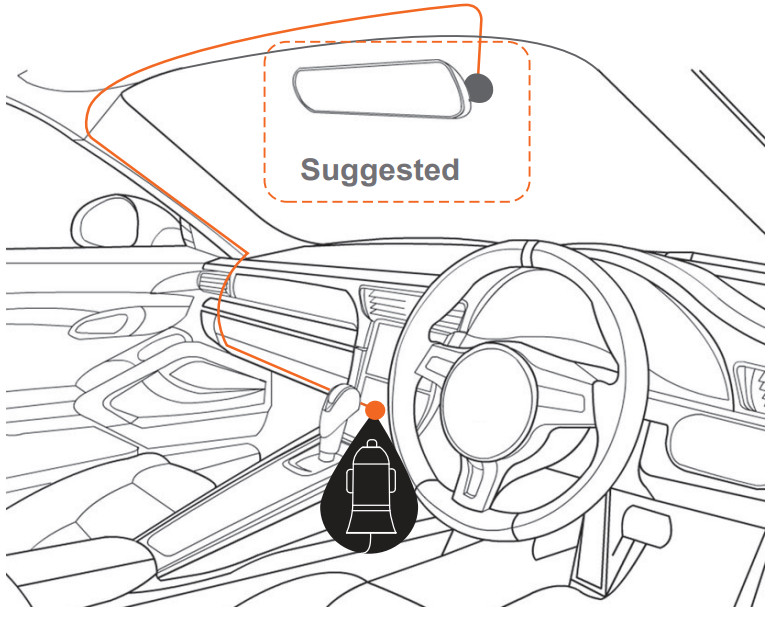
Installation of Dash Cam
- Place mounting bracket onto the Dash Cam by sliding on fixing point. Orientate the device so the when you attach it to the windscreen, the USB socket is on the right-hand side (looking from inside the car) and its lens is on the left. The Hand Gesture Sensor faces down.
- Fix the device onto a clean part of the windscreen toward the center where the vision is not obstructed. (Make sure it’s VERY clean to ensure proper adhesion). A place close to the rear-view mirror is ideal in most cases. Do not install the device near an airbag. (Airbags are often installed along the outer left- and right-hand sides of the windscreen).
- Insert the included Micro SD card into the Dash Cam
- Insert the Micro USB end of the GPS power cable into the Micro USB socket of the Dash Cam. Remove backing off 3M tape of GPS cable and fix to window. Connect the full-size USB plug into the USB socket of the power adapter, insert the power adapter into a free 12V power socket in the vehicle. The power cable is long enough to run along the headlining, down the A-pillar, under, and across the Dash to the transmission tunnel where it should be in the range of the vehicle’s 12V accessory power socket as shown in the diagram above.
- Rotate the Camera direction so that it is facing forward and slightly down from horizontal. Later, using the App, you can align it exactly so that 1/4 of the bonnet of the vehicle is visible at the bottom of the Cameras image.
- Turn the vehicle’s ignition to accessories, the Dash Cam should automatically power ON, you will hear an audible tone once powered. (Some 12V sockets require ignition on).
- A red LED will start flashing and the recording will start. The unit records footage in small blocks. When the card is full, the unit will replace the oldest recordings with the newest footage as it is recorded. The available history is dependent on the size of the SD card’s capacity.
- The Dash Cam starts recording automatically when it receives power from the power adapter. Once power is turned off (when you turn the car off), the Dash Cam will use its onboard supercapacitor to save the current file and then turn itself off.
Downloading the Dash Cam WiFi App
On your Android-based Smartphone, search the Google Play store. For iPhones search the App Store. Search for “GHDVR85W”After downloading the App don’t run the App just yet.Gator has a number of different Apps for different devices. You MUST download the correct App for your device. The model number of your device is mentioned in the App description.
First time pairing procedure
For iPhone,
- Restart/ reboot your phone. (Turn it completely off and then boot it up).
- Go into your phone SETTINGS, then into PRIVACY, and make sure your LOCATION SERVICES is turned on. It is also a good idea go into the location services menu to ensure that the Apps location services specifically are set to on as well.
- Make sure your phone’s MOBILE DATA is turned OFF during this procedure. Tap your settings button, then Mobile and you should see this setting at the top of the page.
- Power up your Dash Cam. In most cases, this will take place when you turn your key to accessories and your 12V socket receives power. If not, start the car or turn on the Ignition (but do not do this on a public road).
- Make sure no other Apps are running (including the Gator Dash Cam App) and close them if needed. Go to your WiFi settings and search for a WIFI access point name that will start with the model number of your device. For example, If you have a GHDVR85W, it will be something like GHDVR85W–O23Cd.
- Select the network and enter the password 12345678 then connect. Your WIFI network should now have a tick next to it.
- Open the “Gator Dash Cam” App. A reminder that each Dash Cam runs on its own App. Make sure your using the correct App. The model of your device is mentioned in the description of the App.
- In recent times the latest updates of the iPhone operating system ask you to enter a “key in DashCam ID” at the top of the screen, and just underneath it will have a white area under WiFi to type in the information. If there is anything typed there already, delete it, it may say something like GHDVR85W. Delete it and type the EXACT syntax of the Dash Cam WiFi name, in our example, it was GHDVR85W-O23Cd. Your WiFi name may be slightly different. It is case-sensitive, so make sure to capitalize what is capitalized and lowercase what is lower case. Make sure not to mix up o / O / 0 as using incorrect lowercase or uppercase o or the number character 0 will not work. Also, make sure you use the – character and not a _ or space or no space between the GHDVR85W and the O23Cd of the WiFi. Once the WIFI KEY Cam ID is entered correctly, click on the blue “OK” button on the bottom of the screen, it may then ask you to click on join. Click join, then you should now be able to view your Dash Camera on your phone.
First time pairing procedure
For Android phones
- Restart/ Reboot your phone. (Turn it completely off, then back on again).
- Make sure that you have your “LOCATION” turned on, and your “MOBILE DATA” turned off. The procedure to access this setting is often, Swipe down from the top of your screen to the bottom at least 2 times and then swipe from left to right (or right to left).
- Make sure your phone’s MOBILE DATA is turned OFF during this procedure.
- Power up your Dash Cam. In most cases, this will take place when you turn your key to accessories and your 12V socket receives power. If not, start the car or turn on the Ignition (but do not do this on a public road).
- Make sure no other Apps are running (including the Gator Dash Cam App) and close them if needed. Go to your WIFI settings and search for a WIFI access point name that will start with the model number of your device. For example, if you have a GHDVR85W, it will be something like GHDVR85W–O23Cd.
- Select the network and enter the password 12345678 then connect. Your WIFI network should now have the word “Connected” under it in “Current network”. Your phone may advise you that “Internet may not be available” “Connect to another network or turn on Switch to mobile” “Switch to mobile data” “Another network”. Ignore this message, it will go away in a couple of seconds. This warning only relates to the WiFi connection between the Phone and the Dash Cam. Your Internet is still available through your mobile data service whilst connected to the Dash Cam. (Except whilst you do this initial pair up where it has been disabled).
- Open the “Gator Dash Cam” App. A reminder that each Dash Cam runs on its own App. Make sure you’re using the correct App. The model of your device is mentioned in the description of the App. Due to recent Android updates, you may be asked to enter an “INPUT CODE” with 2 buttons, one called: “PLAYCODE” and another called “Connect My Dash Cam” Enter four zeros as the code, 0000, then click on “Connect My Dash Cam” button, not the “Play Code” button. You should now be connected and be able to view your Dash Camera video image.
After the first successful WIFI pairing of your devicesAfter the initial pairing of your device to the Dash Cam’s WiFi network, you can turn back on your mobile data. For all future pairing, you do not need to disable your mobile data. However, if you have an issue that looks as if the phone cannot get data from the device you may try disabling mobile data as a possible remedy or try rebooting your phone.
Dash Cam App main screen
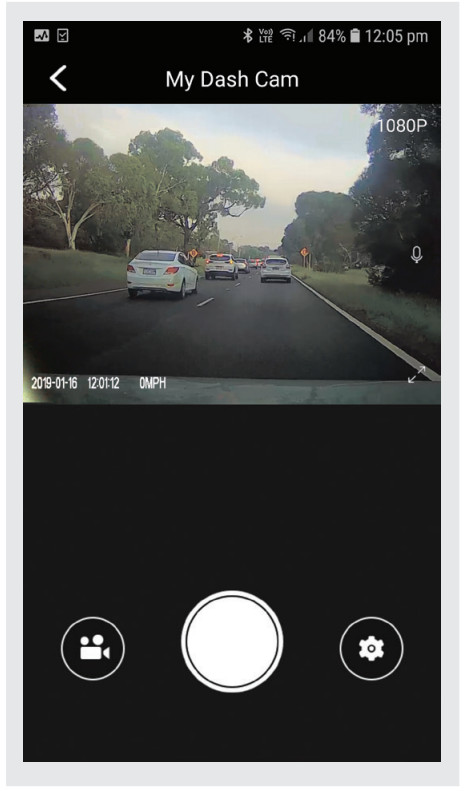
When in portrait mode a live image of the Dash Cameras view will be displayed at the top of the phone screen. Use this image to adjust the angle of the camera so that the lower part of the Cameras’ view can see the end of the bonnet of the car (about ¼ of its length).
- To take a picture, press the white button in the lower center of your screen.
- To access your Dash Cam videos, press the video camera icon in the lower-left of your screen.
- To access the Dash Cam’s settings, press the settings gear icon in the lower right of your screen.
Time and date settings
To set the time and date, Click on the gear icon and scroll down to where it says “Sync the mobile phone time to device”. Click on this option and it will then set the Dash Cam time to the same time as your mobile phone. A confirmation message is also given.
Format SD Card
You should do this at least every 2 to 3 monthsYou can format your SD card by clicking on the “Manage the TFT card” which is near the bottom of the menu list. It will ask you to confirm before formatting. It is recommended you do this to keep the card in good running order and to ensure you purge any locked footage that may have been saved in the past that you no longer need and is taking up space. Note: Back up files you wish to keep prior to formatting, as formatting will delete ALL files on the SD Card.
Download to your phone
To download videos to your phone, click on the video camera icon. If you have a lot of videos, it may take a bit of time before it will load images onto your screen, it may Appear empty to start with, be patient, the video images should Appear in a minute. Then, click on the word “SELECT” at the top right of the screen, then select which video images you want to download to your phone, then click on the downward-pointing arrow at the top left of the screen. Patience is needed while it downloads the videos, the more videos you select, the longer it will take to download. Please keep in mind that this footage is High definition and is quite large. (make sure there is sufficient space on your phone).
Info setting
Displays the version number of the App, Version number of the firmware, Language and Speed unit settings.Factory resetTo hard reset the device back to its original settings in the case of a system jam or crash. Insert a fine point paper clip into the reset hole next to the Micro SD card input.
GPS logger
GPS geolocation data is automatically saved to the video files when the GPS receiver cable is installed. To playback videos with a live map view, you will need to download the video play, 1.0.0.1 viewer. This App is for PC platforms only. The App is available at:www.tdj.com.au/firmware/Gator/DVRDashCams/GHDVR85WATTENTION: To avoid any possible GPS signal interference, make sure the Dash Cam is away from any other car audio equipment.
Product specifications
- HD Camera, HD recording
- Light sensor 2MP CMOS sensor
- G-sensor three-axis accelerometer
- WiFi 2.4GHz 802.11 b/g/n
- Lens 152-degree wide-angle fixed focus, F = 1.8
- Languages supported English, French, German, Italian & Spanish
- Video format MP4
- Video resolution 1280×720/1920×1080 @30fps (16:9)
- Video codec. H. 264
- Loop recording with seamless 3 min blocks
- Auto turn on/off while car power on/off Supports turn on while car starts and turn off while car turns off.
- Date stamp supported
- Still images photo resolution: 2 MP
- Photo format JPEG
- Micro SD SDHC/XC (Class 10 up to 256GB Max)
- MIC/ built-in speaker supported
- Inbuilt Supercapacitor
- Frequency 50HZ/60HZ
- USB supported
- SOS lock function supported
- Working voltage & current DC 5V/1A
Troubleshooting guide
Under normal operating conditions, if there are problems with the device, please refer to the following methods to resolve them.Problem: Cannot take pictures or record video?Solution:
- This kind of issue is almost ALWAYS an issue related to the Memory card. Please check whether there is enough space on the micro SD. As mentioned earlier some footage is write-protected and accumulates on the SD card over time.
- Format the SD card to be sure the card is no longer full of write-protected footage.
- If the device keeps Stopping automatically while recording or it is recording Jumpy footage with dropped frames, this may be due to the SD card’s write speed.
- You must use a high-speed micro SD card. To tell if you have the required high-speed card, check if it has the `Micro SDHC/XC’ logo on the SD card. Cards are often labeled as HD video capable but that is not always true. HD recording requires a Card with class 10, the card should have this printed on it somewhere.
PLEASE NOTE: SD cards have a finite life. Their life is based on the number of times the card is written to. The SD card WILL eventually wear out over time.Dash Cams are very heavy users of the SD card because they are constantly writing to memory. Some cards have a longer life than others. The longest life cards are often labeled as “ENDURANCE” or “HEAVY DUTY”
Problem: The adhesive mount will not stay attached to the windscreenSolution:
- Ensure windscreen is clean and free of debris, use glass cleaner or an alcohol swab to clean.
- Ensure that the plastic film has been removed from the adhesive pad.
- When mounting hold the bracket firmly to the windscreen for at least 60 seconds.
Problem: The Dash Cam will not power onSolution:
- Vehicle Accessory Socket – Check the vehicle accessory socket has power, simply plug another device and see if it powers up (or use a test light/multimeter to check for power).
- Dash Cam Power Cable – Check the fuse in the tip of the accessory plug, it may need to be replaced.
- Dash Cam – Connect the Dash Cam to a computer via the USB cable to see if it powers up.
Problem: The Dash Cam shuts down when connected to the vehicle and the battery will not chargeSolution:
- This Dash Cam does not have a battery, it has a Super Capacitor.
- The Dash Cam will only turn on when the vehicle is switched on.
Problem: The Dash Cam battery only lasts for a few minutes when power is disconnectedSolution:
- This Dash Cam does not have a battery, it has a Super Capacitor.
- The Super Capacitor only holds enough power to safely shut down the Dash Cam, securely save the last file when power is disconnected and retain settings.
- The Dash Cam is designed to be connected to power at all times while being used.
Problem: The Wifi does not seem to be connecting / the Dash Cam won’t connect with my phoneSolution:
- Ensure WiFi is switched on in your mobile phone settings and select your Dash Cam from the device list.
- Make sure you have entered the correct password for the device (12345678).
- If the device is still not connecting correctly, forget the Dash Cam from the phone through the settings, reset the Dash Cam, restart the mobile phone, and then try again.
- Check your phone has the latest software update and also check the App has been updated with the latest version.
Problem: The Dash Cam feels warm when it is operatingSolution:
- It is normal for the Dash Cam to feel warm to the touch during typical use, especially when it is recording HD video.
Problem: The Dash Cam stops automatically while recordingSolution:
- Check to see whether there is enough space on the Micro SD card.
- Ensure correct Micro SD card is being used, 8-64Gb Class 10 or above Micro SDHC/XC is recommended. Other types of Micro SD cards may not be suitable for use in Dash Cams.
- If the correct Micro SD Card is being used, format the Micro SD Card in a computer.
- Micro SD cards have a limited lifespan and become corrupt after a period of time. This is due to the continuous loop recording function. If this has occurred, you will need to replace your Micro SD Card.
Problem: The Micro SD card is not recognized by the Dash CamSolution:
- Format the Micro SD card before using it. Be sure the Micro SD card is compatible with the device, see “The Dash Cam stops automatically while recording” fault above.
Problem: Cannot record video or take picturesSolution:
- Check to see whether there is enough space on the Micro SD card. If not, the Micro SD card will need to be formatted.
Problem: Video files can not be played on the PCSolution:
- The video files from the Dash Cam are in .MP4 format and may not be compatible with your PC if suitable playback software is not installed.
Problem: My videos are blurry, dirty or discoloredSolution:
- Check to see if there are any fingerprints or dirt present on the Camera lens. If needed, clean with a soft dry cloth before recording.
- Remove the transparent lens cover during installation.
Problem: The Dash Cam is frozen or not respondingSolution:
- Reset the unit by pushing and holding the reset button for a few seconds and try again.
- Format Micro SD Card in a computer.
Problem: Unresolved issuesSolution:
- Reset the unit by pushing and holding the reset button for a few seconds and try again.
- Format Micro SD Card in a computer.
- Should the problem persist please contact your Gator Service Agent for your country?
Safety information & warnings
Do not use the Dash Cam in damp working conditions; the Dash Cam is not waterproof. Do not try opening the shell or trying to repair the Dash Cam by yourself. If the Dash Cam or its accessories have any problems and is still under warranty, then take it back to the place of purchase with the original purchase receipt. If out of warranty then contact the authorized repair agent, Gator Support. Do not use a chemical substance, cleaning solvent or cleaner to clean the Dash Cam, please use moist soft cloth if you would like to clean the Dash Cam. Do not use the Dash Cam under conditions where dust is present. Please pay attention to cleaning the lens surface, use a moist soft cloth to clean the lens before use, to avoid poor video footage.
Infringement of copyright warning
Please note that this product is for personal use only, the method of use shall not violate the goods infringe on domestic or international copyright laws. Even recorded images for personal use only, please note that in some cases to use this product to record performances, exhibitions or business activities of the images may infringe the copyright or other legal rights and interests of others.
Technical assistance
 For Australasian supportTEL: 03 8587 8898 FAX: 03 8587 8866 Mon-Fri 9am 5pm AEST EMAIL – [email protected]For European support support.connects2.com/tickets/technical
References
[xyz-ips snippet=”download-snippet”]