GATOR GRV92MKT Touch Screen HD Mirror Display User Manual
For more information on the Gator range go to our website http://gatordriverassist.com
Introduction
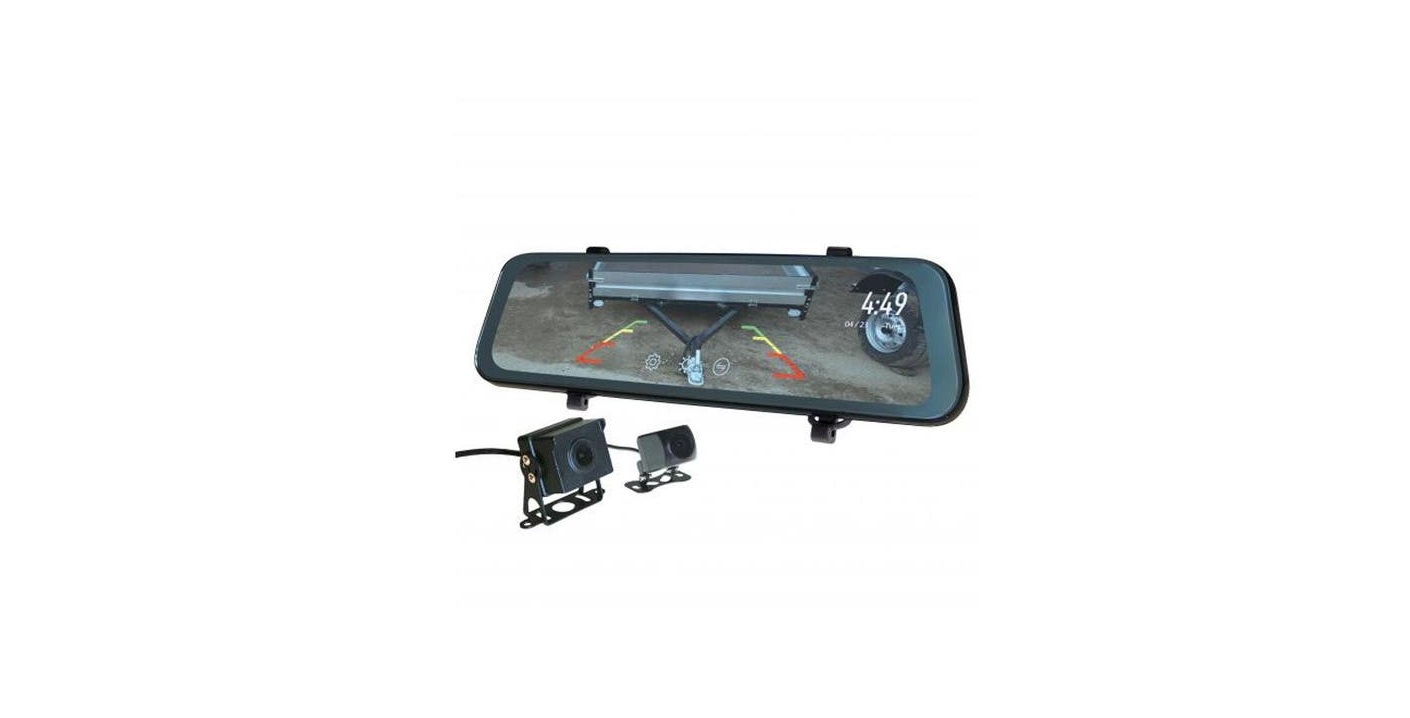
Thank you for purchasing the Gator GRV92MKT Mirror Monitor. This product is a dual camera parking aid. Please ensure that you have read the product manual and instructions in full, prior to installation and use. Failure to do so may result in product failure/damage or incorrect operation and therefore impact the product performance.
ATTENTION: The Mirror Monitor must be connected to power when in use. The internal battery only holds date and time settings
Product features
- 35″ High-resolution LCD touch screen mirror monitor
- Screen resolution 1280*320 pixels
- Dual camera input
- Camera resolution 1920*1080P
- 110 Degree wide angle lens surface mount camera
- 110 Degree heavy duty wide angle lens surface mount camera
- Live streaming functionality
- Parking guide lines
- 400mAh 7V Rechargeable battery (For date & time)
- Rubber clip-on mount
- 12/24V DC car adapter (3.5M length)
- Butterfly camera (including 5.4m camera extension cable)
- Heavy duty camera (including 2 x10m camera extension cable with trigger wire for revering guidelines)
- Dimensions 72(H) x 18(W) x 260mm(L)
Package components
- GRV92MKT

- Heavy duty Camera
- Butterfly Camera
- 12/24V charging adapter
- Camera Lead
- Mounting screws & 3M adhesive for butterfly camera
- Camera Lead with Trigger Wire
- Mirror protector pads & rubber mounting clips


Product structure

- LCD touch screen
- Power button
- Butterfly camera input
- Micro SD card SIOt (Not for recording, only updating firmware)
- Heavy duty camera input with trigger w re (Guidelines)
- Power input (Mini USB)
- Reset hole
- Mounting clip-on system
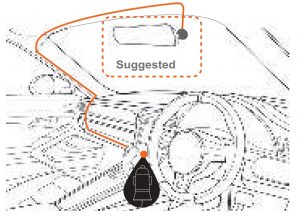
Installation of the Mirror Monitor
- Clip on mirror design securely mounts on the existing rear view mirror in the vehicle by stretching the bands at the back over the hooks on the There are two positions based on thickness of existing mirror.
- Insert power cable into the power input of the Mirror Monitor. Connect the DC charging end of the power cable into the 12-24V power socket of your Hide the cable as pictured below.
- Connect the cameras to the inputs on the mirror. Test the cameras are working correctly and orientation before running the cables and securing the camera mounts to your vehicle.
- Attach the red trigger wire to the reverse light of you vehicle to engage parking guide lines when vehicle is put into reverse gear.
- Turn vehicles ignition on, and the Mirror Monitor will automatically start streaming.
- To switch between the two cameras, slide your finger left to right on the For the Mirror Monitor to work it must receive power from the charging adapter.
Hard wiring kit GUNIHWC (Sold separately)
This can be purchased from your retailer to hard wire your Mirror Monitor to your vehicle. A 3 Metre extension cable is also available separately.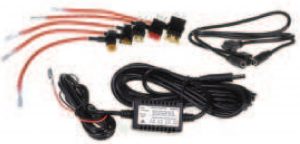
NOTE: The GUNIHWC Hardwire Kit is a simple plug and play solution to hardwire any Mirror Monitor or device using Mini or Micro USB for power. The Hardwire Kit is compatible with 12V/24V DC for car or truck installations. Please ensure that you have read the product manual and instructions in full, prior to installation and use. Failure to do so may result in product failure/damage or incorrect operation and therefore impact the product performance.
Touch screen functions

- Touch screen
- setting
- Brightness
- Image rotation
- Date and Time Display
Long press the power button to turn the Mirror Monitor ON/OFF.
Short press the power button whilst live-view streaming to turn the display off.
Touch the settings icon to enter system settings.
Touch the brightness icon to adjust screen brightness UP or DOWN. To rotate the image on screen, touch the Image rotation icon.
To switch between camera views, slide your finger across the screen.
Settings
Touch settings icon to enter video settings. Select function and select settings to make changes. Touch arrow icon to exit the function.
| Function | Description |
| Clock Settings | Date/Time |
| Clock Display | On/Off |
| Language | English/Simplified Chinese/
Traditional Chinese/French |
| LCD Power Save | Off,5,10 Sec /1 Min
(Screen display time) |
| Beep | On/Off |
| Volume | +/- |
| Flicker | 50/60 Hz |
| Reset Setup | Yes/No (All settings will be deleted) |
| FW Version | Firmware version |
Reversing guide lines
When triggered, the reversing guide lines only assist a driver with backing into a parking space or aligning with an object behind the vehicle. They do not measure distance. You should always get out of the vehicle and visually check the distance to aid the driver when using guide lines.
Product specifications
| Display | 9.35” High-resolution LCD touch screen |
| Color | Black |
| Display Resolution | 1280*320 |
| Camera Resolution | 1920*1080 |
| Frequency | 50HZ/60HZ |
| CPU | Mstar8336 |
| Cameras | Surface mount |
| Viewing Angle | 110 Degree wide angle lens |
| Viewing Angle | 110 Degree wide angle lens |
| OSD Language | English/Chinese/French c |
| Input | Micro SD |
| Battery | 400mAh 3.7V Rechargeable battery |
| Car charger | DC input: 12-24V, output: 5V |
| Dimensions | 72*18*260mm (H*W*L) |
Troubleshooting guide
If there are problems with the device, please refer to the following methods to resolve.
Fuzzy/dirty image†
Make sure to peel off the transparent protective sticker on the front of the Mirror Monitor’s lens.
The Mirror Monitor is jammed or not responding?Reset the device by pressing the reset button located on the rear of the mirror
Safety information & warnings
- Do not use the Mirror Monitor in damp working conditions; the Mirror Monitor is not waterproof.
- Do not try opening the shell or trying to repair the Mirror Monitor by yourself. If the accessories for the Mirror Monitor have any problems, please take it to an authorised repair agent for repair.
- Do not use a chemical substance, cleaning solvent or cleaner to clean the Mirror Monitor, please use a moist soft cloth if you would like to clean the Mirror Monitor.
- Do not use the Mirror Monitor under conditions where dust is present.
- Please pay attention to cleaning the lens surface, use a moist soft cloth to clean the lens before use, to avoid poor streaming image.
Technical assistance
If you need assistance setting up or using your Gator product now or in the future, call Gator Support. Australia
TEL: 03 — 8587 8898
FAX: 03 — 8587 8866
Mon-Fri 9am — Spm AEST
Please retain this user guide for future reference.
If you would like to download a digital copy of this manual, or other Gator manuals/software, please visit the gatordriverassist.com website and click on ‘Firmware & Manuals” or search for the product model number for more information, accessories and products.
This manual is considered correct at time of printing but is subject to change. For latest manuals and updates refer to the website.
Copyright @ 2017 by TDJ Australia
All rights reserved. No part of this publication may be reproduced, distributed, or transmitted in any form or by any means, including photocopying, recording, copying or other electronic or mechanical methods, without the prior written permission of the author.
[xyz-ips snippet=”download-snippet”]