
GATOR GTKPRO2 GPS Tracking Advanced Vehicle Telematics Quick Start Guide
gatortracking.com.au ![]()
Information Guide
This quick start guidel is considered correct at the time of printing but is subject to change. The guide is under constant review and revision, as is the server software constantly being improved and updated. We recommend you download the latest version of the guide, as well as check for more information and instructional videos from our website at Gatortracking.com.au
Introduction
The GTKPRO2 vehicle tracking, telematics device is supplied with all the equipment that is necessary for basic tracking operation. The package contains:
- GTKPRO2 device
- Wiring harness
- Internal 3.7V 170 mAh rechargeable Li-ion battery. (To be connected upon installation)
- M2M SIM card (Operating exclusively on the Telstra M2M CatM1 network. (Includes 30 day operation grace period to subscribe. SIM needs to be inserted at time of installation)
IMPORTANT NOTE:
The following instructions are based upon this unit being connected to the Gator Server which requires an active paid subscription to be entered into within 30 days of activation of the SIM card in this device. If you wish to use this device on an alternate service, you will need to request that the unit be Reset in open configuration mode.
Not Included
 5 pin 30 or 40A Automotive relay required for ignition disable function and 2 additional other functions if required. Recommended part numbers:
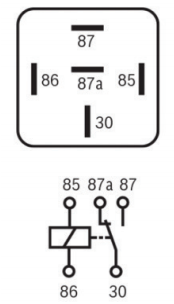 5 pin 30 or 40A Automotive relay required for ignition disable function and 2 additional other functions if required. Recommended part numbers:
Narva P/N 68028 12V 40A, Aerpro P/N RL40A 12V 40A or Bosch 0332209150.
For 24V applications a 24V relay must be used.
Recommended part numbers:
Narva 68052 or Bosch 0332209203
Also not included:
- CAN Data Interface. Gator Part number GCAN1 and GCAN2
- Bluetooth remote sensors. (Third party supplied)
Detailed Product Overview
The GTKPRO2 is a professional real-time tracking device with GNSS and LTE CAT-M1 connectivity and backup battery. This device is pre-configured to Simultaneously use the US based GPS and the Russian based GLONASS global satellite navigation systems. This device also includes a Bluetooth transceiver for remote sensors (Sensors sold separately) and a 4G network LTE CAT-M1 transceiver for data communications to the tracking server. This device is pre-configured with ignition sensing, door sensing and SOS button inputs and has 3 digital control outputs that can operate an external relay for various/ custom functions, one of which is reserved for remote ignition disable functionality. It is perfectly suitable for fleet management, car rental companies, taxi companies, public transport, logistics companies and personal vehicles.
Knowing Your Device

Setting Up Your Device
- Gently remove bottom cover using plastic pry tool from both sides. Then remove the top cover.
- Insert the supplied M2M Micro-SIM card. Make sure that Micro-SIM card cut-off corner is pointing forward to the left looking from above.NOTE: DO NOT INSERT THE INCLUDED SIM CARD IN ANY OTHER DEVICE OTHER THAN THIS TRACKER. DOING SO WILL PERMANENTLY DISABLE THE SIM)
- Connect the battery as shown to device. Position the battery in place where it does not obstruct other components. (Especially the Transceiver modules (large square metal can looking components) Do not insert a 3rd party SIM card in this device.
- Re attach the cover.Right now is a good time to take a photo of the top of your unit with your smart phone or to notate the IMEI number of your device. You will need this in order to register the device on the server.
 NOTE: DO NOT INSERT THE INCLUDED SIM CARD IN ANY OTHER DEVICE OTHER THAN THIS TRACKER. DOING SO WILL PERMANENTLY DISABLE THE SIM)
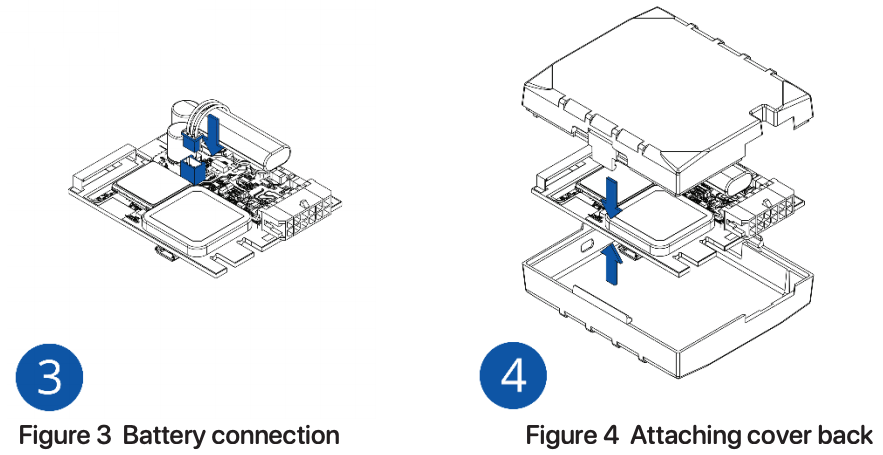 Right now is a good time to take a photo of the top of your unit with your smart phone or to notate the IMEI number of your device. You will need this in order to register the device on the server.
Wiring Diagram
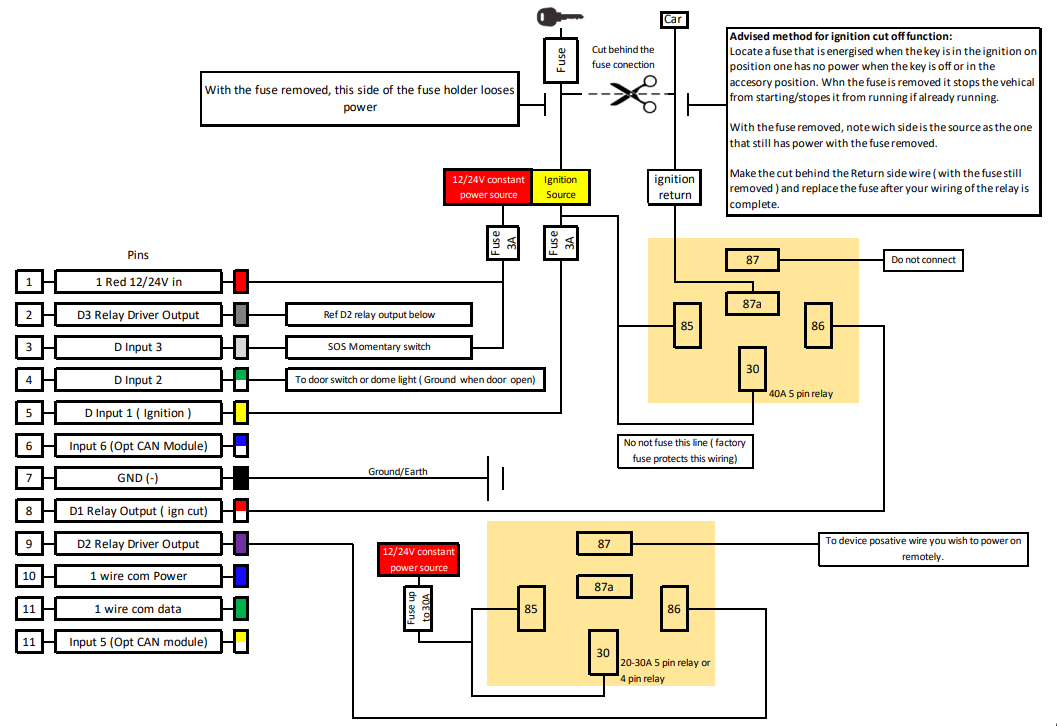
Installation
When wiring up your device, please pay careful attention to the dual colours of some wires.
Connecting power sourceBe sure to locate your constant power wire after the car computer goes to sleep mode this may happen in 5 to 30 minutes period after turning the car off and removing the key.After installation, measure the voltage at the module again to make sure it has not decreased. It is recommended to connect to the main power cable in the fuse box. A 3A, 125 V external fuse should be used (At the source).
Connecting the ignition wireBe sure to check if it is a real ignition wire ie. power does not disappear after starting the engine.Check if this is not an ACC wire (when key is in the first position, most of the vehicle electronics are available).
Connecting ground wireGround wire is connected to the vehicle frame or metal parts that are fixed to the frame. If the wire is fixed with the bolt, the loop must be connected to the end of the wire. For better contact scrub paint from the spot where loop is going to be connected.
After wiring is completeThis device comes pre-configured and does not require any post installation configuration/setup. If operating correctly the unit will make immediate contact with the cellular network, The SIM card will Authenticate that it is in the correct device and activate. The device will then make contact with the tracking server and will be ready to add to our account when you go online.
Led Indications
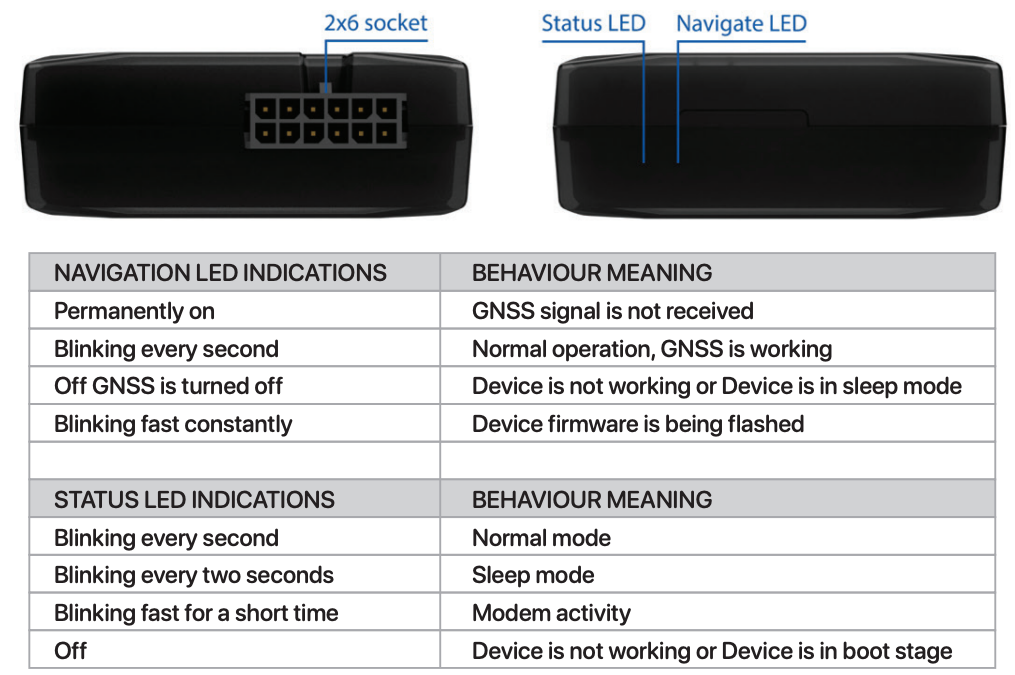
Location and Orientation Considerations
IMPORTANT NOTE:The Unit must be installed with the Writing side of the module facing up. Failure to do so will result in pure GPS positioning. (It is advised to secure the Module in place AFTER your wiring is complete and you have turned the device on to test that it’s working. To do this you need to see the indication LEDS on the device)
After wiring is complete a suitable location should be sought that has an unobstructed view of the sky from a metal perspective. ie. the unit should be placed out of sight but not behind any metal objects that could shade the GPS and cellular transceivers view of the sky above it. Large wiring looms are Metal objects so if you are securing the unit to a harness, you must secure it on top of the harness, not underneath.
A location behind the dash well out of reach as close to the side skin of the top of the dashboard is ideal.
This unit has a 3D gyroscope/accelerometer system that needs to be calibrated after installation. Whilst Because of this, the unit’s orientation does not need to be perfectly flat. However, it is good practice to try and orientate the unit in as plat a position as practical. The flatter the unit’s orientation the better it will work in the case of the unit not being calibrated straight out of the box.
Server Connection and New Account Setup
Notes about our service:The Gator Tracking server is for the exclusive use of Gator branded tracking devices.Gator customers are eligible to register an account at anytime for free. However the devices added to the account require a Subscription in order to work beyond 30 days from activation.All users of the service must agree to our terms of service at the time of registering their account. Users found breaching the terms of service may have their accounts deleted by the server administrator.When adding a device to an account, you must have a SIM card installed in your device (For reasons of easy access, do this before you have it installed) and the unit operational at the time of adding it to your account. (The easiest way to set up an account and add objects is to use a standard desk top computer)
A Video of how to register an account and add your device can be found here.https://www.youtube.com/watch?v=pPVdCOul8wA

Please note that the references to the LED behaviour on this video does not apply to this model.Please refer to this manual for such Alternatively, the following is a basic guide to how to create your account and add an object.
Go to www.gator.net.au
Login Screen

Select “create account“, enter the email address you would like to use, make sure you get this correct as a password will be sent directly to it (one-time).
Enter your details, press “Register“, then wait a second for the success notice, which will ask you to check your email for the password.
Read the help that comes with your email, and login to the server with your server assigned password, we encourage you to change this password in your account settings
Go back to the login screen, this time type in your username and the password that was sent to you via Email.
Main Screen
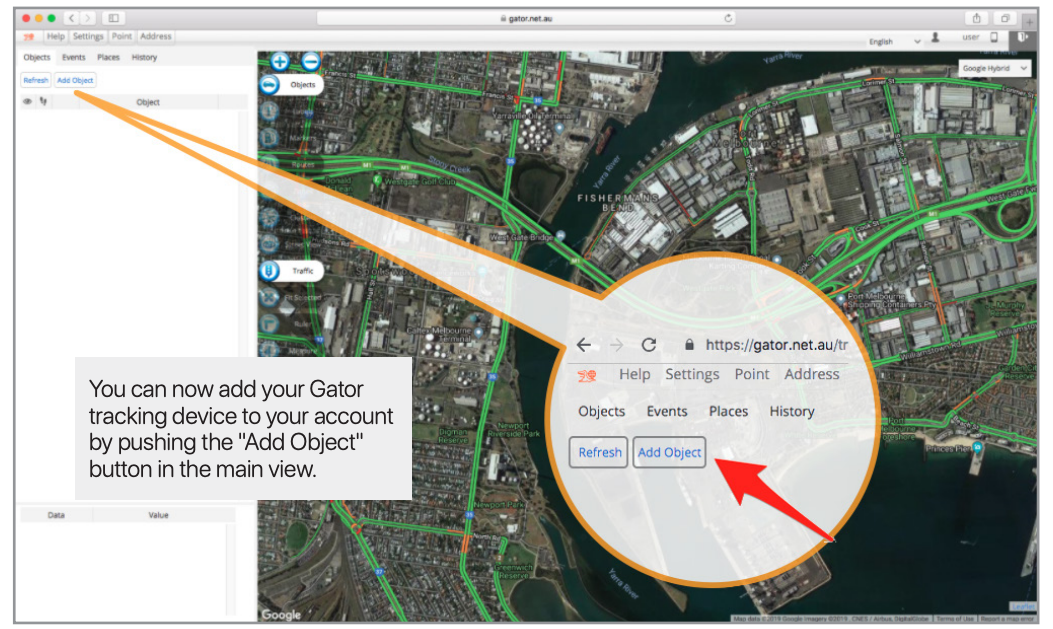
Add Object
When you select add object this will bring up a box that lets you enter details about the device, confirm that you’ve configured it, and save it. You will also have the option of adding a subscription for your tracker. You have up to 30 days to complete this task but we recommend you do it at the time of adding the device to your account. There is no financial advantage to waiting for the 30 days to expire as a credit is given on your first subscription based on the remaining grace period left on your device. The option to add up to 3 devices without subscriptions is available by pressing the link “add without subscription ” instead of “Subscribe now” in the Add Object box.

The name of the object is for you to decide, and will show up on the left hand side of the tracking interface as the objects name, (you can change this later at any time.)
The IMEI number uniquely identifies your tracker, don’t share this with anyone. Hopefully you took a photo of the top of the unit before finishing your installation. It is important to get this number right. If incorrect the add object function will be rejected.
Devices
Once added, If the device is powered on it will be attempting to log data to your account already, so in this case it should work straight away and if you click on its icon the map will zoom to its location. If there is no data received, go to the vehicle and turn on the ignition, wait for the device to power on. In its first cold start a positional fix may take a few minutes, after that the unit generally finds its location in under a minute depending on its sleep state and it will start sending data to the server under your account.
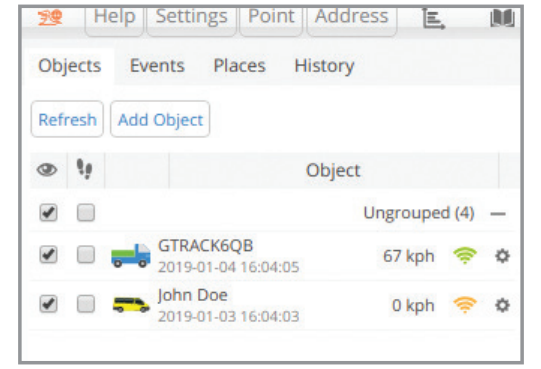
Devices appear in the left hand top section of the screen, like this:
Once you have been able to register your account and add objects you’re up and away.
Please check in on our Gator You tube channel for information about using some of the more advanced features of the server system.
https://www.youtube.com/channel/UCwSTevtQvmDIjbsDCB9bNFA or search “Gator tracking” and look for videos with this logo. ![]()
You can also visit the app store and download the Mobile app. Under “Gator Tracking”
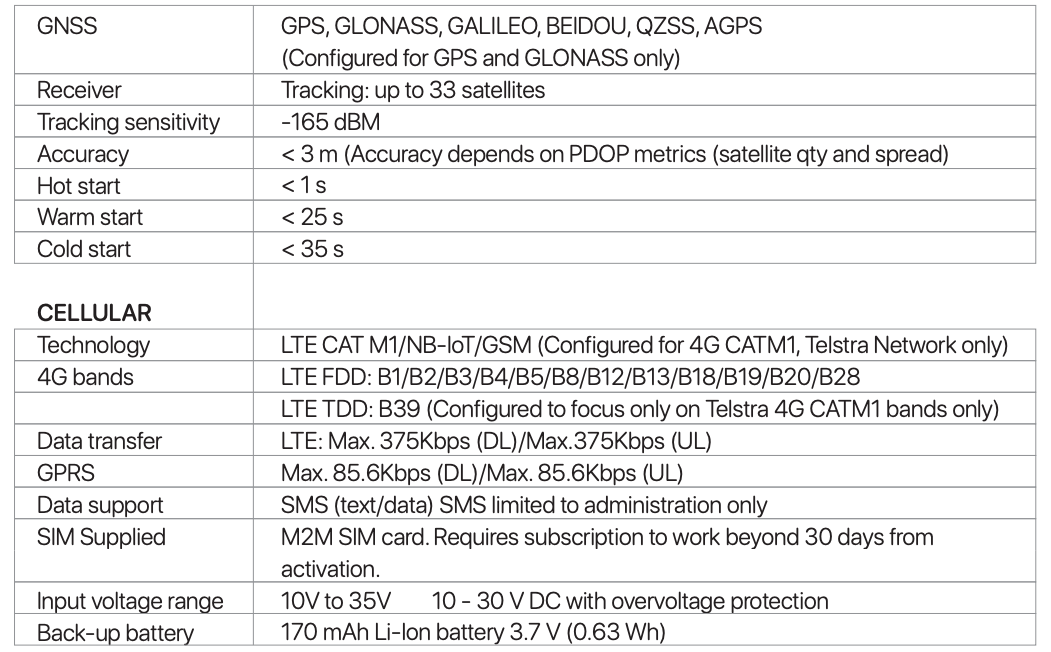
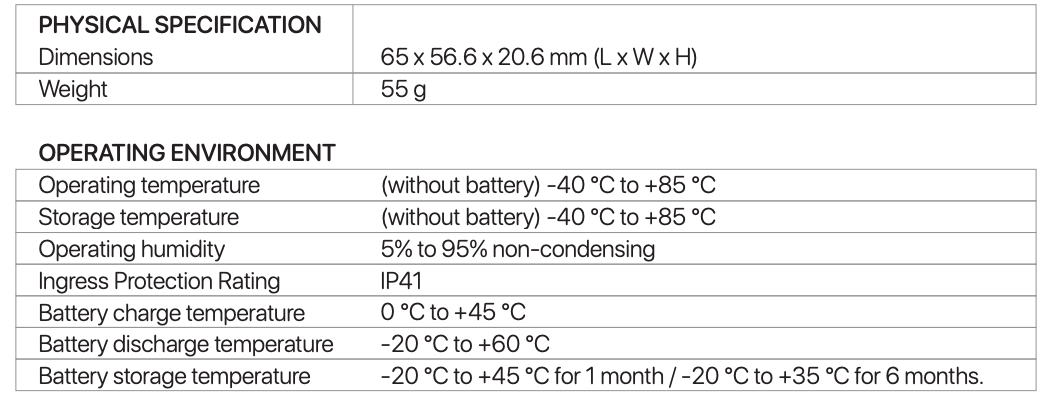
Technical Specifications

Technical Assistance
If you need assistance setting up or using your Gator product now or in the future, call Gator Support. Australia
TEL: 03 – 8587 8898FAX: 03 – 8587 8866Mon-Fri 9am – 5pm AEST
Copyright © 2017 by TDJ AustraliaAll rights reserved. No part of this publication may be reproduced, distributed, or transmitted in any form or by any means, including photocopying, recording, copying or other electronic or mechanical methods, without the prior written permission of the author.
Please retain this user guide for future reference.
References
[xyz-ips snippet=”download-snippet”]