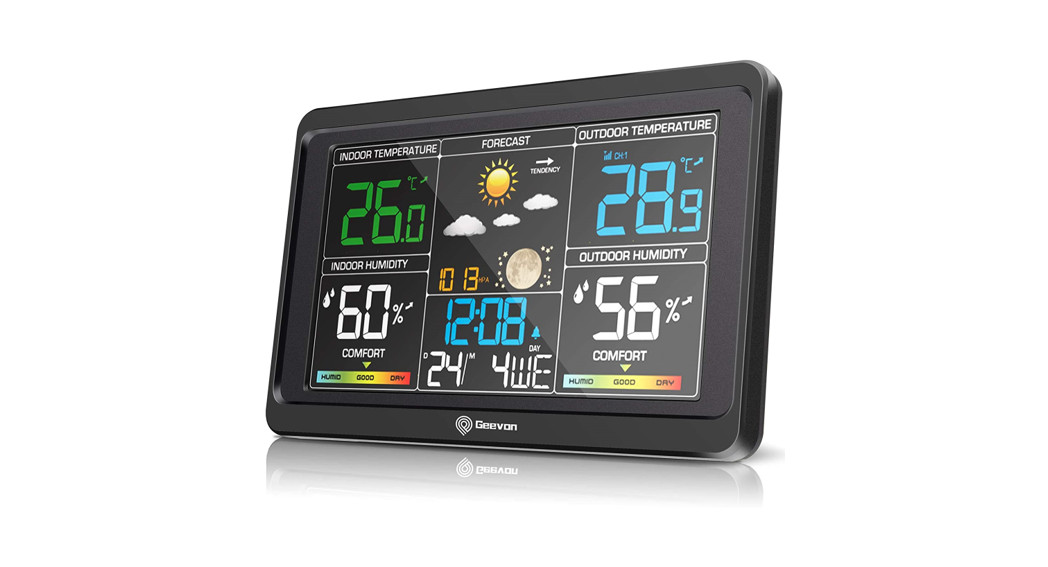
Smart Color Display Weather Station with Touch KeysUser ManualModel No:208667
 |
 |
Features & Benefits:
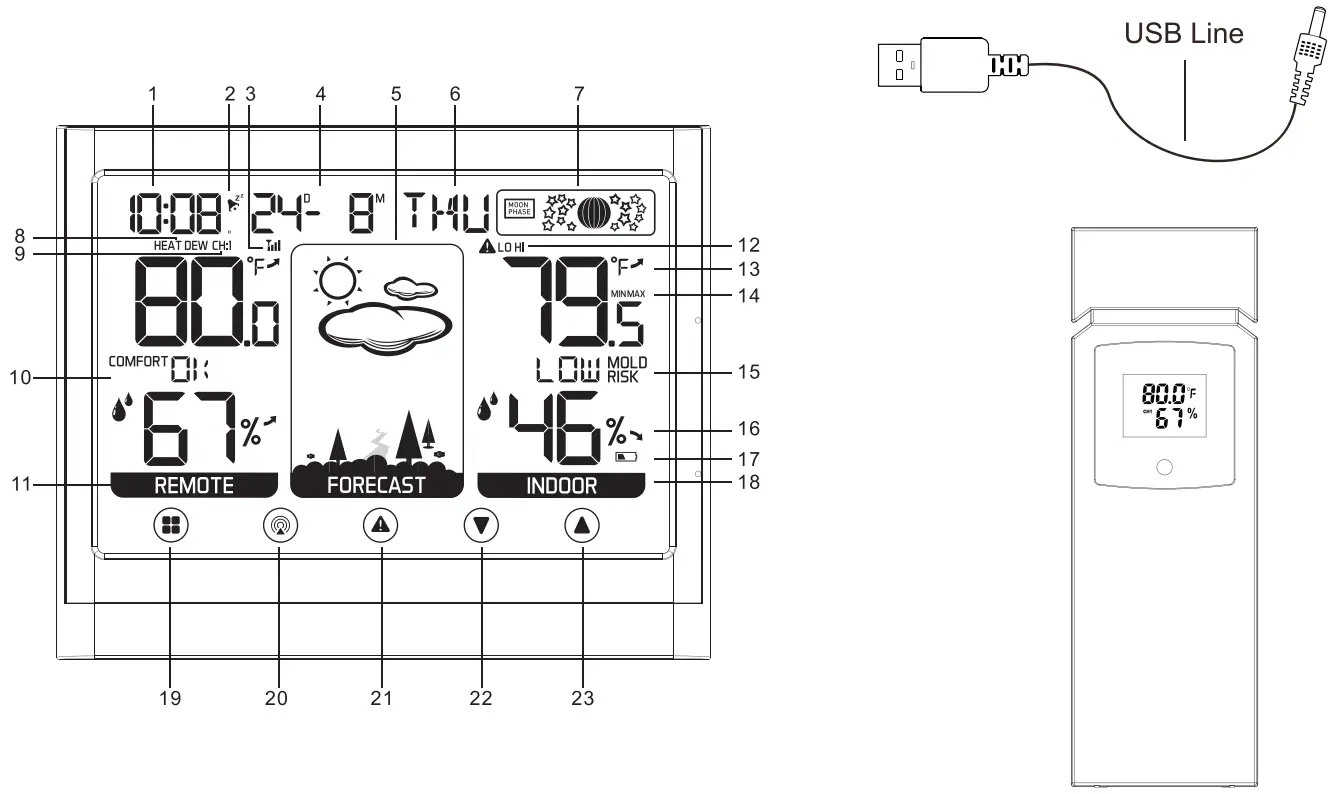
DISPLAY UNIT & OUTDOOR SENSOR
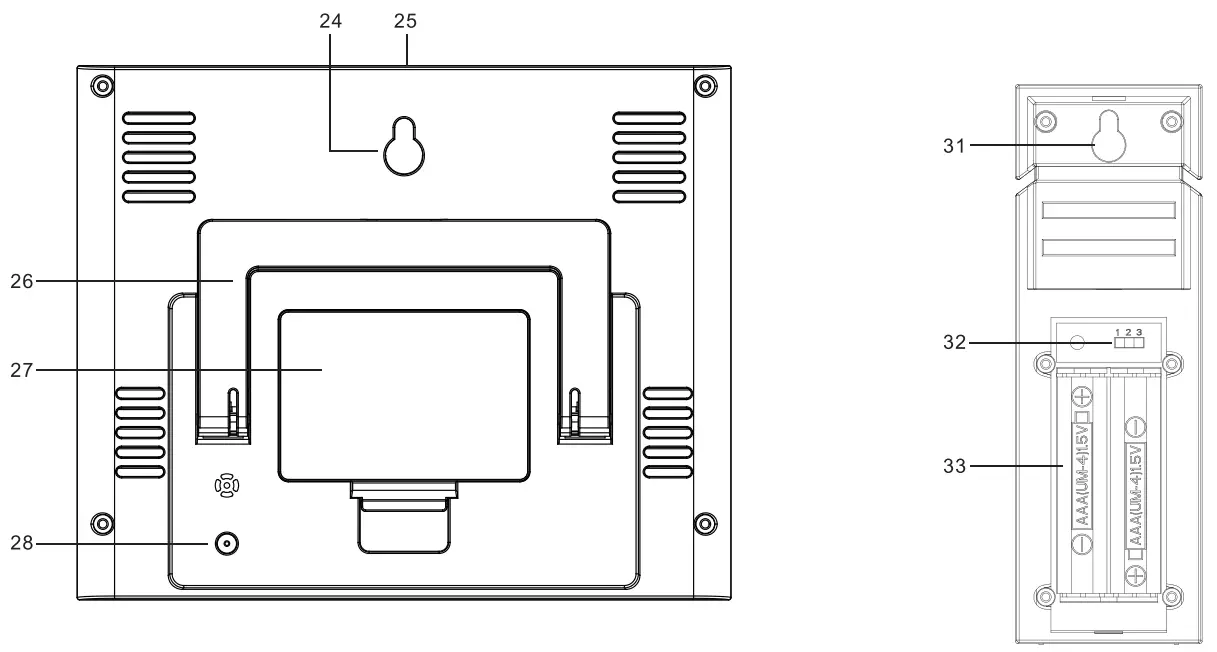
| 1. Time display2. Alarm and snooze icons3. Outdoor sensor signal strength4. Calendar5. Icons weather forecast6. Weekday7. Moon phase8. Heat index/Dew point9. Channel external sensor10. Outdoor comfortable level/moldy index11. Outdoor temperature and humidity | 12. Indoor temperature alert13. Tendency indoor temperature14. Indoor temperature max/min record15. Indoor comfortable level/moldy index16. Tendency indoor humidity17. Display low battery indicator18. Indoor temperature and humidity19. SET button20. CH button21. ALERT button22. DOWN button | 24. Wall mount hole25. SNZ/LIGHT button26. Stand bracket27.Battery Compartment 3xAAA (batteries not included)28. External power supply socket29. Outdoor sensor display30. Wireless signal indicator(Flashes when data is being sent to the display unit)31. Integrated hang hole32. TX channel selector, select external sensor channel33. Compartment 2xAAA batteries (batteries not included) |
Package Contents:
- Display Unit
- Outdoor Sensor
- USB Line
- Instructions Manual
Getting started:
- Inserting the batteries/connecting the USB line with a computer, HUB, or power bank.
- Place 3xAAA batteries into the color weather station.
- Place 2xAAA batteries into the wireless weather sensor.
- Place or hang the sensor outdoors.
Installing or Replacing Batteries:We recommend using high-quality batteries for the best product performance.Heavy duty or rechargeable batteries are not recommended. The outdoor sensor requires lithium batteries in low-temperature conditions. Cold temperatures can cause alkaline batteries to function improperly.Note: Do not mix old and new batteries. Do not mix alkaline, standard, and/or rechargeable batteries.
Default settings
- Default time: 12:00(US) 0:00(EU)
- Default date: 01/01 (Year: 2020, date form: M/D[US],date form: D/M[EU])
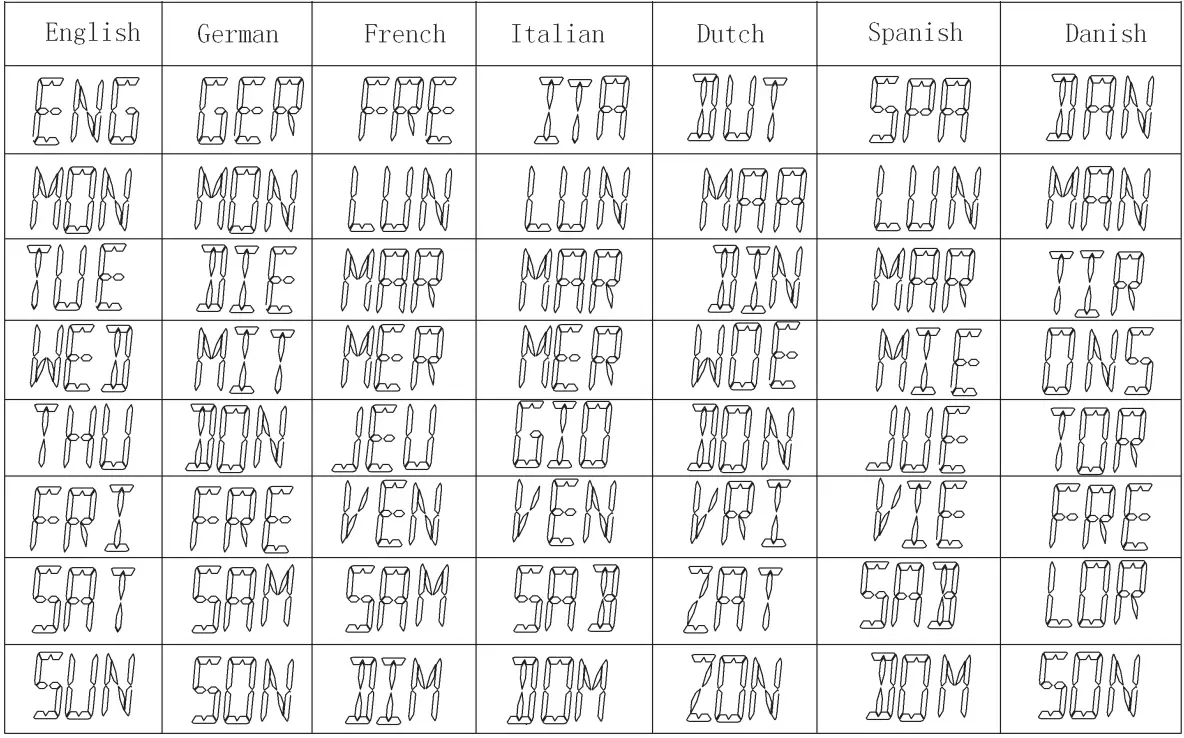
- Default week: WED(Language: ENG, 7 languages can be selected,[US])MIT (Language: GER, 7 languages can be selected,[EU])
- Weather forecast: Partly Sunny
- Default temperature: °F(US)/ °C(EU)
- Default alarm: AM 6:30, default snooze time: 5min.
The LCD display fully for 3 seconds when changing the new battery or resetting, then with a sound BI into the normal state, after testing temperature, receiving RF for 3 minutes.
Display / Keys Details:There are total 6 keys for the alarm clock, they are included: SET, CH, ALERT, DOWN, UP, SNZ/LIGHT.There are totally 6 keys for touching on this color weather station including SET, CH, ALERT, DOWN, UP, and the SNZ/LIGHT.
- SET buttons:a. Press and hold for 3 seconds during normal mode to enter setting mode.b. Press the SET button during normal mode to enter alarm mode.
- CH button:a. Press this button to select the channel.c. In normal display mode, press and hold to search RF.
- ALERT buttona. Press the ALERT button to enter alert mode, use UP or DOWN to open or close the alert.b. Press and hold the ALERT button to enter the alert setting.
- DOWN button:a. Press to decrease the setting value during setting.b. Press and hold 2 seconds button for fast adjust during the setting mode.c. In normal display mode, press this button to display max/min temperature/humidity.d. Press and hold the “DOWN” button 2 seconds to clear the record of MAX/MIN temperature and humidity when display shows MAX or MIN temperature and humidity.
- UP buttons:a. Press to increase the setting value during setting.b. Press and hold 2 seconds button for fast adjustment during the setting mode.c. In normal display mode, press this button to display heat index/dew point/moldy index/comfortable level.
- SNZ/LIGHT button:a. Press this button to open the backlight for 10 seconds (without a USB line).b. Press to activate the snooze function when alarming.c. Press this button to change the brightness of the backlight (Only with USB line).
Manually Setting the Time, Date & Units:
Press and hold down the “SET” button for 2 seconds the 12/24 hour mode starts to flash, use “UP” and “DOWN” buttons to set the correct 12/24 hour mode.Press the “SET” button to confirm your setting, the hour display starts to flash, use the “UP” or “DOWN” buttons to set the correct hour.Press the “SET” button to confirm your setting, the minute display starts to flash, use the “UP” or “DOWN” buttons to set the correct minute.Press the “SET” button to confirm your setting, the Month and Date icon display starts to flash, use “UP” or “DOWN” buttons to set the date display on Month/DatePress the “SET” button to confirm your setting, the year display starts to flash, use the “UP” or “DOWN” buttons to set the correct year.Press the “SET” button to confirm your setting, the month display starts to flash, use the “UP” or “DOWN” buttons to set the correct month.Press the “SET” button to confirm your setting, the date display starts to flash, use the “UP” or “DOWN” buttons to set the correct date.Press the “SET” button to confirm your setting, the language starts to flash, use the “UP” or “DOWN” buttons to set the correct language. The language order is:ENG, DAN, SPA,DUT, ITA, FRE,GER(US). GER, FRE, ITA, DUT, SPA, DAN, ENG (EU).Press the “SET” button to confirm your setting, the temperature units start to flash, use “UP” or “DOWN” buttons set the correct units.Press the “SET” button to confirm your setting and to end the setting procedures, enter the normal mode.NOTE: You will automatically exit settings mode if no buttons are pressed for 20 seconds. Enter settings mode again at any time by pressing and holding the SET button for 2 seconds.Under normal mode, press the SET button to enter alarm mode.
Setting the Alarm:a. Press the SET button to enter alarm mode Under the normal mode, press the SET button to enter the alarm mode. Press and hold the SET button for about 2 seconds to set the alarm time. The alarm hour will begin blinking on the display where the clock time is usually shown.b. To adjust the alarm hour, press the “UP” or “DOWN” buttons (press and hold to fast adjust). When alarm hour is set to your satisfaction, press the SET button to proceed to the alarm minute preference. Press the “UP” or “DOWN” buttons (press and hold to fast adjust), press the SET button again to exit alarm settings. When you setting the alarm, the alarm is default turn on.c. To turn the alarm ON or OFF, press the SET button to enter alarm mode, press the UP or DOWN button to ON or OFF the alarm. The “ ![]() ” symbol should show next to the clock display when the alarm is set to ON. Press the UP or DOWN button again to turn off the alarm, when the alarm is set to OFF, the “
” symbol should show next to the clock display when the alarm is set to ON. Press the UP or DOWN button again to turn off the alarm, when the alarm is set to OFF, the “ ![]()
![]()
![]()
Indoor/outdoor temperature and humidity:
- Indoor temperature 13.9°F ~ 122°F (-9.9°C ~ 50°C), display LL.L when below 13.9°F (-9.9°C )and display HH.H when higher than 122°F(50°C).
- Outdoor temperature -40°F ~ 155°F (-40°C ~ 70°C), display LL.L when below -40°F (-40°C) and display HH.H when higher than 155°F(70°C).
- Temperature resolution: 0.1°F(US)/°C(EU)
- Indoor and outdoor humidity range: 20%-95%, display 20% when below 20%, and display 95% when higher than 95%.
- Humidity resolution: 1 %RH
- When the alarm ringing, the temperature, and humidity test will be stopped.
Accuracy Temperature Accuracy Range:
- Temperature accuracy:(-40°C ~ -20°C) :±4°C(-20°C~0°C):±2°C(0°C~50°C):±1°C
Note: when the temperature in 122°F ~ 155°F(50°C~70°C) range, the temperature is only for reference.Humidity Accuracy Range:+/- 5 % RH (@77°F(25°C) , 30%RH to 50%RH);+/- 10 % RH (@77°F(25°C) , 20%RH to 29%RH, 51%RH to 95%RH)
Temperature Alert Set:
- In standard mode, press “ALERT” to enter alert mode, press and hold “ALERT” to set temperature alert function, use “UP” or “DOWN” to open or close temperature alert function.
- In standard mode, press and hold “ALERT” to set the temperature alert function.
- Press “ALERT” to set an order is outdoor temperature upper limit →outdoor temperature lower limit → outdoor humidity upper limit → outdoor humidity lower limit → indoor temperature upper limit → indoor temperature lower limit → indoor humidity upper limit → indoor humidity lower limit → exit.
- Inset, press “UP” to go ahead by once. Hold “UP” to go ahead at 8 steps per second.
- Inset, press “DOWN” to back by once. Hold “DOWN” to go back at 8 steps per second.
- Press or no handling in 10s will exit.
Temperature Alert
- Temperature and the alert icons will flash when alert.
- In temperature alert status, alert temperature icon will twinkle andthe temperature will always display.
- Temperature alarm sound:a. Two BIs /secondb. Alarm 5s for every minutec. Not stop alarm until meet stop conditions.
- Alarm stop conditions :a. Press any button to stop the alarm but the temperature and the alert icon will continuously flash.b. When temperature goes back into alert range.c. Press “ALERT” to enter alert mode, use “UP” or “DOWN” to turn off the temperature alert function.
Indoor and Outdoor Comfort Display:
| Too dry | 1%’25% |
| Dry | 26%-39% |
| Comfort OK | 40%-75% |
| Wet | 76%-83% |
| Too wet | 84%-99% |
Indoor and Outdoor Moldy Display:
|
Temp. Range |
Humidity Range |
Mold Risk |
| T<9.4°C (T< 49°F) | H<=48% | 0 |
| 49%< =H < =78% | 0 | |
| 79%< =H < =87% | 0 | |
| H>=88% | 0 | |
| 9.4°C <=T<=26.6°C (49°F <=T<=79.9°F) | H<=48% | 0 |
| 49%<=H<=78% | LOW | |
| 79%< =H < =87% | MED | |
| H>=88% | MED | |
| 26.7°C<=T<=30.5°C) (80°F <=T<=86.9°F) | H < =48% | LOW |
| 49%< =H < =78% | LOW | |
| 79%< =H < =87% | MED | |
| H>=88% | HI | |
| 26.7°C< =T< =30.5°C) (80°F <=T<=86.9°F) | H<=48% | LOW |
| 49%< =H < = 78% | MED | |
| 79%< =H < =87% | MED | |
| H> =88% | HI | |
| 30.6°C <=T<=40°C (87°F <=T<=104°F) | H < =48% | 0 |
Setting the Temperature Units:
a. The default temperature unit is Fahrenheit or Celsius degrees (°F(US)/°C (EU))b. To switch the temperature unit, press and hold the SET button. You will see 12/24 hour mode flashing.c. Press the SET button 8 more times to scroll through the other settings. You will see °F/°C flashing.d. Press UP or DOWN to switch from Celsius or Fahrenheit.e. Press SET to confirm your selection and exit.Checking the MAX/MIN temperature and humiditya. Press the “DOWN” button to check MAX/MIN temperature and humidity.b. Press and hold the “DOWN” button to clear the record of MAX/MIN temperature and humidity when the display shows MAX or MIN temperature and humidity.Setting the Channel:Setting the channel connection between the display unit and outdoor sensor:a. To change the channel on the display unit between 1, 2, 3 &1-3 sequential display, press the “CH” button. The channel setting will display on above the outdoor temperature.b. To change the channel option on the outdoor sensor open the battery compartment cover, on the upper left side is a button.c. ALWAYS MAKE SURE THE CHANNEL CHOSEN ON THE DISPLAY UNIT MATCHES THE CHANNEL OPTION CHOSEN ON THE OUTDOOR SENSOR.Back Light:When the display unit is powered by a battery only the backlight will be off to preserve the battery. Press the SNZ/LIGHT button to turn the backlight on for 10 seconds.When the display unit is powered by the USB line the backlight will always remain on. Press the SNZ/LIGHT button to adjust the brightness of the back light between HIGH /LOW/ OFF.Low Battery Indicator:If the low battery indicator is displayed on the LCD for either the outdoor sensor or the display unit, immediately change the batteries to prevent disruptions in communications of the devices.Weather Forecast:The unit predicts weather conditions of the next 12-24 hours based on the change of temperature and humidity.Weather change parameters: the weather forecast is based on the change of the outdoor temperature and humidity (channel 1), if the monitor fails to receive the signal, the weather forecast will be based on the indoor temperature and humidity.The following icons will show:

NOTE:a. The weather forecast is based on the outdoor temperature and humidity change and is about 40-45% correct.b. The weather forecast can be more accurate only under the condition of natural ventilation, in indoor conditions, especially in air-conditioned rooms, there will be not accurate.Moon Phase

Important Placement Guidelines:
a. To ensure accurate temperature measurement, place units out of direct sunlight and away from any heat sources or vents.b. Display unit and outdoor sensor must be within 200ft (60m) of each other.c. To maximize wireless range, place units away from large metallic items, thick walls, metal surfaces, or other objects that may limit wireless communication.d. To prevent wireless interference, place both units at least 3ft (1 m) away from electronic devices (TV, computer, microwave, radio, etc.e. Place the display unit in a dry area free of dirt and dust. The display unit stands up right for tabletop/countertop use.


Outdoor Sensor Placement:The sensor must be placed outside to observe outdoor conditions. It is water-resistant (IP23) and designed for general outdoor use, however, to prevent damage place the sensor in an area that is protected from the direct weather elements and direct sunshine. The best location is 4 to 8 feet above the ground with permanent shade and plenty of fresh air to circulate around the sensor.Outdoor Sensor Function:a. Once the display unit has been set up and the channel synchronized with the outdoor sensor, the display unit will begin the registration process. It can take up to 3 minutes to complete the registration, where the display unit will search for an RF (Radio Frequency) signal from the outdoor sensor. The outdoor sensor signal strength will show the connection strength to the outdoor sensor. If there are no bars or if bars are not showing at their maximum strength (4 bars) (3) try placing the outdoor sensor or display unit elsewhere for better connection.b. If the RF Signal was lost and not reconnected, the outdoor temperature and the humidity level will begin to flash after 1 hour of lost connection. If no connection was found after 2 hours only a dotted line ‘ – – – ’ will be displayed in place of the temperature and humidity level.c. To manually restart the RF registration, press and hold the “ ” button for 3 seconds. The display unit will now search for the RF signal for the next 3 minutes.
Trouble Shooting:
|
Problem |
Possible Solution |
| Outdoor reading is flashing or showing dashes |
Flashing of the outdoor reading is generally an indication of wireless interference. This thermometer is arranged to communicate with three external sensors. One of these comes with the unit, the remaining two are optional.1. Bring both of the sensors and display indoors, side by side, and remove batteries from each. Power the thermometer as described in Getting started.2. Set the selector in the outdoor sensor to the desired transmission channel (1, 2, or 3). Automatic data will be transmitted.3. Press the CH button more times to select the channel set on the external sensor. Sequentially selects channel 1, channel 2, channel 3, and sequentially displays for 3 channels. |
| No outdoor sensor reception |
1. Reload the batteries of both the outdoor sensor and main unit.Please refer to the SENSOR SETUP section.2. Press and hold the CH button to receive the RF signal.3. Always make sure the channel chosen on the display unit matches the channel option chosen on the outdoor sensor.4. Relocate the main unit and/or the outdoor sensor. The units must be within 200ft (60m) of each other.5. Make sure both units are placed at least 3 ft (1m) away from electronics that may interfere with the wireless communication (such as TV, microwave, computer, radio, etc).6. Do not use heavy-duty or rechargeable batteries. The outdoor sensor requires lithium batteries in low-temperature conditions. Cold temperatures would cause alkaline batteries to work improperly.7. Do not mix old and new batteries. |
| Inaccurate temperature | 1. Make sure both the main unit and sensor are placed out of direct sunlight and away from any heat sources or vents.2. Do not tamper with the internal components.3. Temperature accuracy:(-40°C — -20°C): ±4°C(_200c,,00c): ±2°C (00c,„500c):±1oc |
| “HH/LL” display in indoor and/or outdoor temperature | If the temperature is higher than the detection range, HH will display on screen for indication; if lower than the detection range, LL will display on screen for indication. |
| If your Geevon product does not operate properly after trying the troubleshooting steps, contact the seller on your order page or shoot an email to : [email protected]. |
Week Display:

![]()
![]()
[xyz-ips snippet=”download-snippet”]


