
Gekkoscience Terminus R606 Pod Miner User GuideTerminus R606 Pod Miner
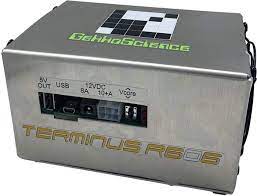
- The First GlanceThe R606 is fully-enclosed in an aluminum shell with integrated heat sink and daul 80mm fans for better cooling. The miner features 12 of Bitmain’s BM1387 ASICs (as found in the Antminer S9), with adjustable core voltage function (from 390mV to 460mV) using a simple push-button interface to step up or down in 10mV increments, (no internal calibration required).
- Features
- Enclosed aluminum shell with integrated 80mm fan and heat sink makes sure the miner runs cool
- 12 x BM1387 ASIC chips give a stock hash speed of 700GH and can be overclocked to 1TH+
- Mines SHA256 algorithm using cgminer software
- Compatible with Windows, Mac OS, Linux and Raspberry Pi
- Easy to adjust core voltage using up/down buttons and LED display
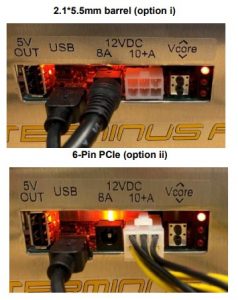
- Requires 12V 8-10 Amps power supply which can be connected using 2.1*5.5mm barrel jack or 6-Pin PCIe connection
- Accessories & ConnectionAccessories:You will need a mini USB cable, a controller (computer or raspberry pi) and a power supply that is capable of supplying at least 12V 8 amps. The power supply must have either 2.1*5.5mm barrel jack or 6-Pin PCIe plug.Connectiona) Connect your power supply to the miner usingi) 2.1*5.5mm barrel jackii) 6-Pin PCIe plug. Turn on the power supply. The miner will power on and fans start to move, red LED light will turn on under Vcore display.b) Connect your mico USB cable into the mico USB plug on the R606. Plug the other end into your controller USB port (host computer or raspberry pi). 2.1*5.5mm barrel (option i)

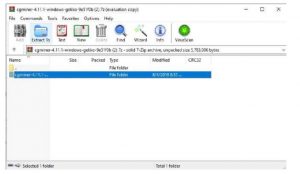
- Setup (Windows)a) Download cgminer to your computer.VH Modified cgminer from here: http://23.108.83.14/images/cgminer-4.11.1-windows-gekko-9e51f0b.7zb) Open the zip file using winzip or winrar
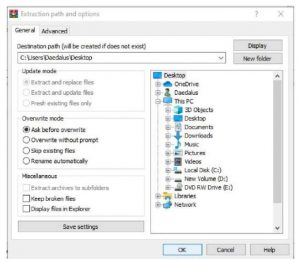
- c) Click the “Extract To” button and then select the directory to extract the cgminer folder, for example to desktop and finally click “OK”
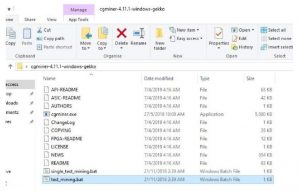
- d) Go to the directory you extracted cgminer to and open the cgminer folder.
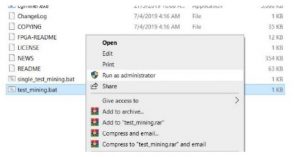
- e) Locate the “test_mining.bat” file and right click then select “edit”This will open the test_mining.bat file in notepad so you can edit the mining information and point it towards your own mining address or pool.
- f) Now edit the mining pool (-o), worker (-u) and password (-p) parts with your own mining pool settings; these are provided by your mining pool (login to your mining pool to retrieve them). Do not change anything else.
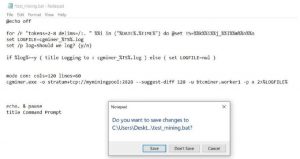
- g) Then close notepad and make sure to save the changes you made.
- h) Now you are ready to run cgminer and start mining. So right-click your newly modified bat file and click run as administrator.
- i) Cgminer will open a black cmd window that will ask you if you want to make a log, press Y (for yes) or N (for no) keys as you wish. Wait a few seconds and the miner will start to run.
- j) Now if you are successful cgminer should look like this with lots of accepted share messages.5. Setup (Linux)Follow these Linux cgminer build stepsUbuntu 18.04.1 LTS new install.Default Install (+OpenSSH server) sudo apt-get update sudo apt-get upgrade -ysudo apt-get install -y build-essential git autoconf automake libtool pkg-config zlib1g-dev libcurl4-openssl-dev libncurses5-dev libusb-1.0-0-dev libudev-devmkdir -p git/vthoang; cd git/vthoang git clone -b r606 https://github.com/vthoang/cgminer.git cd cgminer CFLAGS=”-O2 -march=native” ./autogen.sh –enable-gekko make -j 26. Setup (Debian)Follow these steps for Debian or Raspberry Pi setup:Default Install (No desktop environment, + SSH Server) (*do not specify root password to enable sudo)sudo apt-get update sudo apt-get upgrade -ysudo apt-get install -y build-essential git libusb-1.0-0-dev libusb-1.0-0 libcurl4-openssl-dev libncurses5-dev libudev-dev screen libtool automake pkg-config libjansson-dev mkdir -p git/vthoang; cd git/vthoang git clone -b r606 https://github.com/vthoang/cgminer.git cd cgminer CFLAGS=”-O2″ ./autogen.sh –enable-gekko make -j 27. Controlling Hash SpeedUse the following command to control the speed of your miner:–gekko-r606-freq 600Add this extra line to your bat file for easy convenience.Where 600 is the frequency that dictates speed. The higher frequency the faster your miner will go. Make sure to adjust the v.core voltage as well. Acceptable frequency values: 200-10008. Adjusting Core VoltageCore voltage of the miner can easily be adjusted up or down by pushing the black buttons under <Vcore>, the adjustable range is 390mV to 460mV The push-button interface will step core voltage up or down in 10mV increments. At the same time the 3 LED lights display the current core voltage of your device, as shown in this table below:9. Reinstalling Windows DriverThe miner comes with preinstalled Zadig WinUSB driver so it is plug and play. If your miner is not detected or you need to reinstall then follow these steps:Download Zadig WinUSB Driver: http://zadig.akeo.ie/
- Connect your miner to the controller (computer or raspbery pi) via the micro usb cable and make sure it is powered on. 2>
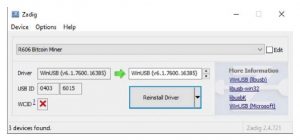
- Open Zadig and click “Options -> List All Devices”
- Select “R606 Bitcoin Miner”, and then click “Replace Driver”
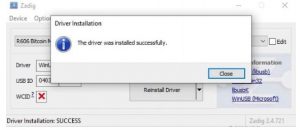
- If it is successful you will see the following message:
 This will open the test_mining.bat file in notepad so you can edit the mining information and point it towards your own mining address or pool.
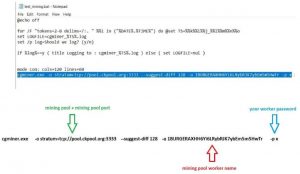


 5. Setup (Linux)Follow these Linux cgminer build stepsUbuntu 18.04.1 LTS new install.Default Install (+OpenSSH server) sudo apt-get update sudo apt-get upgrade -ysudo apt-get install -y build-essential git autoconf automake libtool pkg-config zlib1g-dev libcurl4-openssl-dev libncurses5-dev libusb-1.0-0-dev libudev-devmkdir -p git/vthoang; cd git/vthoang git clone -b r606 https://github.com/vthoang/cgminer.git cd cgminer CFLAGS=”-O2 -march=native” ./autogen.sh –enable-gekko make -j 26. Setup (Debian)Follow these steps for Debian or Raspberry Pi setup:Default Install (No desktop environment, + SSH Server) (*do not specify root password to enable sudo)sudo apt-get update sudo apt-get upgrade -ysudo apt-get install -y build-essential git libusb-1.0-0-dev libusb-1.0-0 libcurl4-openssl-dev libncurses5-dev libudev-dev screen libtool automake pkg-config libjansson-dev mkdir -p git/vthoang; cd git/vthoang git clone -b r606 https://github.com/vthoang/cgminer.git cd cgminer CFLAGS=”-O2″ ./autogen.sh –enable-gekko make -j 27. Controlling Hash SpeedUse the following command to control the speed of your miner:–gekko-r606-freq 600Add this extra line to your bat file for easy convenience.
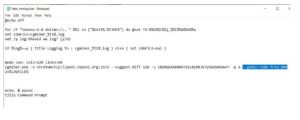 Where 600 is the frequency that dictates speed. The higher frequency the faster your miner will go. Make sure to adjust the v.core voltage as well. Acceptable frequency values: 200-10008. Adjusting Core VoltageCore voltage of the miner can easily be adjusted up or down by pushing the black buttons under <Vcore>, the adjustable range is 390mV to 460mV The push-button interface will step core voltage up or down in 10mV increments. At the same time the 3 LED lights display the current core voltage of your device, as shown in this table below:
 9. Reinstalling Windows DriverThe miner comes with preinstalled Zadig WinUSB driver so it is plug and play. If your miner is not detected or you need to reinstall then follow these steps:Download Zadig WinUSB Driver:

10. Acknowledgements This setup guide could not have been put together without the help and contribution of many people.Big thanks to the following people on bitcointalk.org forum:
References
[xyz-ips snippet=”download-snippet”]