FREE FORM 3D PRINTING PEN FOR ABS/PLA FILAMENT, OLED DISPLAYUSER MANUAL3DP-PEND-01
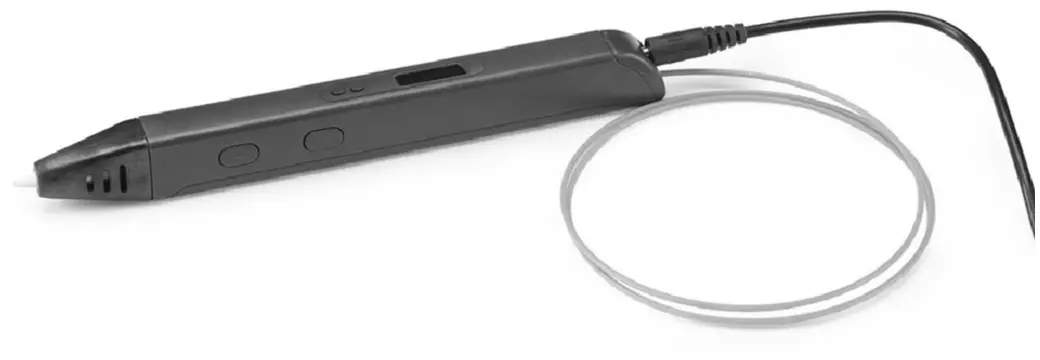
Features
- Free form 3D printing pen
- OLED display: shows temperature and filament type indication
- Suitable for use with ABS and PLA filament of 1.75 mm diameter
Specifications
- Case material: plastic, purple
- Model build size: free form
- Filament: ABS, PLA, 1.75mm
- Nozzle diameter: 0.60 mm
- Extruder temperature: 130 – 230 C
- Power consumption: 5 VDC up to 2A
- Net weight: 40 g
- Dimensions: 175 x 17 x 20 mm

Thank you for using this product, in order to operate the equipment better, please read this manual carefully!
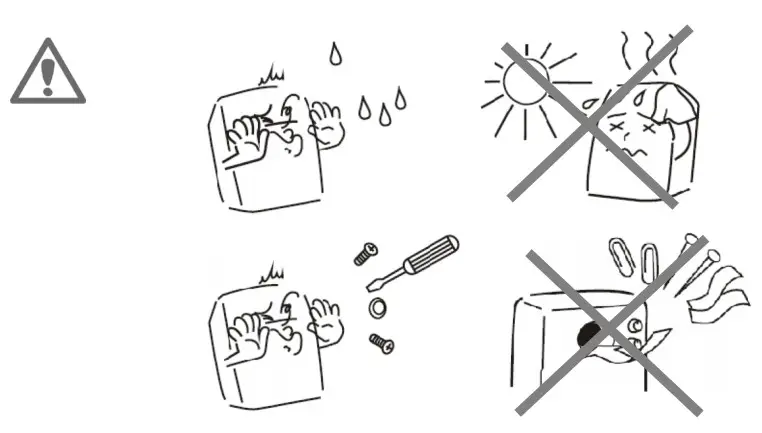
WARNING!
- This equipment is suitable for children over 8 years old and adults.Children are only allowed to use under adult guardianship.
- The nozzle is at a high temperature, do not touch it by hand.
- It is strictly prohibited to input any other material into the filament loading hole.
- Prohibited to use the power adapter provided by other companies.
- Prohibited to use the filament provided by other company, cause different parameter of filament.
- Keep the pen away from water.
- Keep the pen in a safe place, where the children can not reach it.
PRODUCT OVERVIEW AND OPERATION
- Connect AC/DC adapter to AC power socket and 3D pen DC power socket (or use the USB cable to connect with the power bank which output is more than 2A ), when the OLED screen is on – it means power connected.
- Press the filament loading button, it starts to heat, and the screen will display the temperature. When it reaches the target, it means it is ready for loading filament.
- Insert the 1.75mm filament into the “filament loading hole”. Keep pressing the “filament loading button”, the material will be loaded. Hold the loading button till plastic material comes out from the nozzle, it means the filament is ready.(Double press the button can load the filament automatically, press the button again to exit automatic mode ).
- Temperature adjustment: press the temperature “+” or “-“ button to adjust the temperature, the temperature range is 130°C-240°C, each step is 15°C
- Speed adjustment: slip the speed controller to adjust the speed.
- Unload filament: to do so – press unloads filament button, the filament will move out automatically. (Double press the button can unload the filament automatically, press the button again to exit automatic mode).
- Press the increase temperature button “+” and unload the filament button at the same time to switch ABS/PLA mode.
- Replace nozzle set: open the back cover with the plastic screwdriver, and remove the screw, then plug off the nozzle set.
- The pen will enter standby mode after 2 minutes of no operation, press the loading filament button to wake it up.
- Do not touch the nozzle during working.
NOTE
- Heating time may be affected by environmental temperature
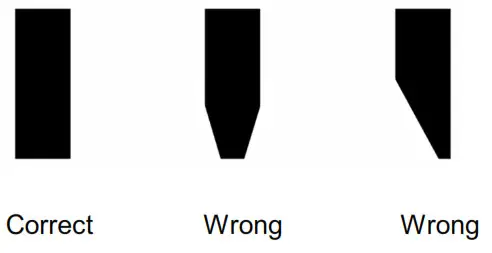
- The filament end should be cut correctly before loading
- Suggest unloading the filament after finishing drawing
TROUBLESHOOTING
Please follow the below instruction in case of any defect
| Problem | Reason | Solution |
| The screen can not be | The power adapter or plug line defective | Repair or replace the poweradapter |
| powered on | Motherboard defective | Repair or replace the motherboard sold the socket |
| Socket leadoff | ||
| No filament comes out from the nozzle | Nozzle blocked | Replace the nozzle set |
| Temperature is not high enough | Replace the nozzle set or adjust the temperature | |
| Not warming up | Replace the nozzle set or check the motherboard | |
| Gear slips | Back wire, cleaning gear, cut off the damaged supplies after the reloading | |
| Fail to load filament | Unload filament and cut the end of filament well | |
| Motherboard defective | Repair or replace the motherboard | |
| Not heated | Heating part defective | Replace the nozzle set |
FILAMENT CUT
Please make sure that you have correctly cut the filament end before using it!
Declaration of conformityThis product is tested and complies with the essential requirements of the laws of member states concerning LVD (2014/35/EU ), EMC (2014/30/EU ), RoHS (2011/65/EU ). The CE declaration can be found under www.gembird.eu
Declaration of conformityThis product is tested and complies with the essential requirements of the laws of member states concerning RED (2014/53/EU ), RoHS (2011/65/EU ). The CE declaration can be found under www.gembird.eu
Waste disposal:Do not deposit this equipment with the household waste. Improper disposal can harm both the environment and human health. For Information about waste collection facilities for used electrical and electronic devices, please contact your city council or an authorized company for the disposal of electrical and electronic equipment.
WARRANTY CONDITIONS
The receipt must clearly list the date of purchase and the part number, in addition it should be printed. Keep the receipt for the entire warranty period since it is required for all warranty claims. During the warranty period, the defective items will be credited, repaired, or replaced at the manufacturer’s expense. Work carried out under the warranty neither extends the warranty period nor tarts a new warranty period. The manufacturer reserves the right to void any warranty claim for damages or defects due to misuse, abuse, or external impact dust, contamination, or break (falling down, impact, ingress of water, ). Wearing parts (e.g. rechargeable batteries ) are excluded from the warranty. Upon receipt of the RMA goods, Gembird Europe B.V. reserves the right to choose between replacement of defective goods or issuing a credit note. The credit note amount will always be calculated on the basis of the current market value of the defective products. Gembird Europe B.V. Wittevrouwen 56, 1358CD Almere, The Netherlands www.gembird.nl/service [email protected]
GEMBIRD EUROPE B.V. http://www.gembird.euAll brands and logos are registered trademarks of their respective owners
[xyz-ips snippet=”download-snippet”]