
User Manual
![]()

GEMBIRD WNP-RP300-01
ONLINE MANUALS
Detailed step-by-step installation guides available in several languages on www.gembird.nl
Features
Compact 300 Mbps WiFi repeater with integrated antennas Supports all IEEE 802.11b/g/n WiFi standards (2.4GHz networks) Up to 300 Mbps data transfer rate via the wireless 802.11n protocol Maximum WLAN security with WPA2, WPA and WEP(128/64) Quick setup via easy to use web-interface or WPS function Can be setup as wireless repeater or as access point Practical LAN port and LED status indication
Specifications
- Supported standards: IEEE 802.3, 802.3u, 802.11b/g/n
- Wireless transmission rate: max. 300 Mbps
- Security : 64/128-bit WEP, WPA-PSK, WPA2-PSK,WPA-MIXED-PSK
- Supported modes: repeater mode, AP mode
- Ports: 1 x 10/100M RJ45
- Chipset: MTK 7628KN
- Frequency band: 2.4-2.4835 GHz
- Channels: 1-13 (Europe)
- Power class: RF power 14 dBm (max. EIRP)
- Internal antenna gain (typical): 2x 3 dBi 1 dBi
- Power consumption: up to 3 W
- Operating temperature: 0 ~ 40°C
- Storage temperature: -40 ~ 70 °C
- Operating humidity: 10~90% non-condensing
- Storage humidity: 5 ~ 95% non-condensing
- Dimensions: 41 x 41 x 67 mm (W x D x H)
- Net weight: 45 g

Product Overview
- Setting up repeater
This manual will help you with setting up the repeater for use in your own home or office network. Before you can use the repeater, you have to connect it to you home router.
There are two ways to connect the repeater to your router:
- Automatically, with WPS (wifi protected setup)
- Manually
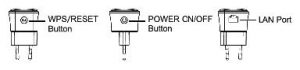
A: Connecting the repeater via WPS
- Press the WPS button on your router (Most routers have this feature, check your router manual for more information). On most routers a WPS indicator light will blink when WPS is activated.
- Now also press the WPS button on your repeater within one minute.
- Your repeater will now automatically connect to your router. During this process the indicator light on the repeater will blink slowly.
- When the setup is complete and your repeater is ready for use, it will the following network name (SSID): yourroutername. Ext. The indicator light has stopped blinking and will be burning continuously.
- The password for this wireless network will be identical to the password of your router.
B: Manual setup of the repeater
1.Plug the repeater into a power socket and wait 1 minute until it is ready. The LED indicator will flash rapidly.

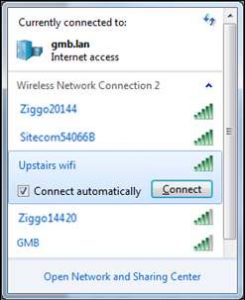
2. Open the wifi settings of your PC, Mac, Tablet and connect it to the wifi network of the repeater. This network is called: Gembird wifi repeater. The default password is 12348765.

3. Your PC/Mac/tablet is now connected to the “Gembird wifi repeater network”. Your PC/Mac/Tablet might warn you that there is no internet connection. This is normal and is no problem, just continue with the next installation steps below.
4. Open your internet browser (IE, Chrome, Firefox, Safari, Edge) and type “192.168.10.1” in the address field. (Do not use the Google search field, this will not work)

5. A window will now appear where you are prompted to enter a login and password. Standard login is “admin” and the password is also “admin” by default.

6. You are now in the main menu of the Gembird wifi repeater. Here you can setup the repeater for use in your home or office network. If you want to connect the repeater to your home router by wifi, select the “Repeater Wizard”, if you want to connect the repeater to your router with a network cable, please select the “AP Wizard”.
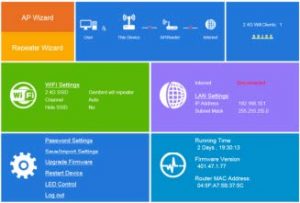
7. Most typical installation will be to connect the repeater to your home network via wifi. Press the “Repeater Wizard” in the upper left corner of the screen. The repeater will now search for all available wifi networks and show these in a list.
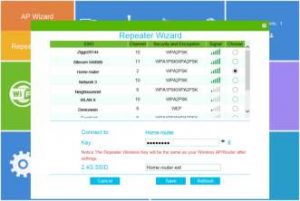
8. Select your home wifi network from the list. Your home network will be shown below the list. Enter the password to your home wifi network into the ‘Key’ text field.
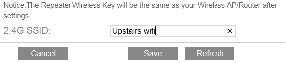
9. Now you only have to decide which name to give to the wife network of the repeater. By default, the repeater adds a – ext suffix behind your router SSID. But you can type any name you like in this field, e.g. “Upstairs wifi”
10. When all done, click the “Save’ button. The repeater will now reboot itself to save your settings. Wait for about 40 seconds until its ready.

11. Your repeater is now ready for use. If the connection to your router was successful, the LED status light will have stopped flashing and will burn continuously. If you now open the wifi settings on your PC/Mac/tablet, you will be able to find and connect to your new repeater wifi network. The password is the same as the password for your home router wifi.
Setting up the repeater as Access Point (AP).
- On the main settings screen, press the AP Wizard button. The AP setup page will open.
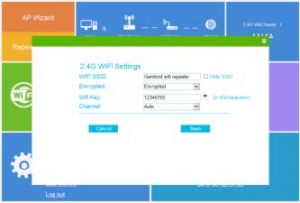
- In the ‘Wifi SSID’ field you can type the wifi network name you prefer for your Access point. Then type a strong password in the “Wifi Key” field and press the Save button.
- The repeater will now reboot to activate the new settings. Wait 40 seconds until it’s finished.
- Now connect the repeater with a network cable to your home router and its ready for use.
Declaration of conformity
This product is tested and complies with the essential requirements of the laws of member states concerning R &TTE(1999/5/EC). The CE declaration can be found under www.gembird.eu
Waste disposal:

Do not deposit this equipment with the household waste. Improper disposal can harm both the environment and human health. For Information about waste collection facilities for used electrical and electronic devices, please contact your city council or an authorized company for the disposal of electrical and electronic equipment.
WARRANTY CONDITIONS
The receipt must clearly list the date of purchase and the part number, in addition it should be printed. Keep the receipt for the entire warranty period since it is required for all warranty claims. During the warranty period the defective items will be credited, repaired or replaced at the manufacturer’s expense. Work carried out under the warranty neither extends the warranty period nor starts a new warranty period. The manufacturer reserves the right to void any warranty claim for damages or defects due to misuse, abuse or external impact (falling down, impact, ingress of water, dust, contamination or break). Wearing parts (e.g. rechargeable batteries) are excluded from the warranty. Upon receipt of the RMA goods, Gembird Europe B.V. reserves the right to choose between replacement of defective goods or issuing a credit note. The credit note amount will always be calculated on the basis of the current market value of the defective products
Gembird Europe B.V. Wittevrouwen 56, 1358CD Almere, The Netherlands www.gembird.nl/service
GEMBIRD EUROPE B.V. http://www.gembird.eu All brands and logos are registered trademarks of their respective owners.
GEMBIRD WNP-RP300-01 User Manual – GEMBIRD WNP-RP300-01 User Manual –
Questions about your Manual? Post in the comments!
[xyz-ips snippet=”download-snippet”]