![]()
41505.00254, 07/2020UNIVERSAL REMOTEINSTRUCTIONS
NOT FOR USE WITH ANY GARAGE DOOR OPENER MANUFACTURED PRIOR TO 1993.SAFETY BEAMS (PHOTOCELLS) MUST BE IN PLACE AND OPERATIONAL.
 WARNING!
MOVING DOORS CAN CAUSE SERIOUS INJURY OR DEATH.

- DO NOT install transmitter unless the door operator’s safety device works as required by the door operator’s manual.
- Wall Console must be mounted in sight of the door, at least 5 feet above the floor, and clear of moving door parts.
- Keep people clear of opening while the door is moving.
- DO NOT allow children to play with the transmitter or door operator.If safety reverse does not work properly:
- Close door then disconnect opener using the manual release handle.
- DO NOT use transmitter or door operator.
- Refer to Door and Door Opener Owner’s Manuals before attempting any repairs.
THINGS TO KNOW BEFORE STARTING:
- During programming, the garage door opener may operate. Ensure that the garage door opening is clear of personnel or any obstructions.
- Do not to press the LEARN button for longer than the noted 2-3 seconds as it could cause your existing, operational remotes and keypads to no longer work.
Below are the brands and specifications that this remote is compatible with and the available methods that can be used to program them. Review Chart A for compatibility and method, then proceed to STEP 1.
Chart A
|
AVAILABLE PROGRAM METHOD |
LEARN METHOD ID# | |
| Brand Name | Specification Notes | Number ofButton Presses (10e) |
| Genie° | 315/390 MHz, Intellicode° I, 1995-current | 1 |
| Overhead Door® | 315/390 MHz, CodeDodger 1, 1995-current | 1 |
| Chamberlain® LiftMaster® CraftsMan® | Purple Learn Button, Security +®, 2006-2014, 315 MHz | 2 |
| Orange/Red Learn Button, Security +°, 1996-2005, 390 MHz | 3 | |
| Yellow Learn Button, Security +2.0°, 2011-current, 390 MHz | 4 | |
| Green Learn Button, Billion Code®, 1993-1995, 390 MHz | 5 | |
| Genie° | 315/390 MHz, Intellicode° II, 2010-2011 | 6 |
| Overhead Door° | 315/390 MHz, CodeDodger° II, 2010-2011 | 6 |
| Sommers | 310 MHz, Rolling Code | 7 |
| Linear° | 318 MHz, Mega Code° | 8 |
| Wayne Dalton® | 372.5 MHz, Rolling Code, 1999-current | 9 |
| Ryobis | 372.5 MHz, Rolling Code | 10 |
| Guardian’ | 303 MHz, Fixed Learn Code | 11 |
| Xtreme® brand | 303 MHz, Fixed Learn Code | 11 |
| Marantec° | 315 MHz, Fixed Learn Code | 12 |
| ‘Chamberlain° | 390 MHz, 9 Switch/3 Position Dip Switch | -TEACH & PAIR – Must have an existing operational remote. |
| *Stanley | 310 MHz, 10 Switch/2 position Dip Switch | |
| FAAC’ | 433.92 MHz, Rolling Code (Teach & Pair Method Only) | |
| ‘Genie® | 390 MHz, 9 & 12 Switch/2 Position Dip Switch, 1993-1995 | For these dip switch instructions.visit www.geniecompany.com‘ |
| ‘Overhead Door | 390 MHz, 9 Switch/3 Position Dip Switch, 1993-199 |
*For instructions on these Dip Switch specifications, visit www.geniecompany.com/912DIPSWITCHES
- Locate the brand and opener/receiver specifications for your device by consulting the label on the opener/receiver, the instruction manual, the current remote controls for the opener, or the original manufacturer of the opener/receiver.
- Find the LEARN/PROG button on your device – the shape, color, or name of this button could vary by brand.For garage door openers, be sure to check under the light covers. For commercial or gate openers, this button may be on the circuit board of the opener. In some cases, this button could also be on an external receiver that is mounted on or nearby the product. Consult the device’s manual if needed.
EXAMPLES:
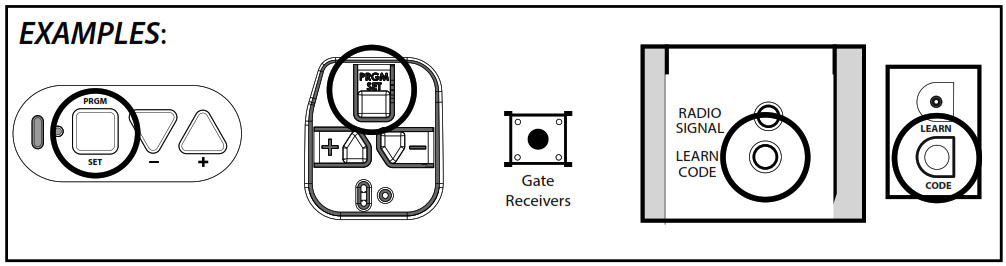 *For Marantec® openers, reference operator manual to program remotes to the operator’s head.
STEP 2 – Activate Remote/Button Layout & Led
LED – The LED will light with each button press and will also light in response to button presses during different programming modes.
 Activation Tab: Pull tab to activate the remote.
STEP 3 – PROGRAMMING REMOTE
Review Chart A to find your specifications and available programming options. Each button can be programmed individually to operate up to 4 different brands of garage door openers and gate receivers.
LEARN METHOD (RECOMMENDED)
- Find and remember the required number of button presses (ID#) in the LEARN METHOD column next to your brands/specification in Chart A.IMPORTANT: For ID#4 Chamberlain®/LiftMaster®/Craftsman® Yellow Learn Button ONLY – move immediately to instructions at right. For all other ID#s, proceed below.
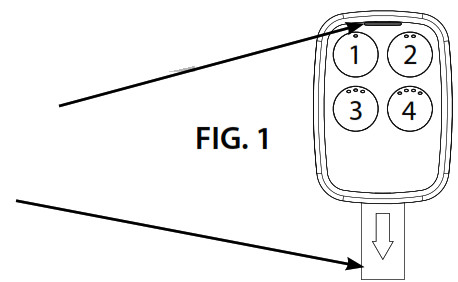
- On remote, press and hold down button #2. (Reference FIG. 1)
- While still holding down button #2, press button #4 on the remote four times.
- Release both buttons – BLUE LED will begin flashing.
- On remote, press the button of your choice the required number of times from Step 1. You will have15 seconds to complete this task.
- Wait the remainder of the 15 seconds – BLUE LED will give a long blink and then go out.
- On the opener, press LEARN/PROGRAM button for 2-3 seconds and then release.
- Press and release button you just programmed once every 2 seconds until the garage door opener operates.
- Test the button – programming is complete.TIP: Allow the LED light on the universal transmitter to stop flashing before your next button press.
Alternate Programming Method – Teach & Pair Method
- On universal remote, press and hold down button #1
- While still holding down button #1, press button #2 on the universal remote four times
- Release both buttons – WHITE LED will begin flashing slowly.
- Place the existing, operational remote and universal remote within 4” of each other
- Hold down the operational button from the original remote. Do not release until the new universal remote blinks change from slow WHITE blinks to rapid BLUE blinks. You will have 20 seconds to complete.TIP: If the universal remote does not recognize the transmission, try different distances between0”-4” away from the side of the universal remote closest to button numbers 1 and 3.
- Once the universal remote BLUE LED is blinking rapidly, press the button of choice on the universal remote ONE TIME slowly and deliberately. The BLUE LED will turn solid and go out.
- On the opener, press LEARN/PROGRAM button for 2-3 seconds and then release.
- Press and release button you just programmed once every 2 seconds until the garage door opener operates.
- Test the button – programming is complete.TIP: Allow the LED light on the universal transmitter to stop flashing before your next button press.
.ID# 4 ONLY: Chamberlain®/LiftMaster®/Craftsman® Yellow Learn Button Inst.
LEARN METHOD (RECOMMENDED)
- On remote, press and hold down button #2. (Reference FIG. 1)
- While still holding down button #2, press button #4 on the remote four times.
- Release both buttons – BLUE LED will begin flashing.
- On the remote, press the button of your choice four times. You will have 15 seconds to complete.
- Wait remainder of 15 seconds – BLUE LED gives long blink and goes out.
- Press and hold down the same button you chose for 5 seconds.
- Release button after WHITE LED blinks 3 times and goes out.
- On the opener, press LEARN/PROGRAM button for 2-3 seconds and then release.
- On remote, press the button you chose ONE time. The opener will click.
- Repeat STEPs 8 & 9 again.
- Test the button – programming is complete.TIP: Allow the LED light on the universal transmitter to stop flashing before your next button press.
Alternative Programming Method – Teach & Pair Method
- On the universal remote, press and hold down button #1.
- While still holding down button #1, press button #2 on the universal remote four times.
- Release both buttons – WHITE LED flashes slowly.
- Place the existing, operational remote and universal remote within 4” of each other.
- Hold down the operational button from the original remote. Do not release until the new universalremote blinks change from slow WHITE blinks to rapid BLUE blinks. You will have 20 seconds to complete.TIP: If the universal remote does not recognize the transmission, try different distances between 0”-4” away from the side of the universal remote closest to button numbers 1 and 3.
- Once the universal remote BLUE LED is blinking rapidly, press the button of choice on the universal remote ONE TIME slowly and deliberately. The BLUE LED will turn solid and go out.
- Press and hold down the button you just chose on the universal remote for 5 seconds.
- Release button after white LED blinks 3 times and goes out.
- On the opener, press LEARN/PROGRAM button for 2-3 seconds and then release.
- On remote, press the button you chose ONE time. The opener will click.
- Repeat STEPs 9 & 10.
- Test the button – programming is complete.TIP: Allow the LED light on the universal transmitter to stop flashing before your next button press.
Programming Assistance:
If the opener does not activate after the steps shown, repeat steps or contactCustomer Care by website chat (www.geniecompany.com) or by phone at: 1-800-354-3643 for programming assistance. You may also scan thisQR code for additional information and links.
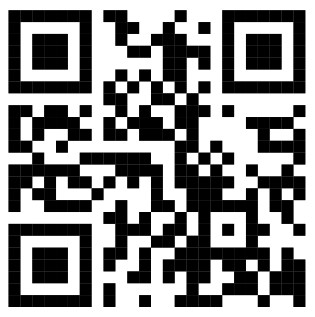 http://qr.w69b.com/g/qn7yH69yw
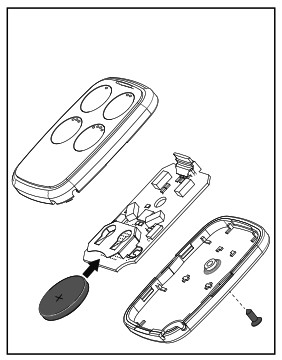
Changing the Battery:
Remove small Phillips head backing screw. Pry case open with small coin or screwdriver. Replace the battery with a CR2032 coin cell.
PARTS
For Patent Information: www.geniecompany.com/patents, ©2020, The Genie Company
FCC Part 15.21 Statement:Changes or modifications not expressly approved by the party responsible for compliance could void the user’s authority to operate the equipment.
 report this ad
FCC / IC Statement:This device complies with FCC Part 15 and Industry Canada licence-exempt RSS standard(s).Operation is subject to the following two conditions: (1) this device may not cause harmful interference, and (2) this device must accept any interference received, including interference that may cause undesired operation of the device.
References
[xyz-ips snippet=”download-snippet”]