GeoVision GV-Patrol Mobile App
Introduction
By utilizing GV-AS ID cards as movable patrol points, GV-Patrol mobile app allows you to set up and perform patrol tours that can be applied to a wide range of surveillance environments with unparalleled flexibility.

System Requirements
| OS | Android 6.0 or later
|
||
| GV-ASManager | V5.1.0.0 or later | ||
| Default Port Settings | GV-ASManager: 443 (HTTPS) | ||
| Applicable ID Cards | Frequency | 13.56 MHz |
|
| Code Type | Wiegand26 / Geo64 | ||
| Note: Throughout this guide, GV-AS ID Card refers to GV-AS ID Card, GV-AS ID Key Fob and GV-Patrol Tag. |
Licensing
| Minimum License | 4 controllers | |
| Maximum License | 1000 controllers | |
| Increment for Each License | 1 controller | |
| Optional Combination | GV-Controller + GV-Patrol | |
| License Type | GV-USB Dongle | External or Internal |
| Software License | GV-ASManager V5.3.0 or later only |
Configuring GV-ASManager
Prior to using GV-Patrol, the following settings need to be set on GV-ASManager:
- Step 1 — Set GV-AS ID cards as patrol points at the site. See 1.1 Setting Patrol Points.
- Step 2 — Set patrol tours to be assigned to patrol personnel. See 1.2 Setting Patrol Tours & Personnel.
Note:
- To use the GV-Patrol virtual controller, a Patrol software/dongle license is required, which can be purchased at a minimum of 4 controllers, with increments of 1.
- Each GV-Patrol virtual controller can manage up to 8 patrol points.
Setting Patrol Points
- In the Device List, click Add in the Controller section.
- Type a desired name for the new controller, to manage your patrol points, select GV-Patrol as Type and click OK. This dialog box appears.

- Select any one of Place 1 ~ Place 8 to enable a patrol point.
- To set GV-AS ID cards as patrol points, select Wiegand26 or Geo64 as Card Code and type its Card Number into the respective field. For 3rd-party MIFARE smart cards, select and type the Card Code and Card Number accordingly.
- To set multiple patrol points, repeat Step 3 & 4 with different cards.
- Click OK. The patrol points are successfully configured.
- Secure the patrol point cards at specific physical locations of the patrol site as desired.
Setting Patrol Tours & Personnel
Setting Patrol PersonnelBefore setting patrol tours, the necessary patrol cards must first be set.
- In the Card List, click New. This dialog box appears.
- Click Assign User, select Assign a new user and fill in the necessary information of the patrol personnel. Alternatively select Assign a user to assign the patrol card to patrol personnel previously set.
- To set a card as the patrol card, type the Card Number and select the appropriate Card Code accordingly.
- Click OK. To define multiple patrol cards, repeat Step 1 ~ 4 with different cards.
For details on access ID cards and users, see Setting Cards and Setting Users, respectively, in Chapter 4, GV-ASManager User Manual.
Creating Patrol ToursOnce the patrol points are set, you can create patrol tours to require personnel to check in at the time periods specified.
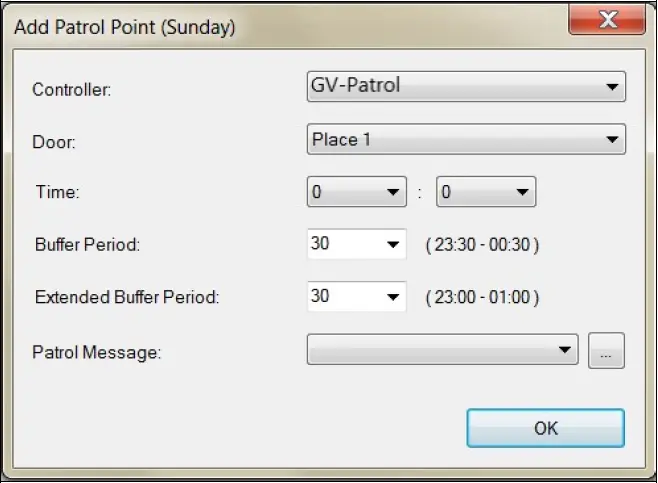
- In the Patrol Tour window, click Add to create patrol tours. Then select the desired day of the week to add patrol points.
- Select GV-Patrol as Controller and select the desired patrol point, predefined using GV-AS ID cards/fobs, from the Door drop-down list.
- Define the Time the personnel need to check in at, from 0:00 to 23:59.
- Specify the Buffer Period, in minutes, that is added to before and after the check-in time specified above. Checking in during the buffer period is registered as on time.
- Specify the Extended Buffer Period, in minutes, that is added to before and after the buffer period. Checking in during the extended buffer period is registered as early or late.
- Optionally type Patrol Messages that can be sent through e-mail or SMS when the check-in status is registered as on time, early, late or absent.
- Click OK. The patrol route is added to the patrol tour.
Add as many patrol routes as desired per patrol tour. You can also drag a patrol route to another day of the week to create a copy.
Note:
- Checking in outside of the buffer and extended buffer periods will not be recorded.
- When adding patrol tours, the Group Patrol Tour option only requires one of the assigned patrol personnel to check in at the patrol points during the times specified
Activating Patrol Tours
- After the patrol tours and personnel are set, double-click the patrol tour in the Patrol Tour window. This dialog box appears.
- Select Activate to enable the patrol tour and click Add to assign the patrol tour to the desired personnel by their patrol cards.
- Optionally select Offline for GV-Patrol to save the patrol records within the mobile app to be later uploaded to the GV-ASManager manually.
- Click OK. The patrol tour is now activated.
For details on patrol tours, see Chapter 7 Patrol Tour in GV-ASManager User Manual.
Using GV-Patrol
After the necessary settings are configured on GV-ASManager, security personnel can begin to perform patrol tours by installing GV-Patrol on an Android mobile phone from Google Play and following the steps below:
- Step 1 — Connect to GV-ASManager and log in with the desired patrol personnel.
- Step 2 — Start patrol tours.
Setting Up GV-Patrol
Upon first-time accessing of GV-Patrol, the following main screen appears.
Main Screen

|
No. |
Name |
Description |
|
1 |
Options |
Access all available and past patrol tours and the settings page. |
|
2 |
Date |
Display the current date. |
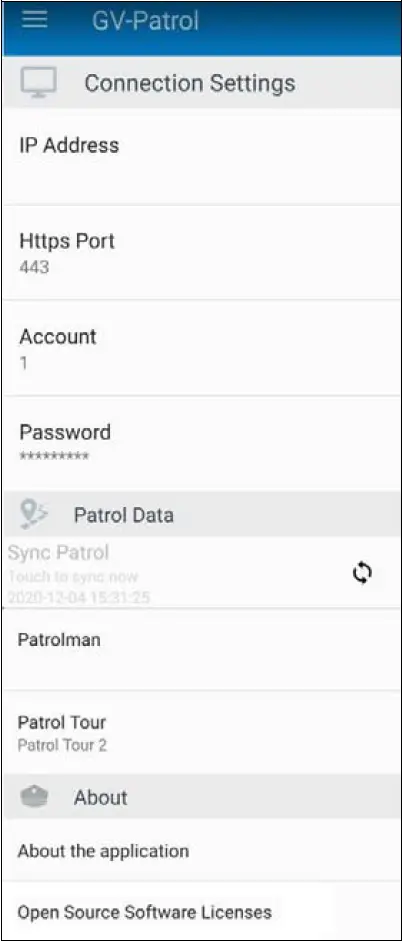
- Tap Options and select Setting. The Settings page appears.
- Type the IP Address, HTTPS Port and login Account and Password of the GV-ASManager. Then tap Sync Patrol to connect.Note: For IP Address, you can type either an IP address or a domain name.
- Once GV-Patrol is connected to GV-ASManager, tap Patrolman and scan the patrol card of a patrol personnel with the GV-Patrol to log in.
- Tap Patrol Tour and select the desired patrol tour assigned to the patrol personnel currently logged in.
- To log in with a different patrol personnel, log out by tapping Patrolman again and repeat Step 3.Note: In the case of GV-Patrol not responding to patrol cards upon scanning with NFC being enabled, download and install an NFC tool app from Google Play to scan the cards again. If no data are shown on the app upon scanning, the NFC function of your Android mobile is either malfunction or incompatible with the specification requirements of GV-Patrol.
Starting Patrol Tours
To proceed with the patrol tour selected, tap Options and select All Tours. All of the patrol points and their patrol times within the tour are displayed in chronological order.
|
No. |
Name |
Description |
|
1 |
Patrol Tour |
The current patrol tour selected, with all of its patrol points listed below. |
|
2 |
Date |
Tap to jump to the closest patrol point requiring the patrol personnel to check in according to the current time. |
|
3 |
Current/Next Patrol Point |
The current/next patrol point requiring the patrol personnel to check in, according to time, is highlighted by a yellow box. |
|
4 |
Last Update |
Display the last time a patrol record was uploaded to the GV-ASManager. |
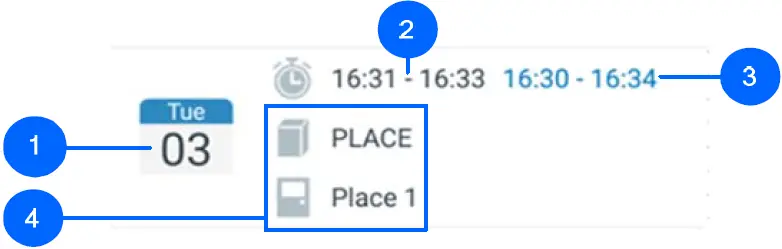
[Patrol Point]For each patrol point, the name of the patrol point and the time required to check in are displayed.
|
No. |
Name |
Description |
|
1 |
Patrol Date |
The date required to check in at the patrol point. |
|
2 |
Patrol Time |
The time required to check in at the patrol point. Checking in within the patrol time is recorded as Pass. |
|
3 |
Buffer Time |
Checking in within the buffer time but outside of the patrol time is recorded as Early or Late. |
|
4 |
Patrol Point |
Display the name of the patrol point and its controller as configured on the GV-ASManager. |
Checking In at Patrol Points
- To check in, go to the designated site at the Patrol Time specified.
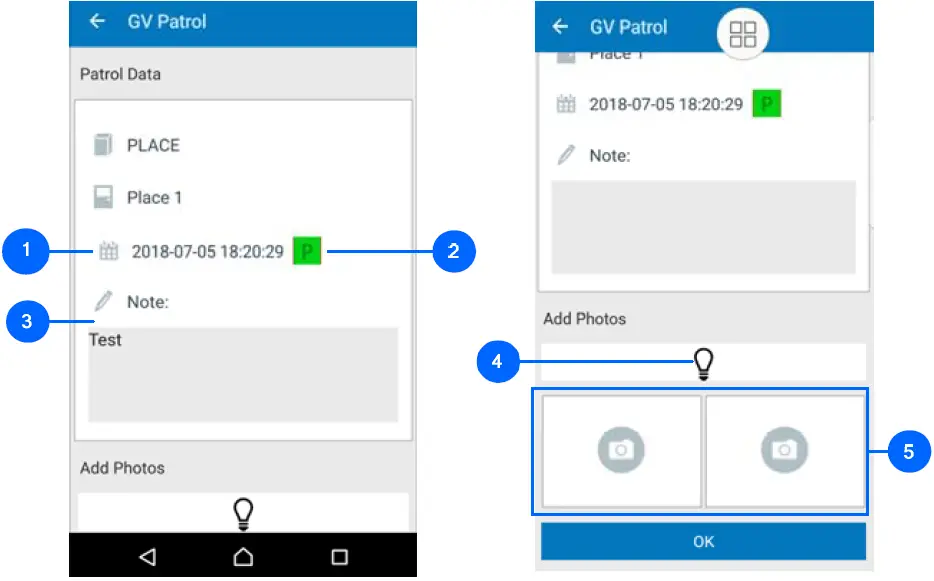
- Scan the patrol point card with GV-Patrol by placing your mobile into close proximity with the patrol point card. When scanning is successful, the Patrol Data page appears.
|
No. |
Name |
Description |
|
1 |
Check In Time |
The time in which the patrol point card is scanned. |
|
2 |
Check In Status |
Depending on the time the patrol point card is scanned, the check in status is recorded as Pass, Early or Late. |
|
3 |
Note |
Tap to type a note during checking in. |
|
4 |
Light |
Tap the Light icon to turn on the mobile’s flashlight, if applicable. |
|
5 |
Camera |
Tap the Camera icon to take snapshots at the patrol site. |
- Optionally tap Note to type a patrol note and/or tap the Camera icon to take a snapshot to be included into the patrol record.
- Tap OK. The patrol record is completed and automatically uploaded to the GV-ASManager when GV-Patrol has access to the Internet.
Note:
- When patrol record(s) are temporarily saved on the GV-Patrol due to unable to upload them to the GV-ASManager, the following message appears.
- If Offline Mode is enabled for the patrol tour, the patrol record(s) must be uploaded to the GV-ASManager manually.
Patrol StatusOn the All Tours page, all past patrol routes are color coded as illustrated below:
- Green: The security personnel checked in on time —Pass.
- Orange: The security personnel checked in outside of the patrol time but within the buffer time — Early or Late.
- Red: The security personnel did not check in within the patrol and buffer time — Absent.
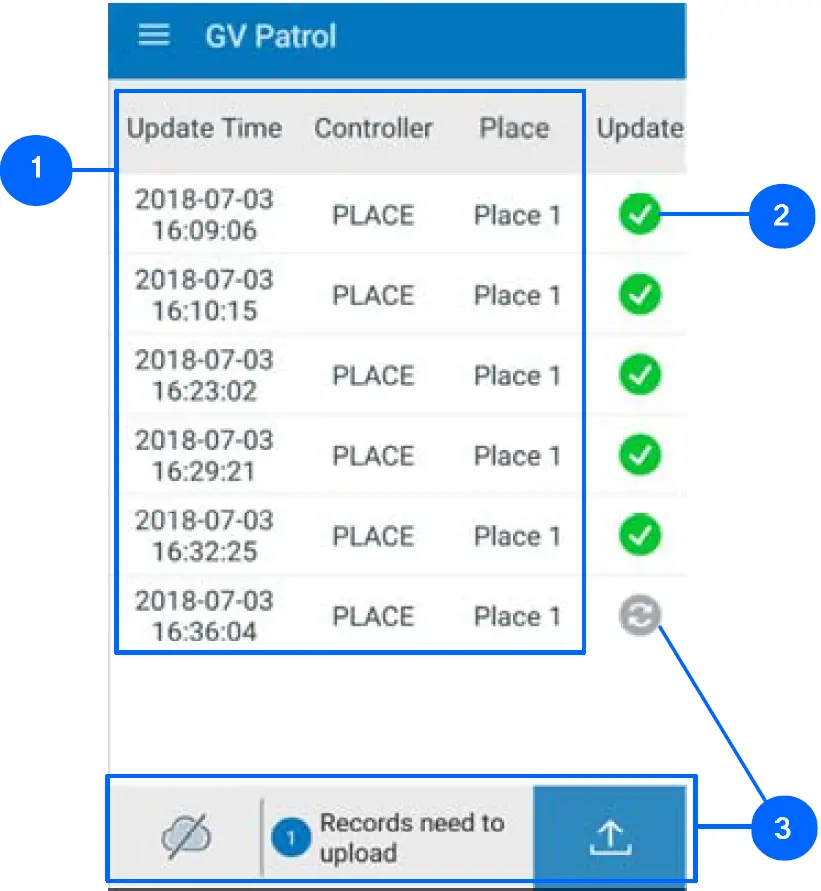
Viewing History
The History page display all of the past patrol records of the patrol personnel currently logged in, excluding absent records. To view past patrol records, tap Options and select History.
|
No. |
Name |
Description |
|
1 |
Patrol Records |
Display the patrol point and time the security personnel checked in at. |
|
2 |
Update Status |
A checkmark indicates that the patrol record is uploaded to the GV-ASManager. |
|
3 |
Offline Records |
Indicates specific patrol records that are yet to be uploaded to the GV-ASManager, either due to Offline Mode being enabled or unable to access the Internet. |
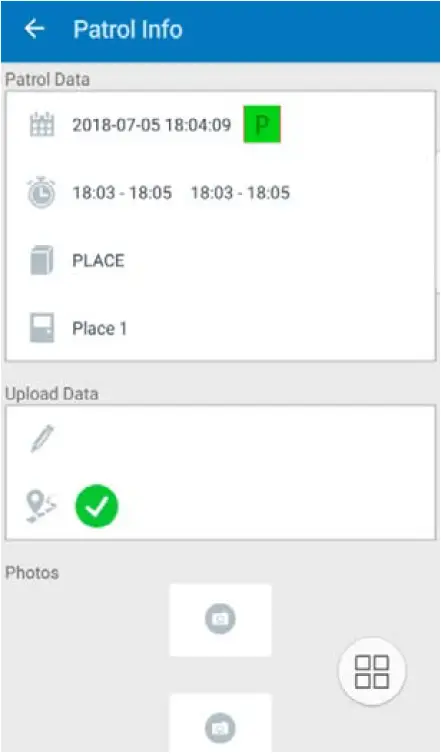
Tap a patrol record to display its full Patrol Info, as illustrated below.
report this ad[xyz-ips snippet=”download-snippet”]