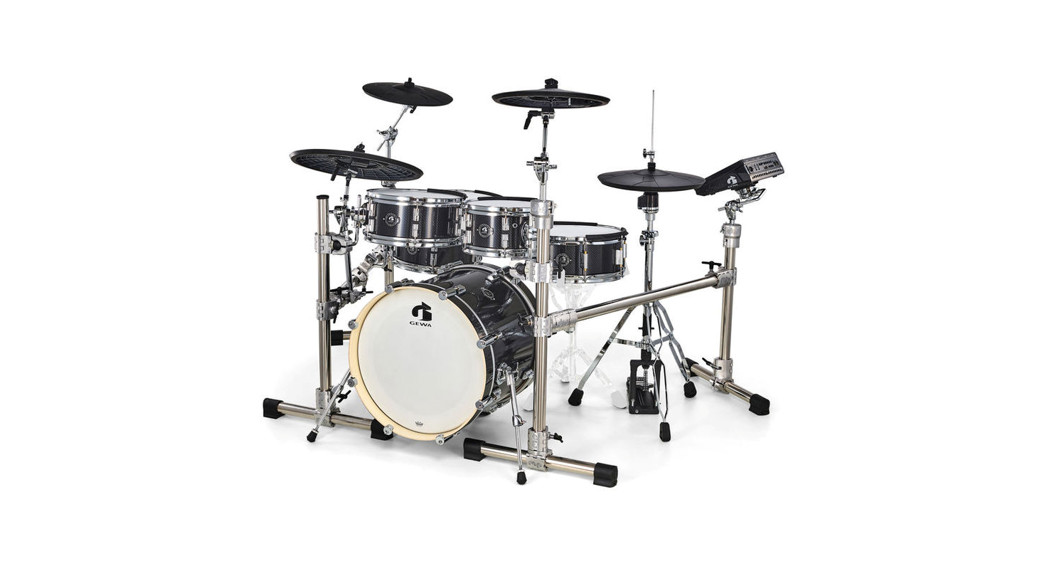
 Owner´s ManualCP14CP14-ACCP18CP18-ACElectronic Cymbals
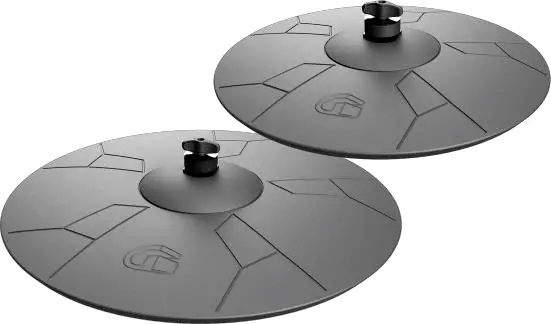

CP14 | CP14-AC | CP18 | CP18ACElectronic Cymbals
| Models | CP14 | CP14-AC | CP18 | CP18AC |
| Document | Owner´s Manual |
| Version | 1.0 |
| Release Date | 2020-10-09 |
![]()
![]()


SAFETY INFORMATION
Failure to observe the following safety directives may result in fire, electric shock, injury, device damage, or damage of other objects or property. Read the following safety instructions completely before operating this product.Further risks are possible; therefore, the following list does not claim to be complete.About the symbols![]()
![]()
![]()
![]()
![]()
![]()
![]()
![]()
![]()
![]()
![]()
![]()
![]()
![]()
![]()
![]()
![]()
![]()
![]()
![]()
![]()
![]()
![]()
![]()
![]()
![]()
![]()
![]()
![]()
![]()
![]()
![]()
![]()
![]()
![]()
![]()
![]()
- Locations of high temperature (in direct sunlight. near heating equipment)
- Moist or humid locations (near a bath or shower, or a wet floor)
- Locations exposed to steam or smoke
- Locations subject to salt damage
- Locations subject to water or rain
- Expressively dusty or sandy environment
- Locations subject to high levels of vibration
- An environment with poor ventilation
![]()
![]()
![]()
![]()
![]()
![]()
![]()
![]()
![]()
![]()
![]()
![]()
![]()
![]()
![]()
![]()
![]()
![]()
![]()
![]()
![]()
![]()
![]()
![]()
![]()
![]()
![]()
![]()
![]()
![]()
![]()
![]()
![]()
![]()
![]()
![]()
![]()
![]()
![]()
![]()
![]()
![]()
![]()
![]()
![]()
![]()
![]()
![]()
![]()
![]()
![]()
![]()
![]()
![]()
![]()
![]()
![]()
![]()
![]()
![]()
![]()
![]()
![]()
![]()
![]()
![]()
![]()
![]()
![]()
![]()
![]()
![]()
![]()
![]()
![]()
![]()
![]()
![]()
![]()
![]()
![]()
![]()
![]()
![]()
![]()
![]()
![]()
![]()
![]()
![]()
![]()
![]()
![]()
![]()
![]()
![]()
- This unit may interfere with radio and television Do not use this unit in the vicinity of such receivers.
- When moved from one location to another where the temperature and/or humidity is very different, water droplets (condensation) may form inside the Damage or malfunction may result if you attempt to use the unit in this condition. Therefore, before using the unit, you must allow it to stand for several hours until the condensation has completely evaporated.
- Whenever any liquid has been spilled on the surface of this unit, be sure to promptly wipe it away using a soft, dry
- Spurs included with stands and pads might scratch the floor. Use a mat or similar, adequate object to protect the floors from damage.
- Make sure that children are not exposed to risks of injury caused by improper placement or setup of
Maintenance
- Never use benzene, thinners, alcohol, or solvents of any kind, to avoid the possibility of discoloration and/or deformation.
- Remove stick marks and dust by treating the top surface of the cymbal with a sponge lightly soaked in silicone oil. Silicone oil protects the top sutruce um! teslotes U rleSi I and even look.
- For everyday, cleaning wipe the unit with a soft, dry cloth or one that has been slightly dampened with water. To remove stubborn dirt, use a cloth impregnated with a mild, non-abrasive detergent. Afterward, be sure to wipe the unit thoroughly with a soft, dry
Additional Precautions
- Use a reasonable amount of care when using the unit’s jacks and connectors. Rough handling can lead to malfunctions.
- When disconnecting all cables, grasp the connector itself – never pull on the cable. This way you will avoid causing cable breakage and short
- This instrument is designed to minimize the extraneous sounds produced when it’s played. However, impact noise still can be transmitted through floors and walls to a greater degree than expected, take care not to allow these sounds to become a nuisance to others nearby.
- Continuous playing may cause discoloration of the pad, but this will not affect the pad’s function.
DISPOSAL AND RECYCLING
EU Countries
![]()
![]()
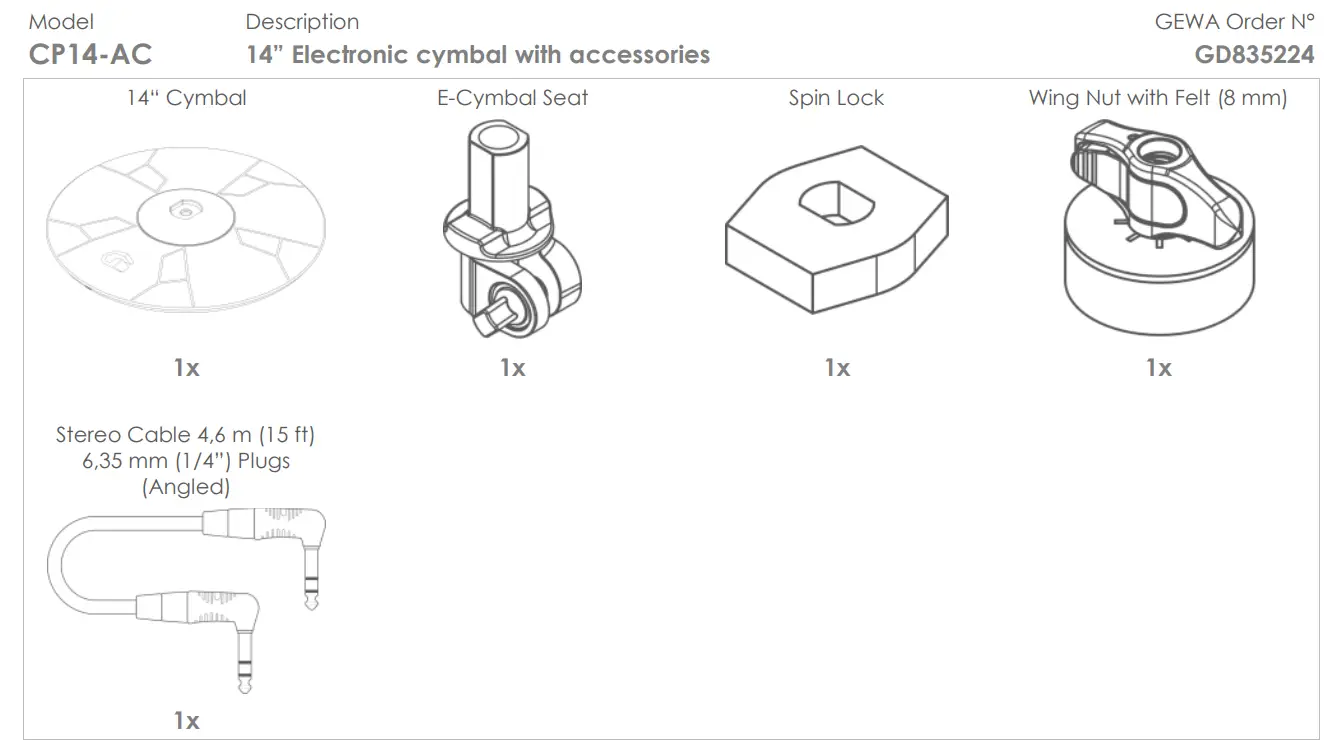
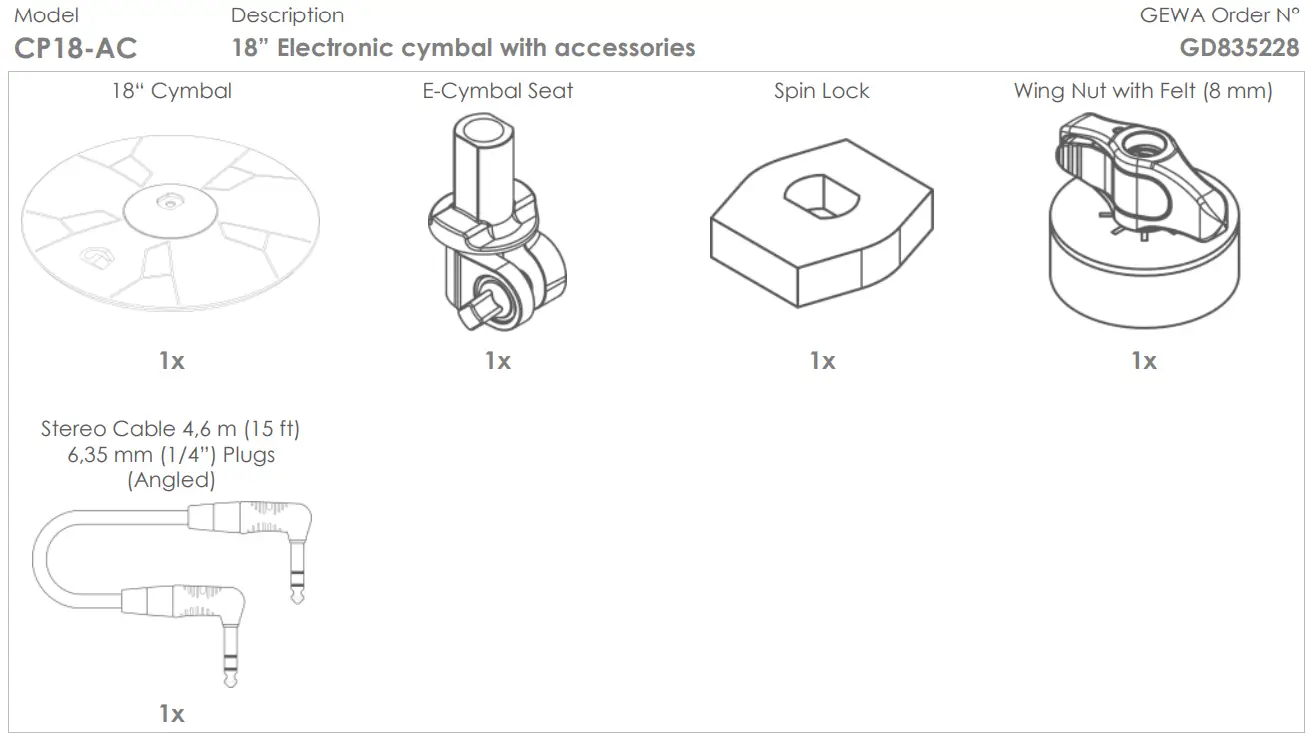
PACKAGE CONTENTS
The original packaging contains the following items. Please check carefully the completeness of the purchased product:





ASSEMBLY INSTRUCTIONS
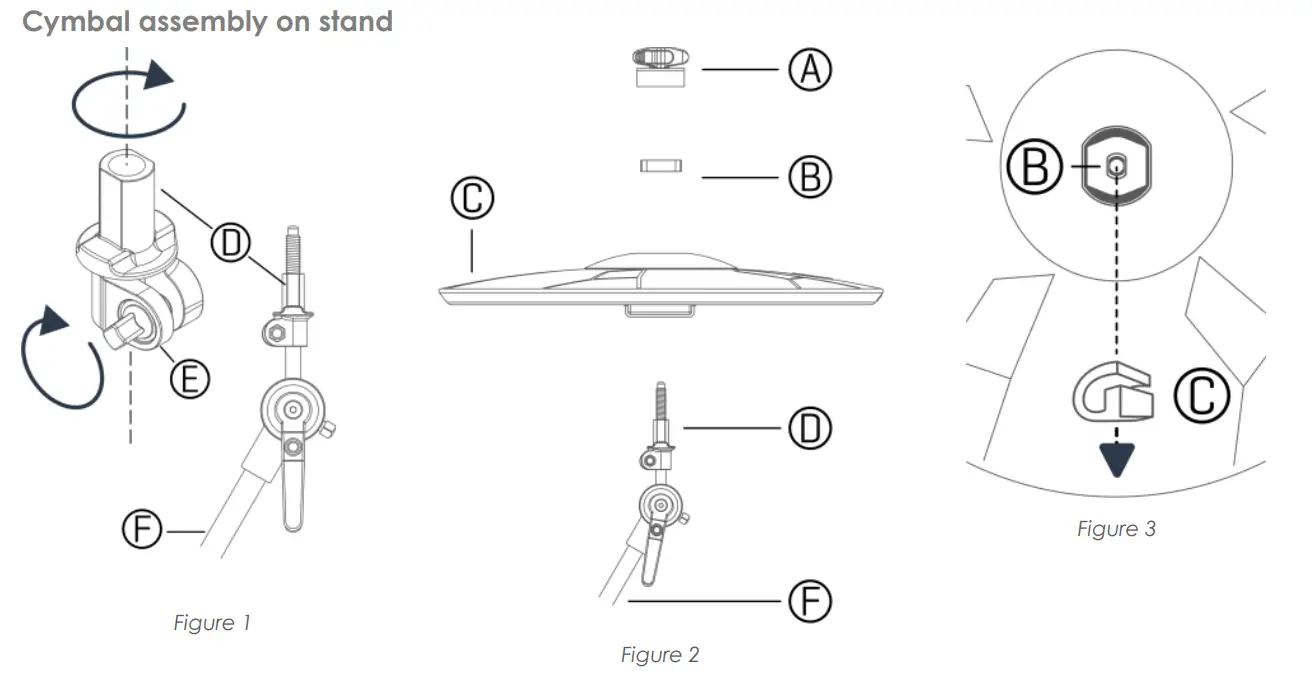

- Screw cymbal seat (D) on an 8 mm cymbal arm (F).
- Place the cymbal (C) on the cymbal seat (D), followed by the spinlock (B).
- Orient the spinlock (B) in the cymbal mold as shown in Figure 3.
- With the spinlock attached, orient the whole cymbal with the “G“ facing in playing position.
- Secure the cymbal seat (D) by fastening screw (E) as shown in Figure 1.
- Screw felt and wing nut (A) onto the cymbal arm.
CONNECTIONS & TRIGGER SETTINGS
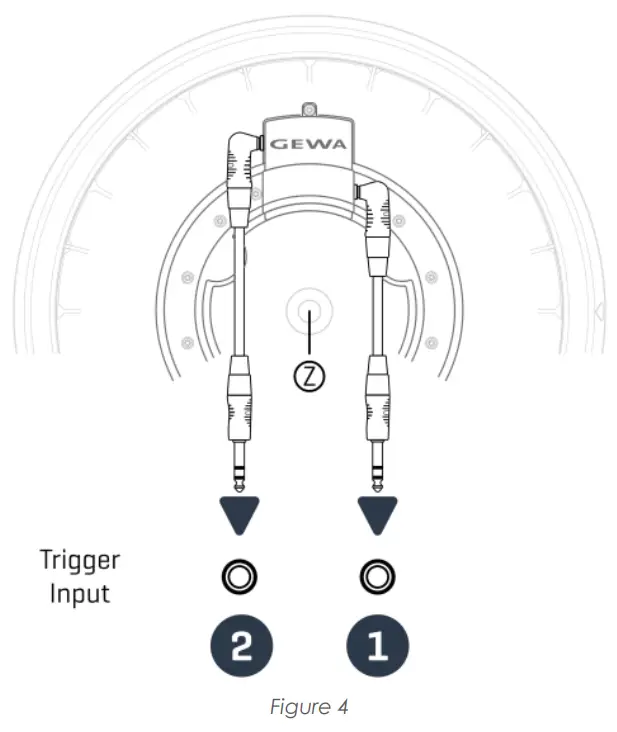


- Connect the stereo cable to the cymbal, using the jack closest to the middle hole (Z).
- Connect the other plug of cable to one of the following Trigger Inputs of your console:Ride I Crash 1 I Crash 2 I Aux 1-4 I (Hi-Hat)
- In your Drum Console make sure that the correct Trigger Bank is loaded at the corresponding input channel. *Default Trigger Banks:CP14: GEWA Crash 14inchCP18: GEWA Ride 18inch
![]()
![]()
![]()
![]()
![]()
![]()
![]()
![]()
![]()
   |
  |
||
| Trigger Inputs | Ride | + | Aux 1 |
| Aux 1 | + | Aux 2 | |
| Aux 2 | + | Aux 3 | |
| Aux 3 | + | Aux 4 |
| Trigger Banks: | CP14: | GEWA Crash 14inch 3W |
| CP14: | GEWA Ride 18inch 3W |
![]()
![]()
![]()
![]()
![]()
![]()
![]()
![]()
![]()
- Check first whether your drum module supports the trigger types (Sensors) built into GEWA pads.
- Check whether the manufacturer of your module offers a trigger bank for the GEWA pad you want to connect.
- Consult the owner’s manual of your drum module for Information about trigger setups, accessible parameters, and customization of 3rd party
PLAYING TECHNIQUES
CymbalsTip Stroke (Bow)
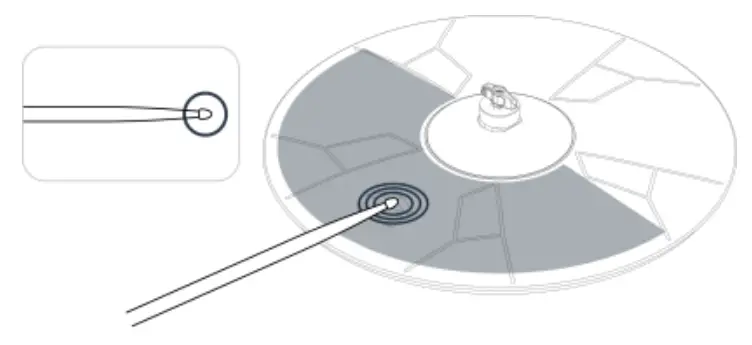

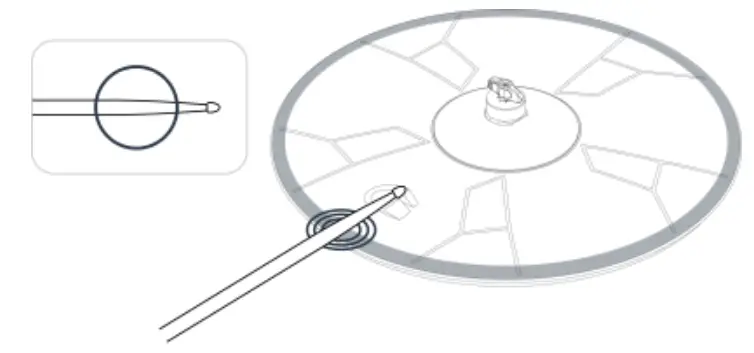

Bell Stroke
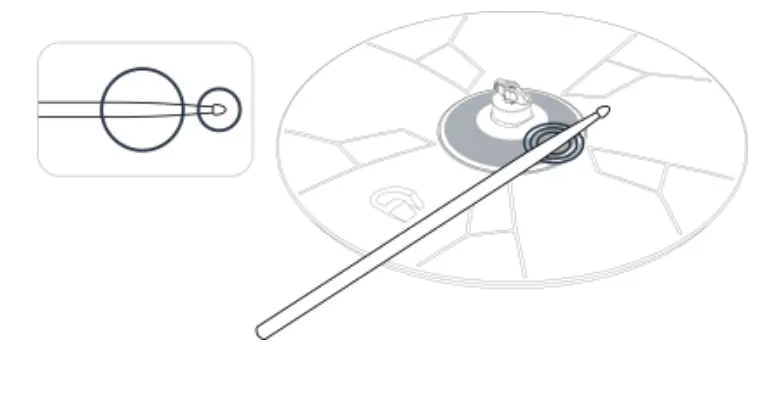

Bells on acoustic cymbals produce musical sounds using either the shoulder or the tip of the stick. Utilize both techniques to trigger the bell sound.Cymbal Choke
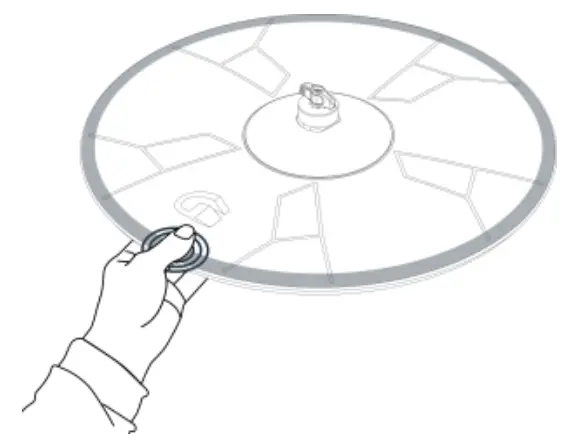

COMPATIBLE STANDS
Compatible stands for GEWA E-Cymbal seats
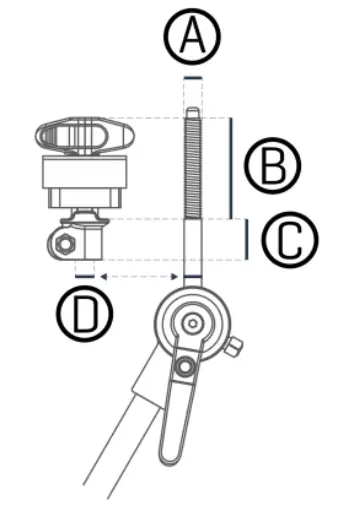

The following measurements describe the minimum requirements for a cymbal stand to fit GEWA E-Cymbal Seats, providing enough play for free cymbal movement. Note that the min/max measurements suppose an overall height of wing nut and felt of 33 mm (1 ¾”).
| Measure in [mm] | Measure in Inch [“] | |||
| A | Thread diameter | M8 | 8 mm | |
| B | Thread length | min | 38,1mm | 1 ½” |
| C | Length non-threaded rod | min | 38,1mm | 1 ½” |
| D | Diameter non threaded part | max | 8,5 mm |
TECHNICAL DATA
CP14 Electronic cymbal (Included with drum set configurations)
| Size | 14″ |
| Sensors | Bow (piezo-ceramic element) |
| Edge & Choke (FSR Switch – MIDI velocity from the piezo signal) | |
| Bell (FSR Switch – MIDI velocity from the piezo signal) | |
| Choke | Yes |
| Connections | Trigger OutputBell Trigger Output (optional for 3Way triggering) |
| Dimensions | 52 (H) x 355 (Ø) mm2 (H) x 14 (Ø) inches |
| Weight | 850g / 1 lb 14 oz |
| Accessories included | Owner’s manual (this document) |
CP 14-AC Electronic cymbal with accessories
| Size | 14″ |
| Sensors | Bow (piezo-ceramic element) |
| Edge & Choke (FSR Switch – MIDI velocity from piezo signal) | |
| Bell (FSR Switch – MIDI velocity from the piezo signal) | |
| Choke | Yes |
| Connections | Trigger OutputBell Trigger Output (optional for 3Way triggering) |
| Dimensions | 52 (H) x 355 (Ø) mm2 (H) x 14 (Ø) inches |
| Weight | 1080 g/ 2lbs 6 oz |
| Accessories included | Universal e-cymbal seat, 8mm wing nut with felt, spinlock, 6,35 mm (1/4″) TRS stereo cable, owner’s manual (this document) |
Cr ID-AC Electronic Cymbal With accessories
| Size | 18″ |
| Sensors | Bow (piezo-ceramic element) |
| Edge & Choke (FSR Switch – MIDI velocity from the piezo signal) | |
| Bell (FSR Switch – MIDI velocity from the piezo signal) | |
| Choke | Yes |
| Connections | Trigger Output
Bell Trigger Output (optional for 3Way triggering) |
| Dimensions | 55 (H) x 458 (Ø) mm2 1/64 (H) x 18 (Ø) inches |
| Weight | 16409/ 3lbs 10 oz |
| Accessories in- chided | Universal e-cymbal seat, 8mm wing nut with felt, spinlock, 6,35 mm (1/4″) TRS stereo cable, owner’s manual (this document) |
![]()
![]()
![]()
![]()
![]()
![]()
![]()
![]()
![]()


References
Gewa Polska – GEWA music Polen
Gewa España
GEWA Drum Workstation G9
Gewamusic – English
Gewa Deutschland – we engineer music
Gewa Italia – GEWA music Italia
Gewa International – GEWA music International
Gewa Česká republika – GEWA music Tschechien
Gewa Deutschland – we engineer music
Gewa France – GEWA music France
Gewa Portugal – GEWA Portugal
[xyz-ips snippet=”download-snippet”]

