![]() Owner´s ManualHC14HC14-ACHC14-TElectronic Hi-Hat Cymbals
Owner´s ManualHC14HC14-ACHC14-TElectronic Hi-Hat Cymbals
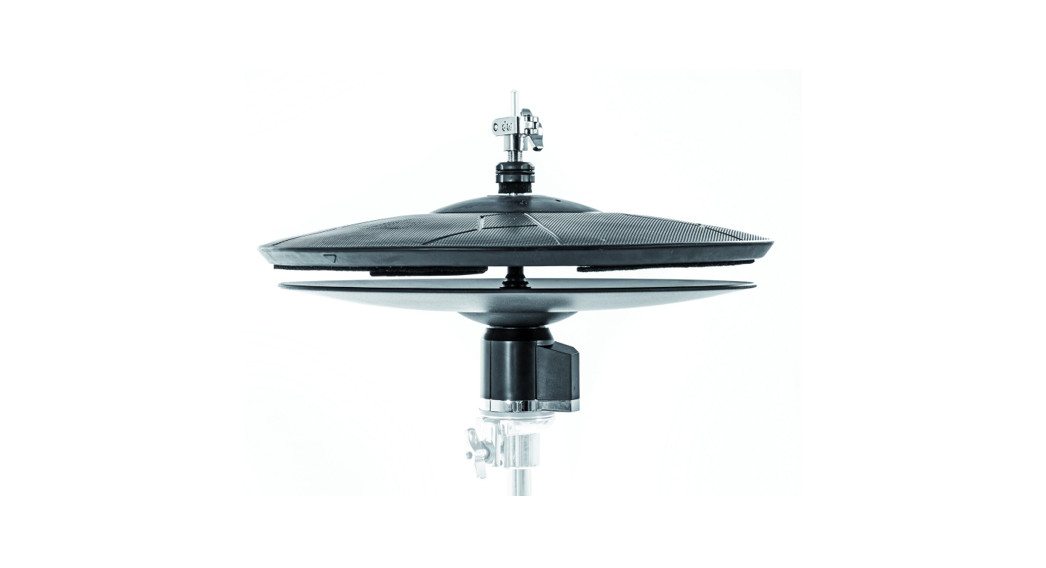
HC14 | HC14-AC | HC14-TElectronic Hi-Hat Cymbals
| Models | HC14 | HC14-AC | HC14-T |
| Document | Owner´s Manual |
| Version | 1.0 |
| Release Date | 2020-10-09 |
![]() Please read this Owner´s Manual carefully before operating the device and take note of the safety information! Keep this document available for immediate reference.Download the complete user´s manual on gewamusic.com:https://int.gewamusic.com/downloads
Please read this Owner´s Manual carefully before operating the device and take note of the safety information! Keep this document available for immediate reference.Download the complete user´s manual on gewamusic.com:https://int.gewamusic.com/downloads
 https://int.gewamusic.com/downloadswww.gewaelectronics.com
SAFETY INFORMATION
Failure to observe the following safety directives may result in fire, electric shock, injury, device damage, or damage of other objects or property. Read the following safety instructions completely before operating this product.Further risks are possible; therefore, the following list does not claim to be complete.About the symbols WARNINGCalls your attention to risks that can result in serious injuries or death.
![]() CAUTIONCalls your attention to risks that can result in minor injuries and/or device damage.
CAUTIONCalls your attention to risks that can result in minor injuries and/or device damage. REGULATIONIndicates a required action. The action which must be carried out is stated more precisely by the white design contained.
 BANThe symbol alerts the user to items that must never be carried out (are forbidden). The prohibited action is stated more precisely by the design contained within the circle.WARNINGIndicates a hazard that could result in serious injury or death.
 Do not disassemble or modifyDo not disassemble or modify this product unless this manual provides specific instructions.Do not repair or replace parts by yourselfDo not attempt to repair the unit or replace parts within it (except when this manual provides specific instructions directing you to do so).Refer all servicing to your retailer, GEWA service partner.
 Do not use or store in the following locations
- Locations of high temperature (in direct sunlight. near heating equipment)
- Moist or humid locations (near a bath or shower, or a wet floor)
- Locations exposed to steam or smoke
- Locations subject to salt damage
- Locations subject to water or rain
- Expressively dusty or sandy environment
- Locations subject to high levels of vibration
- An environment with poor ventilation

![]() CAUTIONIndicates a hazard that could result in injury or property damage.
CAUTIONIndicates a hazard that could result in injury or property damage.![]() Use only the specified standInstall the unit only on the hi-hat stand which satisfies the specifications described on p.9. Remove only the specified screws during the installation.
Use only the specified standInstall the unit only on the hi-hat stand which satisfies the specifications described on p.9. Remove only the specified screws during the installation.![]() Evaluate safety issues before using standsEven if you observe the cautions given in the owner’s manual, certain types of handling may allow this product to fall from the stand or cause the stand to overturn. Please be mindful of any safety issues before using this product.Do not place in unstable locationsNever place the unit on unstable stands. Such stands encourage malfunction and add potential risk for children by facing over.
Evaluate safety issues before using standsEven if you observe the cautions given in the owner’s manual, certain types of handling may allow this product to fall from the stand or cause the stand to overturn. Please be mindful of any safety issues before using this product.Do not place in unstable locationsNever place the unit on unstable stands. Such stands encourage malfunction and add potential risk for children by facing over.![]() Manage cables for safetyTry to prevent cords and cables from becoming entangled. Also. all cords and cables should be placed so they are out of the reach of children.
Manage cables for safetyTry to prevent cords and cables from becoming entangled. Also. all cords and cables should be placed so they are out of the reach of children.![]() Route all power cords and cables in such a way as to prevent them from getting entangledInjury could result if someone were to trip on a ca’ be and cause the unit to fall or topple.Don’t allow foreign objects or liquids to enter the unit; never place containers with liquid on the unitDo not place containers containing liquid on this product. Never allow foreign objects (e.g., flammable objects, coins, wires) or liquids to enter this product. Doing so may cause short circuits, faulty operation, or other malfunctions.Do not drop or expose to strong impactOtherwise, you risk causing damage or malfunction.Be cautious to protect children from injuryAlways make sure that an adult is on hand to provide supervision and guidance when using the unit places where children are present, or when a child will be using the unit.Avoid climbing on top of the unit, or placing heavy objects on itOtherwise, you risk injury as the result of the unit toppling over or dropping down.Take care not to pinch your fingers in the movable partsBe careful not to allow your fingers or hands to be caught between the top and bottom hi-hat. Adult supervision is recommended whenever small children use the unit.Disconnect all cords/cables before moving the unitDamage or malfunction may result if you fail to disconnect all cables before moving the unit.Keep small items out of the reach of childrenTo prevent accidental ingestion of the parts listed below, always keep them out of the reach of small children.Removable Parts:Clutch or clamp screws and nuts, clutch bumper, cymbal seat, felt washers, spinlock, and cable plugs.Additional information about the usePlacement
Route all power cords and cables in such a way as to prevent them from getting entangledInjury could result if someone were to trip on a ca’ be and cause the unit to fall or topple.Don’t allow foreign objects or liquids to enter the unit; never place containers with liquid on the unitDo not place containers containing liquid on this product. Never allow foreign objects (e.g., flammable objects, coins, wires) or liquids to enter this product. Doing so may cause short circuits, faulty operation, or other malfunctions.Do not drop or expose to strong impactOtherwise, you risk causing damage or malfunction.Be cautious to protect children from injuryAlways make sure that an adult is on hand to provide supervision and guidance when using the unit places where children are present, or when a child will be using the unit.Avoid climbing on top of the unit, or placing heavy objects on itOtherwise, you risk injury as the result of the unit toppling over or dropping down.Take care not to pinch your fingers in the movable partsBe careful not to allow your fingers or hands to be caught between the top and bottom hi-hat. Adult supervision is recommended whenever small children use the unit.Disconnect all cords/cables before moving the unitDamage or malfunction may result if you fail to disconnect all cables before moving the unit.Keep small items out of the reach of childrenTo prevent accidental ingestion of the parts listed below, always keep them out of the reach of small children.Removable Parts:Clutch or clamp screws and nuts, clutch bumper, cymbal seat, felt washers, spinlock, and cable plugs.Additional information about the usePlacement
- This unit may interfere with radio and television Do not use this unit in the vicinity of such receivers.
- When moved from one location to another where the temperature and/or humidity is very different, water droplets (condensation) may form inside the Damage or malfunction may result if you attempt to use the unit in this condition. Therefore, before using the unit, you must allow it to stand for several hours until the condensation has completely evaporated.
- Whenever any liquid has been spilled on the surface of this unit, be sure to promptly wipe it away using a soft, dry
- Spurs included with stands and pads might scratch the floor. Use a mat or similar, adequate object to protect the floors from damage.
- Make sure that children are not exposed to risks of injury caused by improper placement or setup of
Maintenance
- Never use benzene, thinners, alcohol, or solvents of any kind, to avoid the possibility of discoloration and/or deformation.
- Remove stick marks and dust by treating the top surface of the cymbal with a sponge lightly soaked in silicone oil. Silicone oil protects the top surface um! teslotes U rleSi I and even look.
- For every day, cleaning wipes the unit with a soft, dry cloth or one that has been slightly dampened with water. To remove stubborn dirt, use a cloth impregnated with a mild, non-abrasive detergent. Afterward, be sure to wipe the unit thoroughly with a soft, dry
Additional Precautions
- Use a reasonable amount of care when using the unit’s jacks and connectors. Rough handling can lead to malfunctions.
- When disconnecting all cables, grasp the connector itself – never pull on the cable. This way you will avoid causing cable breakage and short
- This instrument is designed to minimize the extraneous sounds produced when it’s played. However, impact noise still can be transmitted through floors and walls to a greater degree than expected, take care not to allow these sounds to become a nuisance to others nearby.
- Continuous playing may cause discoloration of the pad, but this will not affect the pad’s function.
DISPOSAL AND RECYCLING
EU Countries
 Devices labeled with this symbol fall under the scope of the European Waste Electrical and Electronic Equipment Directive (WEEE) under which owners are obliged to dispose of such devices separately from domestic waste. Manufacturers and EU member states on the other hand are obliged to transpose the directive into federal law and provide separate collection systems to ensure effective protection of human health and the environment. In case this product needs to be disposed of, take it to your local community waste management service (e.g. disposal companies, re-cycling centers) or to the dealer where the product was purchased.USACA Prop 65This product contains chemicals known to the State of California to cause cancer, birth defects, and other reproductive harm, including lead.
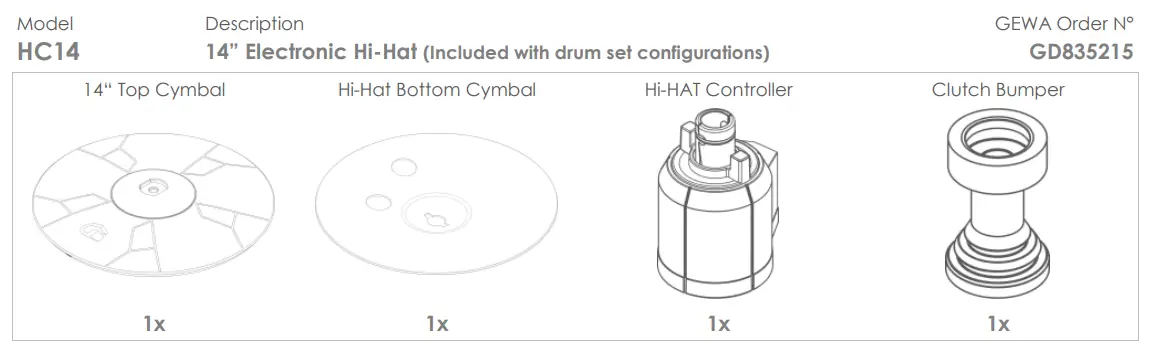
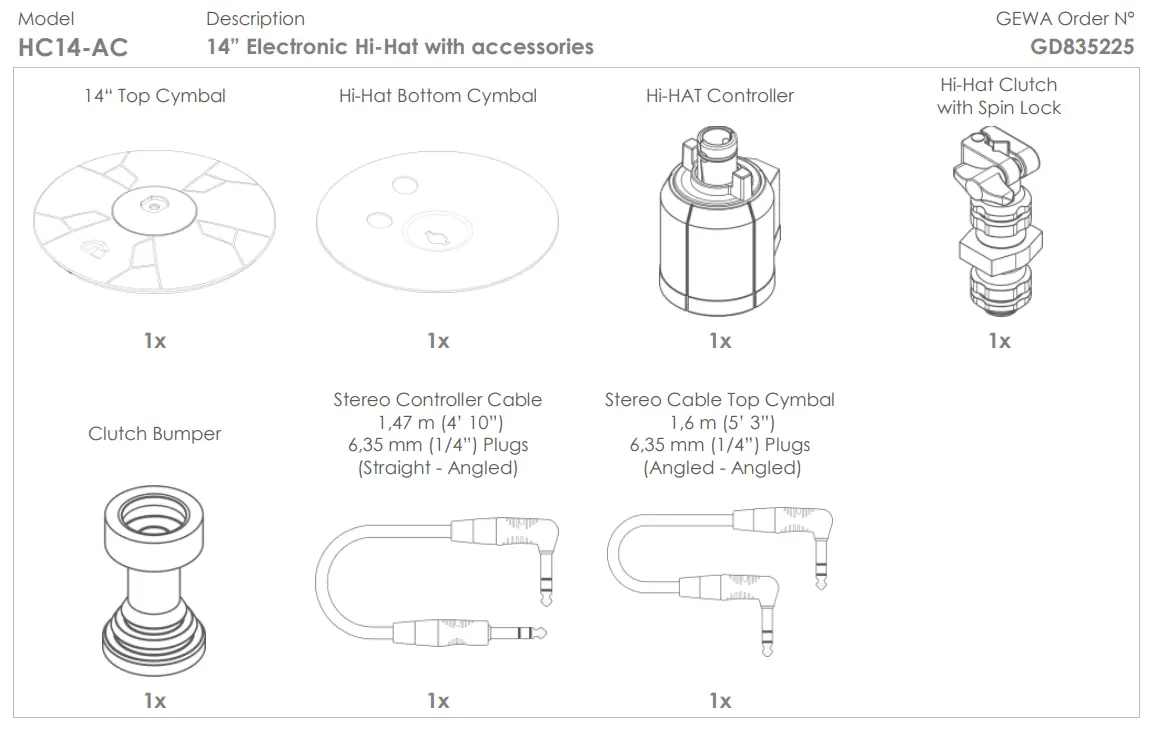
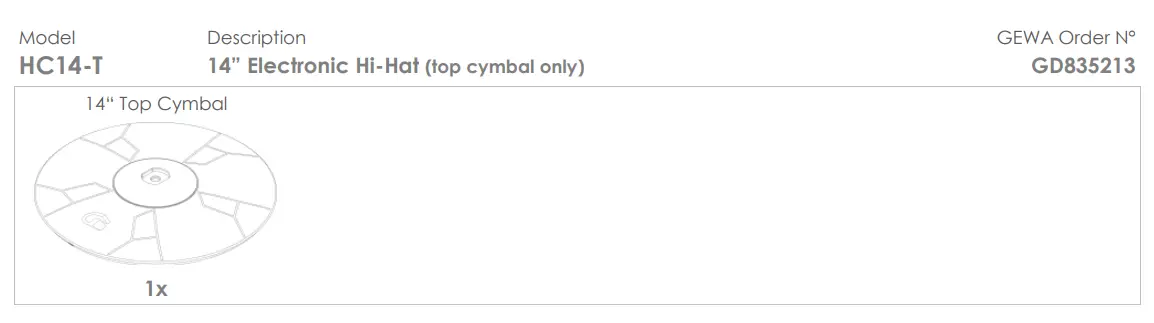
PACKAGE CONTENTS
The original packaging contains the following items. Please check carefully the completeness of the purchased product:
ASSEMBLY INSTRUCTIONS
Assembly top cymbal
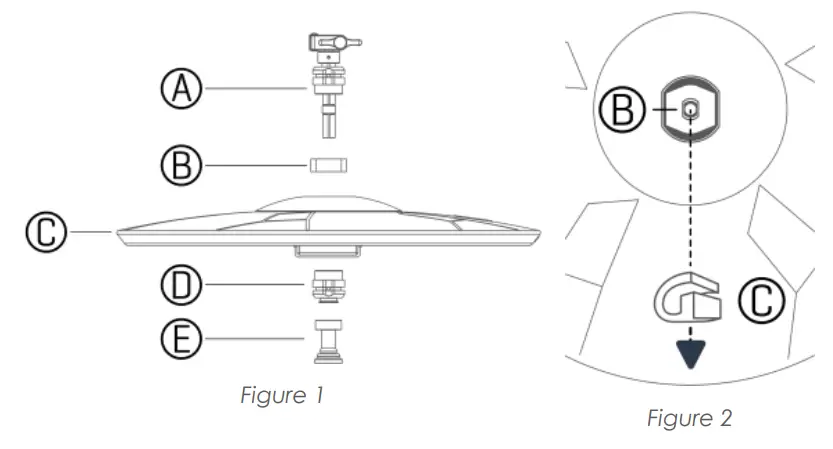
- Unscrew the bottom nut (D) from the Hi-Hat Clutch (A).
- Attach the spinlock (B) to the shaft of the top part of the clutch (A).
- Guide clutch and spin lock through the middle hole of the Top Cymbal (C).
- Orient the spinlock (B) inside the cymbal mold as shown in Figure 2.
- Screw the bottom nut (D) onto the shaft of Clutch (A) again and clip the clutch bumper (E) on the bottom nut (D).
- Lightly clamp the cymbal by fastening the top nut (A).
Assembly bottom cymbal
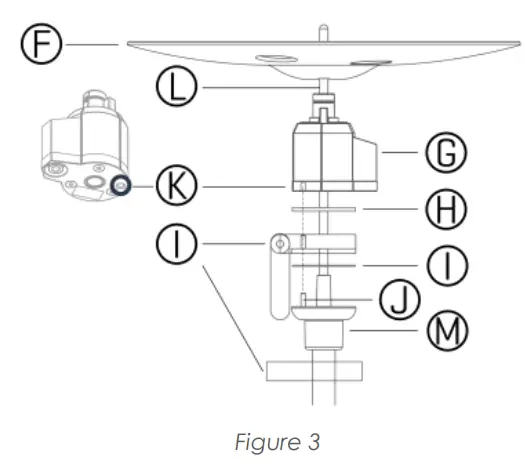
- Remove any felt padding from the Hi-Hat seat (M) of the stand (see also compatible stands).
- Place the steel washer (I) on the seat.
- (Optional) Only for Hi-Hat seats without pin (J): Attach the universal cymbal seat (I) to the hi-hat cymbal seat (M).
- Place the rubber washer (H) on either cymbal seat or universal cymbal seat.
- Guide the Hi-Hat Controller (G) over the Hi-Hat rod (L) and align hole (K) with pin (J).
- Place the Bottom cymbal (F) on the controller (G) and match the profiles around the middle hole.
- Loosen the clamp of the Hi-Hat stand top tube and orient the whole system. Arrow (A2) on the bottom cymbal should face the player. With the correct orientation, fasten the tube clamp again.
HC14 cable connections – Trigger Type Dual
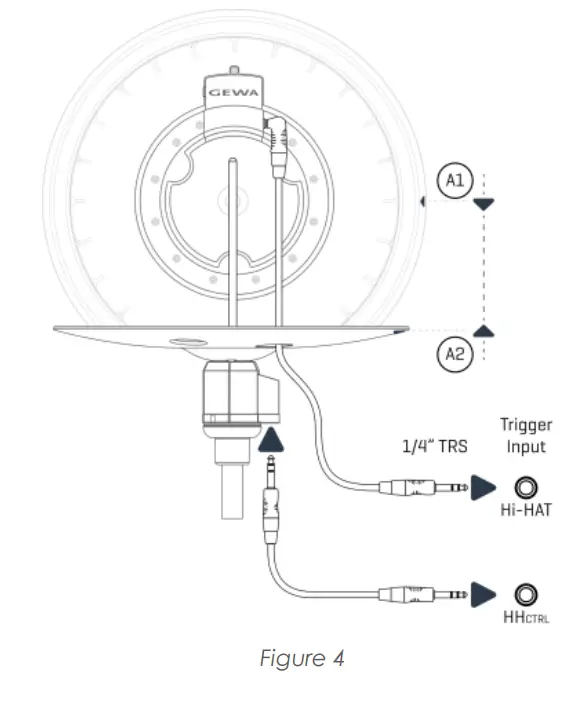
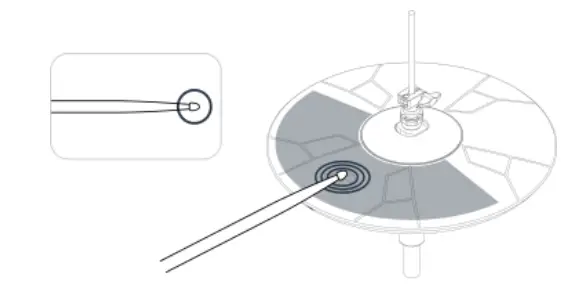
- Take the top cymbal (C) and connect the stereo cable (angled – angled) to the jack closest to the middle hole (see Figure 4).
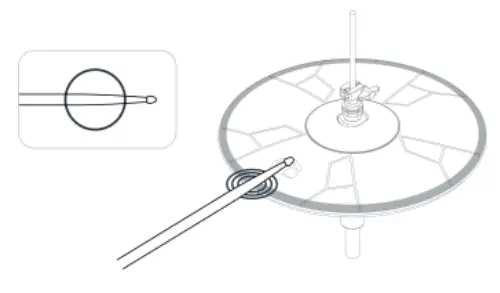
- Guide the cable through the hole of the bottom cymbal which is closest to the Hi-Hat rod.
- Align the arrows (A1) and (A2) and guide the top cymbal over the HiHat rod, so that both cymbals rest on top of each other.
- Straighten the cable carefully if needed.
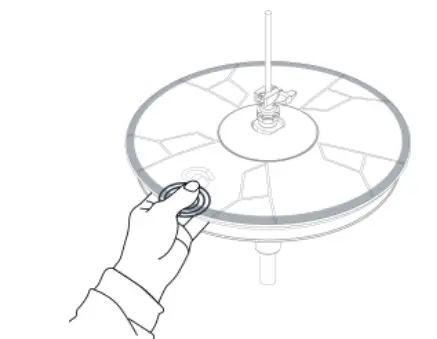
- Connect the straight plug of the Stereo Controller Cable to the Hi-Hat Controller as shown in Figure 4.
- Connect both cables to the corresponding Trigger Inputs of your drum console as shown in Figure 4. The naming convention regarding trigger Inputs might vary from manufacturer to manufacturer, but always offer individual inputs for Cymbal and Controller.
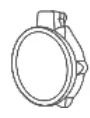
Height adjustment top cymbal (GEWA System)For the use with GEWA factory Trigger Banks, the top cymbal needs to be mounted high enough, so that the Clutch Bumper (E) does not press down the controller shaft (O). See Figure 6 for comparison.
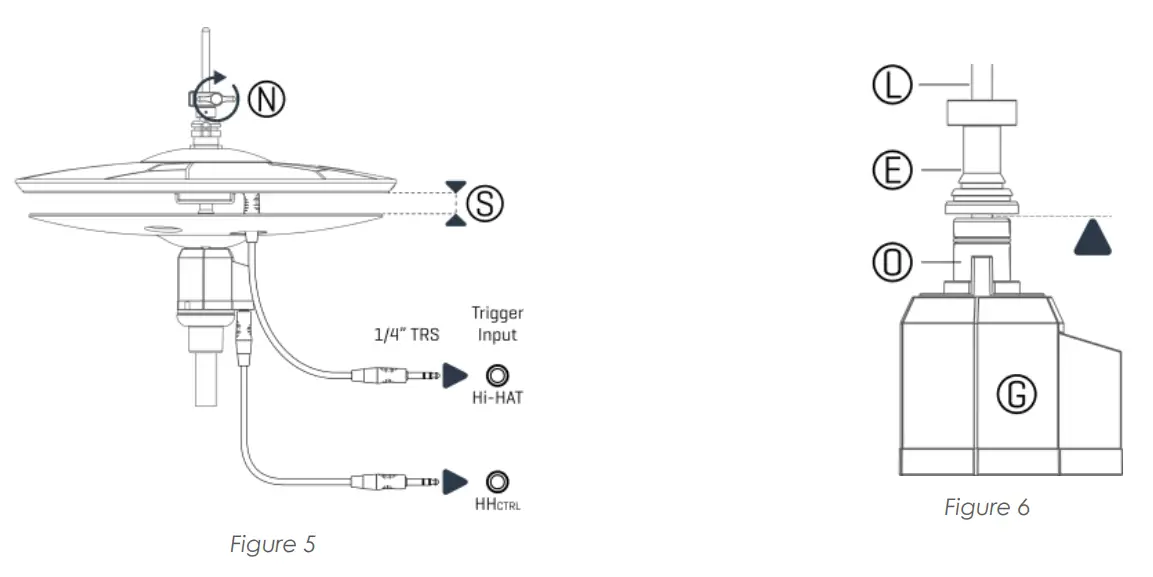
- Lift the top cymbal gradually, until the carriage of the Hi-Hat Controller (O) stops following the movement.
- In this position, fasten the clutch wing screw (N) as shown in Figure 5.
- After step 2, the Clutch Bumper (E) should be touching the carriage Hi-Hat Controller (O), without pressing the shaft down (see Figure 6). This corresponds to a inimum cymbal spacing (S) of approximately 19 mm (¾”).
- (Optional) Repeat steps 1-3 with a higher position of the top cymbal for wider cymbal spacing.
NoteGEWA Drum Consoles: Cymbal spacing below the minimum (S) is possible but requires adjusting the trigger parameter “High Position” (Hi-Hat Controller). For more information, please refer to the section Trigger Settings in the owner´s manual of your GEWA drum console.
TRIGGER SETTINGS
 Having set up the hardware along the lines described in this document, proceed with the trigger settings in your drum module. The operation with GEWA Consoles requires loading the Trigger Bank shown below. Regarding other manufacturers, please take note of the hints given.
GEWA consoles
| Trigger Bank: | GEWA HH14 |
| Input Channel: | Hi-Hat |
Other manufacturers*
- Check first whether your drum module supports the trigger types (Sensors) built into GEWA pads.
- Check whether the manufacturer of your module offers a trigger bank for the GEWA pad you want to connect.
- Consult the owner´s manual of your drum module for Information about trigger setups, accessible parameters and customization of 3 rd party equipment.
Note*Although GEWA cymbals are manufactured to meet industry standards of analogue trigger systems, GEWA does not guarantee flawless functioningwith equipment of other manufacturers. The operation of this product with 3rd party equipment is at your own risk. If you still decide to operate this product with 3rd party drum modules, please take first note of the hints above.
PLAYING TECHNIQUES
Hi-Hat PedalOpen-Closed
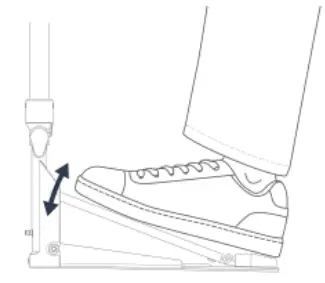
The Hi-Hat sound will vary in any of its sound components (Bell, Bow, Edge), depending on the angle of the foot board. In closed states, the controller can distinguish between splash techniques (short closing time) and chick techniques with longer closing times. The full potential of electronic Hi-Hats is described by the interplay between, Cymbal, ontroller, Pedal action and Sound Module.Closed with additional pressure
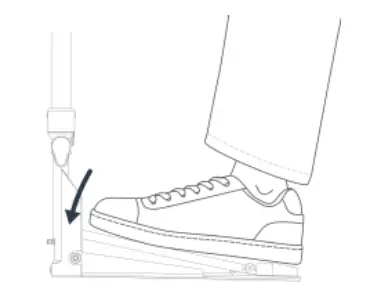
Applying even more pressure in closed states can alter the closed sound towards an even tighter sound. Hi-Hat sounds will become even sharper, while applying this technique to bass Drums, it can be utilized to mimic the effect of burying the beater (pitch bend).Hi-HatTip Stroke (Bow)
Strike the bow region with the tip of the stick within the highlighted area. This will trigger the bow sound. Use this technique in conjunction with the pedal techniques to roduce different sound qualities of the cymbals.Edge Stroke
Strike the edge with the shoulder of the stick in the region of the edge sensor. This will trigger the edge sound. Use this technique in conjunction with the pedal techniques to roduceopen and closed edge sounds.Bell Stroke

Bells on acoustic cymbals produce musical sounds using either the shoulder or thetip of the stick. Utilize both techniques to trigger the bell sound. Use this technique in onjunction with the pedal techniques to make use of the full range of bell sounds stored within a multi-layered sample.Cymbal Choke
After performing an Edge Stroke, subsequently apply pressure to the edge sensor using the fingers. This will prevent the edge sound from sustaining any longer. Regarding Hi- ats this technique is only practical for longer sounding,open sounds.With pressure applied to the edge, striking the cymbal will result in a short, staccato edge sound.
COMPATIBLE STANDS
Compatible Hi-Hat stands (HC14 & HHC)

The following measurements describe the minimum requirements for a Hi-Hat stand to fit the GEWA HHC Hi-Hat Controller. Note that the HHC is not a DIY product. It is a spare part for the HC14 Hi-Hat Cymbal and only works in conjunction with Clutch, Top Cymbal and Bottom Cymbal included with HC14. To prevent the Controller from spinning freely on the Hi-Hat seat, additional accessories might be required.
| Measure in [mm] | Measure in Inch [“] | |||
| A | Rod Diameter | max | 7 mm | ¼” |
| B | Excess Rod Length | min | 220 mm | 8 ¾” |
| C | Excess Sleeve Height | max | 25,4 mm | 1” |
| D | Hi-Hat Sleeve Width | max | 11,5 mm | 7/16” |
TECHNICAL DATA
HC14 Hi-Hat cymbal (Included with drum set configurations)
| Size | 14″ |
| Sensors | Bow (piezo ceramic element) |
| Edge & Choke (FSR Switch – MIDI velocity from piezo signal) | |
| Bell (FSR Switch – MIDI velocity from piezo signal) | |
| Choke | Yes |
| Connections | Trigger OutputHi-Hat Control OutputBell Trigger Output (optional for 3Way triggering) |
| Dimensions | 133 (H) x 355 (Ø) mm5 14 (H) x 14 (Ø) inches |
| Weight | 1280 g/ 2 lbs 13 oz |
| Accessories included | Owner’s manual (this document) |
HC14-AC Hi-Hat cymbal with accessories
| Size | 14″ |
| Sensors | Bow (piezo ceramic element) |
| Edge & Choke (FSR Switch – MIDI velocity from piezo signal) | |
| Bell (FSR Switch – MIDI velocity from piezo signal) | |
| Choke | Yes |
| Connections | Trigger OutputHi-Hat Control OutputBell Trigger Output (optional for 3Way triggering) |
| Dimensions | 133 (H) x 355 (Ø) mm5 1/2 (H) x 14 (Ø) inches |
| Weight | 1580 g / 3 lbs 8 oz |
| Accessories included | Hi-Hat clutch, 2 x 6,35 mm (1/4”) TRS stereo cables (Controller & Cymbal), owner´s manual (this document) |
 report this ad
HC14-T Hi-Hat top cymbal
| Size | 14″ |
| Sensors | Bow (piezo ceramic element) |
| Edge & Choke (FSR Switch – MIDI velocity from piezo signal) | |
| Bell (FSR Switch – MIDI velocity from piezo signal) | |
| Choke | Yes |
| Connections | Trigger OutputBell Trigger Output (optional for 3Way triggering) |
| Dimensions | 52 (H) x 355 (Ø) mm2 (H) x 14 (Ø) inches |
| Weight | 850 g/ 1 lb 14 oz |
| Accessories included | Owner’s manual (this document) |
For reasons of product improvement, the specifica-tions and/or appearance of this unit are subject to change without prior notice. The present specifications describe the version of the product at the time this document was issued. For the latest specifications please refer to gewamusic.com.
![]() GEWA music GmbHOelsnitzer Straße 5808626 AdorfGERMANYwww.gewamusic.comManufacturerGEWA music GmbHOelsnitzer Straße 5808626 AdorfGERMANY
GEWA music GmbHOelsnitzer Straße 5808626 AdorfGERMANYwww.gewamusic.comManufacturerGEWA music GmbHOelsnitzer Straße 5808626 AdorfGERMANY
References
Gewa Italia – GEWA music Italia
GEWA Drum Workstation G9
Gewa France – GEWA music France
Gewamusic – English
Gewa Česká republika – GEWA music Tschechien
Gewa Deutschland – we engineer music
Gewa Portugal – GEWA Portugal
Gewa International – GEWA music International
Gewa España
Gewa Polska – GEWA music Polen
Gewa Deutschland – we engineer music
[xyz-ips snippet=”download-snippet”]