GIANT MY22 Crest SL 34 Suspension Fork User Manual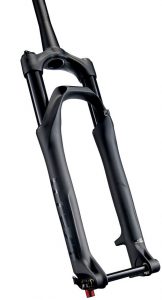
INTRODUCTION
Congratulations on purchasing the new Giant Crest SL 34 suspension fork. The all-new Crest SL 34brings state-of-the-art features and premium performance to a broader range of off-road riders. Featuring a Thixomolded 34mm stanchion chassis, and introducing an all-new refined lubrication system, the Crest SL 34 is engineered to balance stiffness, lightweight and durability. The dedicated tuned damper comes with low speed compression adjustment and an ample rebound circuit to help every rider find their best setting. The Crest SL 34 also uses an all-new fluid lubrication system to improve smoothness. Plush and precise, the Crest SL 34 brings high-end suspension to a whole new level.
IMPORTANT: PLEASE READ BEFORE RIDING
This user manual contains important safety, performance and service information. Please keep it for future reference. We strongly urge you to read this manual before your first ride. If you have any questions about this manual or your Crest SL fork, please contact your local Giant authorized retailer.
![]() WARNING
WARNING
- Do NOT use the suspension fork for the following types of riding: free ride, downhill or other types of extreme riding
- Do NOT use this suspension fork on E-bikes. E-bikes require e specific parts.
- Ignoring safety instructions can cause serious injury or death.
- Do NOT use a high pressure washer to clean the suspension fork. Failure to comply will damage the product and void its warranty.
![]() CAUTION
CAUTION
- Please ensure the suspension fork matches your bicycle’s specification.
- Maximum riding weight is 136kg (299lbs). This includes rider + accessories. For safety, please do not exceed the specified weight limit.
- Modification of the product from its original condition is not covered by Giant limited warranty. Disassembly or modification of any type to the Crest SL 34 fork WILL VOID the warranty.
- Regularly maintain your Crest SL 34 fork through a Giant authorized retailer. Maintenance and replacement of components by a non-authorized retailer WILL VOID the warranty. All service and replacement parts must be genuine Giant components only.
- Make sure to comply with the setting, riding style, maintenance and service instructions to ensure your safety. Ignoring safety instructions can cause serious injury or death.
SERVICE AND TECHNICAL SUPPORT
If you encounter difficulties, or are uncertain about anything mentioned in this user manual, please contact a Giant authorized retailer.
For more information, please visit:https://www.giant-bicycles.com/global/manuals
To find a Giant authorized retailer or to learn more about Giant Bicycles,please visit: www.giant-bicycles.com

CHECK YOUR BIKE BEFORE RIDING
Check the correct functioning of the braking system. For more information on various common brake systems please visit:
- Shimano: https://si.shimano.com/#/
- SRAM: https://www.servicearchive.sram.com/service
- TRP: https://trpcycling.com/downloads/
- Tektro: https://www.tektro.com/download.php?t=7
- If you are unsure of which brake system your bike is equipped with, please consult with your Giant authorized retailer.
Check the correct tire pressure for your tire type and riding style.
If you are unsure of which tire your bike is equipped with, please consult with your Giant authorized retailer.
Check the correct tightness of the thru axle. For more information, please visit:
- Giant: https://www.giant-bicycles.com/global/manuals
- If you encounter difficulties, please contact a Giant authorized retailer.
Check the surface of the suspension fork for leaks, bending, deformation, cracks, etc.
- STOP riding your bike immediately and contact a Giant authorized retailer if you encounter any issues.
Check the correct air pressure setting of the suspension fork.
- If you encounter difficulties, please contact a Giant authorized retailer.
Check the correct tightness of all fasteners. For more information, please visit:
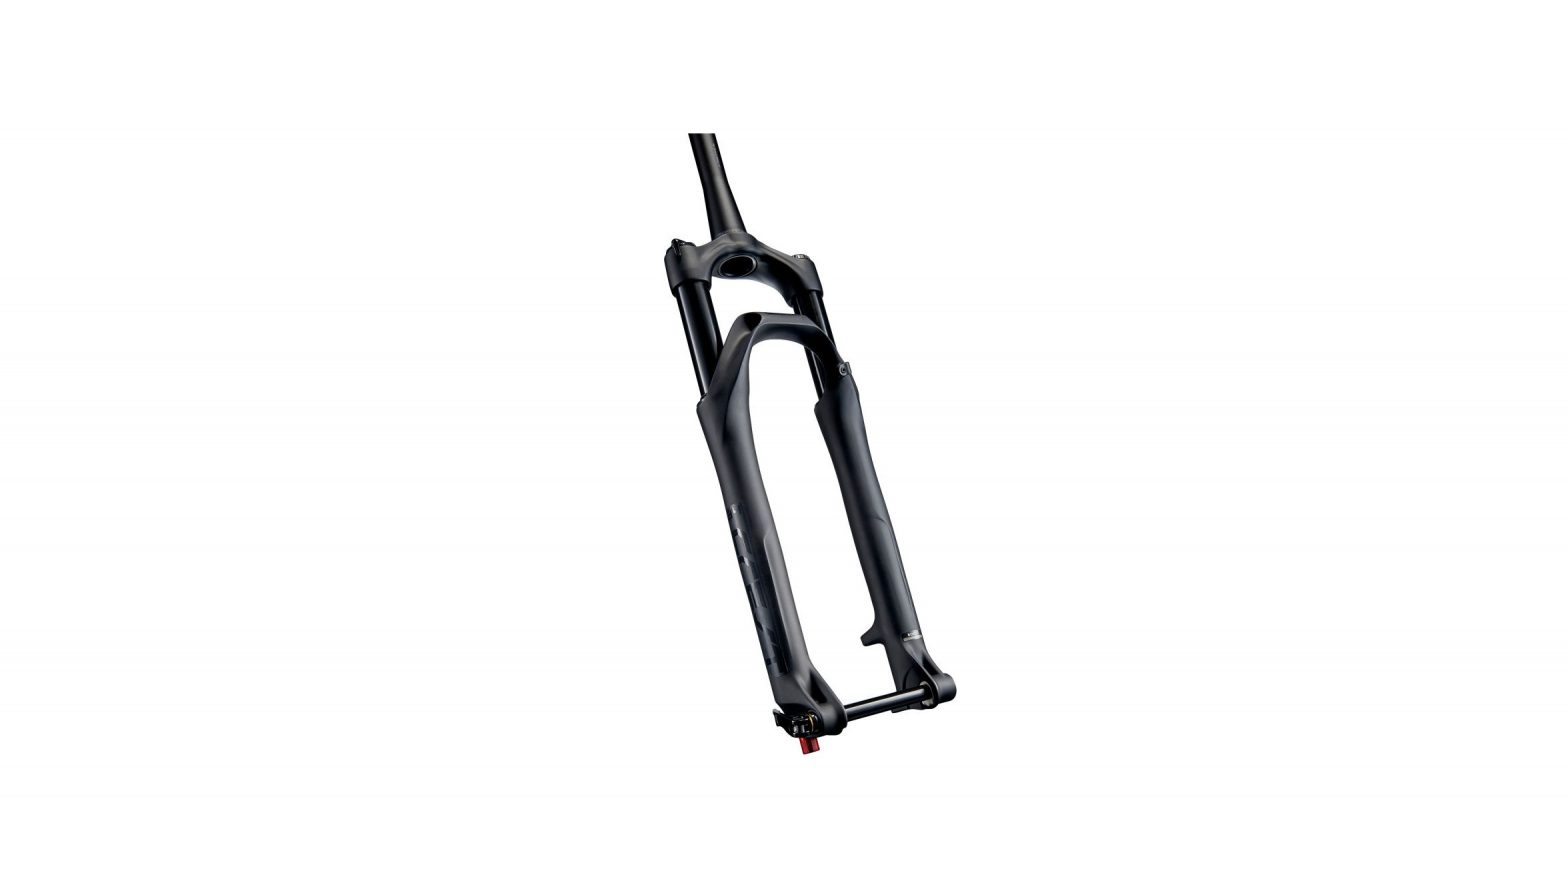
PRODUCT INTRODUCTION

- ❶Tapered steerer tube
- ❷ Air spring cap
- ❸ 34mm stanchion
- ❹ Brake cable guide
- ❺ Lower leg
- ❻ Low speed compression cap
- ❼ Travel indicator o-ring
- ❽ Rebound adjustment knob
- ❾ Thru axle
- ❿ Crown
- ⓫Lower leg arch
INSTALLATION INSTRUCTION
![]() WARNING
WARNING
- The suspension fork should be installed by a Giant authorized retailer in accordance with stated installation instructions. Improper installation will cause malfunction of your suspension fork and could lead to serious injury or death.
- Bending, deforming and cracks on the surface of steerer tube can cause a break or malfunction which can lead to serious injury or death.
- Modification of any type to the fork WILL VOID the warranty. Any modifications of steerer tube other than cutting to the appropriate length to fit your bicycle can cause a break or malfunction which can lead to serious injury or death.
- The spacers of the steerer tube should be less than 30mm from bottom of stem to top of the head tube. More than 30mm of spacers can cause a break or malfunction which can lead to serious injury or death.
- Never use a fork with a too short steerer tube! The gap between the top of the steerer tube and the top of the stem should be greater than 2mm but less than 5mm. And the top of the steerer tube should be higher than the upper clamp bolt of the stem. An insufficient length of steerer tube can cause a break or malfunction leading to serious injury or death.
- Refer to the user manual of the handlebar stem manufacturer for correct installation. Improper installation can cause a break or malfunction which can lead to serious injury or death.
FORK INSTALLATION
Ensure that the suspension fork fits every specification of your frame, e.g., travel, headtube size.Remove the original fork from the bike.Remove the headset crown race from the original suspension fork.Refer to the user manuals of the headset manufacturer. Install headset crown race onto the new suspension fork.
Measure the length of steerer tube of the original suspension fork and replicate the measurement on the steerer tube of the new suspension fork. Cut the steerer tube to length (Always double check the measurement! Measure twice, cut once).
Use a star nut setting tool to insert the star nut at a depth 12~16mm below the top of the steerer tube.
Check if the headset is installed correctly. Fit the suspension fork into the frame.
If required, install spacers. Please note that the total stack height under the stem should be less than 30mm
Install the stem on the steerer tube. Please refer to the user manual of the stem manufacturer to install the stem properly.Tighten the top cap to the torque value recommended in the user manual of the headset manufacturer.Tighten stem clamp bolts to the torque value recommended in the user manual of the stem manufacturer.If you have difficulties or are uncertain about this procedure, contact a Giant authorized retailer.
DISC BRAKE INSTALLATION
 Refer to the user manual of the disc brake manufacturer to install the brake caliper on the fork leg. Fix the disc brake hose onto the fork arch using the supplied bracket and tighten the bolt to the recommended torque value, as shown in fig. A
WARNING
- It is strongly recommended that you have the disc brake system installed and/or checked by a Giant authorized retailer in accordance with the manufacturer’s user manual.
- Before riding, check disc brake system installation again. Improper installation can cause malfunction of the system and lead to serious injury or death.
CAUTION
- The minimum brake rotor size is: 180 mm. Refer to the user manual of the disc brake manufacturer for the installation procedure, install the correct adapter and tighten the bolts to the recommended torque value. Use of a brake rotor bigger than the original specification will void the warranty.
- The caliper mounting bolts must have 9 mm to 14 mm thread engagement to ensure proper mounting.
- Follow all directions described in the user manual of the disc brake manufacturer for correct installation of the disc brake system.
FRONT WHEEL INSTALLATION
WARNING
Giant Crest SL 34 models are designed to work with 15mm thru-axle system. Please consult a Giant authorized retailer to make sure you have a complete understanding of how to correctly install the thru-axle before riding. Improper installation can cause malfunction of the wheel and lead to serious injury or death.
THRU AXLE SYSTEM
Install the front wheel into the Giant Crest SL 34 suspension fork. Align the hub of the front wheel with dropouts of the fork, making sure the rotor of the disc brake system is correctly aligned between the brake pads of the brake caliper. If the hub and/or rotor do not align, do not force the wheel, remove itand repeat the process. Refer to the user manual of the disc brake manufacturer for proper setup and alignment of the disc brake.
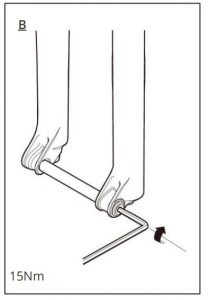
Insert the thru-axle from the non-disc side of the fork.Tighten the thru-axle by using a 6mm Allen key to the recommended torque value of 15Nm (Fig B)If you are unsure about the tightness or the position of the thru-axle after installation, please consult a Giant authorized retailer.
TIRE & WHEEL SIZE COMPATIBILITY
The Giant Crest SL 34 suspension fork is available for 27.5 inch and 29 inch wheel dimensions.
| Minimum Tire Clearance | Maximum Tire Size | |
| Crest SL 34 27.5 | 6mm | 27.5 x 2.6 |
| Crest SL 34 29 | 6mm | 29 x 2.4 |
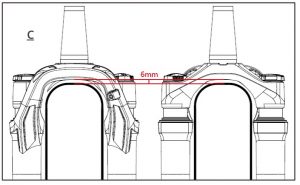
Each combination of tire and rim must be checked with the fork fully compressed, a minimum of 6.0 mm clearance from tire to crown and tire to lower leg arch is required, as shown Figure C. Please check the original specification of your bike and refer the manufacturer’s user manuals for tire installation recommendations and instructions.
WARNING
Insufficient tire clearance can cause malfunction of your wheel and can result in serious injury or death.
SUSPENSION FORK SETTING
RAMP ADJUSTABLE TWIN AIR SPRING
The Crest SL 34 fork features a lightweight air spring with a self-equalizing negative air chamber for increased sensitivity. With tight inner diameter tolerances and precise piston, the air springs give a progressive spring rate, and provide more support towards to full compression travel. Riders can also fine-tune the positive spring using volume spacers to adapt to their riding style and rider weight.
SAG SETTING
Setting appropriate the sag value of your Giant Crest SL 34 suspension fork to achieve optimal suspension performance:
Before setting the sag value, turn the rebound damper knob all the way counter-clockwise(to the fastest setting), and turn the low speed compression knob counter clockwise to open position
Check your weight with the suggested air spring pressure value and use a shock pump to add air until you reach the correct suggested pressure.Using a wall, fence, tree or an assistant for support, get on your bike wearing full riding kit. Compress the fork a few times and pose a natural riding position with both feet on the pedals and hands on the handlebar.
Without changing the position too much or with an assistant to help, slide the travel indicator o-ring down the stanchion to the wiper seal of the fork lower. Gently get off your bike and measure the distance from the seal of the fork lower to the travel indicator o-ring to attain the sag value.Adjust air pressure and repeat steps 1-5 above until you reach recommended sag.IMPORTANT: If the recommended air pressure for rider weight is less than 100psi, add air to the chamber until you reach 100psi and then use the shock pump to gradually release air to the desired pressure.
| SUGGESTED SAG VALUE | ||
| FORK TRAVEL (mm) | SAG (%) | SAG (mm) |
| 130mm | 20% | 26mm |
| AIR SPRING PRESSURE SETTING | 130MM TRAVEL |
| RIDING WEIGHT kg (lbs) | AIR PRESSURE (psi) |
| 54-64 (120-140) | 60 |
| 64-73 (140-160) | 68 |
| 73-82 (160-180) | 83 |
| 82-91 (180-200) | 98 |
| 91-100 (200-220) | 113 |
| 100-109 (220-240) | 128 |
| >109 (>240) | 140 |
| MAX RIDING WEIGHT LIMIT | 136 kg (299lbs) |
| MAX. AIR PRESSURE | 140 psi |
| FACTORY INSTALLED TOKENS | 2 |
| MAX. NUMBER OF TOKENS | 5 |
If the fork has been in storage for a period of time, be it a couple weeks up to a full winter season, it is recommanded to check the air pressure again.
WARNING
Do NOT exceed the maximum number of air tokens and/or maximum air pressure for the fork.
GIANT TUNING DAMPER
Tuned with input from our experienced suspension developers, the fully adjustable damper can be continuously refined for increased control and to allow a wide range of riders to easily match their suspension with the terrain and their riding style.
LOW SPEED COMPRESSION ADJUSTMENT
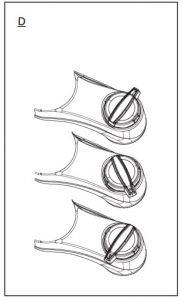 The multi-function adjustable compression circuit has three modes: open mode, trail mode and lockout. Open mode allows full compression for descending on more technical terrain while trail and lockout modes give progressively firmer damping for riding rolling terrain or for climbing, as shown in figure D.
LOCKOUT AND BLOW-OFF
A slight amount of travel movement may be noticeable while the lockout is activated, this is perfectly normal.
If the fork encounters a sudden drop or impact while the lockout is activated, the fork will compress thanks to the blow-off mechanism. The fork will remain locked-out afterwards.
Suspension forks require adequate movement between stanchions and lower legs to stay lubricated internally. Please deactivate the lockout while descending, this helps prolong lifespan as well.
If the bike has been hung up in storage or laid on the side for a while, chances are the lockout may not function fully due to the nature of damper circut design. All you need to do is to deactivate the lockout and keep riding for a couple minutes. The damper will automatically reset itself and the lockout is fully function again.
REBOUND ADJUSTMENT
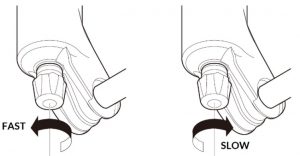 Rebound controls the extension speed after the fork absorbs the shock. The rebound speed can be adjusted to your preferred riding style.
The indexed points are from slowest “0 clicks” position (turn rebound damper knob completely clockwise) to fastest “24 clicks” position (turn rebound damper knob completely counter-clockwise).
CREST SL FORK SERVICE & MAINTENANCE
| Service interval | Action |
| Before riding | Check your fork, bike and all components for wear and damage. |
| After each ride | Clean fork stanchions and wiper seals. |
| After 50 hours of ridin | Fork lower leg service. |
| After 200 hours of riding or 1 year | Air spring and damper service. |
WARNING
- Do NOT use a high pressure washer to clean the suspension fork as this may cause damage to the wiper seals.
- Do not disassemble or modify the suspension fork. This WILL VOID your warranty.
- All fork service must be performed by a Giant authorized retailer or service center.
- The fork must be stored and operated at a temperature between -30°C ~ 80°C.
- If you encounter any issues with your Crest SL 34 fork at any time, please contact a Giant authorized retailer right away.
GIANT LIMITED WARRANTY
Giant Crest SL 34 suspension fork comes with two (2) years warranty from the date of purchase. This warranty applies only to the original owner, and the fork was purchased from a Giant authorized retailer and assembled by that dealer at the time of purchase.
LIMITED REMEDY
Unless otherwise provided, the sole remedy under the above warranty, or any implied warranty, is limited to the replacement of defective parts with those of equal or greater value at the sole discretion of Giant. This warranty extends from the date of purchase, applies only to the original owner, and is not transferable. In no event shall Giant be responsible for any direct, incidental or consequential damages, including, without limitation, damages for personal injury, property damage, or economic losses, whether based on contract, warranty, negligence, product liability, or any other theory.
EXCLUSIONS
The above warranty, or any implied warranty, does not cover:
- Normal wear and tear on parts in situations where there are no assembly or material defects.
- Consumable components including bolts, nuts, caps, cartridge, rebound knob, O/X-ring, thru axle, quick release, and piston set.
- Products serviced by anyone other than a Giant authorized retailer.
- Modifications of the product from its original condition.
- Use of this product in abnormal or extreme riding conditions, competition, commercial activities and / or for purposes other than those for which this product was designed.
- Damage caused by failing to follow the User’s Manual.
- Paint, finish and decal damage resulting from normal wear and tear or from taking part in competitions, jumping, downhill and/or training for such activities or events or as a result of exposing the product to, or operating the product in, severe conditions or climates.
- Labor charges for part replacement or changeover.
Except as is provided by this warranty and subject to all additional warranties, Giant and its employees and agents shall not be liable for any loss or damage whatsoever (including incidental and consequential loss or damage caused by negligence or default) arising from or concerning any Giant product.
Giant makes no other warranties, express or implied. All implied warranties, including the warranties of merchantability and fitness for a particular purpose are limited in duration to that of the express warranties stated above.
Any claim against this warranty must be made through a Giant authorized retailer or distributor. The purchase receipt or other proof of the date of purchase is required before a warranty claim may be processed
Claims made outside the country of purchase may be subject to fees and additional restrictions.Warranty duration and details may differ by country. This warranty gives you specific legal rights, and you may also have other rights which may vary from place to place. THIS WARRANTY DOES NOT AFFECT YOUR STATUTORY RIGHTS.

References
Giant Bicycles | The world’s leading brand of bicycles and cycling gear
Service | SRAM
TEKTRO BRAKE SYSTEMS – Download
Manuals & Technical Documents
Downloads – TRP Cycling search cart user menu TRP_Logo TRP_Logo TRP_CG_Logo_ twitter facebook instagram TRPLogoWhite_
Manuals | Giant Bicycles Official site
Giant Bicycles | The world’s leading brand of bicycles and cycling gear
[xyz-ips snippet=”download-snippet”]