
GIGABYTE™ G5 Quick Start Guide
Using GIGABYTE Notebook for the First Time

- Connect the power cord to the AC adapter.
- Connect the adapter to the Power (DC) Input Port on the back side of the notebook.
- Connect the power cord to the power outlet.
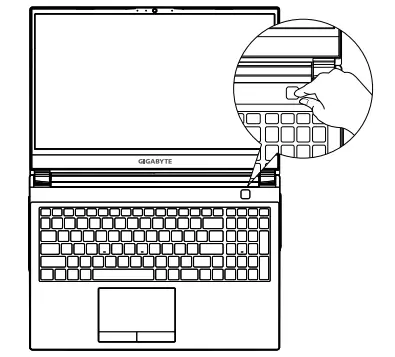
- While the Battery Indicator lights on, press the Power Button to turn on the notebook.
Switching on the Power:
After you turn on the notebook for the very first time, do not turn it off until the operating system has been configured. Please note that the volume for the audio will not function until Windows® Setup has completed.
![]() IMPORTANT
IMPORTANT
- Ensure that your Notebook PC is connected to a grounded power adapter before turning it on for the first time.
- When using your Notebook PC on power adapter mode, the socket outlet must be near to the unit and easily accessible.
- Locate the input/output rating label on your Notebook PC and ensure that it matches the input/output rating information on your power adapter. Some Notebook PC models may have multiple rating output currents based on the available SKU.
- Power adapter information:
- Input voltage: 100-240Vac
- Input frequency: 50-60Hz
- Rating output voltage: 19.5 Vdc / 9.23 A
Full User Manual
For more user guide and software instruction, please refer to the below link: https://www.gigabyte.com/Support
* Product specifications and product appearance may differ from country to country. We recommend that you check with your local dealers for the specifications and appearance of the products available in your country.* Although we endeavor to present the most accurate and comprehensive information at the time of publication, we reserve the right to make changes without prior notice.
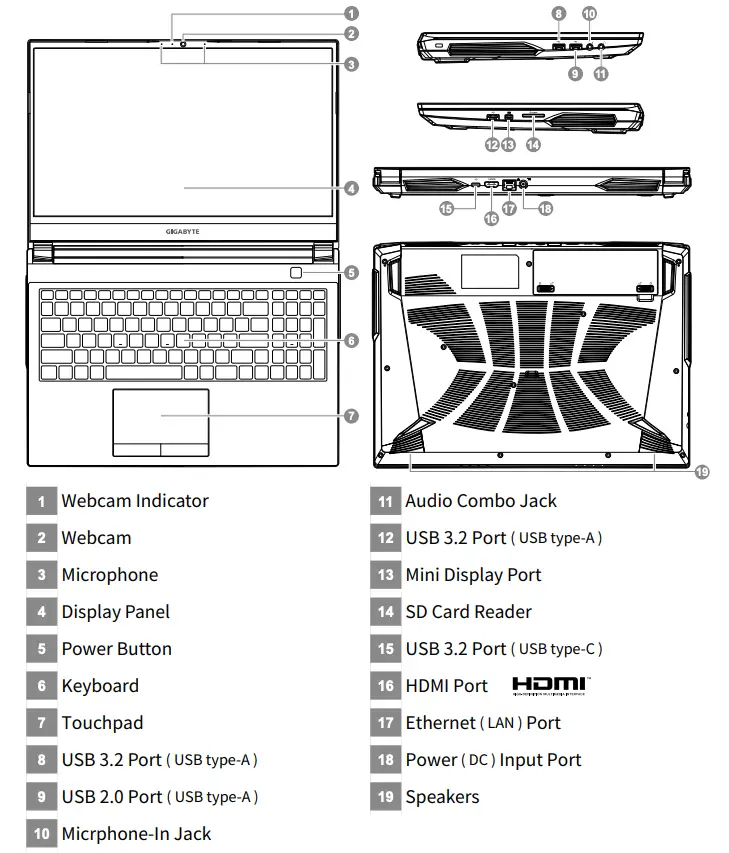
GIGABYTE Notebook Tour
![]() IMPORTANT:
IMPORTANT:
- Do not remove the built-in lithium battery. For any service needs, please contact your local GIGABYTE Authorized Service Center.
- Do not install the Notebook PC on a slant or a place prone to vibrations, or avoid using the Notebook PC in that location for a long time.This increases the risk that a malfunction or damage to the product will occur.
- Do not store and use Notebook PC in direct sunlight or the location where temperatures exceed 112°F (45°C) such as inside a vehicle.There is a danger of Lithium-ion battery expansion and aging.
- Do not use the Notebook PC in a badly ventilated location such as on bedding, on a pillow or cushion, etc, and do not use it in a location such as room with floor heating as it may cause the computer to overheat.Take care that the Notebook PC vents (on the side or the bottom) are not blocked especially in these environments. If the vents are blocked, it may be dangerous and cause the Notebook PC to overheat.
Hotkeys
The computer employs hotkeys or key combinations to access most of the computer’s controls like screen brightness and volume output. To activate hotkeys, press and hold the key before pressing the other key in the hotkey combination.
![]()
System Backup Guide
![]() WARNING
WARNING
- You can backup original recovery image through this application in case of losing by device damage.
- You can backup original recovery image to USB Flash Drive and restore the system if any storage system replacement with the recovery USB Flash Drive.
- Before you restore the system through the recovery USB Flash Drive, please make sure that you have already made the backup of your data.
- Please DO NOT shut down or un-plug the system when performing backup through recovery USB Flash Drive.
![]()
- Please plug in the USB Flash Drive which is at least 32GB in capacity to make the original image (backup the data in USB first. All data will be eliminated during the creation of recovery USB Flash Drive)

- Insert the driver disk to your optical drive and run the install of “System Backup” (for noneODD model, please use USB ODD device or download from http://www.gigabyte.com)
- Run the “System Backup”after finishing the install.

- Select your USB disk from the drop-down list and start to create the recovery USB disk.

- The window will pop out when the creation of recovery disk is done.
- Please press F12 on starting the system when you need to restore the system. Select ” boot from recovery USB Flash Drive ” and the system will be restored.
- The time needed for restore will be around 30 mins (time needed may vary by USB disk model).
Recovery Guide
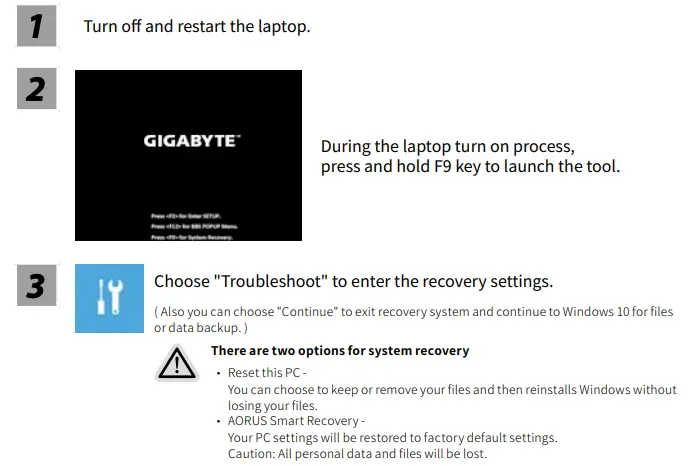
System Recovery (Restore your laptop operating system)
When something is going wrong with the laptop operating system, the storage of the laptop has a hidden partition containing a full back up image of the operating system that can be used to restore the system to factory default settings.
![]()
Note
- If the storage has been switched or the partition deleted, the recovery option will no longer be available and a recovery service will be needed.
- The recovery function is only available on devices with O/S preinstalled. Devices with DOS do not have the recovery function.
Launch System Recovery
The system recovery feature is preinstalled before the laptop is shipped from the factory. The option menu allows you to launch the Windows recovery tool to reinstall the operating system to factory default.
The brief introduction below will show you how to start the recovery tool and restore your system.
![]() All ready to go
All ready to go
Make sure your PC is plugged in. This will take a few minutes.
Windows 10 Recovery Guide


Appendix
- Warranty & Service:Warranty and service and related information please refer to the warranty card or GIGABYTE service website as the below link: https://www.gigabyte.com/Support/Laptop
- FAQ:FAQ (Frequent Asked Questions) please refer to the below link: https://www.gigabyte.com/Support/Faq
Control Center Application
The Control Center application is a quick computer configuration application, which allows you to change power mode, set keyboard backlight and assign a single key to launch multiple key combinations.
Control Center Overview
- Power Modes
- LED Keyboard
- Flexikey
- FAN speed control
 report this ad
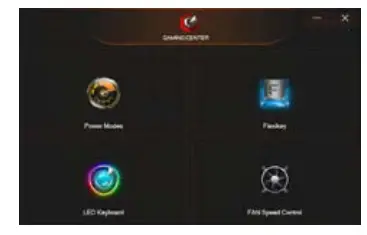
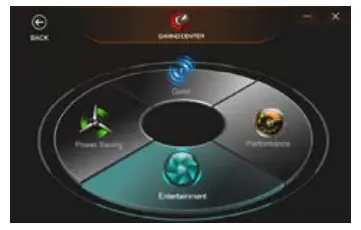
- Power ModesTo set different power mode.

- Quiet
- Performance
- Entertainment
- Power Saving
- LED KeyboardTo set keyboard backlight.
- Light Effects:The buttons surrounding the swatch allow you to alter the effects of the keyboard backlit.
- Keyboard Sleep timer:enter the value to set backlit sleep timer.
- Brightness:to set the brightness of keyboard backlight.
- Flexikey®The Flexikey® application is a quick hotkey configuration application. It allows you to assign a single key to launch multiple key combinations, programs and applications. You also can create text macros and disable certain keys. The application can also be used to configure the mouse buttons and create hotkeys for gaming.Flexikey® Overview1. Profile2. Keyboard Macro3. Statistics4. Mouse Macro5. Disable/EnableKeyboard MacroYou can set macro on every keycap except the black key here.Just click the key you want to set macro and it will pop out the macro assign page.1. Name: naming the macro profile2. Action Type3. Start Record4. Enable Delay Time5. RestoreSetting Steps :a. Choose an action key “each key”, the name can be edited by “1”b. Choose an action type by “2”c. Choose “EXPRESS KEY” as an action type if you want to set a macro key. Then click “3” to start record and press again to stop it.Statistics1. Start RecordClick to start recording the frequency of key presses.Different colors will represent the frequency of key presses, purple is the most frequent through to green is the less frequent.2. Quick DisableThe color bar at left side of the screen, displays the color code against the number of key presses. click to disable the color which corresponds to the keys you wish to disable, all disabled keys will then change to gray.Mouse MacroYou can set macro on every mouse key cap here. Just click the key you want to set macro and it will pop out the macro assign page.1. Name: naming the macro profile2. Action Type3. Start Record4. Enable Delay Time5. RestoreSetting Steps :a. Choose an action key “each key”, the name can be edited by “1”b. Choose an action type by “2”c. Choose “EXPRESS KEY” as an action type if you want to set a macro key. Then click “3” to start record and press again to stop it.
- FAN speed controlYou can set fan speed on here.

 1. Name: naming the macro profile2. Action Type3. Start Record4. Enable Delay Time5. RestoreSetting Steps :a. Choose an action key “each key”, the name can be edited by “1”b. Choose an action type by “2”c. Choose “EXPRESS KEY” as an action type if you want to set a macro key. Then click “3” to start record and press again to stop it.Statistics
 1. Start RecordClick to start recording the frequency of key presses.Different colors will represent the frequency of key presses, purple is the most frequent through to green is the less frequent.2. Quick DisableThe color bar at left side of the screen, displays the color code against the number of key presses. click to disable the color which corresponds to the keys you wish to disable, all disabled keys will then change to gray.Mouse MacroYou can set macro on every mouse key cap here. Just click the key you want to set macro and it will pop out the macro assign page.
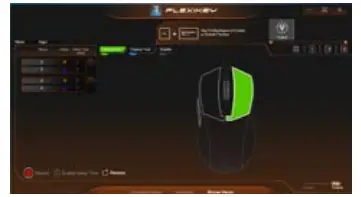 1. Name: naming the macro profile2. Action Type3. Start Record4. Enable Delay Time5. RestoreSetting Steps :a. Choose an action key “each key”, the name can be edited by “1”b. Choose an action type by “2”c. Choose “EXPRESS KEY” as an action type if you want to set a macro key. Then click “3” to start record and press again to stop it.
References
FAQ – GIGABYTE Indonesia
常見問題 – GIGABYTE 技嘉科技
Service / Support – GIGABYTE Global
GIGABYTE Global
Unterstützung – GIGABYTE Germany
服務 / 支援 – GIGABYTE 技嘉科技
GIGABYTE Global
サポート – GIGABYTE Japan
笔记本电脑 | 支持 – GIGABYTE 技嘉科技
Dukungan – GIGABYTE Indonesia
问题集 – GIGABYTE 技嘉科技
FAQ – GIGABYTE France
Soporte y Descargas – GIGABYTE Spain
FAQ – GIGABYTE Japan
支持 – GIGABYTE 技嘉科技
ノートパソコン | サポート – GIGABYTE Japan
FAQ – GIGABYTE Korea
지원 – GIGABYTE Korea
Ordinateur Portable / Netbook | Support – GIGABYTE France
FAQ – GIGABYTE Global
Laptop | Service / Support – GIGABYTE Global
Laptop | Unterstützung – GIGABYTE Germany
Support – GIGABYTE France
Laptop | Dukungan – GIGABYTE Indonesia
[xyz-ips snippet=”download-snippet”]