

PROFESSIONAL MEDICAL PRODUCTS
Gima S.p.A.Via Marconi, 1 – 20060 Gessate (MI) Italy – [email protected]www.gimaitaly.com
__________________________
TERMOMETRO A DISTANZA A INFRAROSSI INFRARED NON-CONTACT THERMOMETER
__________________________
User manual
ATTENTION: The operators must carefully read and completely understand the present manual before using the product.
REF 25591 / YI-400
Wenzhou Yosun Medical Technology Co., Ltd.No. 17, Shahong Road, Lingmen Beibaixiang Town,Yueqing Wenzhou – 325603 Zhejiang, China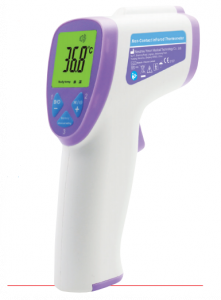 Made in China
Lotus NL B.V.Koningin Julianaplein 10, 1e Verd, 2595AA,The Hauge, Netherlands.Importato e distribuito da/Imported and distributed by:Gima S.p.A. – Via Marconi, 1 – 20060 Gessate (MI) Italy
Congratulations on your purchase of our IR Thermometer. This thermometer is intended for scanning groups of individuals or monitoring an individual for elevated temperatures. Always use a clinical thermometer when high accuracy body temperature measurements are required
Considerations and Warnings:
![]()
- Read all instructions before using this product.
- For the most accurate results, make reading with an ambient (room) temperature of 10 to 40°C (50 to 104°F).
- Make sure the skin is dry and that no hair interferes with the measurement.
- Do not immerse the thermometer in water.
- Avoid touching and/or scratching the infrared sensor lens.
- Always use a clinical thermometer to verify any abnormal temperature measurements.
- Clean the lens area by gently blowing with compressed air and use a damp swab to wipe the lens. Do not use any solvents to clean the lens.
Measurement Notes
- If the meter has been stored in a cold or hot environment, allow it at least 30 minutes to acclimate to room temperature before making measurements.
- To prevent transmission of disease, avoid direct contact with the skin.
- After heavy exercise always wait at least 10 minutes before taking forehead temperature readings.
Storage and maintenance
- Clean the sensor tip after each use. Use a clean cloth or cotton bud that can be moistened with disinfectant, alcohol or warm water.
- To clean the entire device, please use a soft cloth slightly moistened with a mild soapy solution.
- Do not use any harsh cleaning products.
- If prolonged storage is intended, you should remove the battery.
- The device must not be stored or used at an excessively high or low temperature or humidity (see technical data), in sunlight, in association with an electrical current or in dusty locations. Otherwise inaccuracies can occur.
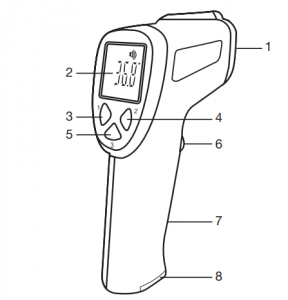
Thermometer Description
- IR sensor
- LCD display

- Body/Object & “-” button
- Voice On/Off & “+” button
- Memory/Setting mode button
- Measurement trigger
- Handle
- Battery compartment
Display Description
- Memory/Memory space number
- Object temperature Mode
- Body temperature Mode
- Voice status
- Low battery icon
- Measurement unit
- Temperature

Temperature Mode settings
- With the meter ON, press “Mode” button, for three seconds until to “F-1” shown to enter the long term calibration drift correction mode. On entering the mode, the previous temperature correction factor will appear on the display. To make a correction, measure a known, fixed temperature source. Enter the correction mode and press the + or – buttons to change the correction value and minimize the difference in readings. Repeat and adjust the correction value as needed until the measurement on the meter matches the known temperature.The mode is applied to Body Temp.
- Press the “Mode” button a second time “F-2” shown to set the alarm temperature limit. Press the + or – buttons to change the value.The mode is applied to Body Temp
- Press the “Mode” button a third time “F-3” shown to set the °C/°F temperature units. The temperature units °C or °F will be shown. Press the + or – buttons to change the unit.
- Press the “Mode” button a forth time “F-4” shown to set the backlit status. Press the + or – buttons to switch from ON to OFF.
- Press the “Mode” button a fifth time “F-5” shown to set the laser status. Press the + or – buttons to switch from ON to OFF.
Notice: Only when the laser head installed.
Mode Function “+” “_“ Default Remark F-1 Setting Deviation Value
Increase 0,1°C
Decrease 0,1°C
0°C Body mode available Effective Range: ±2°C
F-2 Setting Alarm Value Increase 0,1 °C
Decrease 0,1 °C
38.0°C Body mode available Effective Range:
37.0-42.5°C
F-3 Setting Measurement Unit
°F °C °C F-4 Backlit ON/OFF On Off On F-5 Laser setting On Off Off Only when the laser head installed
Save Save and automatic shut off Body Temperature Measurements
Please note that the forehead/temples must be free from sweat and cosmetics and that taking vasoconstrictive medication and skin irritations can distort the result when measuring temperature on the forehead.
- Press the trigger to switch the meter on with one beeper. The device performs a brief self test: all elements of the display are shown for approx. 1 second. Following a successful self test with backlit (Red-Orange-Green).
- Press the “B/O” button for “Body temp” for accurate measurements in the range of 32.0 to 42.9°C (89.6 to 109.2°F).
- Hold the meter by its handle and point it toward the surface to be measured. Measurement distance should be <2.5cm (<1 in).
- Press the trigger to take a temperature reading. The temperature reading appears in the display. If the F-4 MODE of backlit & “ ” button voice ON & F-3 MODE set alarm temperature 38.0°C:
| Temperature (°C) | Temperature (°F) | Fever Teller | Beep |
| T < 32.0 | T < 89.6 | Green | Three beeps |
| 32.0 T_ 37.5 | 89.6 _c. –N 99.5 | Green | One beep |
| 37.6 CT 37.9 | 99.7 CN 100.2 | Orange | One beep |
| 38.0 42.9 | 100.4 CN 109.2 | Red | Ten Rapid beeps |
| T > 42.9 | T > 109.2 | Red | Three beeps |
Notice: Red Backlit is followed alarm temperature limit (Fever alarm) .
- Release the trigger and the reading will hold for approximately 15 seconds after which the meter will automatically shut offNote: Before shutting off, you can take further measurement.
- If the temperature goes above 109.2°F or 42.9°C, Hi will appear in the display.
If the temperature goes below 89.6°F or 32.0°C, Lo will appear in the display![]() Notice: When surrounding temperature is lower than 10.0°C or higher than 40.0°C, it’s not allowed to measure of accuracy in not assured.
Notice: When surrounding temperature is lower than 10.0°C or higher than 40.0°C, it’s not allowed to measure of accuracy in not assured.
Object Temperature Measurements
- Press the trigger to switch the meter on with one beeper. The device performs a brief self test: all elements of the display are shown for approx. 1 second. Following a successful self test with backlit (Red-Orange-Green).
- Press the “B/O” button for “Object temp” for accurate measurements in the range of 0.0 to 100.0°C (32.0 to 212.0°F).
- Hold the meter by its handle and point it toward the surface to be measured.
- Press the trigger to take a temperature reading. The temperature reading appears in the display.
- Release the trigger and the reading will hold for approximately 15 seconds after which thermometer will automatically shut off.
Note: Before shutting off,you can take further measurements.
- If the temperature goes above 212°F or 100°C, “Hi” will appear in the display. If the temperature goes below 32°F or 0°C, “Lo” will appear in the display.
![]() Notice:
Notice:
- The value under this Mode is object temperature instead of core temperature.
- The defaulted infrared from the real temperature according to different emissivity. For example, the reading on stainless steel will be obviously lower than the actual temperature. BE CAUTIONS FOR SCALDING
Data memory
- To review the logged data points, press the “Memory” button for one second while the units is ON until “M” symbol shown on the display. Use the + or – buttons to scroll through the stored measurements and memory locations. To delete all memory data, pls take off the batteries when power on.
Notice: Under Body-Object-switch for “Body temp” Mode, the body temperature memories display;Under Body-Object-switch for “Object temp” Mode, the object temperature memories display;
Battery Replacement
- When the low battery symbol appears in the display, replace the meter’s battery. The battery compartment is located on the bottom of the handle. Press down on the battery compartment lock and at the same time slide the battery compartment downwards. Replace the (2) “AA” batteries and close the battery compartment cover.You, as the end user, are legally bound (Battery ordinance) to return all used batteries and accumulators; disposal in the household garbage is prohibited! You can hand over your used batteries / accumulators at collection points in your community or wherever batteries / accumulators are sold!Disposal: The product must not be disposed of along with other domestic waste. The users must dispose of this equipment by bringing it to a specific recycling point for electric and electronic equipment. For further information on recycling points contact the local authorities, the local recycling center or the shop where the product was purchased. If the equipment is not disposed of correctly, fines or penalties may be applied in accordance with the national legislation and regulations.
IR Measurement Notes
- Before measuring, be sure to clean surfaces that are covered with frost, oil, grime, etc.
- If an object’s surface is highly reflective, apply masking tape or flat black paint to the surface before measuring. Allow time for the paint or tape to adjust to the temperature of the surface it is covering.
- Measurements through transparent surfaces such as glass may not be accurate.
- Steam, dust, smoke, etc. can obscure measurements.
- The meter automatically compensates for deviations in ambient temperature.
However, it can take up to 30 minutes for the meter to adjust to extremely wide
Changes.
Specifications
| Range | Accuracy | |
| Body Temp | 35.0 to 42.0°C (95.0 to 107.6°F) | ±0.2°C / ±0.4°F |
| Body Temp | In the remaining measurement range | ±0.3°C /± 0.5°F |
| Object Temp | 0 to 100.0°C (32.0 to 212.0°F) | ±1.0°C / ±1.8°F |
Body Temp range => 32.0 to 42.9°C (89.6 to 109.2°F)Surface Temp range => 0 to 100.0°C (32.0 to 212.0°F)Emissivity => 0.95 fixedField of View => D/S = Approx. 5:1 ratio (D = distance; S = spot or target)IR Spectral response => 8 to 14 um (wavelength)Display => Backlit LCD display with function indicatorsResponse time => 500msOver range indication => “Hi” or “Lo”Operating Temperature Humidity => 10°C to 40°C (50°F to 104°F), ≤85%RHOperating/Storage ATM => 70kPa-106kPaStorage Temperature Humidity => -20 to 55°C (-4 to 131°F), ≤93%RHPower Supply => 2 AA BatteriesAutomatic Power Off => 15 seconds (approx.)Weight => 144g (approx.)
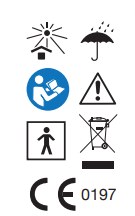
Indice dei Simboli / Index of symbols / Liste des symboles / Indice de simbolos
 |
GB – Product code |  |
GB – Type BF applied part |
 |
GB – Keep in a cool, dry place |  |
GB – Keep away from sunlight |
 |
GB – Manufacturer |  |
GB – WEEE disposal |
| GB – Caution: read instructions (warnings) carefully |  |
GB – Medical Device complies with Directive 93/42/EEC | |
 |
GB – Authorized representative in the European community |  |
GB – Follow instructions for use |
 |
GB – Date of manufacture |  |
GB – Lot number |
 |
GB – Store between -20 and 55°C |
References
[xyz-ips snippet=”download-snippet”]