
Gingko Smart Moon Lamp User Manual
Packing List
The 3D Printed ‘Moon’
The Magnetic Suspension Wood Base
Cork Base Mat
DC Transformer Plug Adapter
Instruction Manual
Product Set Up / Installation
Please follow the below steps closely to set up the Smart Moon Lamp
Step 1: place the magnetic suspension wood base on stable, flat and levelled table surface.
Step 2: connect the DC adapter to the Magnetic Suspension Wood base and plug it into the wall socket; switch on the power on the socket.
Step 3: It’s recommended to place the cork mat on top of the wood base, to protect the wood surface in case the moon falls down by strong magnet force during the set up attempts.
Step 3: Hold the Moon with both hands as per the below diagram and the centre bottom of the Moon MUST BE aligned with the engraved centre circle mark on the base or the mat; Gently place down the Moon to the base till 15-20 mm gap between the moon and base, and you should feel a upwards force from the base to suspend the Moon with the Moon light staying on at the same time.
NOTE: When you feel a force pulling the moon in a different direction other than upwards and the light flickers at the same time, the set up will fail. Then you need to correct the direction and try Again. Patience is key Here as you may have to try a few times before you can successfully set it up.
Product Set Up / Installation
Step 4: While the moon light stays on and doesn’t flicker anymore, at the same time you feel a upwards force from the base to suspend the Moon, then you can slowly release your hands and the Moon should be successfully levitated.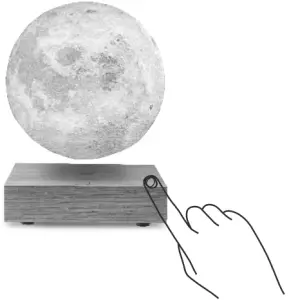
Step 5: When the moon is successfully levitated, the moon light usually should be on. If not, you can turn on/off the light or change the light color mode by tapping the engraved touch control button on the right bottom of the wood base. See above diagram. The Moon Lamp has 3 light modes: white light, warm yellow light and light yellow light.NOTE: The Moon should also slowly rotate itself just like the real elliptical orbiting moon.
There is a temperature controller built inside the base and in unlikely events such as the moon lamp failed to levitate after more than 30 minutes trying by the user, the base temperature may reach 55 degrees or more. Then the temperature controller will turn on to cut off the internal power supply of the base to ensure the safety of the base. In such a case, unplug the power and wait for 10-20 minutes for the base to cool down before attempting to levitate the Moon again.
IMPORTANT
- Please ensure that the product is placed on a safe and stable desktop with no other metal objects near to the product as it may interfere with the magnetic field.
- Please do not place this product in a humid environment such as a bathroom etc.
- Please place any electronic products at least 20cm away from the magnetic base; the electronic products include computers, mobile phones, cameras, bank cards, etc.
- This product is not recommended or suitable for any people with heart disease.
- This product is not a toy and not suitable for children under 12 years old.
- This product is for indoor use only.
- You may find a little bit challenging to levitate the moon for the first time. Please seek help from others if you still can’t set it up after a few attempts.
Warranty
This product is covered under one year manufacturer warranty starting from the date of purchase. Within the warranty period, any repair service or components replacement will be provided for free.
Warranty does not apply to the following circumstances:
- Product failure due to improper use, misuse, drops, abuse, alteration, faulty installation, power line surge or modification.
- Product failure due to acts of nature such as natural disaster, fire, flood, or casualty.
Product Care
- The product base is made from natural wood, any natural wood grain on the wood base is not a product fault.
- Any drop of this product could cause serious damage to the device.
- You can use tissue or a damp cloth to clean the Moon or the wood base when it’s not in use.
- For first time set up, you need to be very patient; If you still can’t levitate the moon after a few attempts, please seek help from others before returning it.
- Do not expose this product under any strong direct sunlight.
If you still have any queries or need any further assistance, please email to us at [email protected]
Discover more elegant and unique Gingko products atwww.gingkodesign.co.uk
You may scan the QR code below to watch the instructional video or visit www.gingkodesign.co.uk/product/smart-moon-lamp/ and click on Support section.
Thank you for your purchase of the Original Gingko Smart Moon Lamp. Please read the instruction manual carefully to achieve the best performance of this product.
report this ad(NOTE: PATIENCE IS KEY TO SET UP THIS PRODUCT AND YOU MAY NEED TO TRY A FEW TIMES BEFORE YOU CAN SUCCESSFULLY LEVITATE THE ‘MOON’).
References
[xyz-ips snippet=”download-snippet”]