
![]()
Item # 1005787576, 1005787584Model # 30609, 30612
ASSEMBLY INSTRUCTIONS
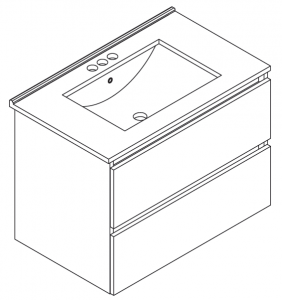
30 IN. SIDEMERE WALL HUNG
Questions, problems, missing parts? Before returning to the store, call Glacier Bay Customer Service. 8 a.m. 7 p.m., EST, Monday Friday, 9 a.m. 6 p.m., EST, Saturday1- 855- HD GLACIER (1-855-434-5224)
HOMEDEPOT.COM/GLACIERBAY
THANK YOU
We appreciate the trust and confidence you have placed in Glacier Bay through the purchase of this vanity. We strive to continually create quality products designed to enhance your home. Visit us online to see our full line of products available for your home improvement needs.Thank you for choosing Glacier Bay!
Table of Contents
Table of Contents . . . . . . . . . . . . . . . . . . . . . . . . . . . . . . . . 2Safety Information . . . . . . . . . . . . . . . . . . . . . . . . . . . . . . . 2Warranty . . . . . . . . . . . . . . . . . . . . . . . . . . . . . . . . . . . . . . . 2LIMITED LIFETIME WARRANTY . . . . . . . . . . . . . . . 2What is Covered . . . . . . . . . . . . . . . . . . . . . . . . . . . . . . . . . 2What is Not Covered . . . . . . . . . . . . . . . . . . . . . . . . . . . . . 2California and Minnesota Residents . . . . . . . . . . . . . . . . . 3California residents. . . . . . . . . . . . . . . . . . . . . . . . . . . . . . . 3Minnesota residents . . . . . . . . . . . . . . . . . . . . . . . . . . . . . . 3Pre-assembly . . . . . . . . . . . . . . . . . . . . . . . . . . . . . . . . . . . . 3Planning Assembly . . . . . . . . . . . . . . . . . . . . . . . . . . . . . . . 3Tools Required . . . . . . . . . . . . . . . . . . . . . . . . . . . . . . . . . . .3Hardware Required. . . . . . . . . . . . . . . . . . . . . . . . . . . . . . . .3Points to Installer . . . . . . . . . . . . . . . . . . . . . . . . . . . . . . . . 4Pre-assembly (continued) . . . . . . . . . . . . . . . . . . . . . . . . . . 5Package Contents. . . . . . . . . . . . . . . . . . . . . . . . . . . . . . . . . 5Installation . . . . . . . . . . . . . . . . . . . . . . . . . . . . . . . . . . . . . . 6Drawer adjustment. . . . . . . . . . . . . . . . . . . . . . . . . . . . . . . .11Maintenance . . . . . . . . . . . . . . . . . . . . . . . . . . . . . . . . . . . . .11Care and Cleaning . . . . . . . . . . . . . . . . . . . . . . . . . . . . . . . . 11Troubleshooting . . . . . . . . . . . . . . . . . . . . . . . . . . . . . . . . . .12
Safety Information
 WARNING
- Two people are required for safe installation. Take extra precautionary measures to ensure a secure grip on the vanity base and vanity top when lifting.
- Read these instructions carefully and keep in a safe place.
- Do not over tighten connectors (screws, bolts, etc.) Overtightening can lead to product damage.
- Assembly needs to be carried out by a qualified person. Wrong assembly can lead to the furniture / object topples or falls resulting in personal injury or damage.
- Screws or fittings are not included. Choose screws and fittings that suits your wall and have sufficient holding power. If you are uncertain, contact your local specialized retailer.
CAUTION
- The bathroom wall must be finished prior to installation of the vanity base and top.
- Do not use water that exceeds temperatures of 140°F/46°C.
- Do not place any sharp or abrasive objects on the bare surface of the vanity top.
- Be sure to check all packing materials carefully for small parts that may have come loose inside the carton during shipment. If parts are missing, contact THE HOME DEPOT to obtain any missing parts.
Warranty
LIMITED LIFETIME WARRANTYWHAT IS COVERED
Glacier Bay products are manufactured with superior quality standards and workmanship and are backed by our limited lifetime warranty. Glacier Bay products are warranted to the original consumer purchaser to be free of defects in materials or workmanship. We will replace FREE OF CHARGE any product or parts that proves defective. Simply, return the product / part to any of The Home Depot retail locations or call 1-855-HD Glacier (1-855-434-5224) to receive the replacement item. Proof of purchase (original sales receipt) from the original consumer purchaser must be made available for all Glacier Bay warranty claims.
WHAT IS NOT COVERED
This warranty excludes incidental/inconsequential damages and failures due to misuse, abuse or normal wear and tear. This warranty excludes all industrial, commercial & business usage, whose purchasers are hereby, extended a limited lifetime warranty from the date of purchase, with all other terms of this warranty applying except the duration of warranty. Some states and provinces do not allow the exclusion or limitation of incidental or consequential damages, so the above limitations may not apply to you. This warranty gives you specific legal rights and you may also have other rights that vary from state to state and province to province. Please see a store or contact 1-855-HD Glacier for more details.
California and Minnesota Residents
CALIFORNIA RESIDENTS
![]() WARNING THIS PRODUCT CAN EXPOSE YOU TO STYRENE / WOOD DUST WHICH IS KNOWN TO THE STATE OF CALIFORNIA TO CAUSE CANCER. GO TO WWW.P65WARNINGS.CA.GOV/PRODUCTS
WARNING THIS PRODUCT CAN EXPOSE YOU TO STYRENE / WOOD DUST WHICH IS KNOWN TO THE STATE OF CALIFORNIA TO CAUSE CANCER. GO TO WWW.P65WARNINGS.CA.GOV/PRODUCTS
MINNESOTA RESIDENTS
“IMPORTANT HEALTH NOTICE. SOME OF THE BUILDING MATERIALS USED IN THIS HOME (OR THESE BUILDING MATERIALS) EMIT FORMALDEHYDE. EYE, NOSE, AND THROAT IRRITATION, HEADACHE, NAUSEA AND A VARIETY OF ASTHMA-LIKE SYMPTOMS, INCLUDING SHORTNESS OF BREATH, HAVE BEEN REPORTED AS A RESULT OF FORMALDEHYDE EXPOSURE. ELDERLY PERSONS AND YOUNG CHILDREN, AS WELL AS ANYONE WITH A HISTORY OF ASTHMA, ALLERGIES, OR LUNG PROBLEMS, MAY BE AT GREATER RISK. RESEARCH IS CONTINUING ON THE POSSIBLE LONG-TERM EFFECTS OF EXPOSURE TO FORMALDEHYDE. REDUCED VENTILATION MAY ALLOW FORMALDEHYDE AND OTHER CONTAMINANTS TO ACCUMULATE IN THE INDOOR AIR. HIGH INDOOR TEMPERATURES AND HUMIDITY RAISE FORMALDEHYDE LEVELS. WHEN A HOME IS TO BE LOCATED IN AREAS SUBJECT TO EXTREME SUMMER TEMPERATURES, AN AIR-CONDITIONING SYSTEM CAN BE USED TO CONTROL INDOOR TEMPERATURE LEVELS. OTHER MEANS OF CONTROLLED MECHANICAL VENTILATION CAN BE USED TO REDUCE LEVELS OF FORMALDEHYDE AND OTHER INDOOR AIR CONTAMINANTS. IF YOU HAVE ANY QUESTIONS REGARDING THE HEALTH EFFECTS OF FORMALDEHYDE, CONSULT YOUR DOCTOR OR LOCAL HEALTH DEPARTMENT.”
Pre-assembly
PLANNING ASSEMBLYTo ensure your installation goes smoothly, please read these instructions carefully and review the recommended tools and hardware before you begin. To remove the old vanity (if applicable): 1) Turn off the water supply and drain out. 2) Disconnect the supply lines from the faucet. 3) Remove the old vanity top and vanity. If the new vanity is not installed immediately, temporarily stuff a rag into the drain pipes. Using a level, locate any uneven wall areas where your vanity will be installed. Unevenness can cause your vanity to become misaligned resulting in twisting of the cabinet. Repair any uneven areas.
TOOLS REQUIRED
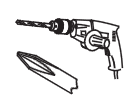 Electric drill with #2 drill bit
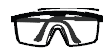 Safety goggles
 Phillips screwdriver
![]() Level
Level
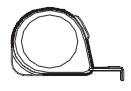 Measuring tape
 Silicone (optional)
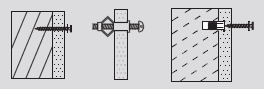
HARDWARE REQUIRED Wall anchors – if the vanitywill not be screwedto wall studs
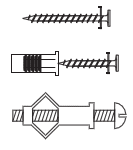 For wood wallFor brick wallFor dry wall
HOMEDEPOT.COM
Please contact 1-877-527-0313 for further assistance.
Points to Installer
INSTALLATION TO BE PERFORMED BY QUALIFIED PROFESSIONAL ONLY.Wall hung vanity cabinets require important wall preparation and installation. Please thoroughly read this notice and all other installation instructions that might be included with the cabinetry.
Keep in mind
- Cabinets must be securely fastened with sufficient type, quantity and size of screws to wall studs and internal structural wall blocking.
- See below for examples and instructions for internal structural wall blocking necessary for proper installation
Internal wall blocking installation
- A horizontal row of wood 2 X 7 structural wall blocks are required and must be installed between wall studs at a height to match where the top of the wall hung vanity cabinets will be installed. Carefully remove drywall in required locations to gain access to wall studs. Use caution to not disturb any electrical or plumbing utilities found within the wall.
- Install a second row of 2 X 7 structural wall blocks to match the height of the cabinets to allow fastening near the bottom.
- The 2 X 7 structural wall blocks should be positioned between each wall stud where the cabinets will be located.
- Use wood screws installed at an angle to securely fasten the structural wall blocks to the wall studs.
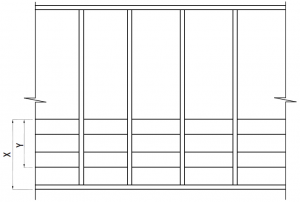 X – Required height for top of the cabinet from the floor.Y – Required distance to match the cabinet height.
![]() WARNINGSerious or fatal injuries can occur should unit fail. To prevent failure:
WARNINGSerious or fatal injuries can occur should unit fail. To prevent failure:
- Do not sit, stand, lean or climb on unit.
- Do not lay or sit beneath unit.
- Do not set heavy objects on the top of the unit, overload unit or overload drawers.
- Do not open more than one drawer at a time.
Pre-assembly (continued)
PACKAGE CONTENTS


|
Part |
Description |
Quantity |
|
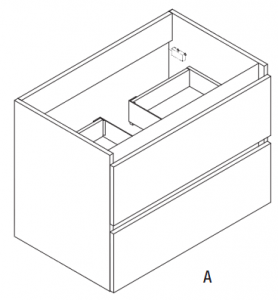
A |
Vanity base |
1 |
|
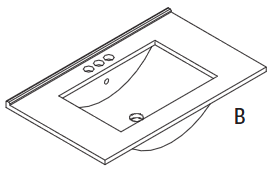
B |
Vanity top |
1 |
|
C |
Bumper |
4 |
|
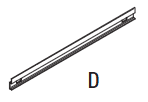
D |
Suspension rail 694mm (27-3/8in) |
1 |
|
E |
Leg screw (required for leg option only) |
16 |
Installation
1 Preparing the wall
- Determine the desired wall location for the cabinet.
- Determine desired height for top of cabinet and mark a horizontal line on the wall using a pencil.
- Use a level to ensure the suspension rail markings will be level before installing to the wall.
![]() CAUTION: Consult an expert for the proper screws / Bolts to use when attaching the various constructions, 2” screws (not included) mentioned here do not match to all wall type. Anchors are not required if brackets are installed in stud.
CAUTION: Consult an expert for the proper screws / Bolts to use when attaching the various constructions, 2” screws (not included) mentioned here do not match to all wall type. Anchors are not required if brackets are installed in stud.
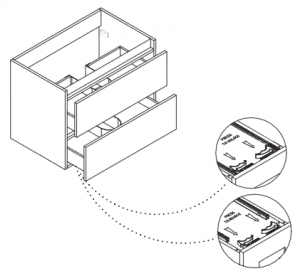
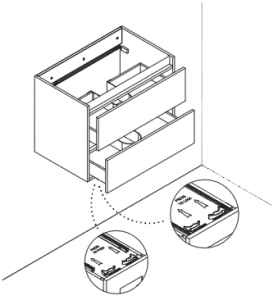
2 Marking the locations
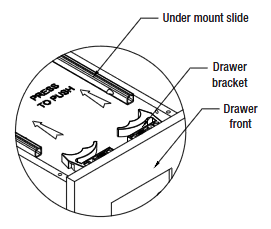
- Remove the drawers from the vanity by pushing the bracket lever underneath the drawer box (refer to below image) and disconnect the drawer box from the slide.
- Measure the desired location of the vanity by placing into the wall and mark mounting hole guidelines on wall. Check alignment of mounting hole guidelines against vanity base to ensure product is level.
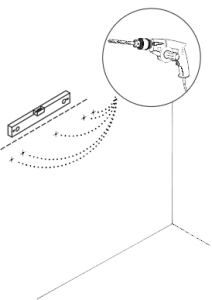
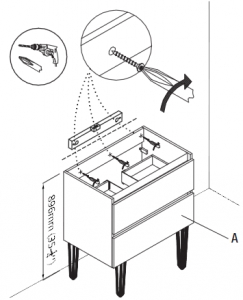
3 Installing the suspension rail
- Place the suspension rail (D) against the wall and determine the desired location.
- Insert the #8 x 2 in. screws (not included) through the suspension rail (D) holes and screw them into the wall.

![]() CAUTION: Different wall materials require different types of fixing hardware (not included). Use suitable fixing hardware for the walls in your home. For advice on suitable fixing systems, consult a local specialized retailer.
CAUTION: Different wall materials require different types of fixing hardware (not included). Use suitable fixing hardware for the walls in your home. For advice on suitable fixing systems, consult a local specialized retailer.
![]() CAUTION: For wall stud installation, insert the screws with washers into the stud locations (not included). For drywall installation, drill holes at the appropriate locations and insert toggle bolts with washers (not included).
CAUTION: For wall stud installation, insert the screws with washers into the stud locations (not included). For drywall installation, drill holes at the appropriate locations and insert toggle bolts with washers (not included).
4 Hanging the vanity base
- Lift the vanity (A) above the suspension rail (D) and place it against the wall.
- Slide the vanity (A) to the left or right to the desired location.
- Hung the vanity (A) to the suspension rail (D) properly by using wall suspension bracket.
- See diagram to the right for measurements and hanging details.

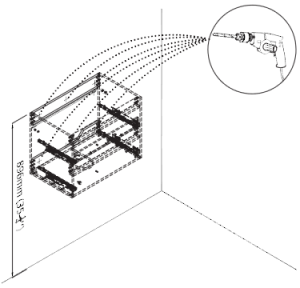
5 Securing the vanity to the wall
- Place the vanity (A) in the desired position taking into account the location of your plumbing. Ensure the vanity (A) is level front to back and at both sides.
- Secure the vanity (A) to the wall by inserting #8 x 2 in. screws (not included) through the back rail of the vanity.
- To install the drawers, open each drawer slide and place the drawer box on the slide and push forward to lock with the slide.

6 Attaching the vanity top
- Place the porcelain top (B) centered on the vanity base (A). For additional stability, clear silicone may be used to secure the porcelain top onto the vanity base.
- Connect the faucet and drain (not included) as per the instruction sheets provided with those items and ensure that there is no leakage.
- Please wipe clean excess silicone squeeze out after the usage.
- After installing the vanity top please adjust the drawer slides if required.

 NOTE: For instructions on how to use the provided bumpers (C), see the Troubleshooting section of this document.
Installation – [Floor-standing unit]
1 Attaching the hairpin legs
- Install each hairpin leg matching each corner of the leg into each corner of the vanity. Provide sufficient protection on the floor to protect the vanity from damage.
- Tilt the vanity backwards and position the hairpin legs, aligned over the pre-drilled holes (refer the image). Attach hairpin legs to the vanity using the provided leg screws (E). Evenly position the screws with vanity base pre-drilled holes.
- Ensure all the screws are tightened properly. With assistance, turn the vanity upright to rest on its legs.
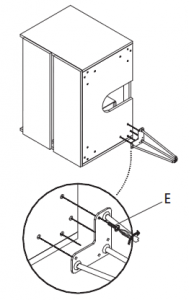
![]() NOTE: Crawley hairpin legs not included with this pack. Buy separately.
NOTE: Crawley hairpin legs not included with this pack. Buy separately.
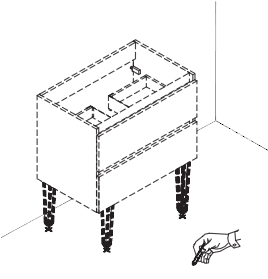
2 Attaching the felt pad
- Place the vanity base on the desired location and mark the felt pad location on the floor. Remove the vanity and stick the hairpin leg felt pad to the floor. Place the vanity on the felt pad.


Securing the vanity to the wall
- Place the vanity (A) in the desired position taking into account the location of your plumbing.
- Ensure the vanity (A) is level front to back and at both sides.
- Secure the vanity (A) to the wall by inserting two #8 x 2 in. screws (not included) through the back rail of the vanity.
![]() CAUTION: For wall stud installation, insert the screws with washers into the stud locations (not included).
CAUTION: For wall stud installation, insert the screws with washers into the stud locations (not included).
Drawer Adjustment
Removing the drawer:Open the drawer as far as possible. Push the bracket lever underneath the drawer box and disconnect the drawer box from the slide.
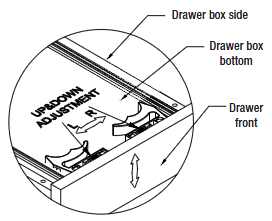
Drawer adjustment:For drawer alignment move the drawer up and down adjustable to the desired position while moving left and right.
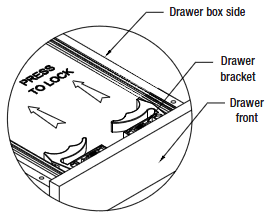
Re-installing the drawer:To install the drawer, open each drawer slide and place the drawer box on the slide and push forward to lock with the slide.
Maintenance
- To maintain the beauty of the furniture finish, avoid placing the vanity in direct sunlight.
- Avoid exposing the vanity to extreme temperatures by installing away from heat and air vents.
Care and Cleaning
- Dust frequently with a clean, soft and dry cloth.
- Wipe away any water or liquid spills on the vanity base immediately with a clean, soft and dry cloth.
- Clean the vanity top only with non-abrasive cleaners or mild detergents – do not use powder cleansers. For extremely stubborn stains, use a small amount of acetone on a cloth and gently rub out the stain.
Troubleshooting
|
Problem |
Possible Cause |
Corrective Action |
|
Vanity drawers rub against another surface. |
Wall is not level. |
|
|
There is an uneven gap between the drawers and cabinet. |
Wall is not level. |
|
|
Vanity top wobbles when placed on the vanity base. |
|
1) Ensure the vanity base is level and plumb. It may be necessary to use shims if the base sits uneven (see Planning Assembly section). 2a) Identify which corners have the wobble. 2b) Carefully remove the vanity top and turn it over. 2c) Apply the bumpers (C) adhesive side down on the corners of the vanity top that you identified in Step 2a. 2d) Carefully place the top back onto the vanity base and make any necessary adjustments to the bumper placement(s) until the vanity top does not wobble. |
![]()
Questions, problems, missing parts?Before returning to the store, call Glacier Bay Customer Service.8 a.m. – 7 p.m., EST, Monday – Friday, 9 a.m. – 6 p.m., EST, Saturday1- 855- HD GLACIER (1-855-434-5224)HOMEDEPOT.COM/GLACIERBAYRetain this manual for future use.
References
[xyz-ips snippet=”download-snippet”]