
GLADIATOR 2253730A Workbench Power Strip Installation Guide

WORKBENCH POWER STRIP
Installation InstructionsCONTACTO MÚLTIPLE PARAMESA DE TRABAJO
WORKBENCH POWER STRIP SAFETY
Your safety and the safety of others are very important.We have provided many important safety messages in this manual and on your appliance. Always read and obey all safety messages.
![]() This is the safety alert symbol.This symbol alerts you to potential hazards that can kill or hurt you and others.All safety messages will follow the safety alert symbol and either the word “DANGER” or “WARNING.”These words mean:
This is the safety alert symbol.This symbol alerts you to potential hazards that can kill or hurt you and others.All safety messages will follow the safety alert symbol and either the word “DANGER” or “WARNING.”These words mean:
DANGER
You can be killed or seriously injured if you don’t immediately follow instructions.
WARNING
You can be killed or seriously injured if you don’t follow instructions.All safety messages will tell you what the potential hazard is, tell you how to reduce the chance of injury, and tell you what can happen if the instructions are not followed.
IMPORTANT SAFETY INSTRUCTIONS
WARNING: To reduce the risk of fire, electric shock, or injury when using your power strip, follow these basic precautions:
- Plug into a grounded 3 prong outlet.
- Do not remove ground prong.
- Do not use an adapter.
- Do not use an extension cord.
- Unplug before servicing.
- Replace all parts and panels before operating
SAVE THESE INSTRUCTIONS
INSTALLATION REQUIREMENTS
Tools and Parts
Gather the required tools and parts before starting installation. Read and follow the instructions provided with any tools listed here.
Tools Needed
- ⁷⁄₁₆” Socket wrench
- ³⁄₁₆” Wood drill bit
- ¹⁄₁₆” Wood drill bit
- Drill
Parts Supplied
- Tool caddies (2)
- #8 x ¹⁄₄” Phillips-head screws (4)
- Phillips screwdriver
- Flat-blade screwdriver
- Tape measure
- ¹⁄₄” x ³⁄₄” Lag bolts (6)
- #8 x ¹⁄₂” Phillips-head screws (2)


#8 x ¹⁄₄” Phillipshead #8 x ¹⁄₂” Phillips ¹⁄₄” x ³⁄₄” Lag screws (4) head screws (2) bolts (6)
Electrical Requirements
|
|
 |
| Electrical Shock Hazard Plug into a grounded 3 prong outlet.Do not remove ground prong. Do not use an adapter.Do not use an extension cord.Failure to follow these instructions can result in death, fire, or electrical shock. |
 WARNING
IMPORTANT: Be sure you have the proper electrical connection before you install the power strip on the workbench
Recommended Grounding Method
A 115 Volt, 60 Hz., AC only, 15-amp, fused, grounded electrical supply is required. Use an outlet that cannot be turned off by a switch. Do not use an extension cord.NOTE: Before moving or cleaning the work bench disconnect the power strip from the electrical source. When you are finished, reconnect the power strip to the electrical source.
Over-Current Circuit Protection
The power strip is designed with a visual over-current protection switch that operates as follows:
Over-current protection switch is in the ON position and the green light is lit
The circuit has not tripped and the power strip can be used.
Over-current switch has been tripped
The green light will go out, and the over-current protection switch will move to the OFF position. Unplug all items from the power strip. To restore power, push the over-current protection switch back to the ON position. Plug items back in one at a time, while watching to see if the green light goes out and the over-current protection switch moves to the OFF position again. If it does, unplug items until you are sure that the green light is remaining lit and the over-current protection switch is remaining in the ON position
Power Strip Use Requirements
- Intended for use in a garage.
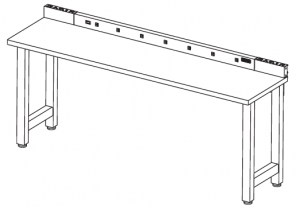
- The 6 ft (1.8 m) power strip is designed to be permanently installed on the Gladiator® workbe
- There are nine electrical outlets on the power All outlets are connected to the over-current protection switch.
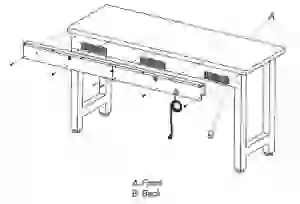
INSTALL POWER STRIP
The workbench power strip can be installed on either the 6 ft (1.8 m) or the 8 ft (2.4 m) workbench. Before installing the power strip, verify thesize of your workbench (6 ft or 8 ft) (1.8 m or 2.4 m) and follow the corresponding installation instructions.
6 ft (1.8 m) Workbench
- Remove the power strip and tool caddies from the Locate the hardware packed in one of the tool caddies, and verify contents. See “Parts Supplied.”
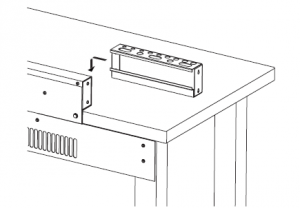
- Place and align the power strip on the back edge of the
- Hold the power strip in place. Using the six holes in the power strip back panel as a template, mark the workbench
Before Installation
- Using a ³⁄₁₆” wood drill bit, drill ³⁄₄” to 1″ deep starter holes where
- NOTE: While drilling, hold the drill level.NOTE: Hand tighten each lag bolt. When all six lag bolts are in place, tighten them completely with a ⁷⁄₁₆” socket wrench. Do not overtighten.Using the six ¹⁄₄” lag bolts (provided), attach the power strip to the
After Installation

8 ft (2.4 m) Workbench
- Remove the power strip and tool caddies from the Locate the hardware packed in one of the tool caddies, and verify contents. See “Parts Supplied.”
- Measure 12″ (30.48 cm) from an edge of the workbench and mark a
- Use the line as a guide to center the power strip on the back edge of the workbench
Before Installation
- Hold the power strip in Using the six holes in the power strip back panel as a template, mark the workbench.
- Using a ³⁄₁₆” wood drill bit, drill ³⁄₄” to 1″ deep starter holes whereNOTE: While drilling, hold the drill level.
- Using the six ¹⁄₄” lag bolts (provided), attach the power strip to theNOTE: Hand tighten each lag bolt. When all six lag bolts are in place, tighten them completely with a ⁷⁄₁₆” socket wrench. Do not overtighten
After Installation

INSTALL TOOL CADDIES
The tool caddies can either be mounted on the 8 ft (2.4 m) workbench (one caddy on each side of the power strip), or mounted on Gladiator®GearWall® panels or GearTrack™ channels.
Option 1: Mount on 8 ft Workbench
The tool caddies are reversible. They can be mounted on the workbench with the larger holes toward the front or back as desired.
- Screw the four #8 x ¹⁄₄” Phillips-head screws (provided) into the two holes on each end of the power strip. Do not completely tighten.
- Align the eyelet holes with the two screws on each side of the power strip and slide the tool caddies into position.
- At the bottom of each tool caddy, locate the eyelet hole closest to the corner of the workbench. Using the hole as a template, mark the workbench. Remove the tool caddies.
Before Installation
- Using a ¹⁄₁₆” wood drill bit, drill starter holes into the workbench where marked.NOTE: While drilling, hold the drill vertical.
- Reattach the tool caddies to the power strip by aligning the eyelet holes with the two power strip screws on each side and sliding the tool caddies into position.
- Screw one #8 x ¹⁄₂” Phillips-head screw (provided), into each starter hole in the workbench.
- Completely tighten all the screws. Do not overtighten.
After Installation
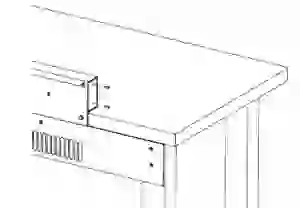

Option 2: Mount on Gladiator® GearWall® Panels or GearTrack™ Channels
- Insert the bracket top into the wall track.
- Push down on the bracket bottom to lock into place.

TROUBLESHOOTING
Power Strip will not Operate
|
|
| Electrical Shock Hazard Plug into a grounded 3 prong outlet.
Do not remove ground prong. Do not use an adapter. Do not use an extension cord. Failure to follow these instructions can result in death, fire, or electrical shock. |
- Has a household fuse blown, or has a circuit breaker tripped? Replace the fuse or reset the circuit breaker. If the problem continues, call an electrician.
- Is the over-current protection on the power strip tripped? If the power on/off switch is not lit, the over-current protection may be tripped. See “Over-Current Circuit Protection.”
GLADIATOR® GARAGEWORKS POWER STRIP WARRANTY
ONE-YEAR LIMITED WARRANTY
For one year from the date of purchase, when this product is operated and maintained according to the instructions attached to or furnished with the product, Gladiator® GarageWorks will replace or repair the defective product or parts to correct defects in materials or workmanship.
Gladiator® GarageWorks will not pay for:
- Service calls to correct the installation of any Gladiator® GarageWorks products or to instruct you on how to use or install them.
- Damage resulting from improper handling or shipping of products, or products damaged by accident, misuse, abuse, fire, flood, improper installation, acts of God, neglect, corrosion, modification or mishandling.
- Shipping or freight fees to deliver replacement products or to return defective products.
- Repairs or replacement when your product is used in other than normal, single-family household use, such as a commercial environment or handled in any way inconsistent with the installation instructions included with the product.
- Cosmetic damage including scratches, dings, dents or cracks that do not affect the structural or functional capability of the product.
- Replacement parts or product for Gladiator® GarageWorks products operated outside the United States and Canada.
- In Canada, travel or transportation expenses for customers who reside in remote areas.
- Any labor costs during the limited warranty period.
- Surfaces damaged due to chemical interaction resulting in corrosion of paint or metal.
DISCLAIMER OF IMPLIED WARRA NTIES; LIMITATION OF REMEDIES
IMPLIED WARRANTIES, INCLUDING TO THE EXTENT APPLICABLE WARRANTIES OF MERCHANTABILITY OR FITNESS FOR A PARTICULAR PURPOSE, ARE EXCLUDED TO THE EXTENT LEGALLY PERMISSIBLE. ANY IMPLIED WARRANTIES THAT MAY BE IMPOSED BY LAW ARE LIMITED TO ONE YEAR, OR THE SHORTEST PERIOD ALLOWED BY LAW. SOME STATES AND PROVINCES DO NOT ALLOW LIMITATIONS OR EXCLUSIONS ON HOW LONG AN IMPLIED WARRANTY OF MERCHANTABILITY OR FITNESS LASTS, SO THE ABOVE LIMITATIONS OR EXCLUSIONS MAY NOT APPLY TO YOU. THIS WARRANTY GIVES YOU SPECIFIC LEGAL RIGHTS, AND YOU MAY ALSO HAVE OTHER RIGHTS WHICH VARY FROM STATE TO STATE OR PROVINCE TO PROVINCE.
Outside the 50 United States and Canada, this warranty does not apply. Contact your authorized Gladiator® GarageWorks dealer to determine if another warranty applies.If you need service, call the Gladiator® GarageWorks Customer eXperience Center, 1-866-342-4089 (toll-free), from anywhere in the U.S.A. In Canada, contact your Whirlpool Canada LP designated service company or call 1-800-807-6777.In the United States, Gladiator® GarageWorks means Whirlpool Corporation, Benton Harbor, Michigan 49022. In Canada, Gladiator® GarageWorks means Whirlpool Canada LP, Mississauga, ON L5N 3A7.Keep this book and your sales slip together for future reference. You must provide proof of purchase or installation date for in- warranty service.Write down the following information about your Power Strip to better help you obtain assistance or service if you ever need it. You will need to know your complete model number and serialnumber. You can find this information on the model and serial label located on the back of the productDealer name _Address _Phone number _Model number _Serial number _Purchase date
Read More About This Manual & Download PDF:
[xyz-ips snippet=”download-snippet”]