![]() GLASSHOUSE V1.2 USER MANUAL
GLASSHOUSE V1.2 USER MANUAL
WARNINGS
- Keep GlassOuse away from magnets.
- GlassOuse V1.2 is foldable as regular glasses. Please fold it carefully.
- Use GlassOuse charger only With GlassOuse device.
- Charge and calibrate GlassOuse before the first use.
BLUETOOTH CONNECTION
- Activate Bluetooth on your device (applicable for devices except for iOS).
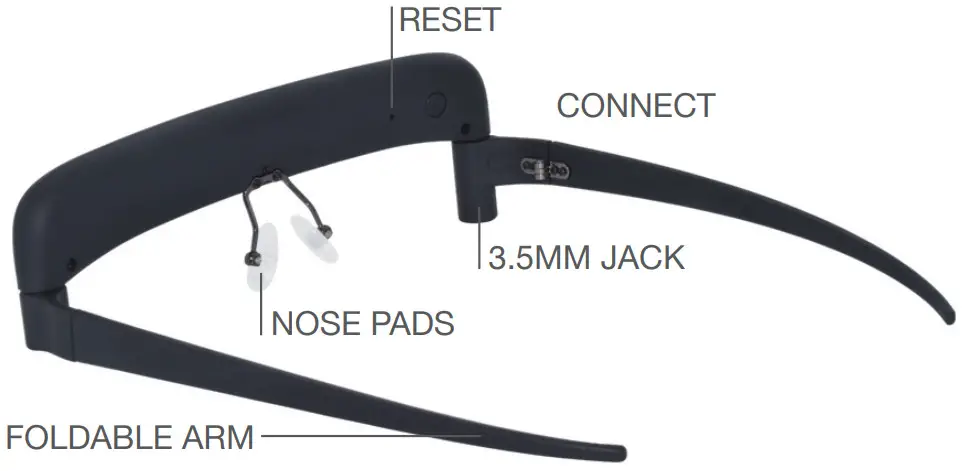
- Press the “Connect” button. The LED light will flash blue.
- Find and link to “CEBA GlassOuse” using your device’s Bluetooth scan screen.
- If the sync is successful, the LED light will turn blue and blink continuously.
- To use GlassOuse with other devices, press the “Connect” button again, or dismiss GlassOuse connection from your device or turn off previously connected device’s Bluetooth function.
MOUSE USE
After you put GlassOuse on your head, the cursor will move according to your head movements. When your head is in a centered and comfortable position towards the screen, the cursor should be in the middle. To move the cursor around the screen, move your head accordingly. Use your switch for clicking actions.
SETTING MOUSE SENSITIVITY
You can set your GlassOuse’s mouse sensitivity in two ways.To set your cursor speed on your device (PC, tablet, phone):
- Go to the “Cursor Speed” options of the device.
- Select the desired speed.
To set the cursor speed of GlassOuse:
- Connect GlassOuse to a G-switch through a mono 3.5mm jack plug. Press your G-Switch and “Reset” buttons simultaneously. If you are using a Puff Switch, press the “Reset” button of your GlassOuse while you are puffing towards to the switch.
- While pressing, release the “Reset” button first and then release the G-switch button. The LED should blink red. If you are using a Puff Switch, release the “Reset” button first and stop puffing after.
- Select desired cursor speed (slow, medium, or fast) by pressing (or puffing) G-switch according to the speed of the red LED light. On the “slow” setting LED Will blink slowly, on the “medium” setting LED will blink faster, and on the “fast” setting LED will blink the fastest.
- Upon your choice, press “Reset” to activate GlassOuse.
G-SWITCH OPTIONS
As GlassOuse V1.2’s optional compatible parts, G-switches come with a 3.5mm jack plug connector to combine perfectly with GlassOuse V1.2. You can use GlassOuse V1.2 with any G-switch option of your choice or you can use it with the “dwell” option of your device instead. Offering short circuit low signals, all G-switch options are specially designed for GlassOuse V1.2 but if you have any other switch devices using a 3.5mm connector, you can connect those to your GlassOuse.
WHICH G-SWITCH IS SUITABLE FOR YOU?
Option 1: Without any G-switch, you can use your GlassOuse V1.2 with dwell software.Option 2: With your GlassOuse V1.2, you can use Bite Switch to make “clicking” actions via smooth bites.Option 3: With your GlassOuse V1.2, you can use Puff Switch to make “clicking” actions via puffs.Option 4: With your GlassOuse V1.2, you can use Finger Switch to make “clicking” actions via button pressing. You can use your finger or any part of your body to press to the button.Option 5: If you have any other switch devices offering 3.5mm jack connectors, you can use your own switch device with your GlassOuse V1.2 to make “clicking” actions.
LED INDICATOR
Charging: Red LED is seen continuously on the deviceCharging is complete: No LED light on the deviceBluetooth is searching for a connection: LED blinks blueBluetooth connection is active: LED is continuously blueLow battery: LED blinks red
OS COMPATIBILITY
- PC (Windows, Linux, Mac, Chrome OS)
- Tablet (Android, Windows, Chrome OS)
- Mobile (Android, Windows, Chrome OS)
- Smart TV (Android)
RESET TO FACTORY SETTINGS
If GlassOuse does not respond properly, or the battery indicator does not work accurately, or you encounter a similar problem, you can press the “Reset” button to return the device to factory settings. You can complete the resetting by pressing the button for 3 seconds.
CALIBRATION
If the cursor moves abnormally (i.e. vibration, sliding, etc.) calibration is recommended. We suggest doing calibration before the first use. The entire process can be completed in two minutes.To calibrate GlassOuse:
- Turn on Bluetooth on your device. Press the “Reset” button.
- Connect your GlassOuse to any device. Wait until LED is continuously blue.
- Place GlassOuse on a flat surface.
- During calibration LED light will turn from blue to red for about a second. When LED is red, the calibration iscompleted and you can start to use your GlassOuse.
Note: Please do not forget, you can make a calibration process in the following 60 seconds just after you connect GlassOuse to your device.
BATTERY
GlassOuse V1.2 comes with CEBA 3.7V 330mAh Li-Po battery. The battery life can go up to 15 hours of use.Please charge the battery every three months at least when you do not use your GlassOuse.
ANGLE OF USE
GlassOuse V1.2 can be used in a 180° horizontal or 160° vertical angle. Please do not use it while reclining fully or looking at the ground.
TURN ON – TURN OFF
To turn off GlassOuse V1.2, click the “Connect” button. LED light will continue to blink for 60 seconds and the device will be turned off.To turn on GlassOuse V1.2, simply click the “Connect” button. LED light will flash blue and the device will automatically connect to the last device used. Or you can connect your GlassOuse to another device (See “Bluetooth Connection”).
GLASSOUSE V1.2
Lenght: 160mm x Width: 145mm x Thickness: 50mm Weight: 55g
DEVICE
![]()
References
[xyz-ips snippet=”download-snippet”]