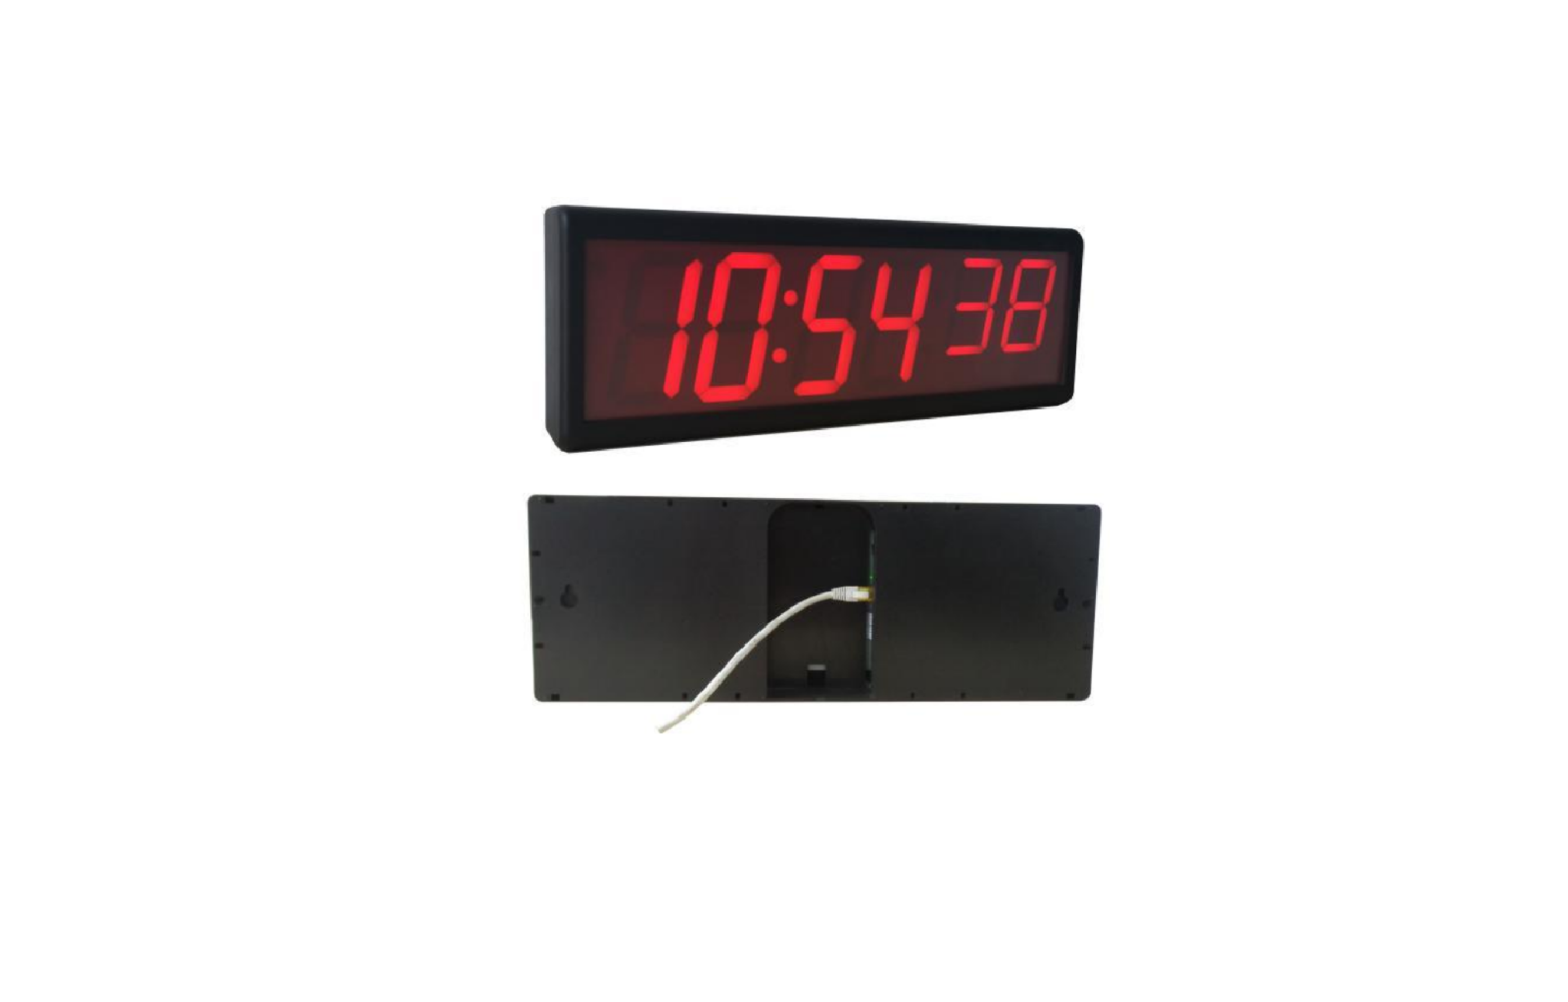
GlobalTime GTD368 Series Digital IP Clocks
Safety Instructions
- To prevent injury, damage to the unit, or other harm, read this manual in its entirety before installing or operating the clock.
- Observe normal safety precautions and use appropriate safety equipment (safety glasses, gloves, ladders, etc.) when installing this product.
- Never install wiring during a lightning storm.
- Never install data jacks or electrical wiring in wet locations unless the equipment is specifically designed for that purpose.
- Be sure that mounting hardware is suitable for the mounting surface and sufficient to support the weight of the clock.
- Observe all local codes when installing the product.
- This product is not a toy! Please keep it out of the reach of children.
- Operation of this product in a manner inconsistent with the instructions in this manual may result in personal injury and damage to the product and will void the warranty.
- Do not use harsh cleaners or aerosol cleaners. Use a damp cloth for cleaning.
- Do not place this product on an unstable cart, stand, or table. The product may fall, causing injury or damage.
Power Supply
(1) If the local network supports PoE, then only one network cable is needed.(2) If not, then an additional power adapter with a 5.5mm x 2.1mm connector is necessary.Notes. Red LED clock should use 12V DC, green and blue LED clock should use 18V DC
- Using Static IP
- Hour Format Setting
- Reset
We can long-press the red button to access the menu and then click it to select the option. When we click, the display screen will show SIP, 12, 24, RES in turn.
How to Use Static IP
The default IP of the clock is 192.168.2.55. Only after we click the button to select SIP first, then we can see the clock on the management software when the PC and the clock are in the same network.
Hour Format Setting
We can click the button to select hour format. For 12 hour format, there will be a dot on the left upper corner to show that it is PM, if no dot, it is AM.
How to Reset
We can click the button to select RES. When the display screen shows RES, we should stop clicking, then the clock will restart. In this way, the clock is reset to factory default settings.
Operation Status
Once powered up, the clock will go through:
- Self- check
- IP Address
- Time Display
Self-check
Self- check status aims to inspect whether all LED segments are in a good condition. This status lasts 10 seconds, from displaying 99:99, 88:88…to 00:00.
Assigning an IP Address
There are two options for configuring an IP address to each GlobalTime clock:
- DHCP (Factory Default Settings)
- Assigned Static IP v4 Address
By default, when powered up, the clock shows “dHCP” first and then the IP address. If no DHCP server available, then please refer to above 3.1 to use a static IP.
Time Display
At first, the time is displayed as 00:00+ time zone. If it is not synchronizing with the external time source, it will keep running based on this time zone. Once the clock can synchronize with the network time sever, it will display the correct time.
Management Software “ClockSniffer”
Download Link:For 64-bit windows computer : https://drive.google.com/file/d/168vkhi23dQMvaRjxhVmGFeOpWzutgI5w/viewFor 32-bit windows computer: https://drive.google.com/file/d/1_rGsEmQM4RIwWY4L_pbP_mkSbkThj7lR/view
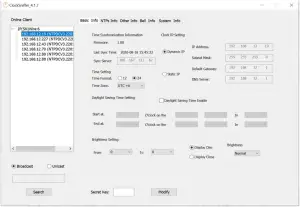
Note:(1) Run the software as administrator(2) The default login password is . It can be reset via the software.(3) After setting, please just click “Modify”, no need to enter the secret key if you have not set one.(4) By default, the clock is configured to use DHCP. If we want to use static IP for the first time, we must long-press the red button on the back side to select SIP. The default IP is 192.168.2.55. Whatever we use, we must ensure that our PC and the clock are in the same network, then we can see the clock on the software.
IP Search
The management software supports both Broadcast (255.255.255.255) and Unicast way to search out online client clocks. Broadcast is factory default.
- BroadcastSelect “Broadcast”, and click “Search”, the software will automatically search online clocks in the subnet, and group IPs based on different subnets.
- UnicastSelect “Unicast”, and input initial IP you want in the bar, then click “Search”, the software will search from the initial IP to the last one. For example, to search all clocks in subnet 192.168.3.0, you can input 192.168.3.001, and then search one by one till 192.168.3.254.
Basic Information and Settings
Password
On the old software “NTPClock”, the default user password is admin. Default global password is globalpw. Global password is for batch modification. Batch modification is under improvement currently, so please set the clocks one by one as possible. On the new software “ClockSniffer”, no password is needed if the user has not set one.
Basic Settings
- Time Format and Time Zone
- Clock IP
- Daylight Saving Time
- Brightness
- NTP Server
- Countdown
Optional Settings
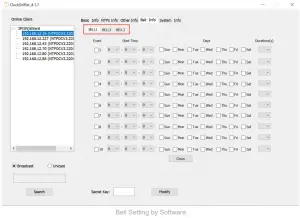
- Bell SettingWe can add a bell relay to the clock, then the clock can be connected to a bell. The voltage and current of the bell should be 5A 30VDC, or 5A 250VAC.

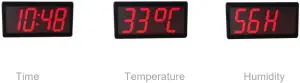
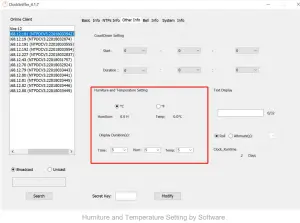
- Humiture & Temperature SettingWe can add a sensor to the cock then it can display time, temperature, humidity alternately:

Installation Instructions
Wall Mounting for Single- sided Clocks
For single-sided clocks, there are two holes on the back for hanging them on the wall, so only screws are needed. Wall mounting kit and ceiling mounting kit are optional, not necessary for single-sided clocks. The installation method of using a walling mounting kit or a ceiling mounting kit for single-sided and double-sided clocks are same.
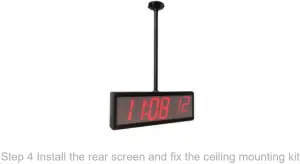
Ceiling Mounting for Double- sided Clocks


Wall Mounting for Double-sided Clocks


Troubleshooting
The Display Screen Shows Wrong Time.
Check the host IP configuration and verify that the network can communicate with the time server preset.
Some LED Segments are Dark.
Reboot the clock to check if there are dark segments under self-check process. If yes, the display screen needs to be replaced.
The Management Software Fails to Search out the Clock.
Make sure that the user’s computer and the clock are in the same sub network and the firewall is set correctly.
The Clock Fails to Synchronize with Any Public Time Server.
The user should make sure that his network can visit the internet time source, and the time server is running its NTP service successfully.
The Small light at the Bottom Right Corner is on All the Time.
This condition indicates that the clock can not synchronize with the time server preset. Please check the network configuration and the operation status of the time server.
Warranty and Maintenance
Warranty
GlobalTime warrants the clocks to be free from defects in material and workmanship during a one-year period. The Warranty begins on the date the unit is shipped from GlobalTime. Extended warranties are available via certain agreements.GlobalTime’ liability under this Warranty is limited to repairing or replacing, at GlobalTime’ option, the defective equipment and providing upgrade version changes for firmware. In case of repair, the product must be returned to an authorized GlobalTime Service Center.This Warranty does not apply if repairs are required due to acts of nature beyond GlobalTime’ control such as, but not limited to, lightning strikes, power surges, misuse, damage, neglect, or if repairs/ modifications have been made or attempted by anyone other than personnel authorized by GlobalTime.In no event will GlobalTime be liable for any indirect, special, incidental, or consequential damages from the sale or use of this product. This disclaimer applies both during and after the term of the warranty. GlobalTime disclaims liability for any implied warranties, including implied warranties of merchantability and fitness for a specific purpose.
Repair and Returns
To obtain service under this warranty, contact GlobalTime at +86-21 36531186 or at the address below during the warranty period to receive a Return Material Authorization (RMA) number and shipping instructions. Then ship the product, transportation prepaid, for inspection.
Ship to:
- GlobalTime
- Attn: RMA XXXXXX
- Floor 7, Building 4, No. 651, Wanfang Road, Minhang District, Shanghai, China / 201112
- Tel: +86-21 3653 1186
Typical equipment repair or replacement time is 10 business days, plus shipping times. One-way shipping is the Customer’s responsibility. GlobalTime will return ship the equipment by the same means it was received. GlobalTime will not be responsible for dismounting and remounting of the GlobalTime clock, for unauthorized returns or for returns that do not list the RMA number and quantity returned on a packing list attached in plain view on the outside of the shipping container.
We reserve the right to make changes at any time.
GlobalTime Electronic Co., LtdFloor 7, Building 4, No. 651, Wanfang Road,Minhang District, Shanghai, China / 201112Tel: +86 3653 1186Fax: +86 3653 1185Email: [email protected]Website: www.ntpclock.com
 report this ad
References
[xyz-ips snippet=”download-snippet”]