GLOW FIREElectric LED FireplacesInstructions Manual
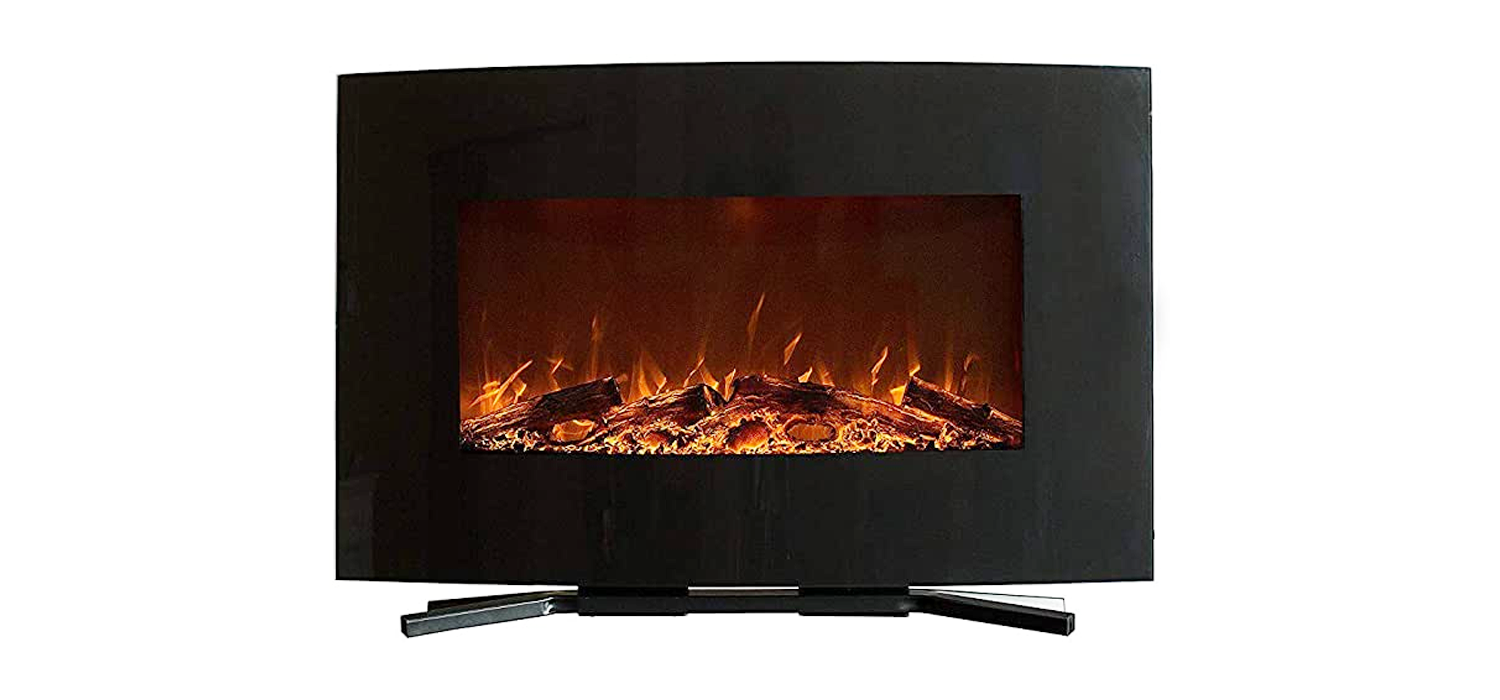
Electric fireplace: Jupiter, Merkur
Power: 220-240 V AC, 50 HzMaximum heat output: 1,400 -1600 watts
Note: Use this heater only as described in this manual. Any other use is not recommended by the manufacturer and may result in fire, electric shock or other injuries.
Warning! Read and understand all of this manual, including all safety instructions, before plugging in or using this product.
Keep this manual for later lookup. If you are selling or subsething this product, make sure that this guide is enclose in this product.
INSTALLATION AND IMPORTANT NOTES:
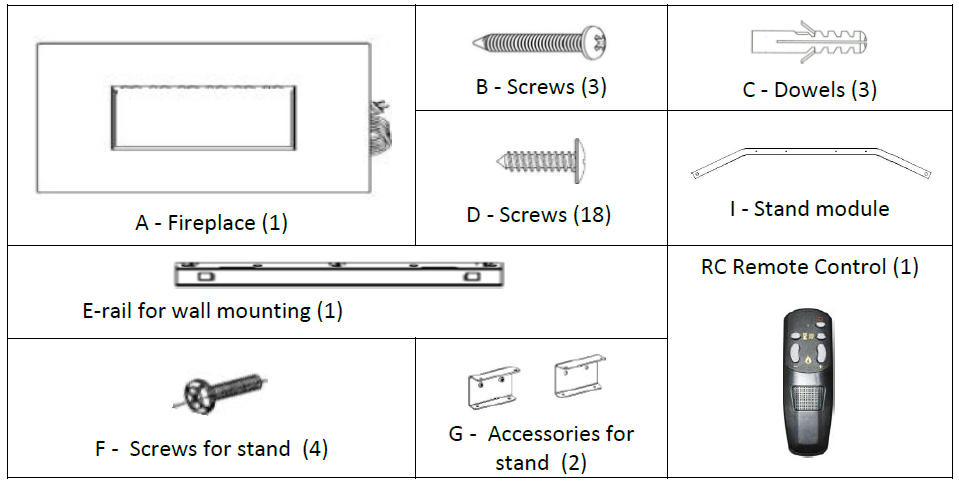
- Remove all packaging materials. Check that all necessary parts are present; if parts aredamaged or missing, contact your reseller.
- Before first use, verify that the mains voltage matches the information on the name-plate.
- The device must not be used in potentially explosive atmospheres where materials suchas fuel, thinners, paints and varnishes are stored.
- Caution: In order to avoid overheating, the heating must not be covered.
- Do not place this electric fireplace directly on carpets or other similar floor coverings.This should avoid possible discoloration due to the heat.
- Do not use this heating in the immediate vicinity of a bathtub, shower or swimmingpool.
- Do not operate the power plug with wet or damp hands.
- Pull the plug before each cleaning and when the device is not in operation.
- Do not connect the device to a damaged power outlet.
- Do not place objects inside the device and prevent foreign objects from entering the de-vice. This can lead to electric shock, fire or damage to the heating.
- Do not move the device during operation.
- If the power cord is damaged, it must be replaced by the manufacturer, its customer ser-vice or a similarly qualified person to avoid a hazard.
- This device is intended for use in homes and similar applications
- This heating device is not suitable for installation in vehicles and machines.
- WARNING: This heater is not equipped with a device to control room temperature. Donot use this heating in small rooms if they are inhabited by persons who are unable toleave the room alone, unless permanent supervision is provided.
Preparation
- Remove all parts and hardware from the box and place them on a clean, soft and dry surface.Note: This product contains a GLAS plate! Always exercise extreme caution when handling. Otherwise, injury or damage to property may occur.
- Compare the content to the BOM to make sure nothing is missing.
- Dispose of all packaging materials properly.
- Please recycle whenever possible.
TOOLS FOR ASSEMBLY
- Phillips screwdriver, electric drill; 1/4″ wood drill, hammer. Water scale (not included)
PARTS AND HARDWARE
Instructions
Warnings: Always make sure that the device is unplugged before the start of assembly! NEVER move or clean the heater or change the incandescent lamps as long as it is plugged in.
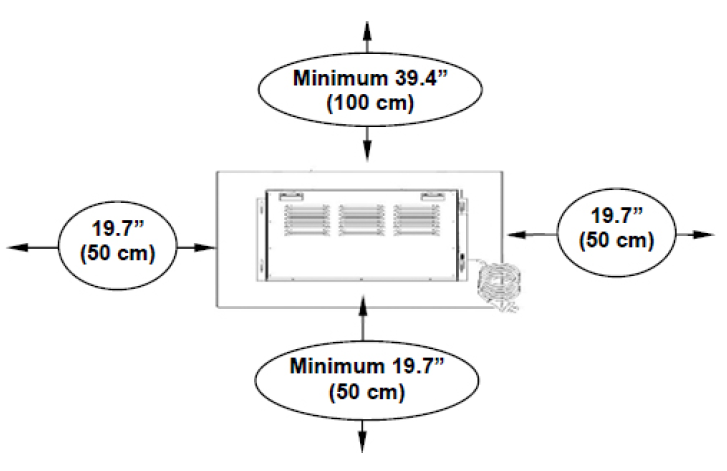
STEP 1:
Find a secure location.
- Minimum distance to each side: 19.7″ (50 cm).
- Minimum distance below: 19.7″ (50 cm).
- Minimum distance over: 39.4″ (100 cm).
- Minimum distance from the front and from the sides:3 feet (90 cm).
Select a location near a power outlet, an extension cable is not required.
Info: The wall fastening elements contained in this fireplace are for use only with a wood-framed wall covered in drywall. For concrete walls or other wall types, consult a specialist for the best fastening methods.
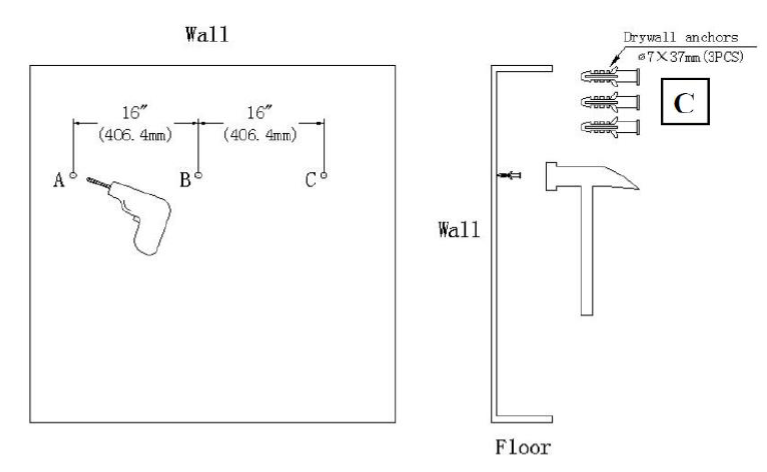
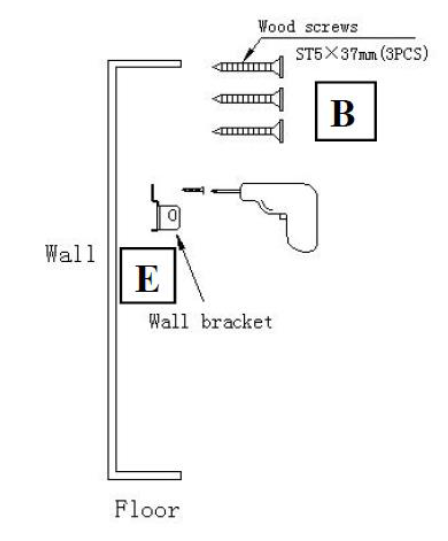
STEP 2:
With the three wooden screws (B) you attach the wall bracket with wooden screws and with the drywall plugs, please tighten all screws.
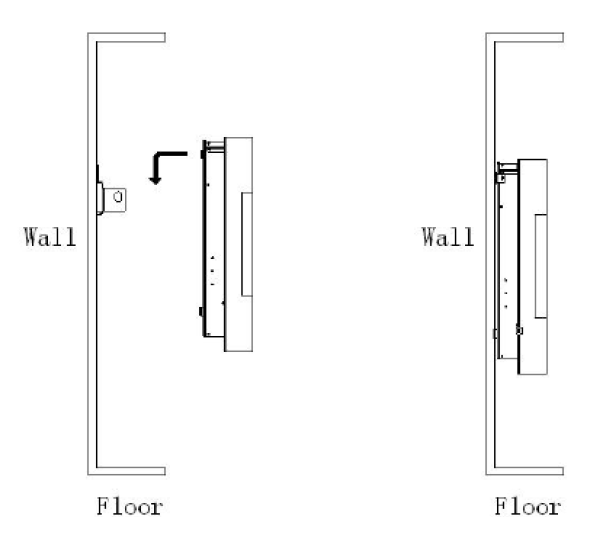
STEP 3:
Let two people lift up the fireplace and insert the hooks (2 hooks on the back of the fireplace) on the wall mount.
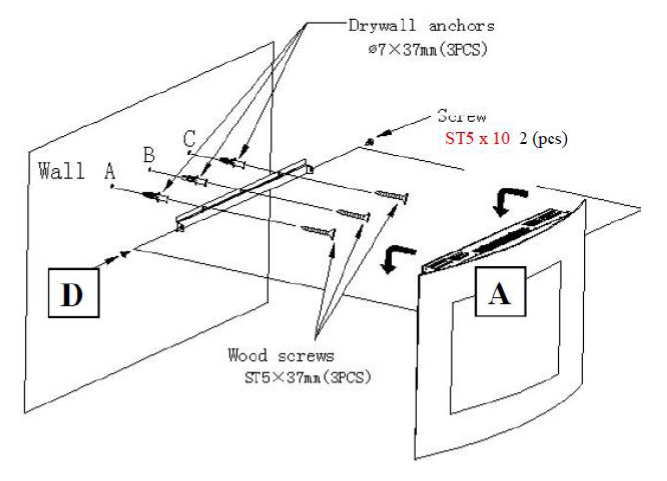
STEP 4:
Screw the fireplace into the bracket. With two ST5x10 (D) screws on both sides. Check the device for stability.
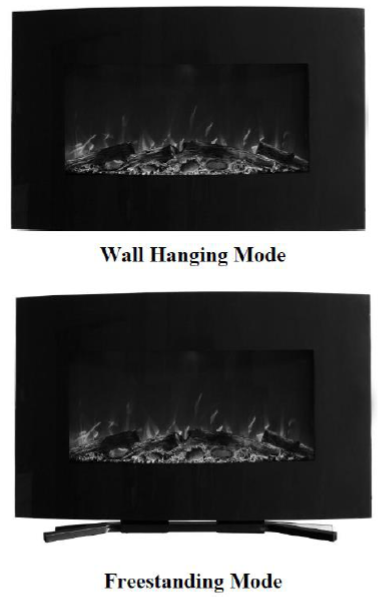
Installation Stand
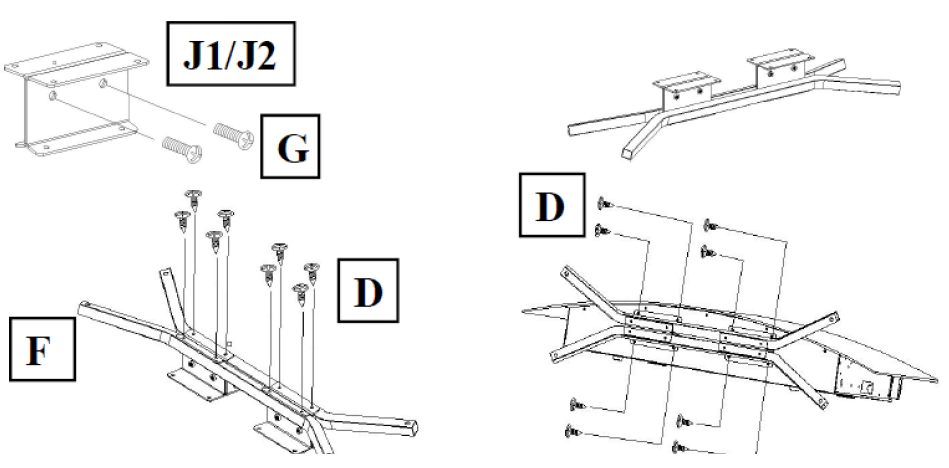
STEP 6A:
Fix the J1 and J2 metal parts with screws (G), a total of two sets. The two tripod holders (F) are fastened to the screws J1 / J2.8 (D) with screws (D).
STEP 6B:
Place the fireplace on a soft flatsurface, see the drawing above. Fasten the skirting board with screws (D). Tighten each screw with a screwdriver.
Operation
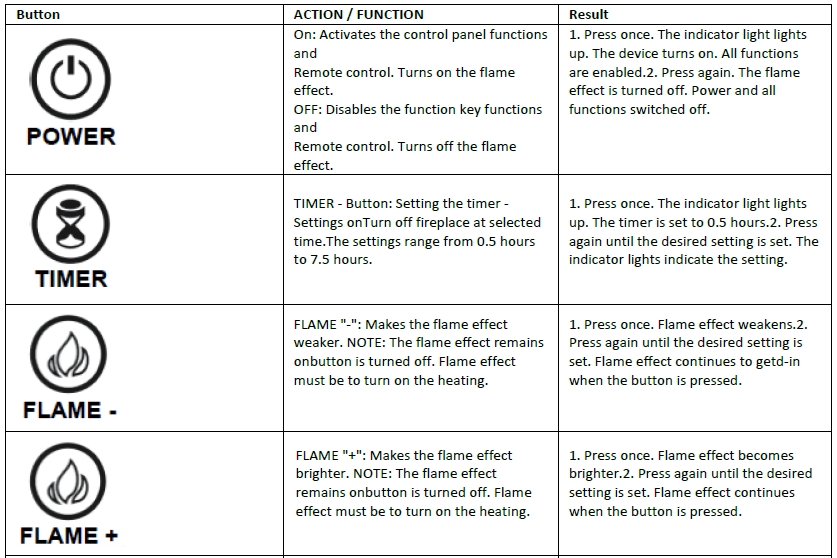
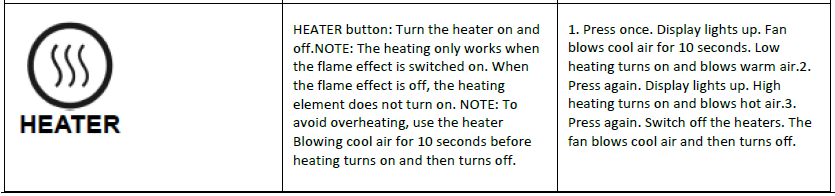
Power
Make sure the ON/OFF switch is in the OFF position on the left. Connect the device to a power outlet (see IMPORTANT SAFETY NOTES pages 2). Make sure that the socket is in good condition and that the plug is not loose. NEVER exceed the maximum current for the circuit. Do not connect other devices to the same circuit.
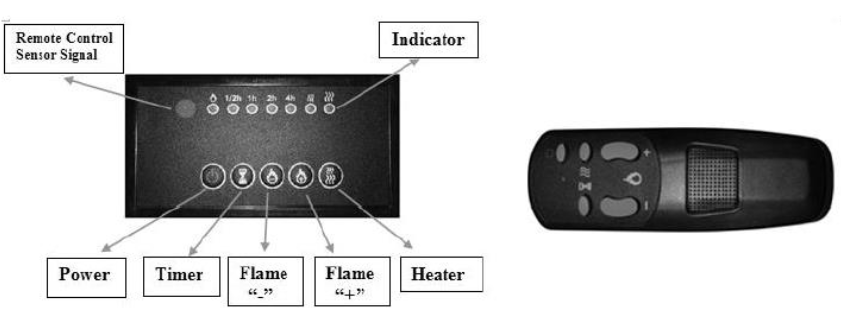
How this electric fireplace can be operated by the CONTROL PANEL, which is on the right, or with the included remote control. The operation and functions of the two methods are the same. Please read the IMPORTANT SAFETY NOTES on pages 2 and 3 before operation.
Info: When the heat function is used for the first time, there may be a slight odor. This is normal and should not be repeated as long as the heating is not used for an extended period of time.
Temperature limitation
This heater is equipped with a temperature limitation control. When the heater reaches an unsafe temperature, the heater turns off automatically.
Reset:
- Unplug the power cord from the power outlet.
- Set the ON / OFF switch on the CONTROL PANEL to OFF.
- Wait 5 minutes.
- Check the fireplace to make sure no vents are blocked or clogged. If they are, use a vac-uum to clean the vents.
- When the POWER switch is switched off, plug the power cord back into the socket.
- If the problem persists, have the power outlet checked by a professional.
Remote control battery information
This remote control uses two AAA batteries (not included). Instructions for battery installation can be found on the battery compartment of the remote control.
Care and maintenance
- ALWAYS turn off the heater and pull the power cord out of the socket before cleaning it, changing the bulbs or moving the oven. Otherwise, there is a risk of electric shocks, fire or injury.
- Never dive in water or rinse with water. Otherwise, there is electric shock, fire or injury.
Cleaning
Metal:
- Use with a soft cloth, slightly moistenedNever use brass polish or household cleaners as they damage the metal.
Glass:
- Use the glass cleaner and dry carefully with a paper towel or a lint-free cloth.
- Do not use abrasives or detergents that could damage the surface
Plastic:
- Wipe with a slightly moistened cloth and a mild soap solution and warm water.
- Do not use abrasives or detergents that could damage the surface.
Vents:
- Use a vacuum cleaner or duster to remove dust and dirt from the heater and vent areas.
- Clean the exterior of the stove with a slightly moistened cloth or duster.
Risk of electric shock! DO NOT OPEN the main panels! No parts that can be serviced by the user!
Electrical and moving parts:
- Fans and motors are factory lubricated and no longer require oil.
- With the exception of the incandescent lamp, all electrical parts and components are integrated into the heating system and cannot be waited for by the consumer.
Storage:
Keep the heat in a clean place when not in use.
 Help protect the environment!Please observe local regulations: Leave waste electricalequipment at a suitable waste disposal site.
[xyz-ips snippet=”download-snippet”]