GoCom GD100 Digital Radio User Manual
To Users
Thank you for purchasing our product! This Manual is designed to make you quickly grasp use of this device. In order to avoid physical injury or property loss due to improper operation, please read this Manual carefully before using this device.
Notice
The device meets the requirements of FCC PART 90, PART 97 and PART 15. Local laws and regulations shall be complied with when setting up or using the equipment, and corresponding qualifications and relevant procedures shall be obtained if necessary. Consulting the relevant authorities is suggested.
This equipment has been tested and found to comply with the limits for a Class B digital device, pursuant to Part 15 of the FCC Rules. These limits are designed to provide reasonable protection against harmful interference in a residential installation. This equipment generates, uses and can radiate radio frequency energy and, if not installed and used in accordance with the instructions, may cause harmful interference to radio communications. However, there is no guarantee that interference will not occur in a particular installation. If this equipment does cause harmful interference to radio or television reception, which can be determined by turning the equipment off and on, the user is encouraged to try to correct the interference by one or more of the following measures:
- Reorient or relocate the receiving antenna.
- Increase the separation between the equipment and receiver.
- Connect the equipment into an outlet on a circuit different from that to which the receiver is connected.
- Consult the dealer or an experienced radio/TV technician for help.This device complies with Part 15 of the FCC Rules. Operation is subject to the following two conditions:
- this device may not cause harmful interference, and
- this device must accept any interference received, including interference that may cause undesired operation.
ISEDC RSS warningThis product meets the applicable Industry Canada technical specifications.
RF Radiation Information
- This product is limited to occupational applications that can meet RF energy radiation requirements. The user must be fully aware of the RF radiation hazards and can take corresponding measures to meet the RF radiation limitation requirements.
- Radio frequency (RF) refers to the electromagnetic frequency that can be radiated into space. It is a widely used technology in the fields of communication, medical treatment, and food processing. It will generate certain RF radiation during use.
Safety Information
In order to use the radio safely and efficiently, please read the following safety information:
- The radio can only be maintained by professional technicians. Do not disassemble the radio without permission.
- Only the batteries and chargers specified by our company can be used.
- To avoid problems caused by electromagnetic interference and electromagnetic compatibility, please turn off the radio in places where the “Please turn off the radio” sign is displayed, such as hospitals and other health care places. When taking the flight, please turn off the radio if the crew requests to do so.
- In vehicles with airbags, do not place the radio in the area where airbag deployment may be involved.
- Please turn off the radio before entering flammable or explosive environment.
- Do not replace or charge the battery in a flammable or explosive environment.
- Please turn off the radio before approaching the blasting area and the detonator area.
- Do not use the radio with damaged antenna. A damaged antenna may cause minor burns when it comes into contact with the skin.
- Do not expose the radio to direct sunlight for a long time or place it near the heating Radio.
- If you wear a portable radio, make sure the antenna is at least 2.5 cm away from your body when the radio is transmitting.
WARNING: Changes or modifications to this unit not expressly approved by the party responsible for compliance could void the user’s authority to operate the equipment.
CAUTION: Use the approved charger to charge the battery. The remaining lithium-ion battery is limited to 30% pursuant to the new lithium battery shipment regulation approved by International Air Transport Association (IATA). Before use, charge the battery. It is recommended that the radio remain powered off during charging. Use of battery not recommend or replaced with incorrect type of battery may result in a risk of fire and explosion or personal injury. Maximum ambient temperature around the power supply equipment including charger must not exceed 40 (104ºF) and device operating temperature not exceed 55 (131ºF).
RF Exposure Compliance and Control Guidelines and Operating InstructionsTo control your exposure and ensure compliance with the occupational/ controlled environment exposure limits always adhere to the following procedures.
Guidelines:
- Do not remove the RF Exposure Label from the device.
- User awareness instructions should accompany device when transferred to other users.
- Do not use this device if the operational requirements described herein are not met.
Operating Instructions:
- Transmit no more than the rated duty factor of 50% of the time. To transmit (talk), push the Push-To-Talk (PTT) button. To receive calls, release the PTT button. Transmitting 50 % of the time, or less, is important because this radio generates measurable RF energy exposure only when transmitting (in terms of measuring for standards compliance).
- Hold the radio in a vertical position in front of face with the microphone (and the other parts of the radio, including the antenna) at least one inch (2.5 cm) away from the nose. Keeping the radio at the proper distance is important because RF exposures decrease with distance from the antenna. Antenna should be kept away from eyes.
- When worn on the body, always place the radio in approved clip, holder, holster, case, or body harness for this product. Use of non-approved accessories may result in exposure levels, which exceed the occupational/controlled environment RF exposure limits.
- Use only manufacturer’s approved supplied or replacement antennas, batteries, and accessories. Use of non-manufacturer-name approved antennas, batteries, and accessories may exceed the FCC and IC RF exposure guidelines.
- For a list approved accessories please consult your local dealer for information.
European Union (EU) Waste of Electrical and Electronic Equipment (WEEE) directiveThe European Union’s WEEE directive requires that products sold into EU countries must have the crossed out trash bin label on the product (or the package in some cases). As defined by the WEEE directive, this cross-out trash bin label means that customers and end-users in EU countries.
INFORMATION CONCERNING SAR FOR FCC

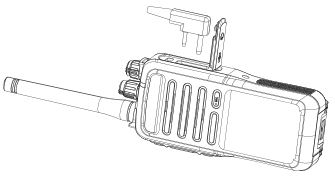
User Interface
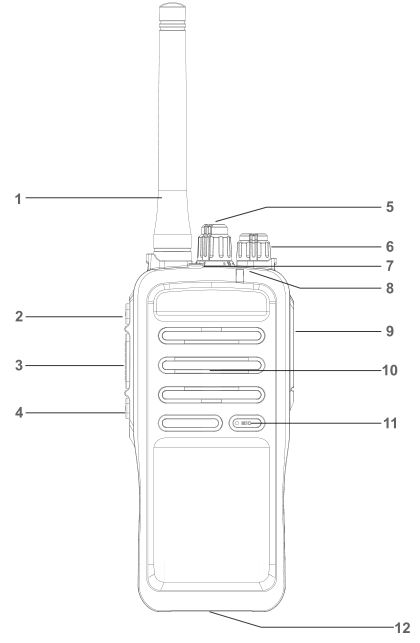
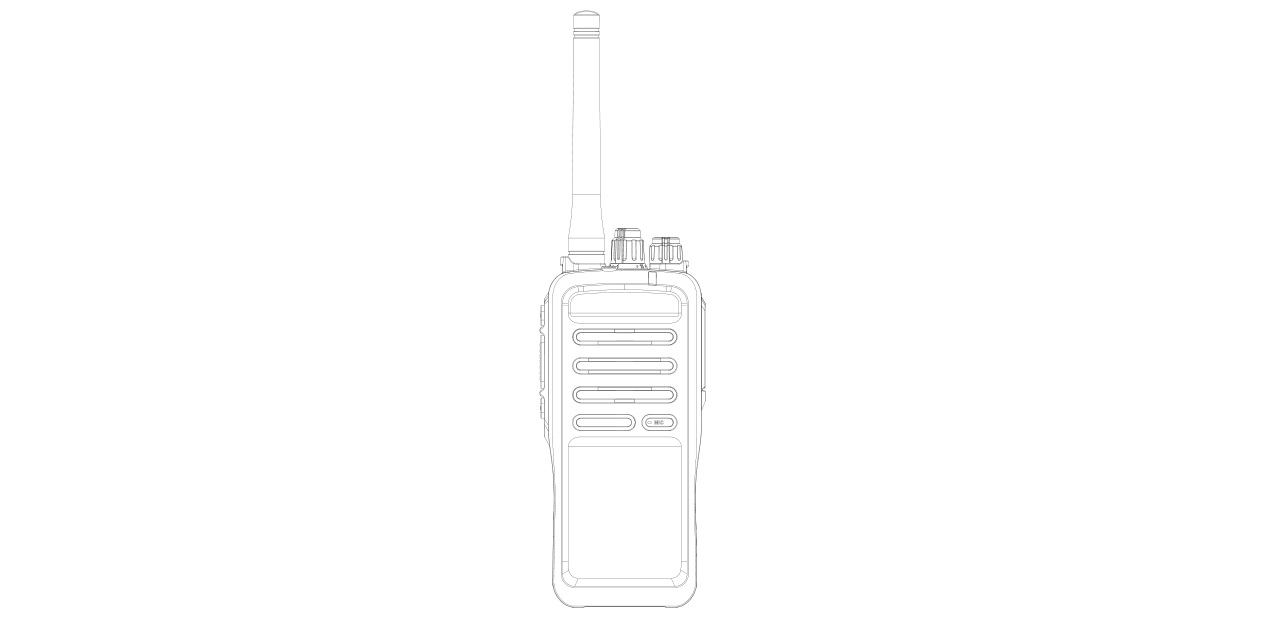
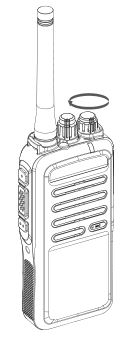
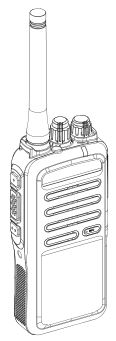
About the Device
- Antenna
- P1 key
- PTT key
- P2 key
- Channel knob
- Power switch/volume control knob
- Alarm key
- LED indicator
- Accessory port
- Speaker
- Microphone
- Battery Latch
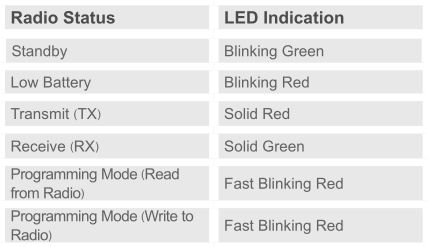
Radio LED Indicators
Power On/Off and Volume Control
 Power on/off:Turn the power switch knob to turn on/off the radio normally.
Note: The battery needs to be charged, otherwise the radio cannot be turned on under low power state.
Volume control:In standby state, turn the knob clockwise/ counterclockwise to adjust the volume that fits your ears.
Battery Installation
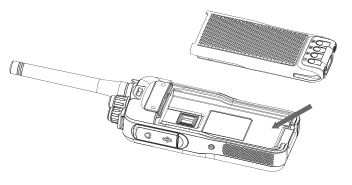
Note: If you need to remove the battery, please turn off the radio first, then lift up the bottom battery latch and take out the battery pack.
Antenna Installation
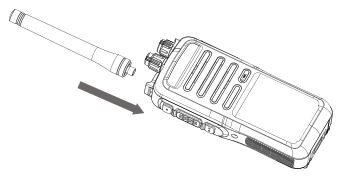
Note: Do not hold the radio by its antenna; otherwise, the performance and service life of radio may be affected.
Belt Clip Installation
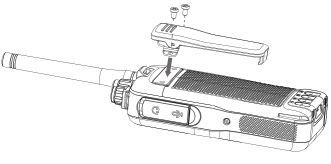
Step 1: Remove the belt clip screws from the device.Step 2: Align the radio screw holes on the belt clip, and then tighten the screws.
Accessory Installation
Step 1: Open the accessory connector cover.Step 2: Align the plug of the accessory (matching headset or programming cable) with the accessory connector.Step 3: Insert the accessory properly into the accessory connector.
Charging Function
The charger tray can support to charge either radio or battery pack.
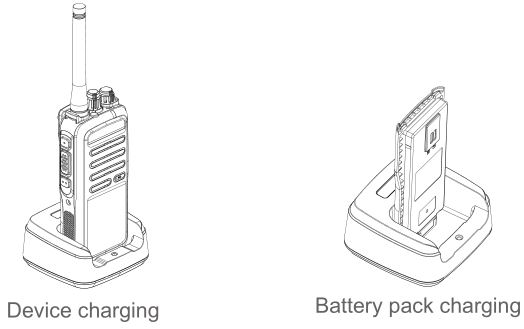
Charge Indicator

Charging precautions:
- Please use the original charger tray of the model for charging.
- When charging, it is recommended that the radio remain powered off during charging.
- To obtain the best battery performance, please charge for at least 5 hours for the first time.
- Do not charge the battery pack overnight, otherwise it will affect the battery pack life. When the battery is fully charged, please stop charging in time.
- The charger can only be used to charge the battery pack of the product. Do not use it to charge other battery packs, otherwise the charger and battery pack may be damaged.
- The battery pack should be stored in a cool and dry place after being fully charged. Do not expose the battery pack near the fire or to the sun, otherwise there are safety risks.
- During charging, it is not recommended to transmit the radio.
- The battery pack may slightly heat up during charging, which is a normal phenomenon.
Channel and Zone Selection
Rotate the [Channel Selection] knob clockwise or counterclockwise to switch to the desired channel.
Zone: A zone is a group of channels. User can include the channels with same property into a zone, which facilitates user to effectively manage existing channels. This product supports a maximum of 16 zones and 32 channels in each zone. Before selecting zone, make sure that the zone contains the required channel.To select a zone, press the preprogrammed [Zone Up]/[Zone Down] shortcut key (P1/P2).
Transmitting/Receiving
After starting up successfully, the user can conduct various call operations.
Precautions for radio use:
- When the radio is transmitting, keep the radio in a vertical position, and keep the microphone 2.5-5 cm away from the mouth. When transmitting, the radio should be at least 2.5 cm away from the head or body.
- Do not turn on/off the radio repeatedly during use, and adjust the volume to a level suitable for your hearing.
Precautions for radio operation:
- Before using the radio for communication, please set the transmitter and receiver to the same frequency point.
- After the analog channel is configured with the same sub-code frequency, the radios can communicate normally; radios with mismatched sub-code cannot communicate.
- After encrypting the digital channel, the receiver and transmitter need to set the same password in order to perform normal communication.
- If the digital channel sets the color code, only when the transmitting color code and receiving color code are the same can the radios communicate.
- Transmit/receive at high/low power (switch by P1/P2 key).
- After inserting the headset, press the [PTT] key to transmit and receive speech through the headset.
- Transmit with VOX headset after enabling VOX (turn on/off VOX through side key and insert the VOX headset).
User can configure program button functions via programming software. Corresponding features as below:
– Emergency Alarm– Zone Selection– One Touch Call– DM On/Off– High/Low Power Switch– Scan On/Off– VOX On/Off
Device Name Configuration and Modification
- Enter the basic setting interface of programming software to configure or modify the device name.
- Device name can support: Letters, numbers, Chinese, special characters, etc.
Device ID
1. The device ID is related to the private call contact, and the ID range is 1 to 16776415.2. When using a private call contact to call, select device ID of the other party.
Password Configuration
1. To prevent information leakage, you can set the reading and writing password through programming software.2. Each time you read or write, you must enter the correct 8-digit password before operating.3. To cancel the password, clear the password and confirm.4. To change the password, key in the old password first, and then enter the new password to rewrite.5. When you forget the password, you can perform factory reset or reprogram it.
Sub-Code Frequency Configuration
1. The sub-code frequency supports CTCSS, DCS positive code, DCS reverse code, standard sub-code and non-standard sub-code.2. Only when the transmitting sub-code and receiving sub-code are the same can they communicate to each other.3. A radio with sub-code can transmit to radio without, but cannot receive signal without sub-code.
Scan List Configuration
1. The scan list can contain analog channels and digital channels.2. After configuring the scan list, the scan switch should be turned on.3. Turn on/off the scan list through preprogrammed [P1/P2] key.4. During scanning, the channels scanned include the channels in the scan list and the current main channel.5. When any channel in the scan list is transmitting a signal, it will stay on that channel upon signal detection.
High/Low Power
1. Set the high/low power through preprogrammed [P1/P2]key.2. The programming software can set the high/low power for each channel according to the use condition.3. If set to high power, the transmission distance is long, but with higher power consumption, which may shorten the battery life.4. If set to low power, the transmission distance is short, but the low power consumption.
DTMF Configuration
1. The DTMF interface of the programming software can configure the DTMF function related parameters, such as side tone, duration, interval time, online telegram code, offline telegram code, transmission start sound, transmission end sound, transmission start and end sound.2. After the transmitter turns on the side tone, when the [PTT] key is pressed to transmit, the transmitter itself will also give DTMF sound.
Emergency Call
- Configure functions of the alarm system through programming software, such as alarm channel, re-transmission times, and alarm type.
- Emergency call supports the digital channel and analog channel.
- Set Alarm key as the “Emergency Call” button .
- When Analog or Digital channel triggers emergency call, an emergency call code will be sent. Emergency call will be automatically transmitted after remaining re-transmit call becomes 0, and automatic emergency calls will repeat transmit twice.
- The transmitter will sound the alert tone after the emergency call is sent. Receiver side also will receive an alert tone after receiving the emergency call.
Digital Encryption
- Add encryption through programming software, which only supports basic encryption, maximum 8 characters.
- Supported characters include: numbers, uppercase letters, lowercase letters.
- The same encryption template must be configured for transmitter and receiver for normal intercom, otherwise the speech content cannot be heard clearly.
- The main purpose is to prevent the content of the speech from being monitored by other people at the same frequency.
Color Code
The color code can identify a system. Users who need to communicate with each other must set the same color code. The radios does not respond to channel activities that do not match the preset color code.
- Set the color code though programming software.
- The color code range of this product can be set: 0~15.
Contacts
1. Contacts are only valid for digital channels.
2. There are three kinds of contacts: private call, group call and all call; and each digital channel needs to be set through programming software.
3. When making private call, only when the frequency is the same, the other party’s ID exists and is in standby state communication can be made.
4. When making group call, pay attention to whether the contact is in the receiving group, and all radios in the same receiving group can receive the speech.
5. When making all call, all channels with the same frequency can receive the speech, and the all call ID is fixed.
Call Alert (Private call only)
Call alert can be used to get a hold of someone quickly for requesting the recipient to call back. Call alert are repeated until response to. To respond, the recipient can talk back.
- Configure “One touch call” through CPS and send “Call Alert”.
- After “Call Alert” is sent successfully, it will prompt a beep sound ,otherwise error tone will sound.
- When “Call Alert” is received, alert tone will continue to sound.
Remote Monitor (Private call only)
Remote monitor is used to send a command to the other party, and the other party’s device sends a voice to the command sender in a secret state to achieve the purpose of monitoring the other party.
1. The transmission duration of monitoring voice can be configured through CPS.
2. The monitored party’s device sends voices secretly without any alert on the interface.
3. Configure “One touch call” through CPS and send “Remote Monitor”.
Radio Check (Private call only)
Radio check is used to check whether it can communicate normally with the other party.
- Configure “One touch call” through CPS to send “Radio Check”.
- After “Radio Check” is sent successfully, it will prompt a beep sound, otherwise error tone will sound.
- After “Radio Check” is received, there will be no interface alert, and the device will automatically reply.
Remote Kill (Private call only)
1. Configure remote kill feature through programming software.2. Press programmable key to execute remote kill command.
Note: The other party cannot operate normally after remote kill, including intercom, menu operation and shutdown.
Activate (Private call only)
1. The activation command is to remove kill status.2. After sending activation command, it can change the other party from remote kill state to active state. After restarting, it can be used normally.
Voice Control Function
1. Preset the [Program] key to [VOX On/Off] key through programming software.
2. Press the [VOX On/Off] key to turn on/off the voice control function. VOX levels can be preset through programming software: Level 1, Level 2, and Level 3, where Level 3 is the most sensitive. When the radio VOX function is on, the preset VOX level is used.
TOT Function
In order to prevent some users from occupying the same channel for a long time, users can set to enable the TOT function. When the user’s continuous transmission time on the current channel reaches the TOT duration, the radio will stop transmitting and the speaker will give a time-limit prompt tone. You can set the time out timer via programming software. By default is 60 seconds. When OFF is selected, user can transmit continuously.
Squelch Step (SQ)
1. SQ is only valid for analog channels.2. SQ can be configured through programming software only.
Power saving function
To extend battery life, the user can enable power saving mode. In the power saving mode, the user can press [PTT] key to transmit or the radio can receive normally when a signal is detected. The power saving function can be enabled/disabled by programming software.
GPS Function (for specific models only)
1. After turning on GPS, you can transmit location information via preprogramming [P1/P2] key to dispatch center.
2. Alternately, in programming software select “Send Voice GPS”. When PTT to transmit voice message, location information is sent to dispatch center.
Vibration Function (for specific models only)
You can set whether to enable the vibration function, which will be applicable to short message, private call prompt, call prompt, etc.
Optional Accessories
Default accessories of the device are included in the product packaging box. For more information about accessories, please consult your local dealer.
Disclaimer
This manual strives for the accuracy and completeness of its content during the preparation. Repeated review has been carried out, and the company will not assume any responsibility for errors or omissions that may occur during the output and printing process. In addition, due to the continuous development of technology, the company reserves the right to change the product design and specification without prior notice.
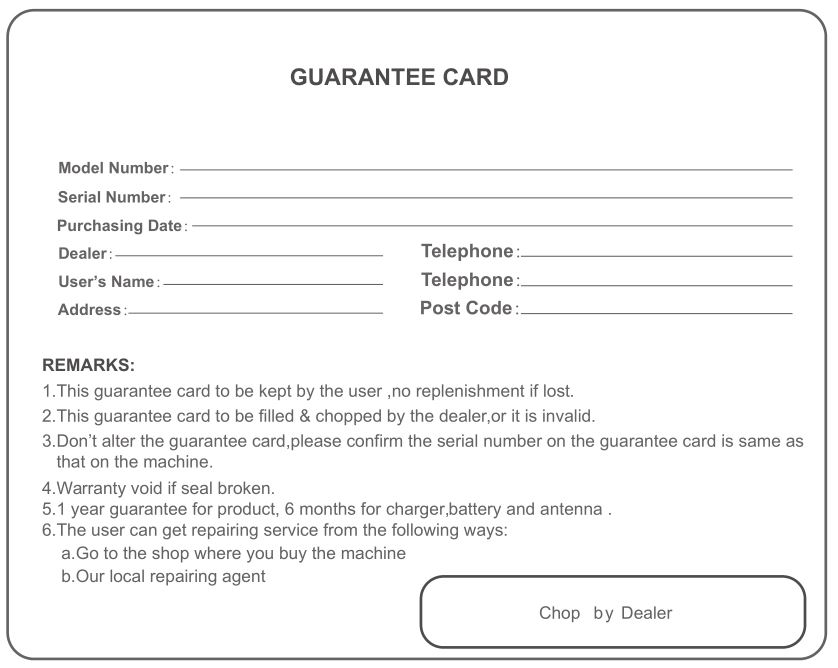
GUARANTEE CARD
* Use an authorize audio accessories compatible to device. For more information about accessories, please consult your local dealer.
GoCom GD100 Digital Radio User Manual – GoCom GD100 Digital Radio User Manual –
[xyz-ips snippet=”download-snippet”]