Godox GM55 5.5 inch 4K HDMI Touchscreen On-Camera Monitor
Forward
Thank you for purchasing 5.5″4K HDMI Touchscreen On-Camera Monitor GMSS. With multiple professional auxiliary functions, this monitor can be used with DSLR cameras and camcorders, which is suitable for onsite monitoring and recording of photography. Please read this manual carefully before using to make 8ure the correct operation and exert the optimum function.
Product Features
- Wide view angle IPS HD !ouch screen
- Support pseudo-color, peaking focusing, zebra crossing, waveforms and other functions
- Support lut lead-in with SD card & compatible with 17/32/33/64/65 cubic files
- 1.4 Output or Input
- Can be controlled by cameras and adjusted through touching or buttons
- Support fake battery function
Warning
⚠ Do not disassemble. Should repairs become necessary, this product must be sent to an authorized maintenance center.⚠ Always keep this product dry. Do not use in rain or in damp conditions.⚠ Keep out of reach of children.⚠ Do not use the product in the presence of flammable gas. In certain circumstance, please pay attention to the relevant warnings.⚠ Turn off the flash trigger immediately in the event of malfunction.⚠ Observe precautions when handling batteries– Use only batteries listed in this manual. Do not use old and new batteries or batteries of different types at the same time.– Read and follow all warnings and instructions provided by the manufacturer.– Batteries cannot be short-circuited or disassembled.– Do not put batteries into a fire or apply direct heat to them.– Do not attempt to insert batteries upside down or backwards.– Batteries are prone to leakage when fully discharged. To avoid damage to the product, be sure to remove batteries when the product is not used for a long time or when batteries run out of charge.– Should liquid from the batteries come into contact with skin or clothing, rinse immediately with fresh water.
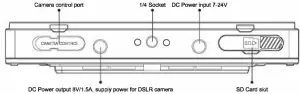
Names of Parts
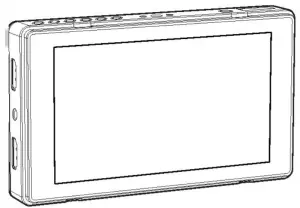
Monitor
These 6 shortcut buttons can be set according to customers’ demands When the camera mapping is powered oo, the functions of monitor are as follows
- Power switch: long press this button to power on or off. Short press this button to switch on or off the touch function.
- Select dial: press down this button and the function menu is displayed. Turn the select dial to choose and press this button to confirm
- Back button: press down this button to back up to the upper stage
- Shortcut button: There are 6 shortcut buttons. Set each shortcut button’s function before.
What’s Inside
|
|
|
|
|
|
|
|
|
|
|
 Monitor X1
 Instruction Manual X1
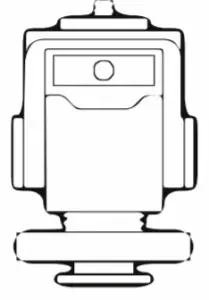 Cold Shoe Bracket X1
 Hood x1
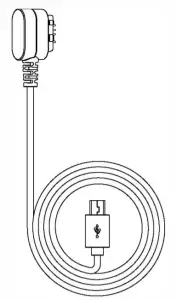
 Standard HDMI to Micro Cable (80cm) X1
 Standard HDMI to Mini Cable (80cm) X1
Optional Accessory
Purchase different control cable cables (optional0 according to different models.
|
|
 USB Camera Cable.
|
Model and Corresponding Port: |
|
| Model | Camera Port |
| GMX-S1 | Multi |
| GMC-U1 | Micro USB |
| GMC-U2 | Mini USB |
| GMC-U3 | USB-Type-C |
More camera control cable, please visit the Godox website to gain the newest information of support camera models
Usage
Usage Requirement
- The DC power input ‘Voltage of this product is 7 to 24V.
- Please avoid too wet and too much dust, otherwise, malfunction may be caused by circuit erosion.
- This product supports firmware upgrade. Do not blackout during the upgrading app,rox.3 minutes). Power the product on after the screen completely out out.
- Please power off and disconnect it with the power supply if do not use in a long period
Usage Instruction
- Select Dial OperationPress down the select dial to enter the main menu . Turn the select dial leftwards or rightwards to choose the needed parameters and press down to confirm. Press the back button to return to the upper menu until exiting.

- Touch OperationDouble-click the screen to enter main menu. Click the menu area to set and single-click the video area tu exit the menu.
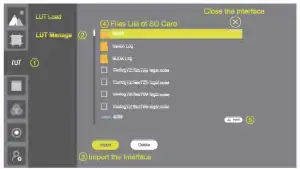
- Lut OperationThis monitor supports SD card which belongs lo NTFS or FAT32 file system.The monitor can store 25 lut files at most.3.1 Lut Import3.1.1 Touch operation: crick Import, the monitor will auto read the folders of SD card and cube files and display them. After marking the cube files to be led in under the same contents, click the “‘Import” icon on the bottom right to finish file leading in.3.1.2 Buttons operation~ turn the select dial to choose lut manage-import. Then press down the select dial and the monitor will read the files of SD card and cube file Turn the select dial leftwards or rightwards and press down to mark them. After marking finished, press the back button and press down the select dial lead in the marked files.Note “Import 0/20” will be displayed on the Import interface. In there, “0” means the quantity of marked files and “20” means remained quantity of imported files.3.2 Lut Delete3.2.1 Touch operation: click “delete” icon and the locally stored lut files will be displayed. Mark the undesired lut files and click the delete icon on the bottom right tu delete3.2.2 Button Operation: turn the select dial to choose lut manage-delete and press down the dial until the locally stored lut files are displayed. Mark the files according to the requirements and press down back button and select dial to delete the lut files.Note: Delete 0/4 will be displayed on the Delete interface in there “0” means the quantity of marked files and “4” means the quantity of imported files.
- Camera Control4.1 When the camera control is on and camera mapping is off, slide leftwards from the screen edge on the right to pop-up the camera control menu. Single-click the hidden menu in the video area can also pop up or hide the menu as required.4.2 When camera control and camera mapping is switched on, the touch camera control menu will not display. Mapping the camera control function button to the shortcut button F: F1: camera control on/off, F2: shooting; F4: auto focus; F5: focusing +1; F6: focusing -1.Note: To achieve camera control, it is recommended to purchase corresponding camera control cable and gain support of camera As the control orders are not supported by all cameras please refer to the relevant instruction manual of the camera control cable to see Its support functions and camera models in detail.
F2 Recording (Click record or stop recording) F3 Shooting (click to take photos) F4 Auto focus Focusing +5, quick adjustment + F5 Focusing +1, fine adjustment + F6 Focusing -1, fine adjustment – Focusing -5,quick adjustment - WaveformWhen the waveform is switched on, waveform will be displayed on the bottom right of the screen. Slide the screen in a downward direction to hide the waveform while in an upward direct on to display it. When the waveform is on, c ick the waveform to switch YNUV/RGB graph.
- Menu Introduction
Auxiliary function Auxiliary composition Lut Waveform Color Setting Shortcut button System setting
 Note “Import 0/20” will be displayed on the Import interface. In there, “0” means the quantity of marked files and “20” means remained quantity of imported files.3.2 Lut Delete3.2.1 Touch operation: click “delete” icon and the locally stored lut files will be displayed. Mark the undesired lut files and click the delete icon on the bottom right tu delete3.2.2 Button Operation: turn the select dial to choose lut manage-delete and press down the dial until the locally stored lut files are displayed. Mark the files according to the requirements and press down back button and select dial to delete the lut files.
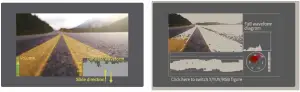


Technical Data
| Model | GM55 |
| Screen | 5.5″ IPS Touch Screen |
| Screen Ratio | 16: 9 |
| Resolution | 1920×1080 |
| Power | ≤7W |
| Material | PC Plastic |
| Contrast Ratio | 1000: 1 |
| Color Depth | 8bit |
| Dimness | 410 nit ±10% |
| Visual Angle | 160°H1160°V |
| Video Format |
|
| Audio Output | 3.5mm Earphone dual-channel output |
| SD Card Slot | Support to lead in .cube files by SD cardSupport 17/32/33/64/65 cube |
| Power Source | Input: DC 7-24V; Output: the max. output of fake battery is DC 8V/1.SA |
| Battery | Compatible with F550/F750/F970 lithium battery |
| Working Temperature | -10°C~50°C |
| Dimension | 154 x90.4 x34.3 mm(with hood) |
| Net Weight | 318g(with hood) |
Maintenance
Avoid sudden drops. The device may fail to work after strong shocks, impacts, or excess stress.
Keep dry. The product isn’t water-proof. Malfunction, rust, and corrosion may occur and go beyond repair if soaked in water or exposed lo high humidity
The sudden temperature changes may cause product condensation
Keep away from strong magnetic field. The strong static or magnetic field produced by devices leads to malfunction.Unauthorized service or artificial damage will void the warranty. In those situation, maintenance fees will be charged
If the product had failures or was wetted, do not use it until it is repaired by professionals
Changes made to the specifications or designs may not be reflected in this manual
GODOX Photo Equipment Co., Ltd.Add: Building 2, Yaochuan Industrial Zone,Tangwei Community, Fuhai Street, Bao’an District, Shenzhen 518103, ChinaTel: +86-755-29609320(8062) Fax: +86-755-25723423E-mail: [email protected]
 report this ad
References
[xyz-ips snippet=”download-snippet”]