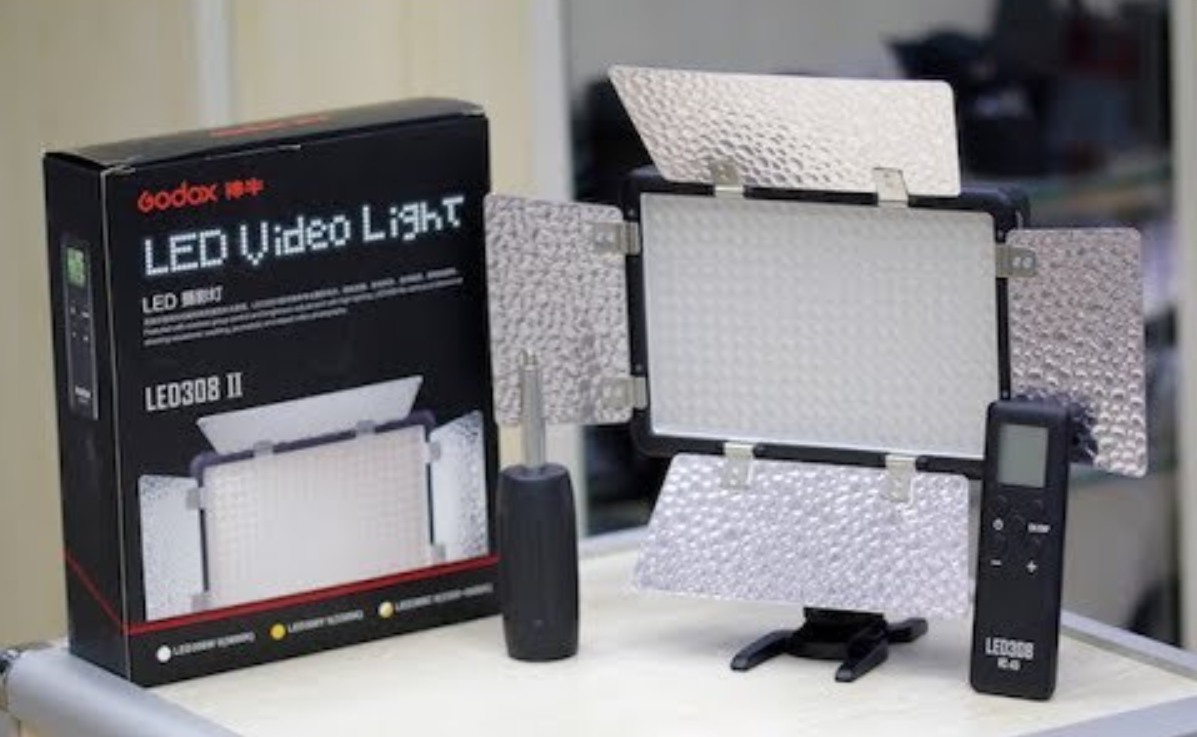
Godox LED308II LED Video Studio Light

Foreword
This LED video light is excellent for macrophotography, product shooting, photojournalistic and video recording, etc. The lightweight and portable light provides high brightness and accurate color temperature. Three types are available: LED308W II White Version (5600K), LED308Y II Yellow Version (3300K), and LED308C II Changeable Version (3300~5600K).
Features
- 308-LED-bulbs panel is lithium-ion or DC powered
- Wireless 433MHz grouping system (6 groups & 16 channels)
- Wirelessly adjust brightness or color temperature
- Large-sized LCD panel. Settings auto saved. Quickly change panel angle
- Fits almost any cameras and camcorders
Warning:
- Always keep this product dry. Do not use in rain or in damp conditions.
- Do not disassemble. Should repairs become necessary, this product must be sent to an authorized maintenance center.
- Keep out of reach of children.
- As this product do not have waterproof function, please take measures of waterproof in rainy or damp environment.
- Do not use or store the product if the ambient temperature reads over 50°C.
- Do not use the flash unit in the presence of flammable gases, chemicals and other similar materials. In certain circumstance, these materials may be sensitive to the strong light emitting from this flash unit and fire or electromagnetic interference may result.
- Observe precautions when handling batteries
- Do not put batteries into a fire or apply direct heat to them.
- Batteries are prone to leakage when fully discharged. To avoid damage to the product, be sure to remove batteries when the product is not used for a long time or when batteries run out of charge.
- Should liquid from the batteries come into contact with skin or clothing, rinse immediately with fresh water.
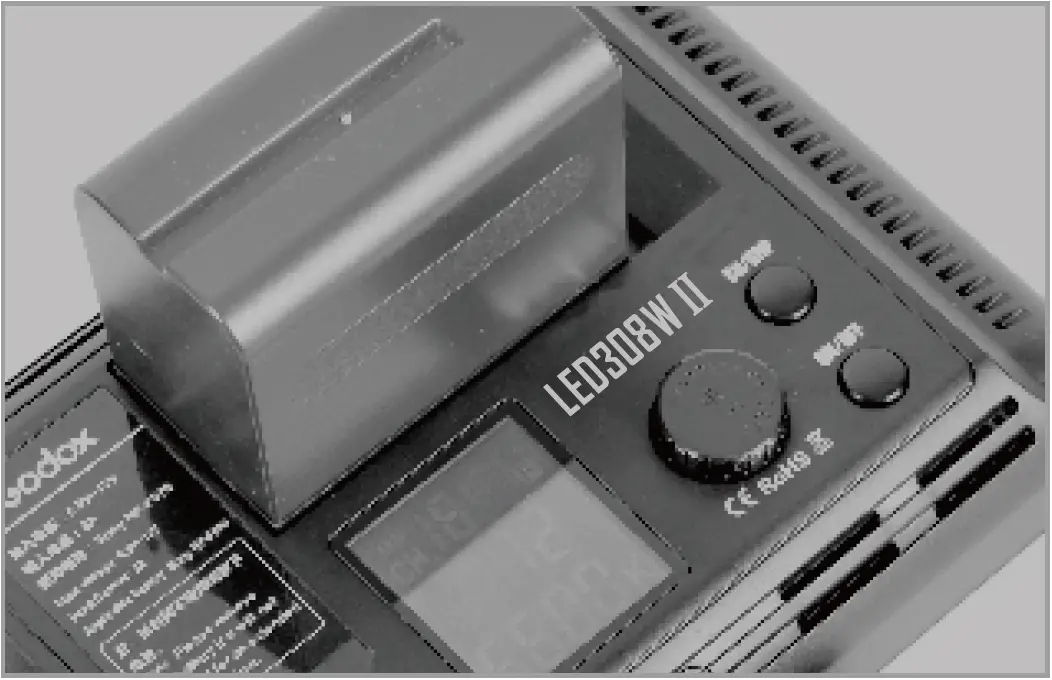
Parts
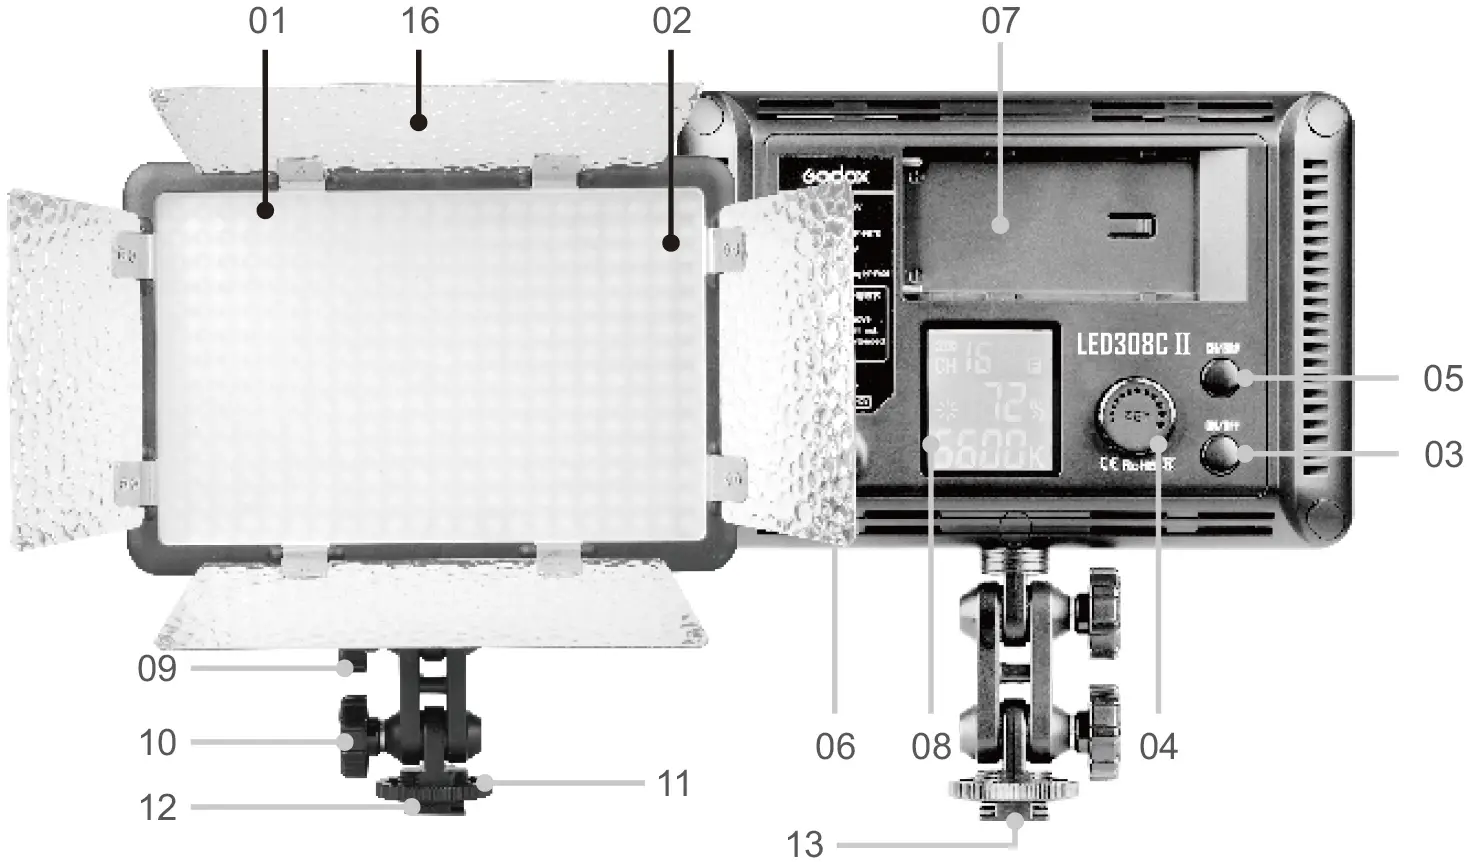
- 308 LED Beads
- Color Filters
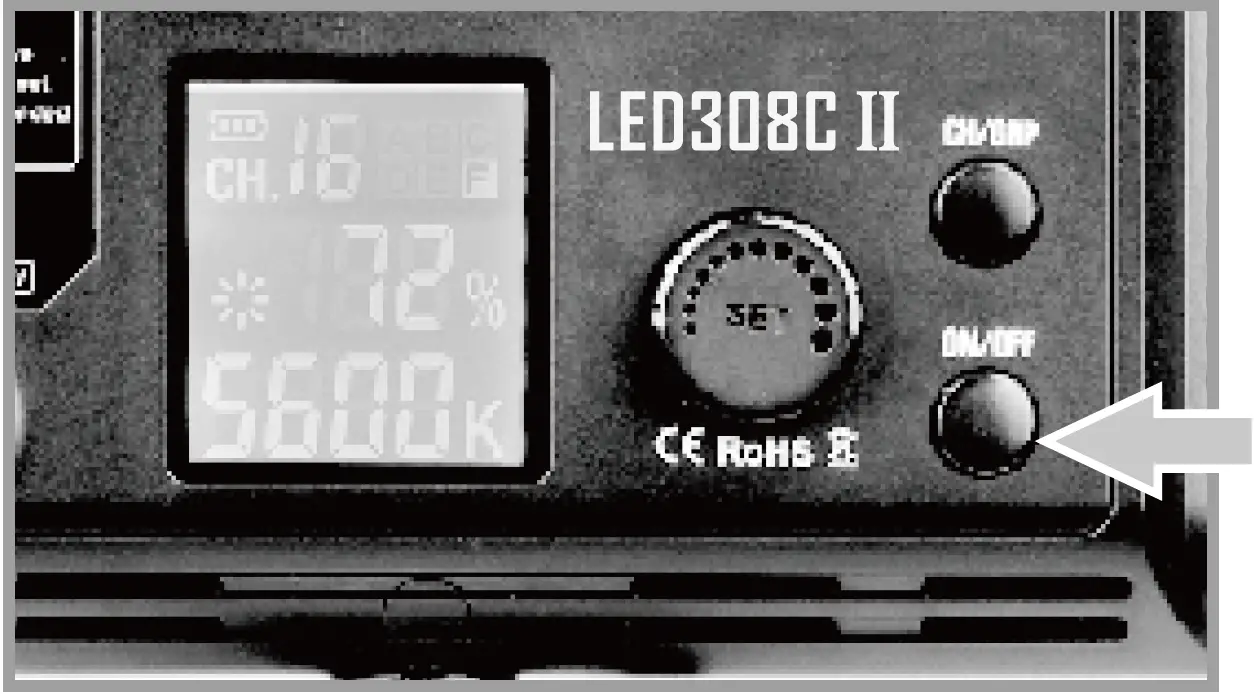
- Power Switch
- Select Dial + SET Button
- CH/GRP Button
- DC Power Jack
- Lithium Battery Compartment
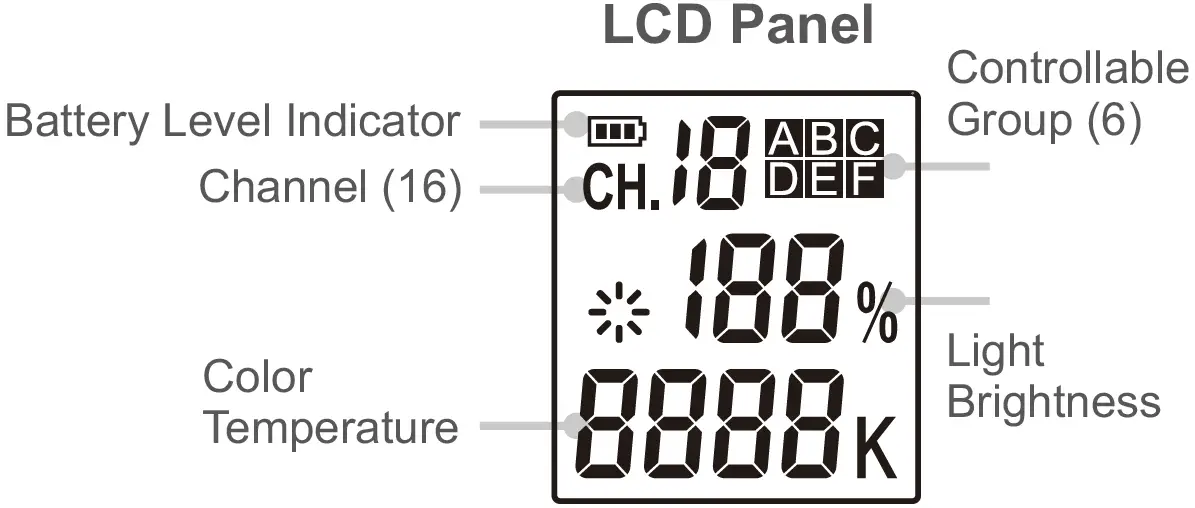
- LCD Panel (White in Blue)
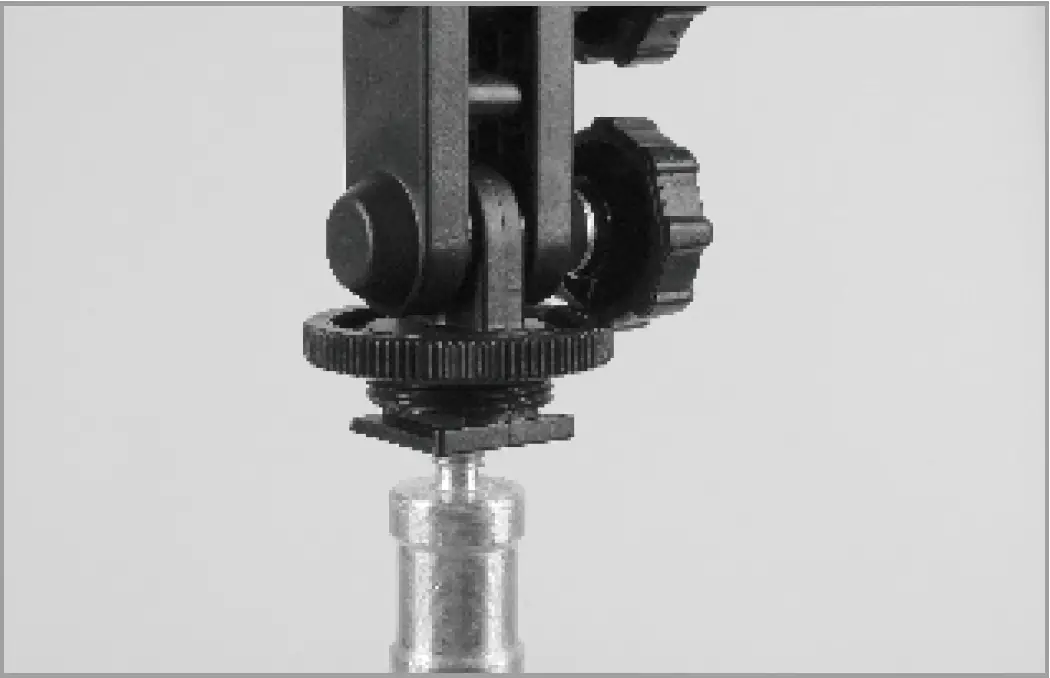
- Angle Adjusting Knob A
- Angle Adjusting Knob B
- Locking Ring
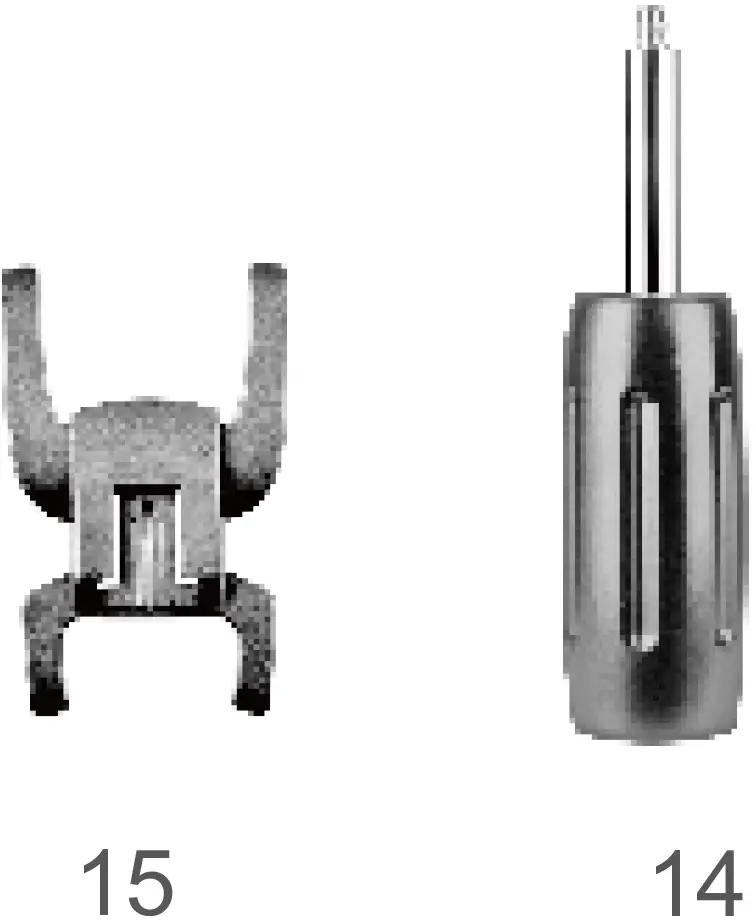
- Camera Hotshoe Connection
- 1/4″ Bracket Mounting Hole
- Handle
- Mini Stand

- Reflector
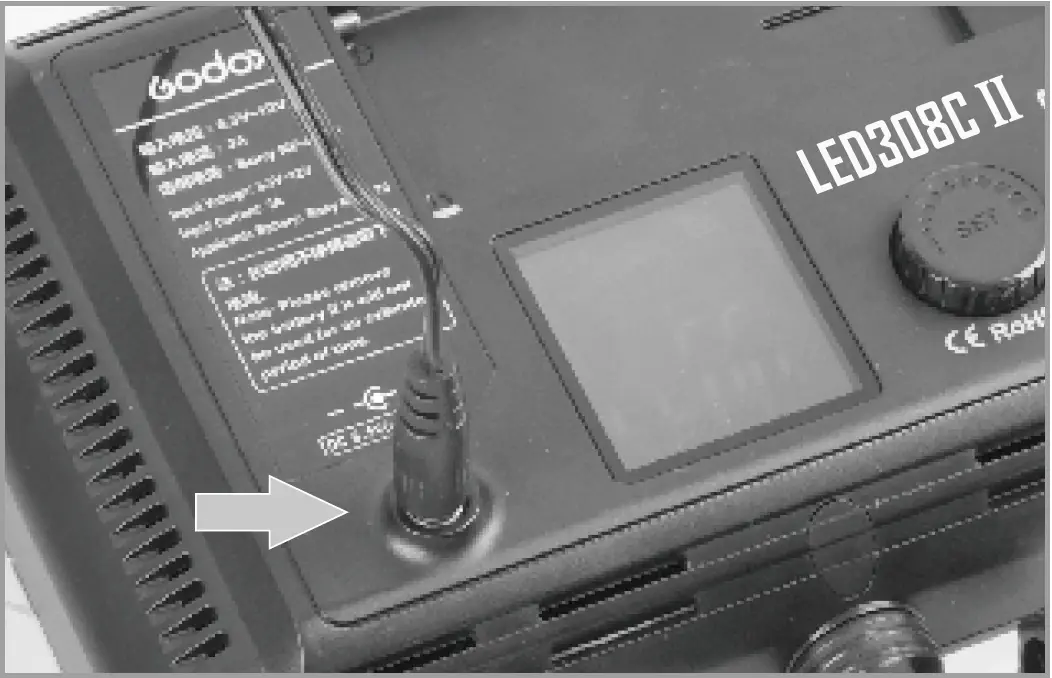
Power Management
Power Supply
Two power supply modes are available:
- Using lithium battery: This light uses SONY NP-F970 model lithium battery
- Using DC power jack: This light can be powered by DC power supply. Use a 6.5~12V adapter (purchased separately) to connect the light with the DC power supply.
Note:
- When using lithium battery, the Battery Level Indicator is displayed on the LCD panel. When the indicator blinks, the lithium battery power is low. Please recharge it immediately before usage in order to avoid forceful auto off.
- When using DC power supply, the indicator is not displayed when the voltage is over 10V.
Installing Lithium Battery
- Turn the Power Switch (03) off.
- Target the socket of the lithium battery towards the “+” “-” contacts of the Battery Compartment (07). Push the battery in until it locks.
- Power the light on.
- After using the light, please power it off.

Using the Video Light
On the Camera
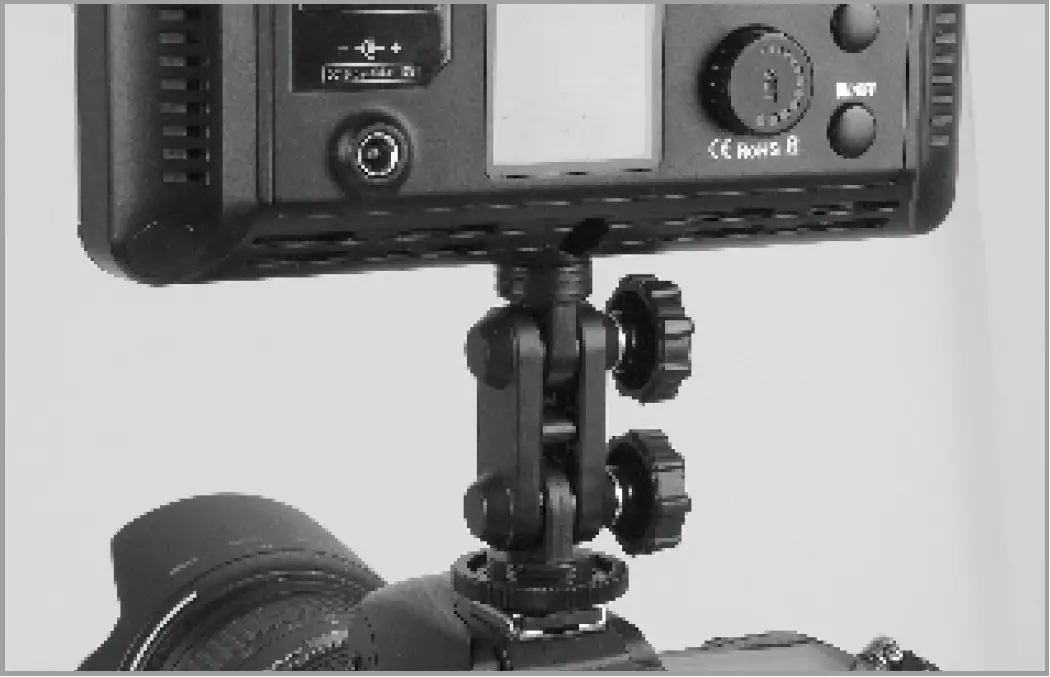
- Screw the Locking Ring (11) to the highest point and insert the Camera Hotshoe Connection (12) horizontally into the hotshoe of a camera or a camcorder.
- Tighten the Locking Ring (11).
By the Handle
- Screw the Locking Ring (11) to the highest point and install the handle onto the 1/4”Bracket Mounting Hole (13).
- Tighten the Locking Ring (11).
On the Mini Stand
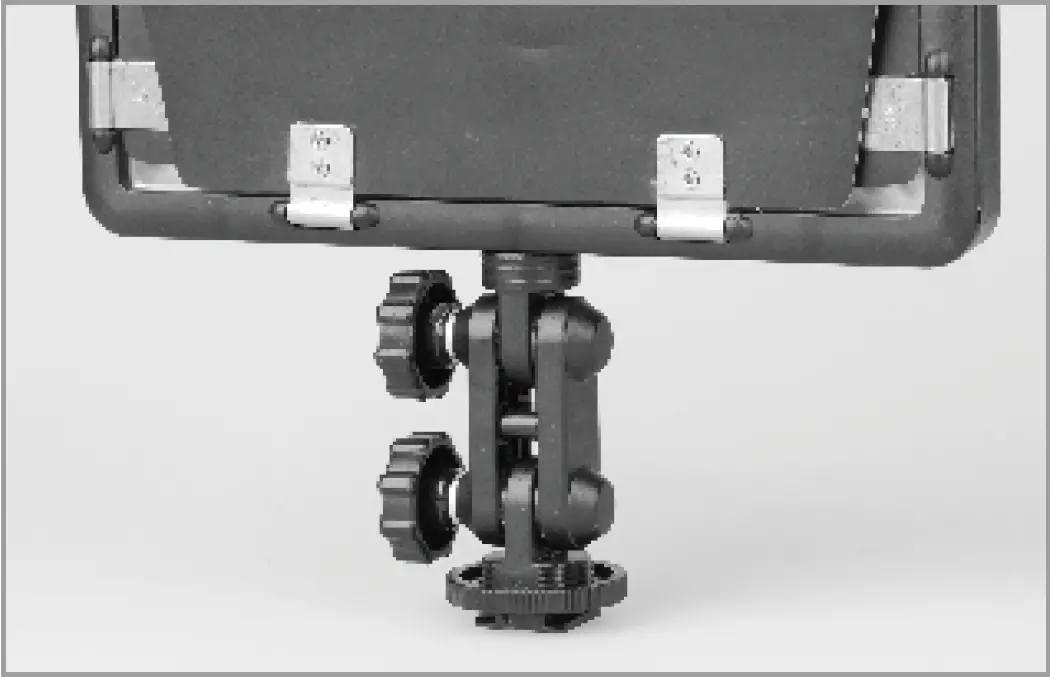
- Screw the Locking Ring (11) to the highest point and insert the Camera Hotshoe Connection (12) horizontally into the hotshoe of the mini stand.
- Tighten the Locking Ring (11).
On the Light Stand
- Screw the Locking Ring (11) to the highest point and install the light stand onto the 1/4”Bracket Mounting Hole (13).
- Tighten the Locking Ring (11).
Note: If your camcorder has no hotshoe connection, you are advised to purchase a connecting bracket for camcorder. The video light has a 1/4″ Bracket Mounting Hole as your camcorder does. Therefore, you can easily connect both the light and the camcorder to the bracket.
Operation
Before Usage
- Insert the lithium battery or connect the light with the DC power supply.
- Switch the power on, the video light giving out light.
- LCD panel shows the information.
Light Brightness/Color Temperature Adjustment Adjusting Light Brightness
- Turn the select dial to adjust the light brightness.The light brightness adjustable range changes at different color temperature with different models.
Adjusting Color Temperature
- Press the SET button once and the color temperature icon blinks. Turn the select dial to adjust color temperature.
NOTE: Color temperature of LED 308W II or LED 308Y II is invariable. The LCD panel only shows 5600K or 3300K.
Wireless Remote Control
With 433 MHz wireless system, this product has remote grouping and control function. Up to 6 groups of LED light can be controlled. 16 channels are available with strong anti-interference capability.Please set the channels and groups of LED video light to the same as those of remote control before usage.
Adjusting Channel/Group of the LED Video Light
- Press the CH/GRP button and the group icon blinks. Turn the select dial to choose a group ID (A to F).
- Press the CH/GRP button twice and the channel icon blinks. Turn the select dial to choose a channel ID (1 to 16).
Adjusting Channel/Group of the Remote Control
- Press the CH/GRP button and the group icon blinks. Press the “+” “-” button to choose a group ID (A to F).
- Press the CH/GRP button twice and the channel icon blinks. Press the “+” “-” button to choose a channel ID (1 to 16).
Adjusting Light Brightness/Color Temperature with the Remote Control
- Press the “+” “-” button to adjust the light brightness.
- Press the SET button of the remote control once and the color temperature icon blinks. Press the “+” “-” button to adjust the color temperature.
Note: The wireless signal can be received only when the LED light is power on. Remote control purchased separately.
Other Operation Tips
- Pressing the ON/OFF button on the remote control can only turn on/off all the LED groups instead of powering it on or off. When received the “OFF” command from the remote control, LED video light stop lighting up and LCD panel gets dark with “OFF” displayed. If this continues for four hours without any other operation, the LED video light will auto power off and the remote control will not work.
- Pressing the “SET” button on the remote control for 2 seconds can only turn on/off the current LED group instead of powering it on or off.
- The remote control will auto power off after four hours of idle operation.
Tips of Using Remote Control:
- When using the White Version LED308W II, please set the color temperature of the remote control as 5600K constantly;
- When using the Yellow Version LED308Y II, please set the color temperature of the remote control as 3300K constantly;
- Please remove the battery if the light will not be used for an extended period of time.
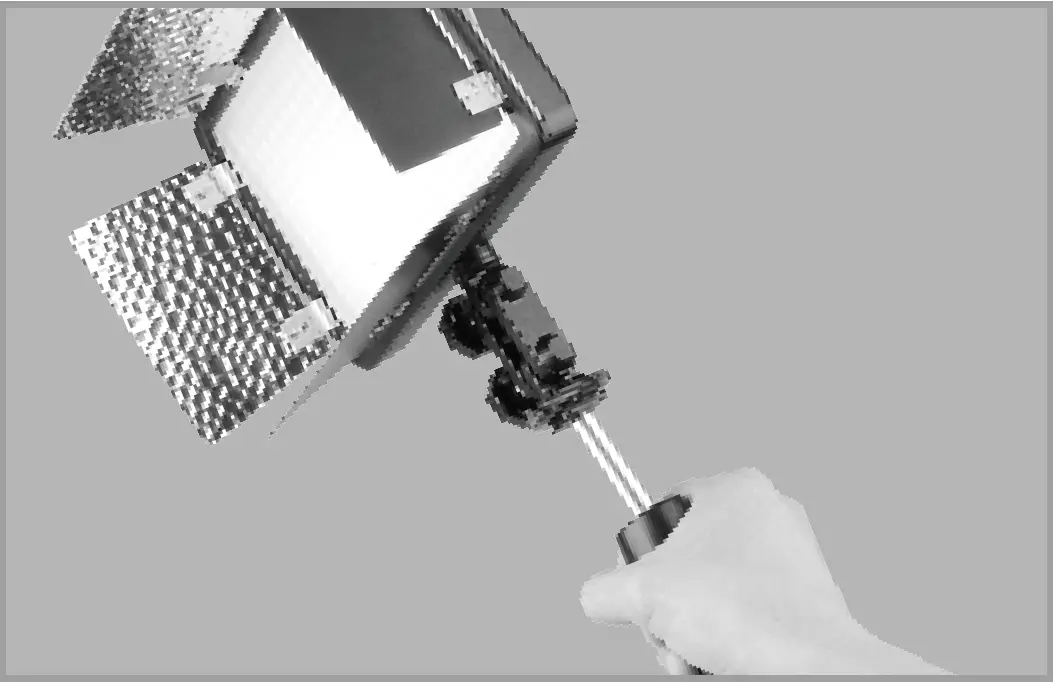
Replacing A Color Filter
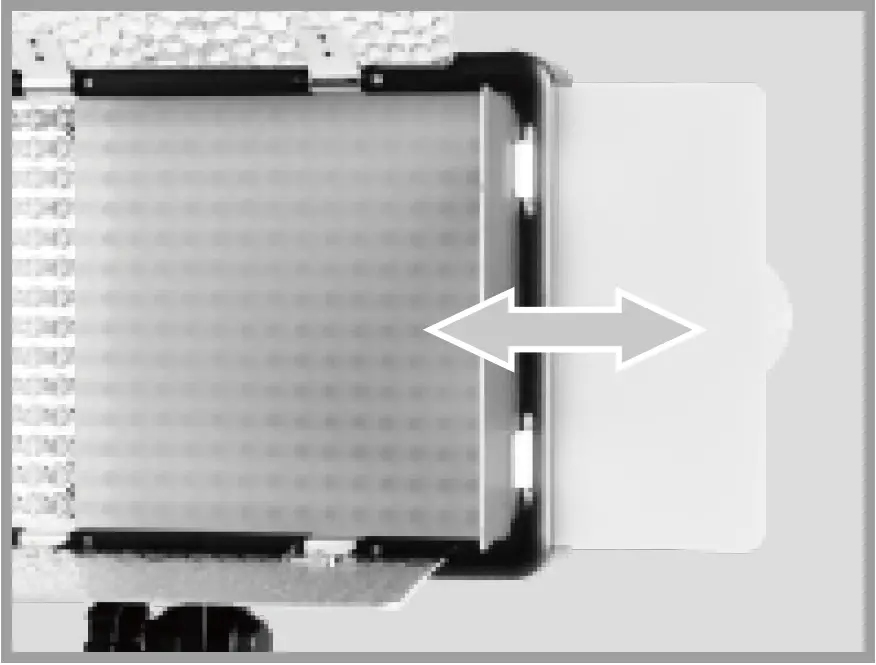
- Pinch the edge of the color filter (02) and pull it out.
- Insert a new color filter in and push it to the left. Then the color filter is securely in position.
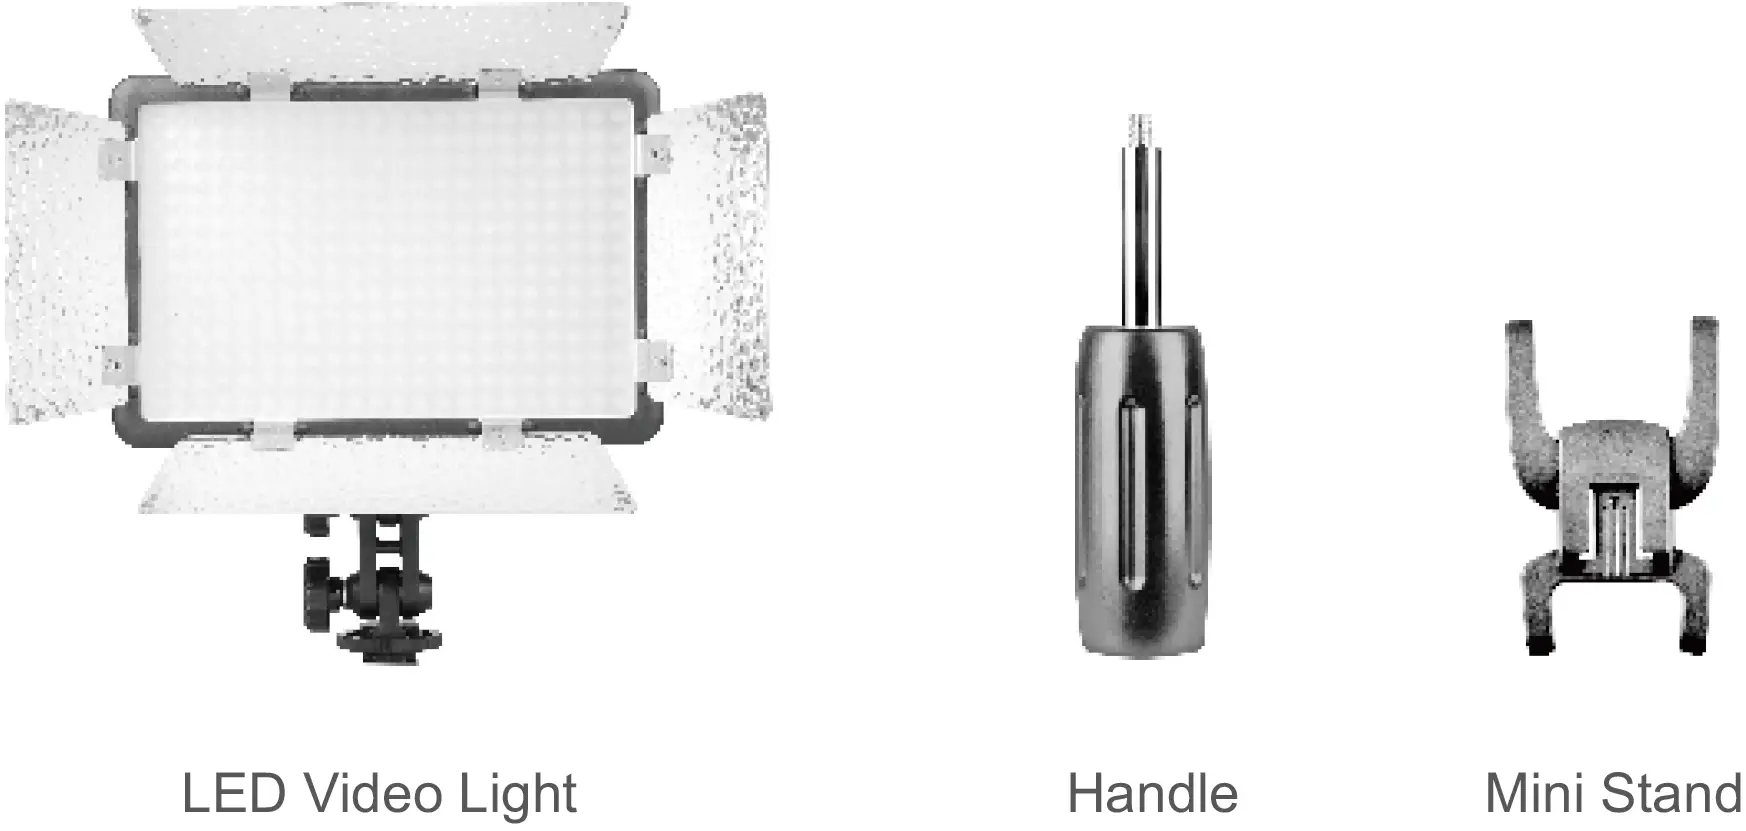
What’s in the Box?
- LED Video Light
- Handle
- Mini Stand
- Diffusion Filter
- Yellow Filter
- Blue Filter
 report this ad
![]()
References
[xyz-ips snippet=”download-snippet”]