![]() SILENT LED VIDEO LIGHTUL 150
SILENT LED VIDEO LIGHTUL 150
Instruction Manual
![]()
Foreword
Thank you for purchasing this Godox Product!Silent LED Video Light UL series are suitable for live recording, video shooting, and photojournalistic shooting for they have no fan and won’t make noise. UL series are very convenient due to the separation design of main body, adapter, and controller. UL series create stable light resource and even illumination for photography. With an included remote control and easy operation, UL series LED lights can be adjusted its light brightness in separate groups.
Main Features:
- With strong power, stable light source and adjustable light brightness
- Powered by V-port Lithium battery or DC power supply with wide application
- Adapter and controller are separate from the main light body, which offers more convenient operation and better heat dissipation
- Achieving wireless control by 433MHz grouping system (6 groups & 16 channels) and smartphone APP through Bluetooth
- With U-type bracket to adjust different angles easily
- Bowens-mount enables to install various of accessories
 IMPORTANT SAFETY INSTRUCTIONS
When using your photographic equipment, basic safety precautions should always be followed, including the following:
- Read and understand all instructions before using.
- Close supervision is necessary when any appliance is used by or near children. Do not leave appliance unattended while in use.
- Care must be taken as burns can occur from touching hot parts.
- The appliance switch is provided with the symbols 0 indicating off and 1 indicating on. The symbols and may be used for this purpose.
- Do not operate appliance with a damaged cord or if the appliance has been dropped or damaged – until it has been examined by a qualified serviceman.
- Position the cord so that it will not be tripped over, pulled, or contact hot surfaces.
- If an extension cord is necessary, a cord with a current rating at least equal to that of the appliance should be used. Cords rated for less amperage than the appliance may overheat.
- Always unplug appliance from electrical outlet before cleaning and servicing and when not in use. Never yank cord to pull plug from outlet. Grasp plug and pull to disconnect.
- Let appliance cool completely before putting away. Loop cord loosely around appliance when storing.
- To reduce the risk of electric shock, do not immerse this appliance in water or other liquids.
- To reduce the risk of electric shock, do not disassemble this appliance, but take it to a qualified serviceman when service or repair work is required. Incorrect reassembly can cause electric shock when the appliance is used subsequently.
- The use of an accessory attachment not recommended by the manufacturer may cause a risk of fire, electric shock, or injury to persons.
- Connect this appliance to a grounded outlet.
- Disconnect this unit from its source of supply before replacing the projection lamp.
SAVE THESE INSTRUCTIONS
Body
Main Body
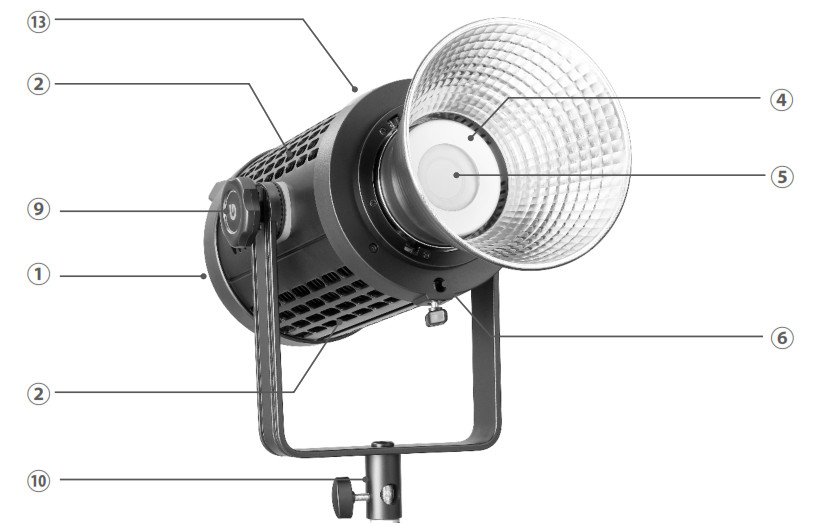
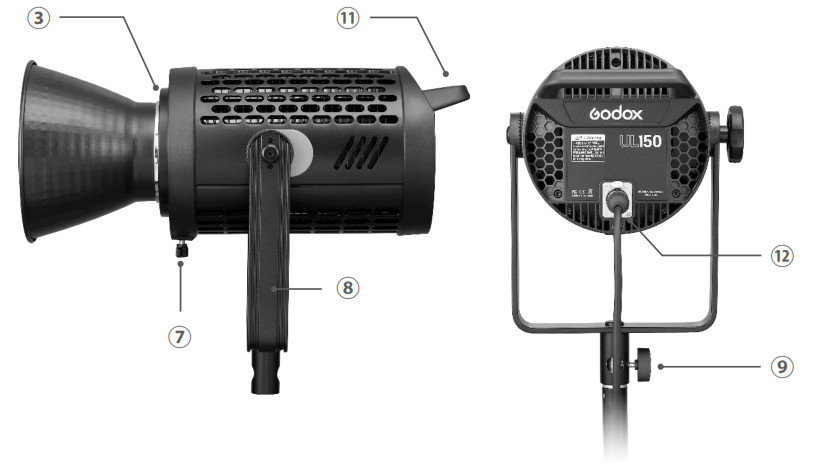
| 1 | Light Body | 8 | U-type Bracket |
| 2 | Thermovent | 9 | Bracket Locking Ring |
| 3 | Bowens Mount | 10 | Bracket Sleeve |
| 4 | Protect Cover | 11 | Handle |
| 5 | LED Light | 12 | Power Input Socket |
| 6 | Umbrella Input | 13 | Accessory Locking Button |
| 7 | Locking Ring |
LCD Panel
Main Body Included Items
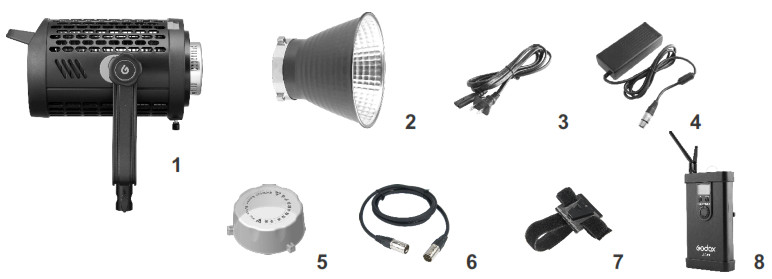
Optional AccessoryRC-A5II Remote Control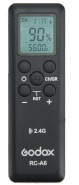
Power Supply
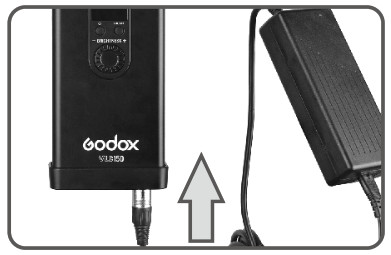
- Firstly, plug the two ends of connect cord separately into the controller’s output control port and the light’s power input socket. A “click” will be heard once finished.
- Plug the output end of adapter’s connect cord into controller’s power input end.
- Use the power cord to connect the power supply.Note: If using V-port battery, please insert the battery into the LED light and power it on for usage.
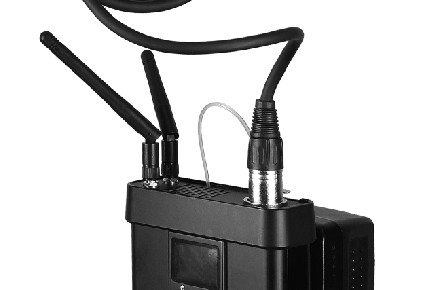
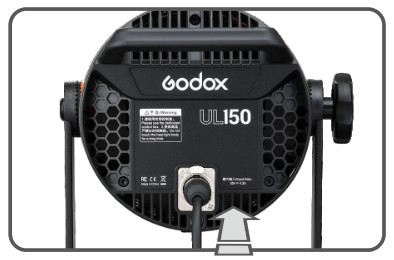
 Note: If using V-port battery, please insert the battery into the LED light and power it on for usage.
Operation
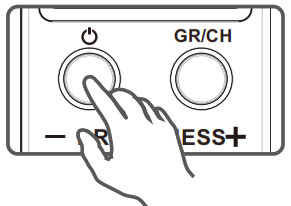
- Power on/off: long-press the Power Switch of controller to power the LED light on or off.
- Choose group/channel: press GR/CH button for once, and turn the Select Dial for Light Brightness to change the channel value. Then, press GR/CH button again, and turn the Select Dial for Light Brightness to change the group value (the group figure will be displayed recurrently). Press GR/CH button to exit.3. Light brightness adjustment: turn the select dial for light brightness to change the value from 0% to 100%.
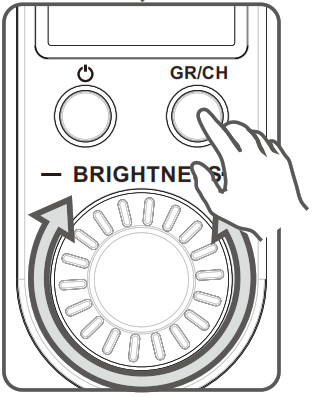 3. Light brightness adjustment: turn the select dial for light brightness to change the value from 0% to 100%.
![]() Overheat WarningOver heat occurs when the HP appeared on the controller’s display and blinked on the display. It is recommended to turn off the light and cool it down before reuse to avoid destroying the light beads.
Overheat WarningOver heat occurs when the HP appeared on the controller’s display and blinked on the display. It is recommended to turn off the light and cool it down before reuse to avoid destroying the light beads.
Wireless Control (433MHz wireless & smartphone APP through Bluetooth)
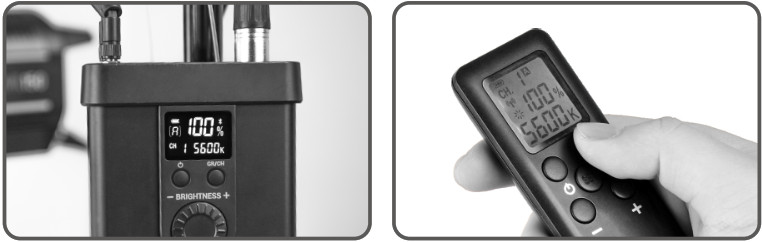
- With 433 MHz wireless system, UL series have remote grouping and control function. Up to 6 groups of LED lights can be controlled. 16 channels are available with strong anti interference capability. Please set the channels and groups of LED light to the same as those of RC-A5II (optional purchase)remote control before usage.Adjusting Channel/Group of the Controller• Press the GR/CH button and the channel icon blinks. Turn the select dial for light brightness to choose a channel ID (1 to 16).• Press the GR/CH button twice and the group icon blinks. Turn the select dial for light brightness or color temperature to choose a group ID (A to F).Adjusting Channel/Group of the Remote Control• Press the CH/GRP button and the group icon blinks. Press the “-” or “+” button to choose a group ID (A to F).• Press the CH/GRP button twice and the channel icon blinks. Press the “-” or “+” button to choose a channel ID (1 to 16).Adjusting Light Brightness with the Remote Control• Press the “-” or “+” button to adjust the light brightness.Note: The wireless signal can be received only when the controller is power on.
- Godox UL series LED lights can also be controlled by smartphone APP through Bluetooth with 6 groups and 16 channel.• Bluetooth connection: power the LED light on and long-press the GR/CH button until a Bluetooth ID is displayed on the controller. Then, open the “GodoxPhoto”APP, click Bluetooth and choose the corresponding Bluetooth ID of the controller. Finally, enter the password (the initial password is “000000”), and the Bluetooth is successfully connected.Note: The channels and groups of LED controller and APP should be adjusted to the same.• LED control: please find more details in the “GodoxPhoto” APP of smartphone: Setting—Help—LED.
 Adjusting Channel/Group of the Controller• Press the GR/CH button and the channel icon blinks. Turn the select dial for light brightness to choose a channel ID (1 to 16).• Press the GR/CH button twice and the group icon blinks. Turn the select dial for light brightness or color temperature to choose a group ID (A to F).Adjusting Channel/Group of the Remote Control• Press the CH/GRP button and the group icon blinks. Press the “-” or “+” button to choose a group ID (A to F).• Press the CH/GRP button twice and the channel icon blinks. Press the “-” or “+” button to choose a channel ID (1 to 16).Adjusting Light Brightness with the Remote Control• Press the “-” or “+” button to adjust the light brightness.Note: The wireless signal can be received only when the controller is power on.
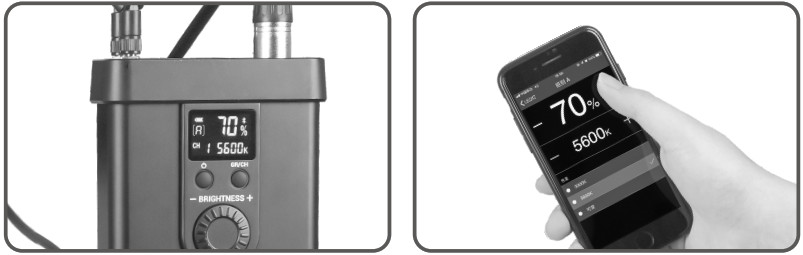 • Bluetooth connection: power the LED light on and long-press the GR/CH button until a Bluetooth ID is displayed on the controller. Then, open the “GodoxPhoto”APP, click Bluetooth and choose the corresponding Bluetooth ID of the controller. Finally, enter the password (the initial password is “000000”), and the Bluetooth is successfully connected.Note: The channels and groups of LED controller and APP should be adjusted to the same.• LED control: please find more details in the “GodoxPhoto” APP of smartphone: Setting—Help—LED.
Technical Data
| Silent LED Video Light | UL150 | |
| Power Supply | DC Power supply | AC100V-240V(50/60HZ)/2A(DC16.8V 10A) |
| Lithium battery | V-port battery(separately sold) | |
| Power | 150W | |
| Color Temperature | 5600±200K | |
| 100% Light Brightness (LUX, 1m)(=) | 58000 | |
| CRI (z–) | 96 | |
| TLCI (t) | 97 | |
| Light Brightness Range | 0%-100% | |
| Operation Temperature | -10°C-40°C | |
| Channel | 16 | |
| Group | 6 groups (A, B, C, D, E, F) | |
| Dimension | 316.9*217.8*170mm | |
| Net Weight | Light: 3.09KgController: 0.86Kg Adapter: 0.72Kg |
Note: The illumination value will be different when changing different accessories.
FCC Warning
This device complies with part 15 of the FCC Rules. Operation is subject to the following two conditions: (1) This device may not cause harmful interference, and (2) this device must accept any interference received, including interference that may cause undesired operation.
Any changes or modifications not expressly approved by the party responsible for compliance could void the user’s authority to operate the equipment.
Note: This equipment has been tested and found to comply with the limits for a Class B digital device, pursuant to part 15 of the FCC Rules. These limits are designed to provide reasonable protection against harmful interference in a residential installation. This equipment generates uses and can radiate radio frequency energy and, if not installed and used in accordance with the instructions, may cause harmful interference to radio communications. However, there is no guarantee that interference will not occur in a particular installation. If this equipment does cause harmful interference to radio or television reception, which can be determined by turning the equipment off and on, the user is encouraged to try to correct the interference by one or more of the following measures:
- Reorient or relocate the receiving antenna.
- Increase the separation between the equipment and receiver.
- Connect the equipment into an outlet on a circuit different from that to which the receiver is connected.
- Consult the dealer or an experienced radio/TV technician for help.
This equipment complies with FCC radiation exposure limits set forth for an uncontrolled environment. This equipment should be installed and operated with a minimum distance 20cm between the radiator & your body.
GODOX Photo Equipment Co., Ltd.Add: Building 2, Yaochuan Industrial Zone, Tangwei Community, Fuhai Street, Bao’an District,Shenzhen, China Tel: +86-755-29609320(8062) Fax: +86-755-25723423 E-mail: [email protected]godox.comMade in China![]()
References
[xyz-ips snippet=”download-snippet”]