Godox TL60 RGB Tube Light
|
|

Foreword
Thank you for purchasing this Godox Product!This RGB Tube Light TL60 is a multifunctional RGB light with dual color temperature, high light brightness and wireless adjustment. Suitable for almost all shooting occasions e.g. live, camping, make up, portrait shooting, make up, video, wedding, children photography, etc. It’s portable and easy to be operated.
Features
- Freely switch LED CCT mode, RGB mode and 39 special effects modes
- Easy to adjust color temperature, light brightness, hue and color saturation
- Blink and change colors with the rhythm of music
- Remote control by smartphone APP/2.4G wireless/OMX
- Use in combination to make more creative light groups
Warning
⚠ Always keep this product dry. Do not use in rain or in damp conditions.⚠ Do not disassemble. Should repairs become necessary, this product must be sent to an authorized maintenance center.⚠ Keep out of reach of children.⚠ As this product do not have waterproof function, please take measures of waterproof in rainy or damp environment.⚠ Do not use the flash unit in the presence of flammable gases, chemicals and other similar materials. In certain circumstance, these materials may be sensitive to the strong light emitting from this flash unit and fire or electromagnetic interference may result.⚠ As this product has built-in lithium battery, do not disassemble, impact, squeeze or put it into fire. If serious bulge occurs, please do not use. Do not use or store the product if the ambient temperature reads over 40°C. Please charge the product with included adapter and correctly operate it within the defined voltage and working temperate according to the instruction manual.
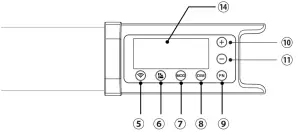
Names of Parts
- Body
- Power Switch
- DC Power Jack
- Control Panel

- Wireless Button
- Colored Paper Button
- MOD Button
- DIM Button
- FN Button
- + Button
- – Button
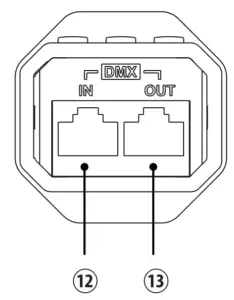
- DMX Input Port
- DMX Output Port
- Display
What’s in the Box
|
|
|
|
|
|
|
|
|
|
|
|
 Steel Cable *2
Battery Management
- Power SupplyWith built-in lithium battery which can offer about 2 hours ‘lighting in 100% brightness once got fully charged.The light can also put into usage by connecting the adapter to power source.
- ChargeThe whole charging takes about 2.5 hours. The charge grids indicator will be blinking in charging while displaying full grids once got fully charged.
Operation
- Power SwitchUse the power switch to control the on or off of the RGB tube light.Then, the current information will be displayed on the LCD panel.
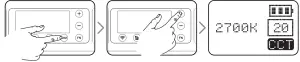
- Mode Selection: CCT Mode/RGB Mode/ Special Effects ModePress MOD button to switch different modes:2.1 Bicolor Mode2.1.1 Color temperature adjustment: press the “+”or”-“button to adjust the color temperature from 2700k to 6500k2.1.2 Press the DIM button, then, press the”+” or”-” button to adjust the brightness from 0 to 100.2.2 Colorful Mode2.2.1 Adjust hue H: press the FN multifunction select dial and His selected. Then, press the “+”or “-” button to adjust the hue from 0 to 360°.2.2.2 Adjust saturation S: press the FN multifunction select dial and Sis selected. Then, press the “+”or “-“button to adjust the saturation from 0 to 100.
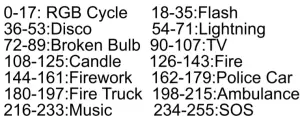
- Special Effects Modes (39)3.1 Press the”+” or “-“button to choose different special effects categories from 1 to 14. And the modes will display circularly by turning the select dial.3.2 After choosing the current mode, press down the FN multifunctional select dial from I, II and III. And the modes will display circularly when keeping pressing the FN multifunctional select dial.3.3 There’re 39 kinds of situational special effects mode which are divided into 14 categories for your choice.
No.
Display Situation Display I Display II Display III 1
RGB cycle Slow speed Medium speed Quick speed 2
Flash Flash Press conference Paparazzi 3
Laser Birthday party KTV Disco 4
Lightning Discontinuous Frequent Sustainable 5
Broken bulb Discontinuous Frequent Sustainable 6
TV Slow speed Medium speed Quick speed 7
Candle Discontinuous Frequent Sustainable 8
Fire Firewood Campfire Fire hazard 9
Firework Brief Continuous Show 10
Police car Strong flash Frequent flash Quick flash 11
Firetruck Strong flash Frequent flash Quick flash 12
Ambulance Strong flash Frequent flash Quick flash 13
Music Music I Music II 14
SOS - Control Modes Selection: Bluetooth/2.4G Wireless Remote Control/DMX ControlPress the wireless button firstly, then, press the “+”or “-“button to choose the control mode. After choosing the mode, press the FN or wireless button to enter the relevant setting interface. Press the wireless button or other button to exit the setting interface.4.1 Bluetooth Setting4.1.1 Bluetooth switch: press the FN button to select the Bluetooth. Then, press the “+”or”-“button to switch on or off. If ‘ON” is displayed, the Bluetooth is on and “OFF” means off. When the Bluetooth is on, the indicator will turn to blue.4.1.2 Initialize the Bluetooth Password: press the FN button to select RESET. Then, press the “+”or “-” button to reset the Bluetooth.4.1.3 Bluetooth Number: MAC: xxxx is the Bluetooth number of this light.4.2 2.4G Wireless SettingWith 2.4G wireless system, TL60 RGB tube light has remote grouping and control function. It is recommended to purchase RC-R9 remote control (optional) to achieve wireless control. Up to 6 Dt1X groups of LED lights can be controlled. 32channels and 99IDs are available with strong anti-interference capability.4.2.1 2.4G Wireless switch: press the FN button to select the wireless icon. Then, press the “+”or”- “button to switch on or off 2.4G wireless.“ON” means 2.4G wireless is turned on(wireless< indicator is lightened green), “OFF” means turned off(wireless indicator is put off).4.2.2 Chanel setting: press the FN button to select CH. Then, press the “+”or”-” button to select32 channels from 1 to 32.4.2.3 Group setting: press the FN button to select GR.Then, press the “+”or”-” button to select 6 groups from A to F.4.2.4 ID setting: press the FN button to select ID.Then, press the “+”or “-“button to select 99 IDs from 1 to 99.
Note: When opening the Bluetooth and 2.4G simultaneously, the indicator will turn to cyan. Please make LED light’s channel, group and ID to the same as remote control’s. The RGB tube light can only receive wireless signals in powered-on status. 4.3 DMX Control Modes4.3.1. Set the light to FOLLOW mode and press FN button to choose ADD.4.3.2. Press the “+”or”-” button toset512ADDsfrom 001 to 512. Now the indicator will display blue.4.3.3. After set ADD, connect one end of the DMX cable to DMX output port of control center and the other end to DMX input port of the light.4.3.4. The statistics sent by the control center are as follows:
Mode Channel (ADO)
CCT HSI RGBW FX Filters n 0-52 52-103 104-155 156-207 208-255 n+1 0-1000-100%Brightness Adjustment 0-1000-100%Brightness Adjustment 0-1000-100%Brightness Adjustment 0-1000-100% Brightness Adjustment 0-1000-100% Brightness Adjustment n+2 0-255Color Temperature Selection 0-180H=180* 2Hue Selection 0-255Red Light 0-127:ROSCO128-255: LEE n+3 0-100Saturation Setting 0-255Green Light 0-85: Special Effect I86-171: Special Effect II 172-255: Special Effect III 0-255(LEE/ROSCO)Colored Paper Switch (Every 13valuesrefers to one colored paper) n+4 0-255Blue light n+5 0-255White light 4.4 DMX LEAD and FOLLOW mode4.4.1. Set one of the LED lights to LEAD mode.4.4.2. Set other lights to FOLLOW modes.4.4.3. Connect the lights with RJ45 cable.4.4.4. The lights in FOLLOW modes will automatically synchronize the light in LEAD mode.
Note: When using LEAD and FOLLOW modes through OMX port, the quantity of lights in FOLLOW modes cannot be over 18. - Colored Paper SettingPress the colored paper button to enter the interface. Then, press the “+”or”-” button to choose ROSCO or LEE colored paper group. Then, press the FN to enter the colored paper group to select the corresponding colored paper. There are both 20 colored papers in ROSCO and LEE groups for your choice, 40 kinds in total.
- Connect with Smartphone APP1. As there is a QR code on the light body ofTL60, please scan the QR code directly to download the “Godoxlight” smartphone APP(can be used by Android and Apple system).For more smartphone APP operations, please open the “help” in APP to gain detailed guidance.2. Set the Bluetooth of TL60 to ON.
 2.2 Colorful Mode2.2.1 Adjust hue H: press the FN multifunction select dial and His selected. Then, press the “+”or “-” button to adjust the hue from 0 to 360°.
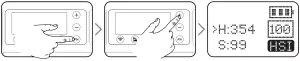 2.2.2 Adjust saturation S: press the FN multifunction select dial and Sis selected. Then, press the “+”or “-“button to adjust the saturation from 0 to 100.


Technical Data
| LED Light | TL60 |
| Built-in Lithium Battery | 14.4V/2600mAh lithium battery |
| Adapter | Output 20V 2.4A |
| Power | Max.18W |
| Channel | 32 |
| Group | 6(AB CD E F) |
| Color Temperature Range | 2700K-6500K |
| Light Brightness Range | 0%-100% |
| RGB Color Gamut | 0 – 360° |
| 100% Light Brightness (LUX)(=) | 1500 |
| CRI(=) | 96 |
| TLCI (=) | 98 |
| Duration(continuous output in 100% full power in 2700K or 6500K) | Approx. 120 minutes |
| Control Method | Smartphone APP/2.4G wireless/OMX control |
| Bluetooth Wireless Control Distance | =30m |
| 2.4G Wireless Control Distance | =50m(with optional RC-R9 remote control) |
| Operation Temperature | -10-40 °C |
| Dimension | cp48″750MM |
| Net Weight | 0.73Kg |
* Product design and specifications are subject to change without notice.
Maintenance
This product, except consumables e.g. adapter and adapter cable, is supported with a one-year warranty.Avoid sudden impacts and the product should be dedusted regularly.Maintenance of the flash must be performed by our authorized maintenance department which can provide original accessories.Unauthorized service will void the warranty.If the product had failures or was welled, do not use it until it is repaired by professionals.Changes made to the specifications or designs may not be reflected in this manual.
FCC Statement
This device complies with part 15 of the FCC Rules. Operation is subject to the following two conditions: (1) This device may not cause harmful interference, and (2) this device must accept any interference received, including interference that may cause undesired operation.
Any Changes or modifications not expressly approved by the party responsible for compliance could void the user’s authority to operate the equipment.
Note: This equipment has been tested and found to comply with the limits for a Class B digital device, pursuant to part 15 of the FCC Rules. These limits are designed to provide reasonable protection against harmful interference in a residential installation.This equipment generates uses and can radiate radio frequency energy and, if not installed and used in accordance with the instructions, may cause harmful interference to radio communications. However, there is no guarantee that interference will not occur in a particular installation. If this equipment does cause harmful interference to radio or television reception, which can be determined by turning the equipment off and on, the user is encouraged to try to correct the interference by one or more of the following measures:
– Reorient or relocate the receiving antenna.– Increase the separation between the equipment and receiver.– Connect the equipment into an outlet on a circuit different from that to which the receiver is connected.– Consult the dealer or an experienced radio/TV technician for help.
 report this ad
References
[xyz-ips snippet=”download-snippet”]