
gofanco® PRO-KVMDP-2P User’s Guide
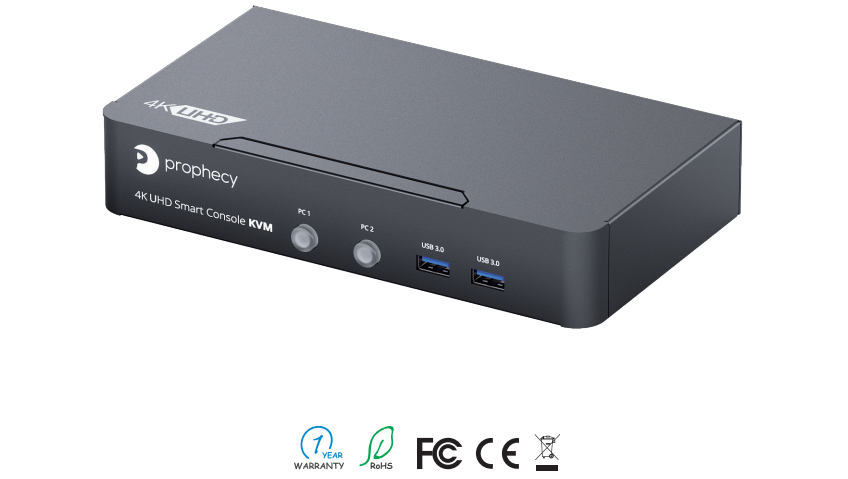
2-Port DisplayPort 1.2/Audio KVM Switch with USB 3.1 Gen 1 HUB
Made in Taiwan
Congratulations for owning a gofanco product. Our products aim to meet all your connectivity needs wherever you go.
Have fun with our products!
Please read this manual carefully before first use.
If you need more information about our products, please visit www.gofanco.com.
For technical support, please email us at [email protected].
For drivers/manuals download, please go to http://www.gofanco.com/download.
Safety and Notice
Please read all of these instructions carefully before you use the device. Save this manual for future reference.
The PRO-KVMDP-2P 2-Port DisplayPort 1.2/Audio KVM Switch with USB 3.1 Gen 1 HUB has been tested for conformance to safety regulations and requirements, and has been certified for international use. However, like all electronic equipments, the PRO-KVMDP-2P should be used with care. Please read and follow the safety instructions to protect yourself from possible injury and to minimize the risk of damage to the unit.
- Follow all instructions and warnings marked on this unit.
- Do not attempt to service this unit yourself, except where explained in this manual.
- Provide proper ventilation and air circulation and do not use near water.
- Keep objects that might damage the device and assure that the placement of this unit is on a stable surface.
- Use only the power adapter and power cords and connection cables designed for this unit.
- Do not use liquid or aerosol cleaners to clean this unit. Always unplug the power to the device before cleaning.
Introduction
The PRO-KVMDP-2P 2-Port DisplayPort 1.2/Audio KVM Switch with USB 3.1 Gen 1 HUB provides the most flexible and cost effective solution in the market for multiple computer management at home & office. The KVM switch can control 2 DisplayPort USB computers by one set of console peripherals (keyboard, mouse & monitor). With built-in USB 3.0 hub, users can share USB peripheral devices between connected computers.
Features
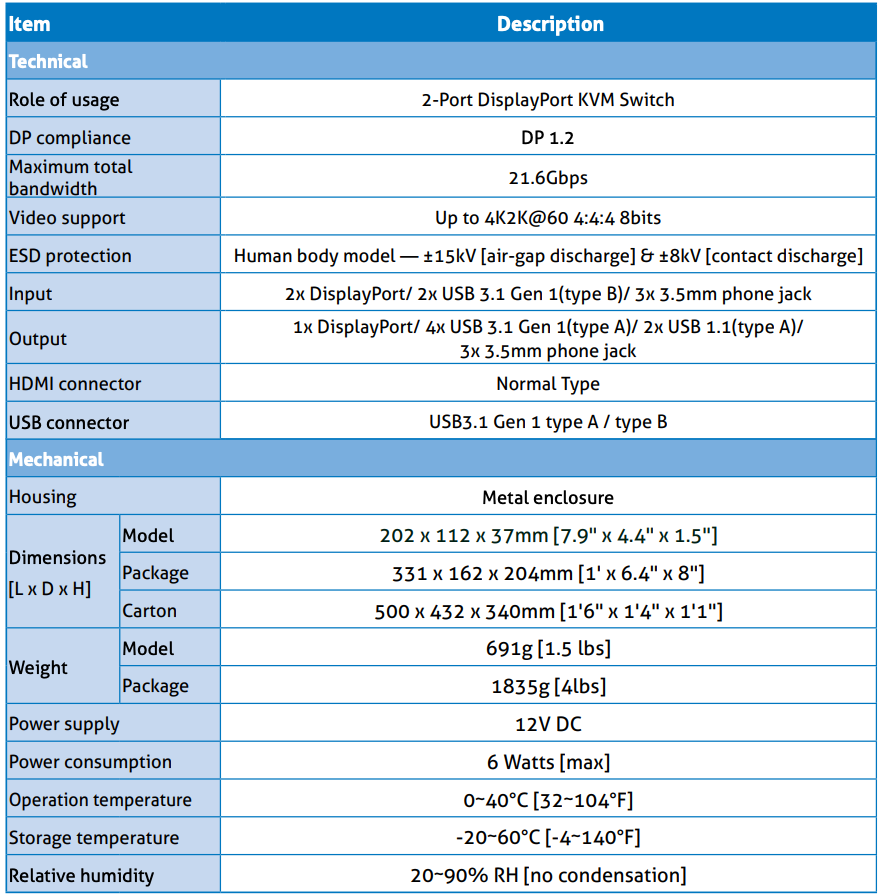
- DP 1.2 compliant
- Supports 4:4:4 8bits
- HDCP 1.3 compliant
- Supports separate line input and output
- Plug and Play without any driver needed
- Supports built-in 4-port USB 3.1 Gen 1 HUB to share USB devices
- Supports independent HID keyboard & mouse ports
- Supports hotkeys function
- Maximum total bandwidth: up to 21.6Gbps
- EDID Bypass
- Firmware upgradable for support of new features and technology enhancements
- The KVM can switch every input by push buttons
- DisplayPort 1.2 spec does NOT support HDR
- The suggested DisplayPort cable length is 1.5m to 2m
- DisplayPort does NOT support dongle device
Package Contents
- 1x PRO-KVMDP-2P
- 1x DC 12V power supply
- 1x User Manual
Specifications
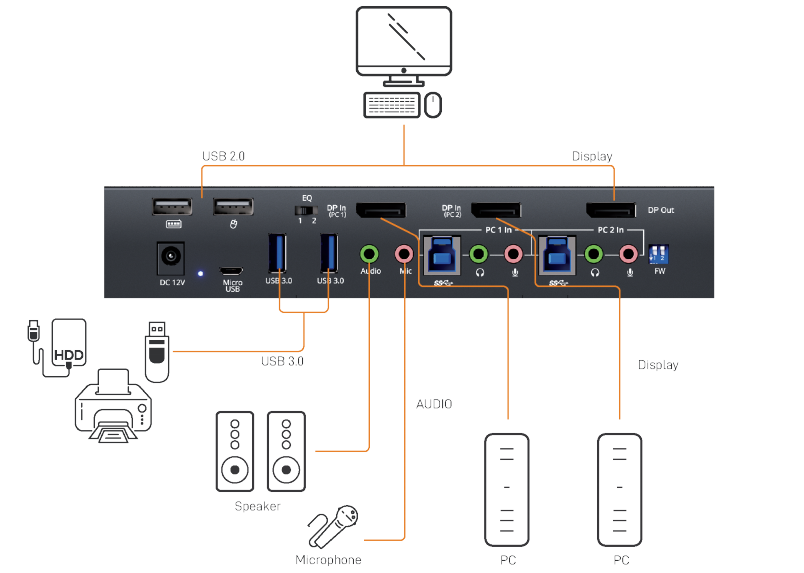
Connection Diagram

Panel Description

1. Port 1-2 Selection Push Button: Switch between computers
2. USB 3.1 Gen 1 Hub: Connect to USB devices
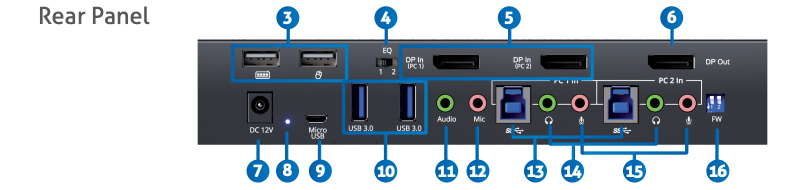
3. Console USB Ports: Connect to keyboard & mouse
4. Signal Level: Adjust the equalization control to receive DisplayPort signals.
[Left]: EQ is weaker (short DisplayPort cables)
[Right]: EQ is stronger (long DisplayPort cables)
5. KVM Video IN 1-2 (DP IN 1-2): Connect the DP cable to PC
6. Console Video OUT (DP OUT): Connect the DP cable to a display
7. +12V DC: +12V DC power jack
8. Power Status: Power indicator LED
9. Micro USB: For F/W update
10. USB 3.1 Gen 1 Hub: Connect to USB devices
11. Console Stereo Audio OUT: Connect to analog stereo audio speaker
12. Console Stereo Audio IN: Connect to analog stereo audio source
13. KVM USB 3.1 Gen 1 (Type B): Connect the USB cable to PC
14. KVM Stereo Audio IN 1-2: Connect the stereo cable to PC
15. KVM Stereo Audio OUT 1-2: Connect the stereo cable to PC
16. 2-Pin Dip Switch: For F/W update

Hotkey
Default setting, all of the following commands begin by pressing the [Scroll Lock] key twice. Please follow the hotkey command listed below for selected operating functions:
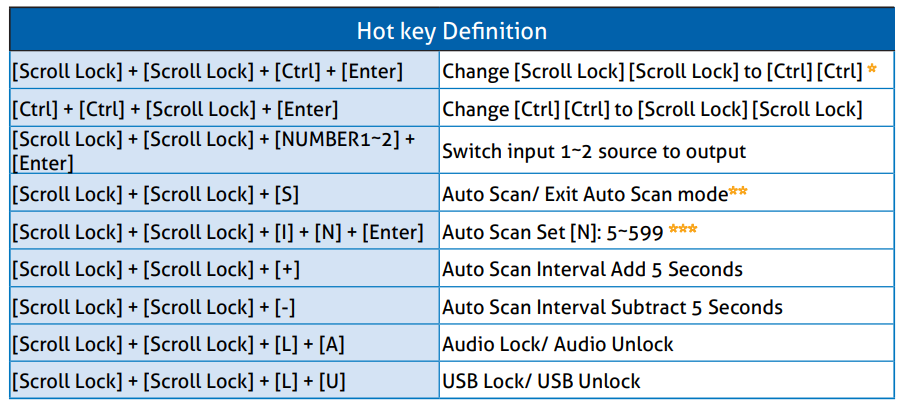
* You can change the default setting to [Ctrl] [Ctrl], if you are using a Mac keyboard or a keyboard that does not have Scroll Lock key
** Auto scan through each channel for quick screen browsing (default = 15 seconds)
*** You can set the auto scan interval according to the steps. (N = Number, 5~599)
Firmware update
Firmware update is proceeded through Micro-USB
KVM F/W update
- Connect the Micro-USB to USB cable between PC and device
- Set dip switch PIN#1 to ON[↓] and then power on device
- Open firmware update software and then select COM Port

- Click button to open “KVM Firmware Update” windows.Check all items and click each button to select the file which you want to write into device.Click the button to start firmware update
- After updating, please set the dip switch PIN#1 to OFF [↑] and power cycle the device


References
[xyz-ips snippet=”download-snippet”]