![]() 2-Port Dual-Head HDMI 2.0KVM with USB 2.0User’s GuideP/N:KVMHD2-DualG4-0102A
2-Port Dual-Head HDMI 2.0KVM with USB 2.0User’s GuideP/N:KVMHD2-DualG4-0102A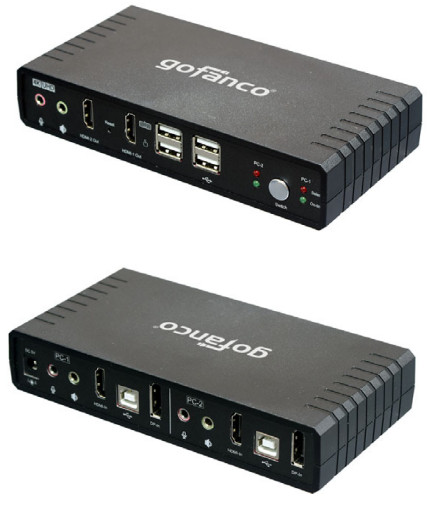
Thank you for purchasing from go fancy. Our products aim to meet all your connectivity needs wherever you go. For optimum performance and safety, please read the instructions carefully and keep this User’s Guide for future reference. If you need more information about our products, please visit www.gofanco.com. For technical support, email us at [email protected].For drivers or manual downloads, please go to www.gofanco.com/downloads.
Important Safety Notices
Please read safety instructions carefully before installation and operation.
- Please pay close attention to all warnings and hints for this device
- Do not expose this unit to rain, heavy moisture, or liquid
- Do not put any items into the device or attempt to modify its operation
- Do not repair the device or open the enclosure without professional guidance to avoid electric shocks. Doing so may void your warranty
- Keep the product in a well-ventilated location to avoid damage from overheating
- Shut off the power and make sure the environment is safe before installation
- Do not plug the HDMI or DisplayPort cables in/out when the device is in use to avoid cable damage. Make sure they are plugged into the correct ports
- Use the included power adapter only. Make sure the specification matches if using 3rd-party DC power adapters
Introduction
The 2-Port Dual-Head HDMI 2.0 KVM with USB 2.0 allows you to control two 4K computers using one set of keyboard, mouse, microphone, speaker, and displays.
Features
- 2-Port Dual-Head KVM Switch with the latest HDMI 2.0 (Video), USB Keyboard/Mouse, with Stereo Out and Mic In. All cables are included
- Supports 2 independent (Extended) display outputs
- Supports up to resolution
- HDMI 2.0 and DisplayPort 1.2 compliant
- HDCP 2.2 compliant
- Includes a 2-port USB 2.0 hub
- Manual push button and keyboard hot-key device switching
Installation Requirements
- HDMI or DisplayPort computers
- HDMI display
- HDMI cables (not included)
Package Contents
- 2-Port Dual-Head HDMI 2.0 KVM with USB 2.0
- HDMI 2.0 cables (2pcs)
- DisplayPort 1.2 cables (2pcs)
- USB 2.0 cables (2pcs)
- Audio/Mic cables (2pcs)
- Power adapter (Output: 5V/2A)
- User’s guide
Product Layout

- Microphone jack: Connects to your microphone
- Speaker/Headphone jack: Connects to your speaker/headphone
- HDMI 2 out Connects to your HDMI display.Note: Receives video signal from the DisplayPort in port.
- Reset: Press to reset the system
- HDMI 1 out: Connects to your HDMI display.Note: Receives video signal from the HDMI in port.
- USB Type-A (x2): Keyboard and mouse connection
- USB Type-A (x2): Connects to your USB devices
- PC 2 select LED: Lights up the PC 2 is the selected computer
- PC 2 active LED: Lights up when PC 2 is up and running
- Switch button: Press to switch between the 2 computers
- PC 1 select LED: Lights up the PC 1 is the selected computer
- PC 1 active LED: Lights up when PC 1 is up and running

- Power jack: Connects to the included power adapter
- Microphone jack: Connects to PC 1’s microphone input jack
- Audio input jack: Connects to PC 1’s speaker/headphone jack
- HDMI in: Connects to PC 1’s HDMI output port.Note: Transmits video signal to HDMI out 1 port.
- USB Type-B: Connects to PC 1’s USB Type-A port
- DisplayPort in: Connects to PC 1’s DisplayPortoutput port.Note: Transmits video signal to HDMI out 2 port.
- Microphone jack: Connects to PC 2’s microphone input jack
- Audio input jack: Connects to PC 2’s speaker/headphone jack
- HDMI in: Connects to PC 2’s HDMI output port.Note: Transmits video signal to HDMI out 1 port.
- USB Type-B: Connects to PC 2’s USB Type-A port
- DisplayPort in: Connects to PC 2’s DisplayPort output port. Note: Transmits video signal to HDMI out 2 port.
Note: Both HDMI in and DisplayPort need to be connected to PCs in order for the Dual Head outputs (HDMI out 1 and HDMI out 2) to work.
Hardware Installation
Front Panel Connection
- Connect your HDMI displays to the HDMI out of the KVM using HDMI cables (HDMI cables not included).
- Connect your keyboard and mouse to the keyboard and mouse ports of the KVM.
- Connect your microphone and speaker/headphone to the corresponding jacks of the KVM (optional).
- Connect your USB devices to the USB ports (optional).
Rear Panel Connection
- Using the included cables, plug the HDMI and/or DisplayPort, USB, microphone, and speaker connectors into their corresponding sockets on the rear panel of the KVM.
- At the other end of the cable, plug the HDMI and/or DisplayPort, USB, microphone, and speaker connectors into their corresponding sockets on PC 1, then repeat for PC
- Plug the included power adapter into the KVM’s power jack, then plug the power adapter into a reliable power outlet.
- Power on all connected devices.
Connection Diagram
The application diagram shows the most typical input and output devices used with the KVM.Front Panel Connections
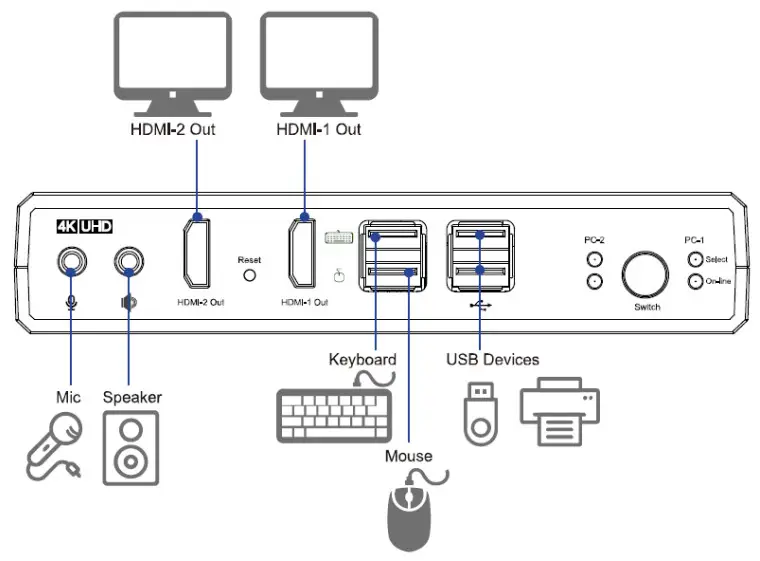
Rear Panel Connections
 report this ad
Note: Both HDMI in and DisplayPort in need to be connected to PCs in order for the Dual Head outputs (HDMI out 1 and HDMI out 2) to work.
Operating Instructions
PC SwitchingThere are two ways to switch between the computers, manual push-button and keyboard hot-key commands.Manual Push ButtonPress the front panel switch button to switch between the connected computers.Keyboard Hot-key
- Press the [Scroll Lock] or [Ctrl] key twice within 5seconds to enter Hot-key mode. While in Hot-key mode the keyboard’s Scroll Lock LED flashes continuously or Ctrl LED flashes instead if Scroll Lock is not available. Note: When entering or exiting Hot-key mode, the KVM’s buzzer will sound an audible beep.
- Complete the Hotkey command within 10 seconds, or the process will be aborted.Hot-key Commands:A. [Scroll Lock] + [Scroll Lock] + [Enter] OR [Ctrl] +[Ctrl] + [Enter]: Switches between the connected computersB. [Scroll Lock] + [Scroll Lock] + [B] + [0/1] OR [Ctrl] + [Ctrl] + [B] + [0/1]: Disables [0] or Enables [1] the KVM’s buzzer.C. [Scroll Lock] + [Scroll Lock] + [S] OR [Ctrl] + [Ctrl] + [S]: Enables Auto Scan mode. Press any keyboard key or the front panel switching button to disable Auto Scan mode.D. [Scroll Lock] + [Scroll Lock] + [I] + [5-99] + [Enter] OR [Ctrl] + [Ctrl] + [I] + [5-99] + [Enter]: Sets Auto Scan time interval. Default Auto Scan interval is 8 seconds.
Specifications
| Storage temperature | -20 to 60 C |
| Operating humidity | 0 to 80% RH (no condensation) |
| HDMI compliance | HDMI 2.0 |
| DisplayPort compliance | DisplayPort 1.2 |
| HDCP compliance | HDCP 2.2 |
| Video format | Ultra HD, 4K4D60Hz (max) |
| Control | Front panel buttons, keyboard hot-key |
| Power adapter | Input: 100-240 VAC, 50/60Hz, 0.4A Output: 5V, 2A |
| Dimensions (mm) | 167 (W) x 84 (D) x 32 (H) |
Disclaimer
The product name and brand name may be registered trademarks of related manufacturers. TM and ® may be omitted on the user’s guide. The pictures on the user’s guide are just for reference, and there may be some slight differences with the actual products.We reserve the right to make changes without prior notice to a product or system described herein to improve reliability, function, or design.
![]() Thank you for choosing to go fancywww.gofanco.com
Thank you for choosing to go fancywww.gofanco.com
[xyz-ips snippet=”download-snippet”]