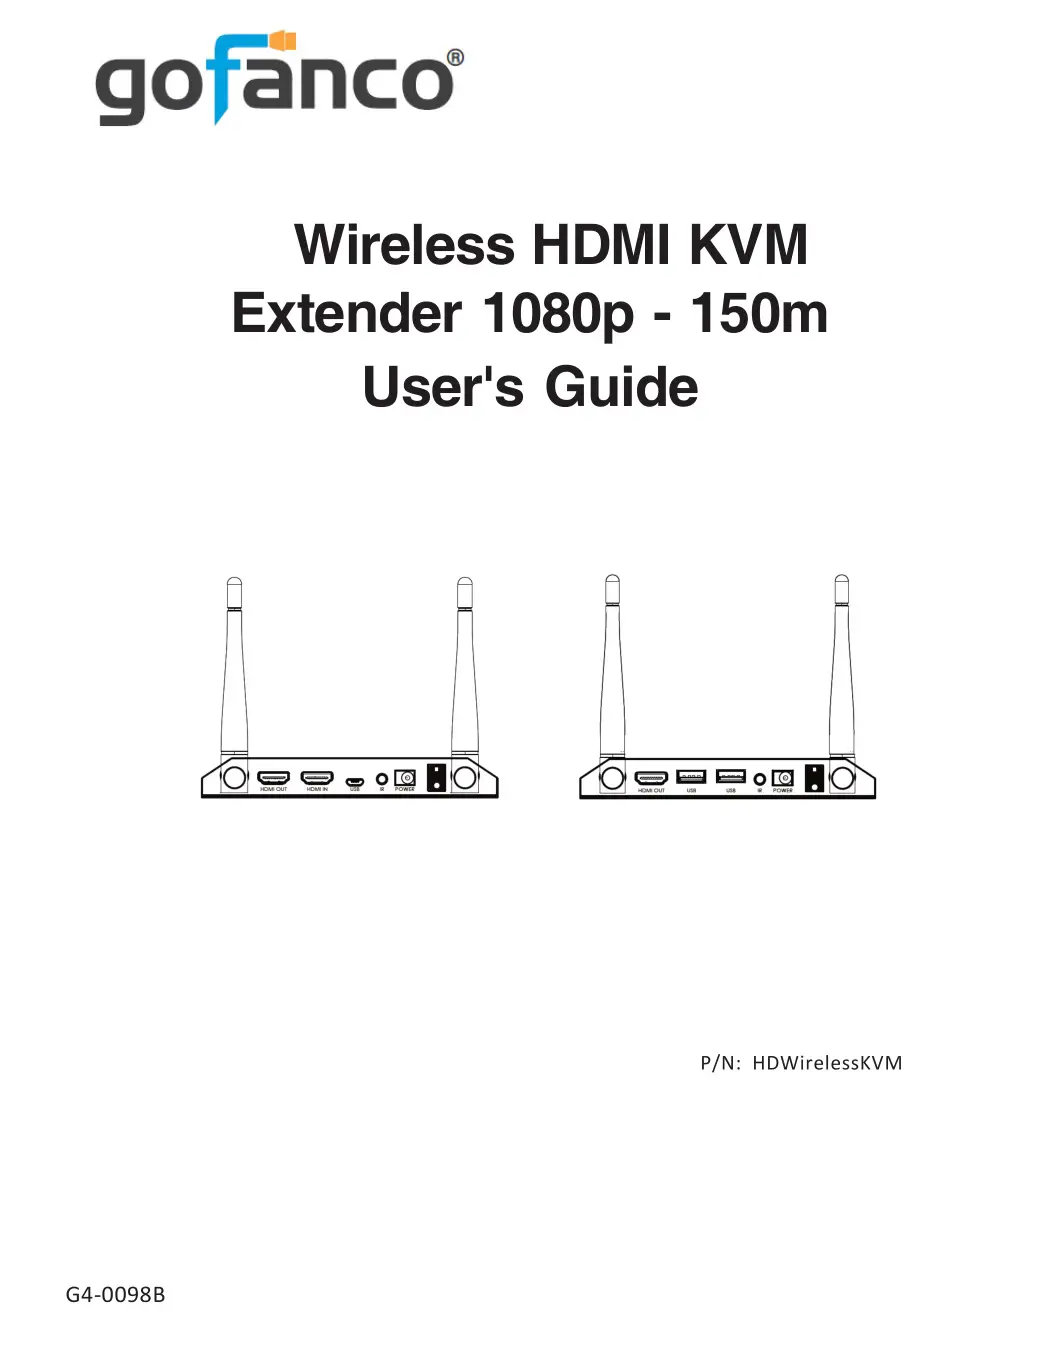
gofanco Wireless HDMI KVM Extender
1080p - 150m User Guide
Thank you for purchasing from gofanco. Our products aim to meet all your connectivity needs wherever you go. For optimum performance and safety, please read the instructions carefully and keep this User’s Guide for future reference. If you need more information about our products, please visit www.gofanco.com. For technical support, email us at [email protected]. For drivers or manual download, please go to www.gofanco.com/downloads.
Important Safety Notices
Please read safety instructions carefully before installation and operation.
- Please pay close attention to all warnings and hints for this device
- Do not expose this unit to rain, heavy moisture, or liquid
- Do not put any items into the device or attempt to modify its operation
- Do not repair the device or open the enclosure without professional guidance to avoid electric shocks. Doing so may void your warranty
- Keep the product in a well-ventilated location to avoid damage from overheating
- Shut off power and make sure environment is safe before installation
- Do not plug the HDMI cables and IR cables in/out when the device is in use to avoid cable damage. Make sure they are plugged into the correct ports
- Use the included DC5V power adapters only. Make sure the specification matches if using 3rd-party DC power adapters
Introduction
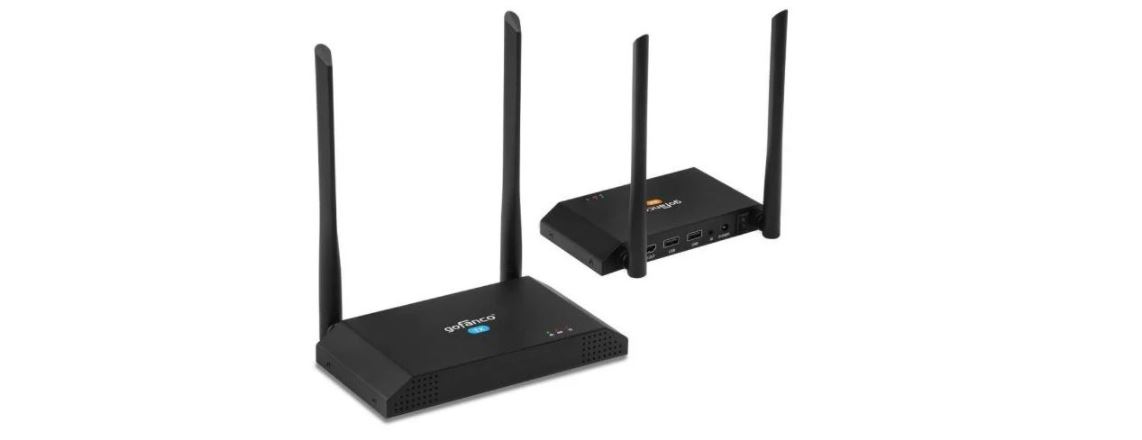
The Wireless HDMI KVM Extender 1080p – 150m extends HDMI signals from a source device to a display device with KVM (2 USB ports) extension wirelessly up to 492ft (150m). It requires no cables between the Transmitter (TX) and Receiver (RX), making the installation easy and clean. Great for homes and offices.
Note: Wireless transmission distance will vary due to the environmental conditions. Thick walls, brick, glass, electronic interference, and wireless signals from other devices will shorten the wireless transmission distance or cause signal loss.
Features
- Transmits HDMI signals in 1080p up to 492ft (150 meters) wirelessly
- KVM extension with 2 USB ports to control the source device, such as a PC, at a remote location
- Supports Full HD 1080p with near zero latency
- IR extension allows the source device to recognize remote commands from a remote location. 20-60KHz IR frequency
- HDMI loop-out on the transmitter to connect a local display, allows easy monitoring of the source signal
- No cables required between Transmitter (TX) and Receiver (RX)
- Dual antenna maximizes wireless reception with stable data transmission
Package Contents
- Wireless HDMI KVM Extender 1080p – 150m (1 Transmitter unit & 1 Receiver unit)
- IR blaster cable and IR receiver cable (1 each)
- Antenna (4pcs)
- Power adapter (2pcs)
- User guide
Installation Requirements
- HDMI source device (DVD player, set top box, PC, etc.)
- HDMI display device (SDTV/Monitor, HDTV/ Monitor, projector, etc.)
- HDMI cables (not included)
- USB keyboard and USB mouse for KVM control (optional)
Product Layout
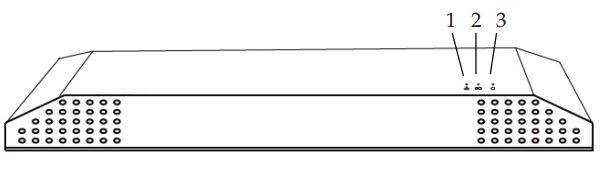
Figure 1: Front Panel (TX & RX)
- WiFi LED: Slow flashing green when detecting wireless signal; fast flashing green when detected and transferring data
- Pairing LED: Flashing red when detecting signal; solid red when paired
- Power LED: Solid red when powered on; solid blue when HDMI source device is detected
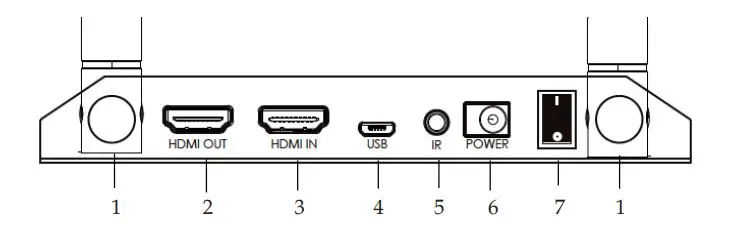
Figure 2: Transmitter Rear Panel (TX)
- Antenna (x2): Connects to the included antenna
- Local HDMI Output: Connects to your local HDMI display
- HDMI Input: Connects to your HDMI source device
- Micro USB: Connects to your PC’s USB port using the included Micro USB to Type-A cable
- IR Out: Connects to the IR blaster cable
- Power Jack: Connects to the included power adapter
- Power Switch: Powers On/ Off the transmitter

Figure 3: Receiver Rear Panel (RX)
- Antenna (x2): Connects to the included antenna
- HDMI Output: Connects to your local HDMI display
- USB Type-A (x2): Connects to your keyboard and mouse
- IR In: Connects to the IR receiver cable
- Power Jack: Connects to the included power adapter
- Power Switch: Powers On/ Off the receiver
Hardware Installation
- Power off all devices including your HDMI source and HDMI display(s).
- Install the included antennas to the TX and RX.
- Connect your HDMI source device to the Transmitter’s HDMI Input connector with an HDMI cable (HDMI cable not included).
- Optional: Connect your local HDMI display to the Transmitter’s Local HDMI Output connector with an HDMI cable (HDMI cable not included). This connection allows you to monitor the HDMI signal from the source device location.
- Optional: Connect the IR Blaster cable to the Transmitter’s IR interface port. Face the eye towards your HDMI source device’s IR window. This connection is needed only if you need to control your HDMI source from the remote location.
- Connect your HDMI display to the Receiver’s HDMI Output connector with an HDMI cable (HDMI cable not included).
- Optional: Connect the IR Receiver cable to the Receiver’s IR interface port. This connection is needed only if you need to control your HDMI source from the remote location.
- Plug your keyboard and mouse into the USB ports of the Receiver (RX) unit.
- Plug the included power adapters into the Transmitter’s and Receiver’s Power Jacks, then plug both power adapters into reliable power outlets. Power on the transmitter and receiver.
- Power on your HDMI source device and HDMI display(s). The wireless KVM extender is ready for use.
Note: For optimal signal range, install in a clear environment with few obstacles. Wireless signals from other devices, such as microwaves, wireless mice and keyboards, etc. may interfere with transmission. Contact our technical support team if you have specific questions.
Application Diagram
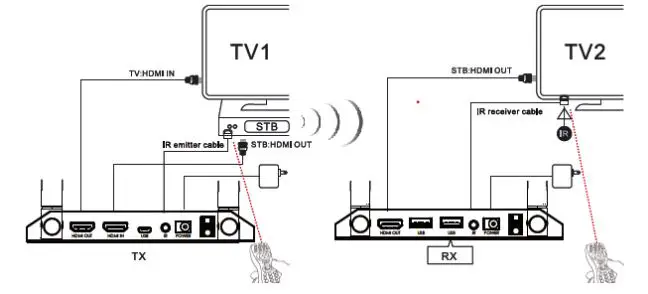
Figure 4: IR Control
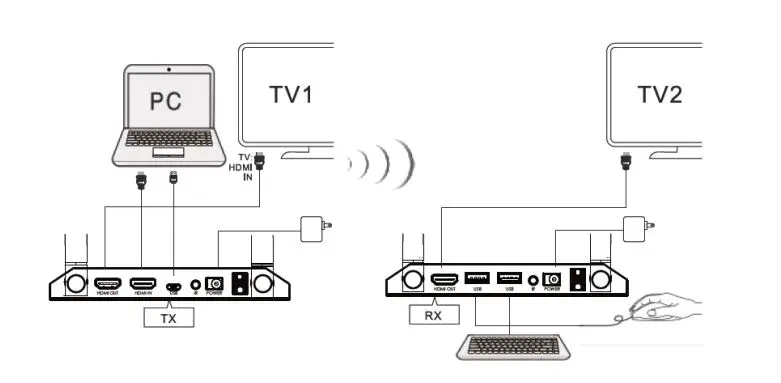
Figure 5: Keyboard and Mouse Control
Notice
- Wireless signals transmitted through walls, glass, brick or other solid objects will cause signal loss and decrease the transmission distance
- External wireless signals from microwaves, wireless mice and wireless keyboards will interfere with HDMI signal transmission
- Keep the unit in a well ventilated environment to prevent it from overheating
- DO NOT expose the unit to rain, moisture, or liquids
- DO NOT place anything on the unit
- DO NOT open the housing, doing so will void the warranty and may cause personal injury due to electronic hazard
- DO NOT plug-in or remove the IR cables when the unit is powered on
FAQ & Troubleshooting
Q: The Wireless Connection LED is on, but no video output on the remote display:
A: 1) Check the HDMI source device is powered on.2) Check the transmitter’s HDMI Signal LED is on.3) Check the HDMI cables for solid connection. Use different HDMI cables if necessary.4) Connect the HDMI source device directly to the display to see if there is a signal.Q: Poor video quality:A: 1) Check the HDMI cables are connected properly. Use different HDMI cables if necessary.2 ) Change the angle of the antenna on the transmitter unit and receiver unit. Generally, the antenna angle should be positioned as far apart as possible.3) Adjust the position of transmitter unit and receiver unit, and make sure they are within the required signal range.4) Remove other wireless signals and move any obstacles that are blocking the signal line-of-sight.5) Decrease the distance between the transmitter unit and the receiver unit.
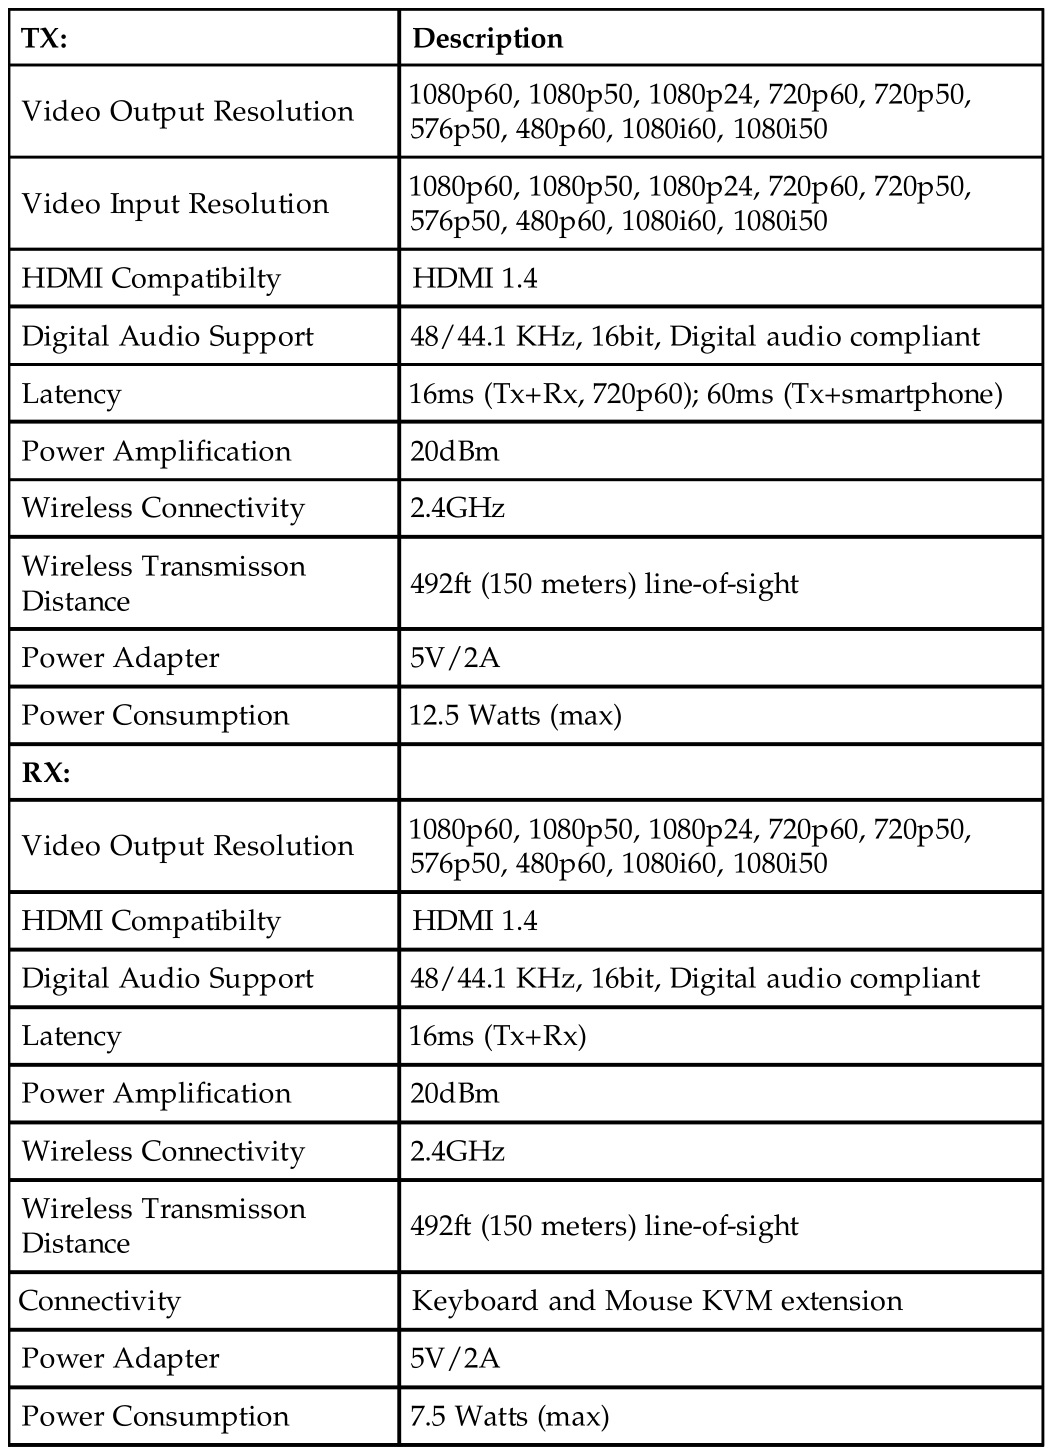
Specifications
Disclaimer
The product name and brand name may be registered trademarks of related manufacturers. TM and ® may be omitted on the user’s guide. The pictures on the user’s guide are just for reference, and there may be some slight differences with the actual products.We reserve the right to make changes without prior notice to a product or system described herein to improve reliability, function, or design.
 report this ad
![]()
Thank you for choosing gofanco
[xyz-ips snippet=”download-snippet”]