![]()
QUICK START GUIDEA24 Trapgoodnature.co.nz
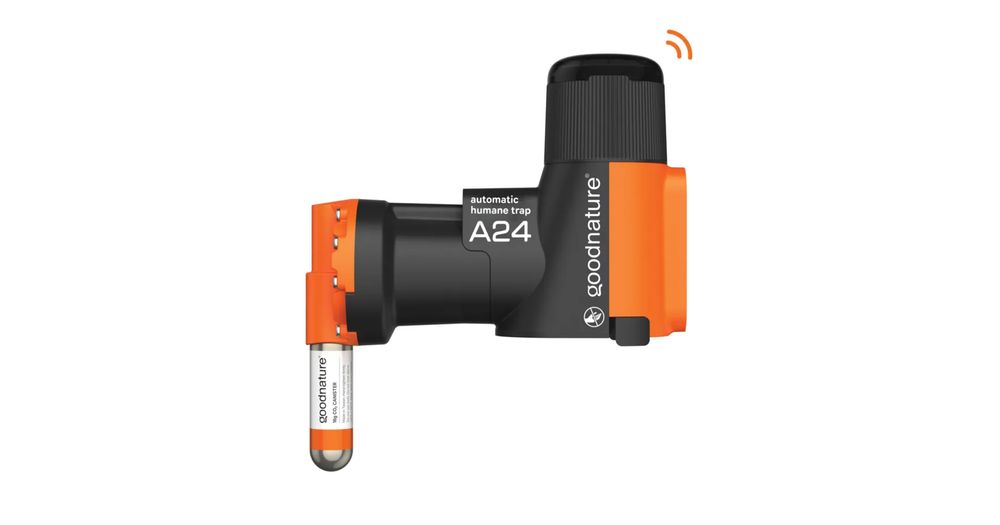
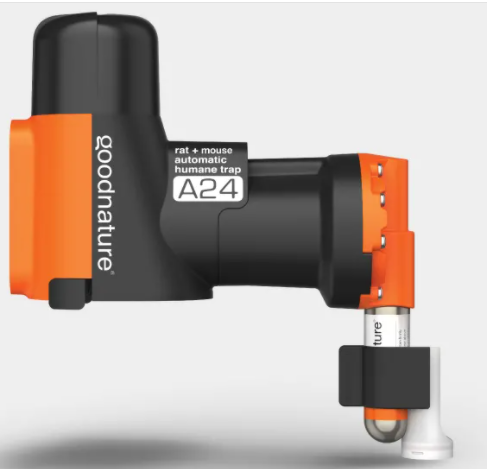
YOUR TRAP – A24
HOW IT WORKS
 |
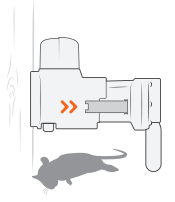
SNIFF SNIFFTargeted long-life lurattracts rodents into the trap. |
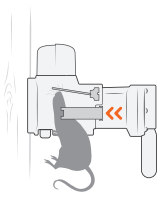 |
KAPOW!Rodent moves the trigger to get to the lure, firing the trap. |
 |
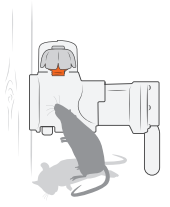
AUTO-RESETThe trap clears and resets immediately after an A-Class humane kill. |
 |
SNIFF SNIFF…The long life lure continues to attract rodents for constant control. |
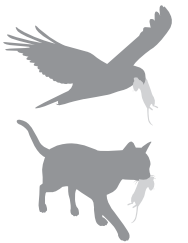 |
SCAVENGEDDifferent species scavenge the dead carcasses from below the trap. |
DOING THIS DIFFERENTLY IS IN OUR NATUREWe started Goodnature for good reason: to see endangered wildlife in New Zealand and around the world flourish again. This means getting on top of a bunch of pests – rats, mice, and stoats for starters. We also want to go about it kindly, without using nasty toxins.That’s why we develop humane traps that automatically reset and are easy and safe to use in living spaces through to wild places. Not only have we created a world-first, we started a revolution.Big thanks for joining us. Happy trapping!YOUR CONSTANT CONTROL SYSTEMCongratulations! You’re now the owner of the world’s most advanced pest control technology. Goodnature’s self-resetting trapping system gives you constant control against pest reinvasion. Powered using compressed CO2 gas, Goodnature technology combines design engineering principles and animal behavioral science with the highest manufacturing standards to deliver a trap that will kill 24 times per gas canister. Our lures are developed to be long life to minimize maintenance effort and maximize freshness to remain highly attractive to pests. As our lures are toxin-free there is no risk of secondary poisoning to wildlife, pets, livestock, and working animals. Our Trigger and Strike mechanism gives the Goodnature A24 its certified A-Class humane status.This Quick Start Guide has been developed to help you get the best results from your trap. Your success is everyone’s success so if you have any questions or need any tips, we’re here to help – good-nature.co.NZ [email protected]TRAP SAFELYOur A24 traps are safe for everyone and everything, except rats, mice, and stoats. We’ve designed our traps to target specific pests only. To avoid injuring or killing protected wildlife or any other animal that’s good for nature, it’s important you follow the installation instructions and our safety advice to set up your trap correctly. For trapping safety advice, tips to maximize success and support biodiversity in your own backyard visit good-nature.co.NZ
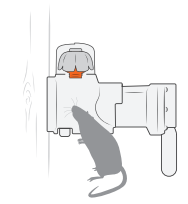
FIND THE BEST TRAPPING LOCATION
USE DETECTOR CARDS BEFORE INSTALLING YOUR TRAPSOur Rodent Detector Cards help you think like a rat. To be a successful trapper, it’s important that you assess (don’t guess), where to position your A24 trap.The Detector Cards show you where rodents in your area feel safe to eat. That’s the place you need to install your trap, even though it might be somewhere different from where you’ve seen or heard them.WHY GOODNATURE DETECTOR CARDS WORKAlthough you may see signs of rodents such as droppings, diggings or even see them, these are not always places where a rodent will enter a trap. Rodents will investigate food, and therefore a trap, in places where they feel safe.The cards contain our toxin-free long-life lure, which testing shows rodents find super tasty. By noticing which cards have bite marks after a few nights, you’ll know where your pests are eating and exactly where to position your trap.
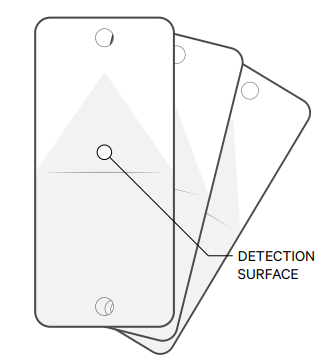
SETTING YOUR DETECTOR CARDSFirst, choose a few locations around your property where you think you’ll install your trap.Next, fold the Detector Card in half with the orange triangular detection surface facing out. You should see the lure squeeze out along the fold. The Detector Card is now ready to install.Position the Detector Card so the bottom edge, with the lure, is a hand width height (roughly 12 cm) off the ground. The orange side should be facing out.Use the screws supplied to attach the cards to a tree, post, or wall in the areas you’ve chosen. The screw should be in firmly but take care not to force the card flat against the surface. If necessary pull the bottom edge of the Detector Card a few millimeters away from the tree or post. This allows rodents to get their mouths around the card and leave bite marks for you to see.

LEAVE CARDS OUT FOR 3 NIGHTSLeave your Detector Cards in place for three nights before checking. If you have rodents interacting with your cards you’ll see teeth marks on the detection surface of the card. Now you’ve found the best sites to set your trap!
IDENTIFYING BITE MARKS
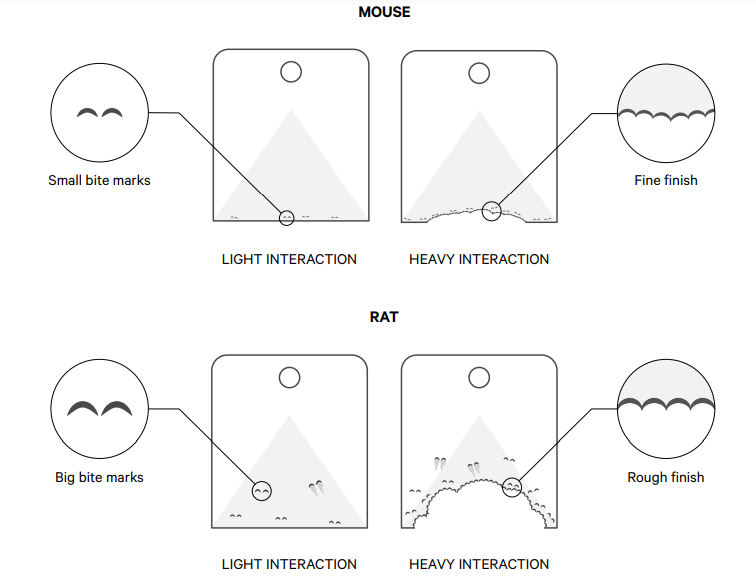
NO RODENT INTERACTION?If you don’t see any bite or scratch marks on your cards, this could mean no rodents are around, or it’s not a location they feel safe eating.We recommend waiting a few more days or moving the cards to a different location.If you’re so excited to get your trap set up, choose a sheltered location – where a rodent wouldn’t be easily seen by predators like cats or birds of prey. Keep an eye on your detector cards too, so you’ll know if you need to move your trap to a better location.
BITE MARK INTERACTIONIf there are rodents feeding near where you have your Detector Cards, they’ll try and eat the lure in the cards. You’ll then see scratch or bite marks on the cards. Sometimes this will look like light scratches and other times the card will be chewed to pieces!
INSTALLING YOUR TRAP

1. INSTALL YOUR DETECTOR CARDSTo find the best location for your trap, use Detector Cards, leaving them in place for three nights. Install your trap where rodents have interacted with the cards.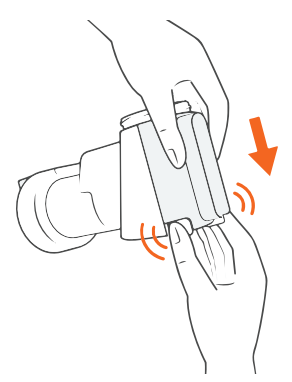
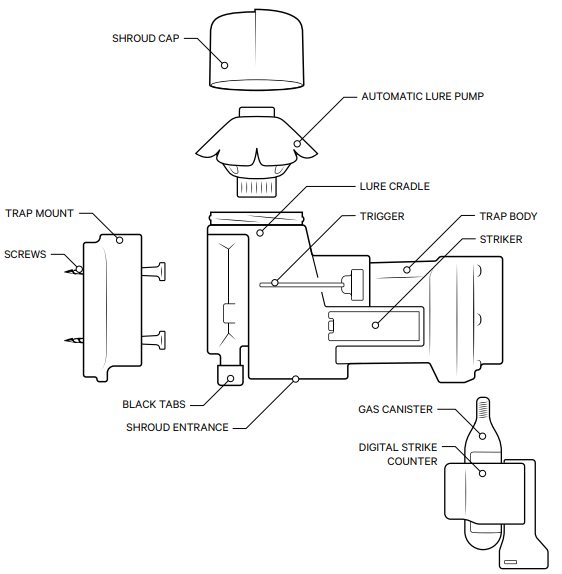
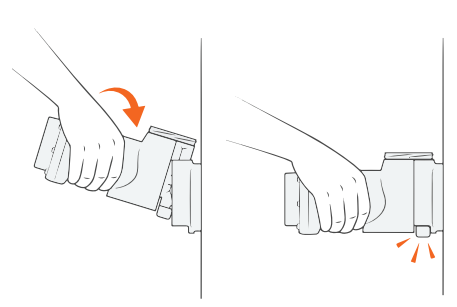
2. SEPARATE TRAP MOUNT FROM THE TRAP BODYUsing your forefinger and thumb, press the Black Tabs inwards and ease the orange Trap Mount along and off the Trap Body.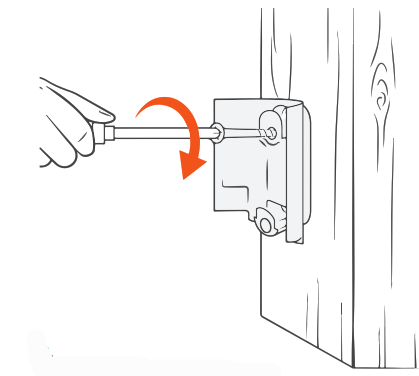
3. ATTACH THE TRAP MOUNTUsing a screwdriver, screw in the orange Trap Mount 12cm (about a hand width) above the ground onto a straight tree or post. Do not overtighten the screws.
4. CLICK THE TRAP BODY INTO THE TRAP MOUNTTilt the Trap Body backward slightly and lower it onto the top locking tab of the Trap Mount. As you press downwards the Trap Body will be guided in toward the Trap Mount and lock in with a click.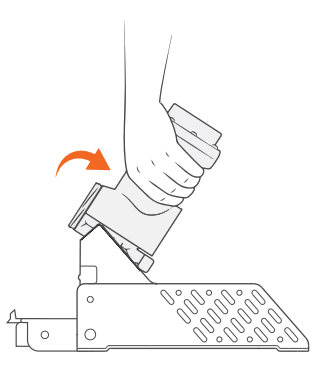
5. IF ATTACHING TO A TRAP STANDGuide the top slot at the rear of the A24 onto the upper central locking tab of the stand. Once these are coupled, gently ease the trap into the stand and it will click into the lower locking tab. It is easiest done when you don’t force it. The trap is mounted correctly when there is no gap between the A24 and stand.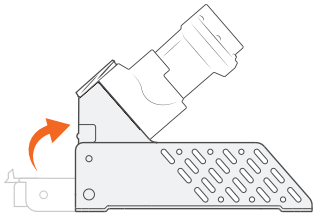 6. A24 TRAP STANDSecure the A24 to the stand by closing the orange Stand Lock. You will hear a ‘click’ when it is in place. Place your trap stand on a flat surface or ground. There are two peg holes at either end of the stand that you can use to keep the trap upright when situating it on an uneven surface.
 7. POWER UP YOUR TRAPRemove the black cap from the gas canister. Be careful to keep the screw thread clean and free of debris. Screw the canister firmly into the trap. Hand tightens only.
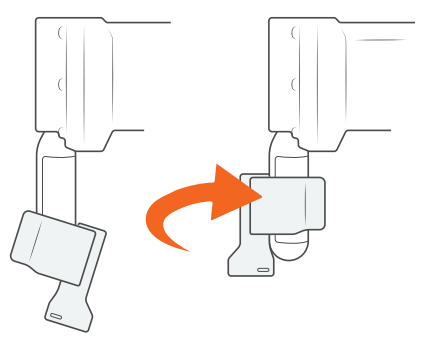 8. ATTACH THE DIGITAL STRIKE COUNTERIf you purchased a Counter with your A24, slightly wet the inside of the rubber strap for lubrication and rotate the Counter anti-clockwise as you ease it up the canister. The Counter display must face directly away from the trap.
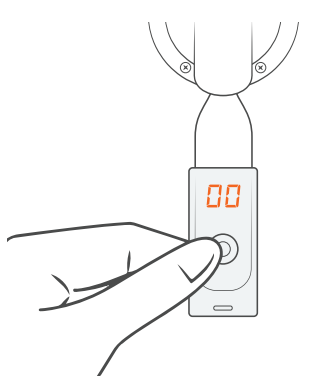 9.ZERO THE COUNTERZero the Counter by pressing the button and holding it down until the display shows ‘00’. The Counter goes to sleep a few seconds after the button is released.
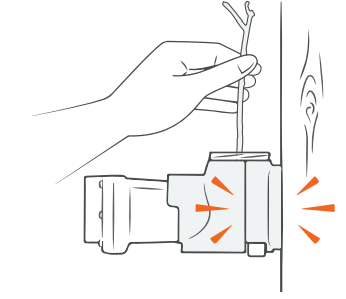 10. TEST-FIRE YOUR TRAPTo test fire the trap, reach a pen or twig down through the top of the trap and push the Trigger gently to the side. The Striker will fire with a bang and then retract. Always keep your hands clear of trap entrances and always treat the trap as live.
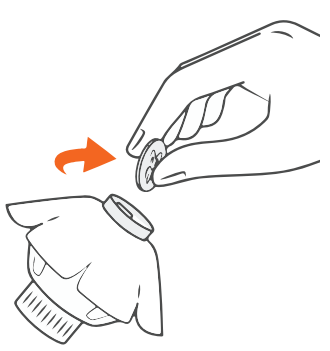 11. ACTIVATE THE AUTOMATIC LURE PUMPRemove the 10c coin from the top of the Automatic Lure Pump (ALP) just before you put it into the Shroud Cap. This activates the technology which will dispense lure for 6 months. It is vital you remove the coin or the ALP will not activate.
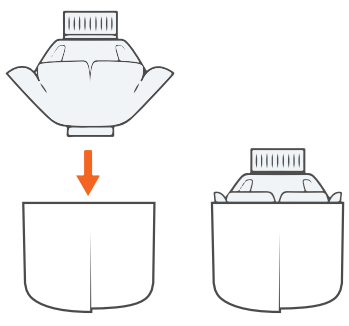 12. NEST ALP INTO SHROUD CAPWith the ALP activated, gently squeeze and shape the ALP into the Shroud Cap. It will be a tight fit. Push the ALP into the Shroud Cap until its skirted edge sits aligned with the edge of the Shroud Cap rim. It will then easily screw into the Lure Cradle.
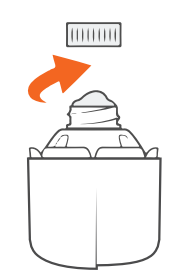 14. SCREW & SECURE THE SHROUD CAP & ALPPlace the Shroud Cap with the ALP into the Lure Cradle and screw into the internal thread with a few turns. Once the ALP is screwed into the Lure Cradle, secure the Shroud Cap onto the trap by pushing down and clicking into place with another turn. The ALP is now set and active!
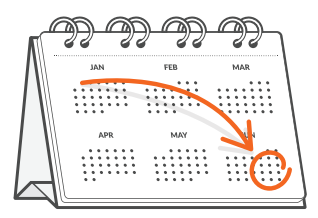 15. REPLACE THE GAS & LURE EVERY 6 MONTHSYour ALP will last for 6 months. Make a note of when you’ll need to replace your lure. This keeps your lure fresh and attractive to pests. It’s a good idea to replace your gas canister at the same time, so your trap is powered and ready for action.
 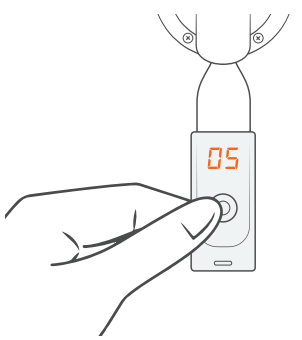 16. CHECKING THE COUNTERTo check the tally on the Counter, quickly press and release the button. The display will show the number killed. Pressing and holding the button down zeroes the Counter.
MOVING YOUR TRAP
- REMOVE COUNTER2. UNSCREW GAS3.TESTFIRE4. DETACH TRAP
 2. UNSCREW GAS
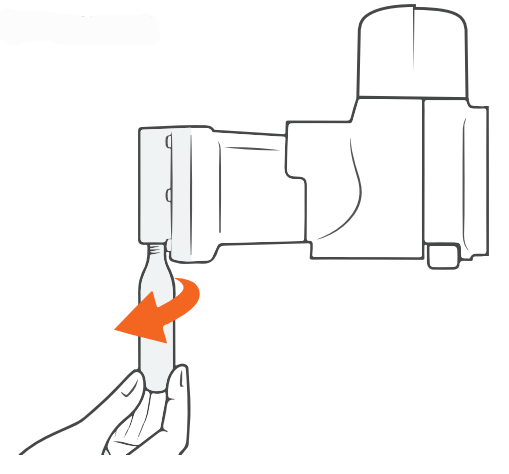 3.TESTFIRE
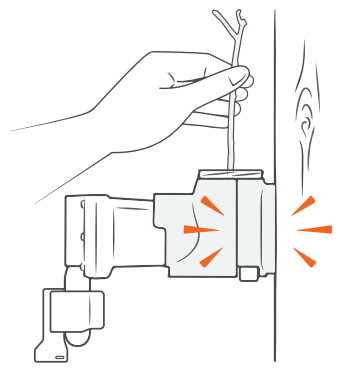 4. DETACH TRAP
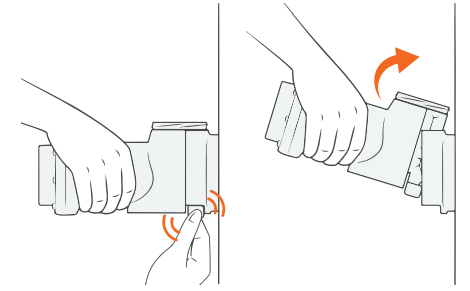
HOW TO MOVE TRAPS SAFELYRather than move your traps, it’s better to add to your trap network and increase your pest-free area. To move the trap, first remove the Counter and unscrew the gas canister. You may hear any remaining gas in the canister escaping. This may cause the canister to freeze rapidly, so it’s a good idea to unscrew the gas canister using a cloth to protect your hands.
WARNING – REMOVE FINAL CHARGE FROMTHE TRAPAlthough the gas canister has been removed, the trap may still be live with one charge remaining in its chamber. Safely test fire your trap by removing the Shroud Cap and the ALP, and using a pen/twig to reach down through the top of the trap and push the Trigger to one side. If there is still gas in the trap, the orange Striker will be triggered, if nothing happens, all gas has been flushed out and the trap is safe to move.
Always treat the trap as live until you have de-gassed and test fired it. If the trap doesn’t fire when triggered, the trap has successfully been de-gassed. With the trap de-gassed, your trap is now safe to detach from the Trap Mount. Using your thumb and forefinger, squeeze the Black Tabs and with upward pressure pull the trap up and off the Trap Mount.Always keep your fingers clear of trap entrances.
DECLARATION & WARNINGS
EC DECLARATION OF CONFORMITY OF MACHINERY (ORIGINAL)This declaration relates exclusively to the machinery in the state in which it was placed on the market and excludes components that are added and/or operations carried out subsequently by the final user.Product: Rat and Stoat Trap / Rat and Mouse Trap, A24; including trap mount kit and blocker accessories.Manufacturer: Goodnature Limited, 8 Horner Street, Newtown, Wellington 6021, NEW ZEALANDTechnical File Authorised owner: Craig Bond, 8 Horner Street, Newtown, Wellington 6021, NEW ZEALAND
This product fulfills all relevant provisions of the Machinery Directive. Signed for an on behalf of: Goodnature Limited, WellingtonPlace and date of Issue: Goodnature Limited, 8 Horner Street, Newtown,Wellington 6021, NEW ZEALAND, 28th June – 2019Name, Function, Signature:Craig R. Bond, Director
WARNINGS
- USE ONLY Goodnature CO2 Canisters. Use of other canisters will void the warranty
- NEVER use a petroleum-based lubricant in your trap
- ALWAYS store CO2 Canisters below 49°C
- NEVER leave CO2 Canisters in a vehicle on a hot da
- ALWAYS dispose of used CO2 Canisters responsibly
- NEVER crush CO2 Canisters or put in a fire
- NEVER allow children to play with or around traps
- NEVER submerge your trap
- NEVER use a damaged trap
- NEVER modify your trap
- ALWAYS act responsibly
- USE ONLY as recommended in this quick start guide
- ALWAYS wear appropriate safety gear when setting and firing a trap
- DO NOT install the CO2 Canister until the trap is correctly mounted
- ONLY test fire your trap as directed: see section: Moving Your Trap
- ALWAYS treat your trap as LIVE
- ALWAYS remove the CO2 Canister and test-fire to remove final charge before removing the trap from its mounted position
- ALWAYS remove the CO2 Canister and test-fire to remove final charge before moving the trap
- ALWAYS test-fire to remove final charge from the trap after removing the CO2 Canister and before removing it from the trap mount: see section: Moving Your Trap
- ONLY set traps at the height recommended in this guide and be considerate of others when choosing the location of the trap
- NEVER put hands or objects in the entrance of the trap
- NEVER fire and re-fire the trap in quick succession
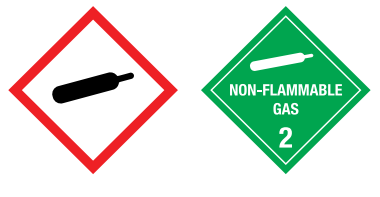
- Contains gas under pressure; may explode if heated
- Protect from sunlight. Store in a well-ventilated place
- UN2037 / EN16509
- Carbon Dioxide CO2, CAS: 124-38-9, 16g
TRAPPING IN THE UKOur A24 trap is approved for trapping rats, mice, and stoats in the UK. If you’d like to trap Grey Squirrels, check out our A18 trap. All use of traps is subject to the legislation set out in the Spring Traps Approval Order for each country.goodnature.co.nz

 Please recycle after use. This material has been printed using vegetable oil-based/mineral oil-free inks. Printed on uncoated woodfree paper produced from eucalyptus fibers and sourced from sustainable forests.33-004_REV-18
References
[xyz-ips snippet=”download-snippet”]