
/ Table of Contents
The BasicsGetting StartedCamera Status ScreenCamera MenusCamera ModesNavigating Settings MenusVideo ModePhoto ModeSetup ModeProtuneTransferring Files to a ComputerOmni Files and GoPro SoftwareSmart RemoteBatteryImportant MessagesTroubleshootingCustomer SupportTrademarksRegulatory Information
/ The Basics
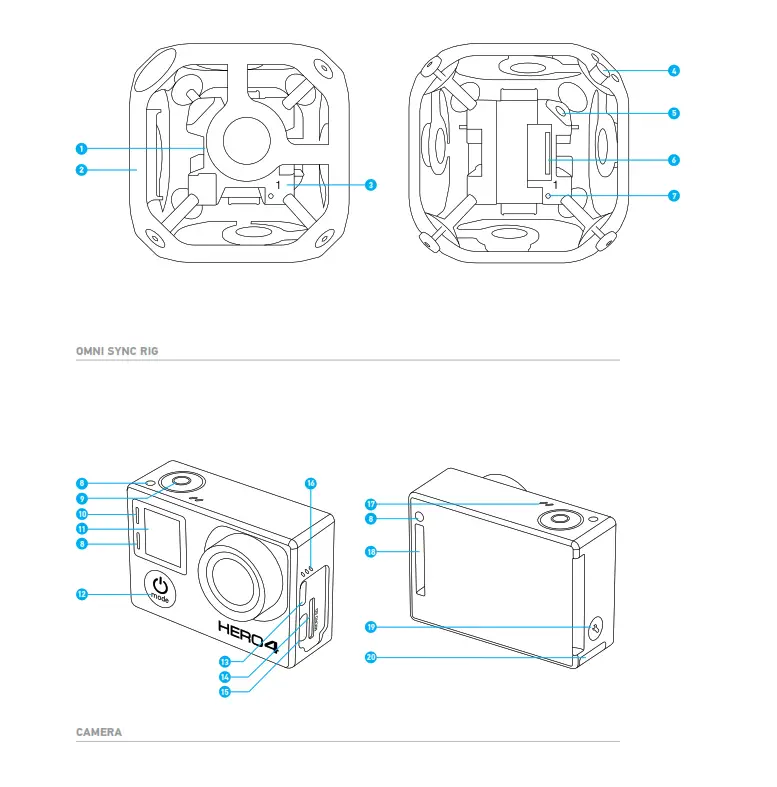
1. Inner Cube (Synchronizer)2. Frame (6x Outer Panels)3. Camera Position Indicator (1-6)4. Mounting Corner (1/4-20 Threaded Insert, 1x Top under removable Corner Cap, 1x Bottom)5. Power Connector (2.5mm x 5.5mm)6. HEROBus Connector (30-pin)7. Array Camera Status Light8. Camera Status Light (red)9. Shutter/Select Button [![]() ]10. Wireless Status Light (blue)11. Camera Status Screen12. Power/Mode Button [
]10. Wireless Status Light (blue)11. Camera Status Screen12. Power/Mode Button [ ![]() ]13. Micro HDMI Port (cable not included)14. microSD Card Slot15. Mini-USB Port (supports composite A/V cable/3.5mm stereo mic adapter, not included)16. Audio Alert17. Microphone18. HEROPort19. Settings/Tag Button [
]13. Micro HDMI Port (cable not included)14. microSD Card Slot15. Mini-USB Port (supports composite A/V cable/3.5mm stereo mic adapter, not included)16. Audio Alert17. Microphone18. HEROPort19. Settings/Tag Button [![]() ]20. Battery Door
]20. Battery Door
/ Getting Started
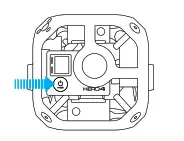
MEMORY CARDSHERO4 Black requires a microSD, microSDHC, or microSDXC memory card. The card must have a minimum rating of Class 10 or UHS-I, and a capacity of 32GB or 64GB. Visit gopro.com/help for the list of GoPro-tested microSD cards.

NOTICE: Use care when handling memory cards. Avoid liquids, dust, and debris. As a precaution, power off the camera before inserting or removing the card. Check manufacturer guidelines regarding use in acceptable temperature ranges.
![]() WARNING: Use caution when using your GoPro as part of your active lifestyle. Always be aware of your surroundings to avoid injury to yourself and others.Abide by all local laws when using your GoPro and related mounts and accessories, including all privacy laws, which may restrict recording in certain areas.
WARNING: Use caution when using your GoPro as part of your active lifestyle. Always be aware of your surroundings to avoid injury to yourself and others.Abide by all local laws when using your GoPro and related mounts and accessories, including all privacy laws, which may restrict recording in certain areas.
ROLE OF THE PRIMARY CAMERAThe camera that is connected to the inner cube and marked with 1 is referred to as the primary camera. All other cameras are referred to as secondary cameras.
The primary camera controls all cameras in the array for these functions:• Powers all cameras on/off• Connects to the Smart Remote so that all cameras can be controlled remotely• Displays Array Ready when the system is ready for use• Displays Array Error when one of the secondary cameras experiences an error
ASSEMBLING THE ARRAYInstalling the CamerasThe All Inclusive Omni package ships with the cameras already installed. If you want to re-install a camera or if you have the Rig Only version of Omni, follow the steps below.
- Confirm that all cameras are HERO4 Black cameras. Other GoPros are not supported.
- Confirm that all cameras are using the same version of array firmware. To obtain the latest array firmware for Omni, visit gopro.com/help and log in to the Omni Support Hub. If you need to create a support hub account, follow these instructions: https://community.gopro.com/ html/assets/GoProOmniSupportHub.pdf
- Complete these steps for each camera:a. Use the included hex key to loosen (but not remove) the screws on one of the panels.
 b. Gently pull the panel off of the frame.c. Connect a camera to the HEROBus connector on the inner cube.d. Align the outer panel with the lens, then gently slide the panel onto the lens and move the corners into place.e. Tighten the screws in a star pattern.
 - Tighten the screws for the panel.
- Repeat steps 3-6 for the remaining cameras.
 b. Gently pull the panel off of the frame.c. Connect a camera to the HEROBus connector on the inner cube.
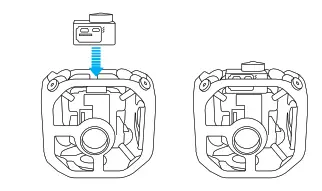 d. Align the outer panel with the lens, then gently slide the panel onto the lens and move the corners into place.
 e. Tighten the screws in a star pattern.
SUPPLYING POWER TO THE RIG
You have two options for powering the rig: external power or the camera batteries.
NOTICE: Do not switch from one power source to another (camera batteries to external power or external power to camera batteries) without first powering off the cameras. Failure to follow this guideline can lead to unexpected powering off, interrupted recordings, and erratic Omni behavior.
Powering the Rig with External PowerFor extended recording time, power the rig with an external power source.1. Be sure that the battery for the external power unit is charged.2. Remove the batteries from the cameras.3. Connect the power cable to the power connector.NOTICE: Do not connect a high-voltage power source to Omni. Omni requires 5V input but can be powered using a 12V to 5V step-down converter, such as the Switronix XP-DV-5GP. The Omni power connector is a 2.5mm x 5.5mm polarity plug. The step-down converter has an 8A rating.Powering the Rig with Camera Batteries + Charging in the RigWith these options, you can charge the camera batteries without removing the cameras from the rig.• Using USB cables, connect the camera USB ports to the USB hub (available with the All Inclusive Omni package).• Use the power connector to connect the external power to the inner cube.The camera status lights turn on during charging and turn off when charging is complete.Powering the Rig with Camera Batteries + Charging Outside of the RigWith this option, you must remove the cameras from the rig.1. Insert the battery into the camera.
2. Connect the camera to a computer, USB hub, or other USB charging adapter using the included USB cable. The camera status light turns on during charging and turns off when charging is complete.When charging with a computer, be sure that the computer is connected to a power source. If the camera status light does not turn on, use a different USB port.For more battery information, see Battery.
/ Getting Started
![]() WARNING: Use caution when using your GoPro as part of your active lifestyle. Always be aware of your surroundings to avoid injury to yourself and others.Abide by all local laws when using your GoPro and related mounts and accessories, including all privacy laws, which may restrict recording in certain areas.
WARNING: Use caution when using your GoPro as part of your active lifestyle. Always be aware of your surroundings to avoid injury to yourself and others.Abide by all local laws when using your GoPro and related mounts and accessories, including all privacy laws, which may restrict recording in certain areas.
MOUNTING OMNI1. If you want to use the top 1/4-20 threaded insert, unscrew the corner cap.2. Use a 1/4”-20 screw with the threaded insert on the top or bottom of the rig (near the power connector) to attach Omni to a monopod or other suitable mounting solution.
NOTICE: When removing Omni from a monopod or other mounting solution, disconnect the power connector first to avoid damaging the connection.POWERING ON + OFF ALL CAMERAS IN THE ARRAY
To Power On All Cameras:
Press the Power/Mode button [ ![]() ] on the primary camera. The camera status lights flash three times and the sound indicator emits three beeps. The primary camera powers up, followedby the secondary cameras. When Array Ready disappears, you can begin capturing video or photos.The array is properly configured if the camera mode icon and AR alternate in the upper left of the camera status screen.If Array Error appears on the primary camera’s status screen, see Array Error.
] on the primary camera. The camera status lights flash three times and the sound indicator emits three beeps. The primary camera powers up, followedby the secondary cameras. When Array Ready disappears, you can begin capturing video or photos.The array is properly configured if the camera mode icon and AR alternate in the upper left of the camera status screen.If Array Error appears on the primary camera’s status screen, see Array Error.
To Power Off All Cameras:Press and hold the Power/Mode button [ ![]() ] on the primary camera for two seconds. The camera status lights flash several times and the sound indicator emits seven beeps.
] on the primary camera for two seconds. The camera status lights flash several times and the sound indicator emits seven beeps.
/ Camera Status Screen
Your HERO4 Black features a status screen that displays the following information:
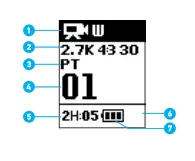
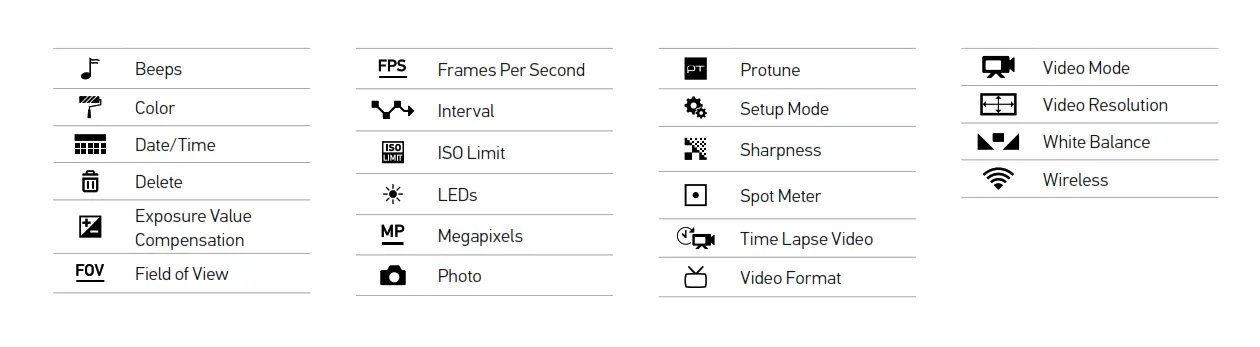
1. Camera Mode/FOV (field of view)2. Resolution/fps (frames per second)3. Protune™ (if on)4. Number of Files Captured5. Available Time on Memory Card6. Wireless (if on)7. Battery Life
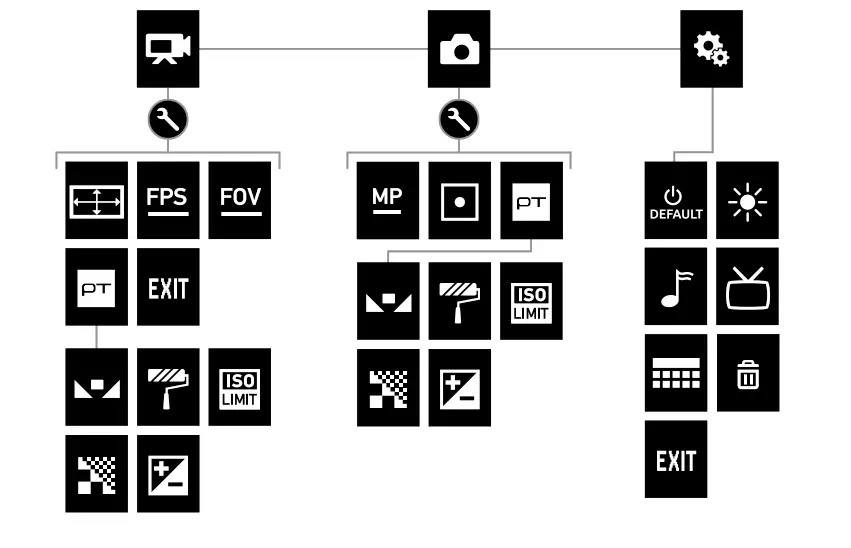
/ Camera Modes
The HERO4 Black features three camera modes. To cycle through the modes, press the Power/Mode button [ ![]() ].Video – Record video or time lapse videoPhoto – Capture single photosSetup – Adjust general camera settings
].Video – Record video or time lapse videoPhoto – Capture single photosSetup – Adjust general camera settings
Each mode has its own settings menu. Follow the instructions below on your camera or the Smart Remote to navigate the settings menus.For information about connecting the Smart Remote to your HERO4 Black cameras, see the Smart Remote User Guide at gopro.com/help.TO NAVIGATE SETTINGS MENUS:1. Verify that the camera is in the desired camera mode. To cycle between the modes, press the Power/Mode button [![]() ].2. Press the Settings/Tag button [
].2. Press the Settings/Tag button [ ![]() ] to open the settings menu for that mode.3. Use the Power/Mode button [
] to open the settings menu for that mode.3. Use the Power/Mode button [ ![]() ] to cycle through the settings.
] to cycle through the settings. 4. Press the Shutter/Select button [
 ![]() ] to cycle through the options within a setting. To select an option, leave the option highlighted when you move to another screen.
] to cycle through the options within a setting. To select an option, leave the option highlighted when you move to another screen.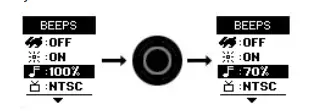 5. To go back to the previous screen or exit the settings menu, press the Settings/Tag button [
 ![]() ].
].
/ Video Mode
Video mode contains two capture modes: Video and Time Lapse Video.Capture ModeVideo (default)Time Lapse VideoDescriptionCaptures video.Creates video from frames captured at specific intervals. Time Lapse Video is captured without audio. Protune™ is not available in this capture mode.CAPTURING VIDEO1. Verify that the camera is in Video mode. If needed, press the Power/Mode button [ ![]() ] to change to Video mode.2. If necessary, select a different video capture mode (Video orTime Lapse Video):a. Press the Settings/Tag button [
] to change to Video mode.2. If necessary, select a different video capture mode (Video orTime Lapse Video):a. Press the Settings/Tag button [ ![]() ] to open the settings menu.b. Press the Shutter/Select button [
] to open the settings menu.b. Press the Shutter/Select button [ ![]() ] repeatedly until you get to the desired capture mode.c. Press the Settings/Tag button [
] repeatedly until you get to the desired capture mode.c. Press the Settings/Tag button [ ![]() ] to close the settings menu. The icon for the selected capture mode appears in the upper left on your camera status screen.3. Press the Shutter/Select button [
] to close the settings menu. The icon for the selected capture mode appears in the upper left on your camera status screen.3. Press the Shutter/Select button [ ![]() ]. The camera beeps once and the camera status lights flash while the camera is recording.4. To stop capturing, press the Shutter/Select button [
]. The camera beeps once and the camera status lights flash while the camera is recording.4. To stop capturing, press the Shutter/Select button [ ![]() ]. The camera status lights flash three times and the camera beeps three times. If the memory card is full or the battery is out of power, your camera automatically stops recording. Your video is saved before the camera powers off.VIDEO SETTINGSThe capture mode that you select in Video mode determines the settings that appear in the rest of the menu.For instructions on how to change the following settings, see Navigating Settings Menus (page 6).PRO TIP: To open the settings menu for the current mode, press the Settings/Tag button [
]. The camera status lights flash three times and the camera beeps three times. If the memory card is full or the battery is out of power, your camera automatically stops recording. Your video is saved before the camera powers off.VIDEO SETTINGSThe capture mode that you select in Video mode determines the settings that appear in the rest of the menu.For instructions on how to change the following settings, see Navigating Settings Menus (page 6).PRO TIP: To open the settings menu for the current mode, press the Settings/Tag button [ ![]() ].
].![]() INTERVALThe Interval setting applies to Time Lapse Video. Interval determines the amount of time that passes between each captured frame. Available intervals range from 2 seconds (default) to 60 seconds.Interval 2 seconds5-10 seconds10-60 secondsExamplesBusy street cornerSunsetLengthy activities, such as construction projectsNote: Time Lapse Video is not supported for 1440p 50 and 60 fps.
INTERVALThe Interval setting applies to Time Lapse Video. Interval determines the amount of time that passes between each captured frame. Available intervals range from 2 seconds (default) to 60 seconds.Interval 2 seconds5-10 seconds10-60 secondsExamplesBusy street cornerSunsetLengthy activities, such as construction projectsNote: Time Lapse Video is not supported for 1440p 50 and 60 fps.
CAPTURE RESOLUTION, FPS, AND FOVWith Omni, each HERO4 Black camera captures video at the following resolutions:Video Resolution2.7K 4:31440PFPS (NTSC/PAL)30/2560/50FOV WideWideScreen Resolution2704×2028, 4:31920×1440, 4:3
![]() High-Performance Video Modes, Camera Temperatures, and Battery Performance
High-Performance Video Modes, Camera Temperatures, and Battery Performance
When capturing video at 2.7K 4:3, it is normal for the cameras to become warm and use more power.
If a camera gets too hot, a message appears on the screen indicating that the cameras is shutting down. The camera stops recording, saves your video, and powers off. If this happens with a camera in Omni, let your camera sit and cool for 20 minutes before attempting to use it again.For extended recording time, capture shorter video clips or remove the batteries from all cameras and use an external power source with the power connector on the rig.PROTUNEFor details about Protune settings, see Protune (above).
/ Photo Mode
Photo mode contains one capture mode: Single photo.CAPTURING PHOTOS1. Verify that the camera is in Photo mode. If needed, press the Power/Mode button [ ![]() ] to change to Photo mode.2. Press the Shutter/Select button [
] to change to Photo mode.2. Press the Shutter/Select button [ ![]() ]. The camera beeps two times, the camera status lights flash and the counter on the camera status screen increases by one.PHOTO SETTINGSFor instructions on how to change the following settings, see Navigating Settings Menus (above).PRO TIP: To open the settings menu for the current mode, press the Settings/Tag button [
]. The camera beeps two times, the camera status lights flash and the counter on the camera status screen increases by one.PHOTO SETTINGSFor instructions on how to change the following settings, see Navigating Settings Menus (above).PRO TIP: To open the settings menu for the current mode, press the Settings/Tag button [ ![]() ].MP MEGAPIXELSThe HERO4 Black captures photos at 12MP.
].MP MEGAPIXELSThe HERO4 Black captures photos at 12MP.
/ Photo Mode
![]() SPOT METERSpot Meter lets you capture photos from a dark space while pointing the camera into a brighter setting, such as when recording the outdoors from within a car. When Spot Meter is turned on, [
SPOT METERSpot Meter lets you capture photos from a dark space while pointing the camera into a brighter setting, such as when recording the outdoors from within a car. When Spot Meter is turned on, [![]() ] appears on the camera status screen. The options for this setting are off (default) and on.
] appears on the camera status screen. The options for this setting are off (default) and on.![]() PROTUNEFor details about Protune settings, see Protune.
PROTUNEFor details about Protune settings, see Protune.
/ Setup Mode
Setup mode contains settings for wireless and settings to customize your camera . For instructions on how to change the following settings, see Navigating Settings Menus.![]() WIRELESSFor Omni, this setting applies only to the primary camera. Wireless must be off for all secondary cameras.
WIRELESSFor Omni, this setting applies only to the primary camera. Wireless must be off for all secondary cameras.
When the primary camera’s Wireless is on, a Wireless status icon appears on the camera status screen and the blue wireless lights on the camera blink intermittently. The default setting for Wireless is off.SettingPAIRMODEDescriptionLets you pair your primary camera to a GoPro remote. For more information, see Smart Remote.After pairing, Mode lets you connect the primary camera to a GoPro remote.
PRO TIP: If you forgot your camera’s name or password, use the Camera Reset setting (Reset Wi-Fi option) in the primary camera’s Setup mode to reset them to the defaults. The default password is goprohero.
![]() DEFAULT MODEYou can select the capture mode that appears when the camera powers on. The options are Video, Time Lapse Video and Single Photo.
DEFAULT MODEYou can select the capture mode that appears when the camera powers on. The options are Video, Time Lapse Video and Single Photo.
![]() LEDSThis setting determines which camera status lights (red) to activate. The options for this setting are 4 (top, bottom, front, back), 2 (front and back), or off (none). The default setting is 4.Note: The Wireless status light (blue) is always activated unless you select off for this setting.
LEDSThis setting determines which camera status lights (red) to activate. The options for this setting are 4 (top, bottom, front, back), 2 (front and back), or off (none). The default setting is 4.Note: The Wireless status light (blue) is always activated unless you select off for this setting.
![]() BEEPSYou can set the volume for the sound indicators to be 100% (default), 70% or off.
BEEPSYou can set the volume for the sound indicators to be 100% (default), 70% or off.
/ Setup Mode
![]() VIDEO FORMATThe Video Format setting governs frame rates for recording and playback when viewing video on a TV/HDTV.Setting NTSC (default)PAL DescriptionViewing video in North AmericaViewing video on a PAL TV/HDTV (most televisions outside of North America)
VIDEO FORMATThe Video Format setting governs frame rates for recording and playback when viewing video on a TV/HDTV.Setting NTSC (default)PAL DescriptionViewing video in North AmericaViewing video on a PAL TV/HDTV (most televisions outside of North America)
![]() DATE/TIMEThis setting lets you set the date and time. If the battery is removed from the camera for an extended period of time, you must reset the date and time.
DATE/TIMEThis setting lets you set the date and time. If the battery is removed from the camera for an extended period of time, you must reset the date and time.
![]() DELETEThis setting lets you delete the last file, or delete all files and format the memory card. Deleting all files is useful after you transfer your files to your computer and want to make room on your memory card for more content. LED lights blink until the operation is complete. NOTICE: If you select All/Format, the memory card is reformatted, which deletes every file on the card. If you select this option from the primary camera, memory cards in all cameras are reformatted.
DELETEThis setting lets you delete the last file, or delete all files and format the memory card. Deleting all files is useful after you transfer your files to your computer and want to make room on your memory card for more content. LED lights blink until the operation is complete. NOTICE: If you select All/Format, the memory card is reformatted, which deletes every file on the card. If you select this option from the primary camera, memory cards in all cameras are reformatted.
CAMERA RESETWith this setting, you can reset your camera’s settings or username and password.Setting Reset DefaultsReset Wi-FiDescriptionReturns all settings to their default values. This option retains the Date/Time setting, the camera’s name and wireless password, and remote control pairing.Resets the camera’s name and password to the defaults. The default password is goprohero.
/ Protune
PROTUNE BENEFITSProtune unlocks the camera’s full potential, yielding stunning image quality and cinema-caliber video optimized for professional productions.Protune is compatible with professional color correction tools, GoPro software and other video editing software.
![]() PROTUNEThe options for this setting are off (default) and on. When Protune is on, PT appears on the camera status screen. Protune is available for all video and photo resolutions.
PROTUNEThe options for this setting are off (default) and on. When Protune is on, PT appears on the camera status screen. Protune is available for all video and photo resolutions.
![]() WHITE BALANCEWhite balance adjusts the overall color tone of videos based on the environmental conditions.Note: Array camera firmware does not offer the Auto white balance selection. Be sure to choose the appropriate white balance for your scene.
WHITE BALANCEWhite balance adjusts the overall color tone of videos based on the environmental conditions.Note: Array camera firmware does not offer the Auto white balance selection. Be sure to choose the appropriate white balance for your scene.
Setting 3000K5500K6500KNative (default)DescriptionWarm light (incandescent or sunrise/sunset lighting)Slightly cool light (cool fluorescent or average daylight)Cool light (overcast conditions)Minimally color-corrected file from the image sensor that allows for more precise adjustments in post-production
![]() COLORColor lets you adjust the color profile of your video and photos.Setting GoPro ColorFlat (default)Description Provides GoPro color-corrected profile (same great color as when Protune is off)Provides a neutral color profile that can be color corrected to better match footage captured with other equipment, offering more flexibility in postproduction. Due to its long curve, Flat captures more details in shadows and highlights.
COLORColor lets you adjust the color profile of your video and photos.Setting GoPro ColorFlat (default)Description Provides GoPro color-corrected profile (same great color as when Protune is off)Provides a neutral color profile that can be color corrected to better match footage captured with other equipment, offering more flexibility in postproduction. Due to its long curve, Flat captures more details in shadows and highlights.
![]() ISO LIMITISO Limit adjusts the camera’s sensitivity in low-light environments, and creates a balance between brightness and resulting image noise. Image noise refers to the degree of graininess in the image.Setting 640032001600 (default)800400Resulting QualityBrighter video in low light, highest image noiseBrighter video in low light, increased image noiseModerately bright video in low light, moderate image noiseDarker video in low light, marginal image noiseDarker video in low light, minimum image noise
ISO LIMITISO Limit adjusts the camera’s sensitivity in low-light environments, and creates a balance between brightness and resulting image noise. Image noise refers to the degree of graininess in the image.Setting 640032001600 (default)800400Resulting QualityBrighter video in low light, highest image noiseBrighter video in low light, increased image noiseModerately bright video in low light, moderate image noiseDarker video in low light, marginal image noiseDarker video in low light, minimum image noise
![]() SHARPNESSSharpness controls the sharpness of your video footage.Sharpness Setting Resulting QualityHigh (default) Ultra-sharp videoMedium Moderately sharp videoLow Softer video
SHARPNESSSharpness controls the sharpness of your video footage.Sharpness Setting Resulting QualityHigh (default) Ultra-sharp videoMedium Moderately sharp videoLow Softer video
![]() EXPOSURE VALUE COMPENSATION (EV COMP)Exposure Value Compensation affects the brightness of your video. Adjusting this setting can improve image quality when shooting in environments with contrasting lighting conditions.Settings
EXPOSURE VALUE COMPENSATION (EV COMP)Exposure Value Compensation affects the brightness of your video. Adjusting this setting can improve image quality when shooting in environments with contrasting lighting conditions.Settings![]() PRO TIP: Exposure Value Compensation adjusts brightness within the existing ISO Limit. If brightness has already reached the ISO Limit in a low-light environment, increasing the Exposure Value Compensation does not have any effect.RESETThis option resets all Protune settings to their default values.
PRO TIP: Exposure Value Compensation adjusts brightness within the existing ISO Limit. If brightness has already reached the ISO Limit in a low-light environment, increasing the Exposure Value Compensation does not have any effect.RESETThis option resets all Protune settings to their default values.
/ Transferring Files to a Computer
Remove the microSD cards from the cameras.
- Complete these steps for each microSD card:a. Connect the card reader to your computer.b. Insert the microSD card into the reader.c. Transfer your files to your computer.d. If appropriate, delete the files from your cards.NOTICE: Be sure to back up your files before deleting them./ Omni Files and GoPro SoftwareFiles recorded with Omni are optimized for use with GoPro Omni Importer. This application offers unique functionality for Omni files: fast previewing, color correction, image stabilization, file export, and media management tools.You can also use Omni files with GoPro Autopano Video Pro software for advanced stitching, stabilizing, and VR content publishing. Content created using the GoPro Omni Importer and GoPro Autopano Video Pro can be used with GoPro VR (available for iOS© and Android) and GoPro VR for desktop. For more information, visit kolor.com and refer to the user manuals for these apps.Note: Omni recordings were not designed to work with the GoPro App (mobile or desktop), Quik™,or Splice.
/ Smart Remote
The Smart Remote can control your cameras from up to 600’ (180m) away in optimal conditions with a clear line of sight between the Smart Remote and the Omni. To use the Smart Remote with Omni, pair it only with the primary camera. You can then control all 6 cameras remotely. For information about connecting the Smart Remote to your HERO4 Black cameras, see the Smart Remote User Guide at gopro.com/help.Note: You cannot use more than one Smart Remote with Omni or control more than one Omni with a Smart Remote.
/ Battery
MAXIMIZING BATTERY LIFEThe battery icon on the camera screen blinks when the battery drops below 10%. If the battery in any of the cameras reaches 0% while recording, the camera saves the file and the array powers off.Extreme cold temperatures can decrease battery life. To maximize battery life in cold conditions, keep the camera in a warm place prior to use.
CHARGING INFORMATIONThe battery charges to 100% in approximately two hours when using GoPro’s USB-compatible Wall or Auto Charger (both sold separately).
When charging with a computer, be sure that the computer is connected to a power source. If the camera status light does not turn on, use a different USB port.The included lithium-ion battery comes partially charged. No damage occurs to the camera or battery if used prior to a full charge.You can also charge the battery outside the camera using the HERO4 Dual Battery Charger (sold separately).
![]() WARNING: Using a wall charger other than a GoPro Wall Charger can damage the GoPro battery and could result in fire or leakage. Only use chargers marked: Output 5V 1A. If you do not know the voltage and current of your charger, use the included USB cable to charge the camera from your computer.
WARNING: Using a wall charger other than a GoPro Wall Charger can damage the GoPro battery and could result in fire or leakage. Only use chargers marked: Output 5V 1A. If you do not know the voltage and current of your charger, use the included USB cable to charge the camera from your computer.
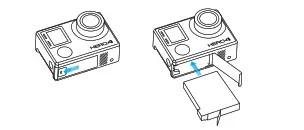
REMOVING THE BATTERY FROM THE CAMERAThe HERO4 Black battery is designed to have a tight fit to maximize reliability in high-vibration activities.To Remove the Battery:1. Open the battery door by placing your thumb in the indentation in the battery door (on the bottom of the camera) and sliding it to the left. Allow the door to open.2. Grasp the battery pull-tab and remove the battery from the camera.
![]() WARNING: Only use manufacturer-recommended replacementbatteries for your camera.
WARNING: Only use manufacturer-recommended replacementbatteries for your camera.
BATTERY STORAGE AND HANDLINGThe camera contains sensitive components, including the battery. Avoid exposing your camera and battery to very cold or very hot temperatures. Low or high temperature conditions may temporarily shorten the battery life or cause the camera to temporarily stop working properly. Avoid dramatic changes in temperature or humidity when using the camera, as condensation may form on or within the camera.Do not turn on your camera if it is wet. If your camera is already on, turn it off and remove the battery immediately. Allow the camera to dry thoroughly before using it again. Do not dry the camera or battery with an external heat source such as a microwave oven or hair dryer. Damage to the camera or battery caused by contact with liquid is not covered under the warranty.
 WARNING: Do not drop, disassemble, open, crush, bend, deform, puncture, shred, microwave, incinerate or paint the camera or the battery, if it is removable. Do not insert foreign objects into any opening on the camera. Do not use the camera or the battery if it has been damaged—for example, if cracked, punctured or harmed by water. Disassembling or puncturing the battery (whether integrated or removable) can cause an explosion or fire.
Do not store your battery with metal objects, such as coins, keys or necklaces. If the battery terminals come in contact with metal objects, this may cause a fire.
BATTERY DISPOSALMost rechargeable lithium-ion batteries (whether removable or integrated into the camera) are classified as non-hazardous waste and are safe for disposal in the normal municipal waste stream. Many localities have laws in place requiring battery recycling. Check your local laws to make sure that you can dispose of rechargeable batteries in your regular trash. To safely dispose of lithium-ion batteries, protect terminals from exposure to other metal with packing, masking or electrical tape so they do not cause a fire while being transported.Lithium-ion batteries, however, do contain recyclable materials and are accepted for recycling by the Rechargeable Battery Recycling Corporation’s (RBRC) Battery Recycling Program. We encourage you to visit Call2Recycle at call2recycle.org or call 1-800-BATTERY in North America to find a convenient recycling location.Never dispose of a battery in a fire because it may explode.
/ Important Messages
MICROSD CARD MESSAGESIf you cannot capture video, one of the microSD cards may be missing, full, or experiencing an error.NO SD – No card present. The camera requires a microSD, microSDHC or microSDXC card (sold separately) to capture videos.FULL – Card is full. Delete files or swap card.SD ERR – Camera is unable to read card formatting. Reformat the card in the camera.
PRO TIP: Reformat your microSD cards before each shooting session to ensure that the cards remain in good condition.
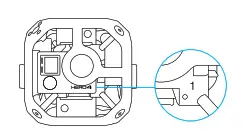
ARRAY ERRORIf Array Error appears on the primary camera, check the secondary cameras for errors and improper connections. To identify the secondary camera that is experiencing theerror, refer to its light on the inner cube.• No light on the inner cube: 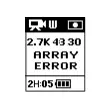 • The camera has no battery installed or the battery needs charging• The camera is not running array camera firmware or is running a different firmware version than the other cameras in the array• Red light on in the inner cube is blinking:• The camera has no microSD card• The camera’s microSD card has an errorBe sure to resolve any issues before attempting to record.
FILE REPAIR ICON![]() If your last video file was corrupted during recording, the camera displays the File Repair icon while it tries to repair the file. When this process is finished, press any button to continue using the camera.
If your last video file was corrupted during recording, the camera displays the File Repair icon while it tries to repair the file. When this process is finished, press any button to continue using the camera.
TEMPERATURE ICON![]() The Temperature icon appears on the camera status screen when the camera becomes too hot and needs to cool down. If this happens with a camera in Omni, let it sit and cool for 20 minutes before attempting to use it again. Your camera was designed to identify conditions of overheating and is designed to respond accordingly.
The Temperature icon appears on the camera status screen when the camera becomes too hot and needs to cool down. If this happens with a camera in Omni, let it sit and cool for 20 minutes before attempting to use it again. Your camera was designed to identify conditions of overheating and is designed to respond accordingly.
/ Troubleshooting
MY GOPRO WON’T POWER ONMake sure the camera’s battery is charged or the array is connected to an external power supply.
CAMERAS IN OMNI WON’T RECORDCheck the cameras for errors:• If the primary camera has a problem, the camera status screen displays a message describing the problem. For more information, see Important Messages.• If one of the secondary cameras has a problem, the primary camera displays Array Error and the camera status light on the primary camera flashes rapidly. For more information, see Array Error.
MY OMNI ISN’T BEHAVING AS EXPECTEDThis issue is often caused by switching from one power source to another when the camera is powered on. To switch from camera batteries to external power (or external power to batteries), you must first power off the camera.
MY GOPRO WON’T RESPOND WHEN I PRESS A BUTTONPress and hold the Power/Mode button [ ![]() ] for 8 seconds to reset your camera. This reset saves all of your content and settings, and powers off your camera.
] for 8 seconds to reset your camera. This reset saves all of your content and settings, and powers off your camera.
I FORGOT MY CAMERA’S USERNAME OR PASSWORDTo reset the username and password to the defaults, go to Setup mode. Press the Power/Mode button [![]() ] repeatedly to cycle to Camera Reset. Press the Power/Mode button [
] repeatedly to cycle to Camera Reset. Press the Power/Mode button [ ![]() ] to cycle to Reset Wi-Fi, and then press the Shutter/Select button [
] to cycle to Reset Wi-Fi, and then press the Shutter/Select button [![]() ] to select it. The camera name is reset, and the password is reset to goprohero.
] to select it. The camera name is reset, and the password is reset to goprohero.
I WANT TO RESET MY GOPRO SETTINGS TO THE DEFAULTSIn Setup mode, select Camera Reset, and then select Reset Defaults. This option does not reset the Date/Time or your camera’s username and wireless password.
I POWERED OFF MY GOPRO, BUT THE BLUE LIGHT IS STILL BLINKINGThe blue light indicates that Wireless is on. To turn off Wireless, press and hold the Settings/Tag button [ ![]() ] for four seconds.For more answers to commonly asked questions, see gopro.com/help.
] for four seconds.For more answers to commonly asked questions, see gopro.com/help.
/ Customer Support
GoPro is dedicated to providing the best possible service. To reach GoProCustomer Support, visit gopro.com/help.
/ Trademarks
GoPro, HERO, the GoPro logo, the GoPro Be a HERO logo, Protune, SuperView, and Wear It. Mount It. Love It. are trademarks or registered trademarks of GoPro, Inc. in the US and internationally. Other names and marks are the property of their respective owners.
/ Regulatory Information
To see the complete list of country certifications, refer to the Important Product + Safety Instructions included with Omni or visit gopro.com/help.

 report this ad
GoPro Omni HER04 Camera User Manual – GoPro Omni HER04 Camera User Manual –
[xyz-ips snippet=”download-snippet”]