
![]() AIR FRYER OVEN
AIR FRYER OVEN

USER MANUALGTF7580
IMPORTANT, RETAIN FOR FUTURE REFERENCE: READ CAREFULLYFOR CUSTOMER SERVICE QUESTIONS OR COMMENTSVISIT WWW.GOURMIA.COM EMAIL [email protected] OR CALL 888.552.0033 MON-THU 9:00 AM TO 6:00 PM ET AND FRI 9:00 AM TO 3:00 PM ET LANGUAGES SUPPORTED: ENGLISH, SPANISHModel: GTF7580 © 2020 Gourmia www.gourmia.com The Steelstone Group Brooklyn, NYAll rights reserved. No portion of this manual may be reproduced by any means whatsoever without written permission from The Steelstone Group, except for the inclusion of quotations in a media review.Although every precaution has been taken in the preparation of this manual, The Steelstone Group assumes no responsibility for errors or omissions. Nor is any liability assumed for damages resulting from the use of the information contained herein. Although every effort has been made to ensure that the information contained in this manual is complete and accurate, The Steelstone Group is not engaged in rendering professional advice or services to the individual consumer; further, The Steelstone Group shall not be held responsible for any loss or damage allegedly arising from any information or suggestion in this manual.
Congratulations on the purchase of your Air Fryer Oven from Gourmia!Here at Gourmia, we’re all about helping cooks make easy, healthy, and delicious meals an everyday possibility. We know how fast-paced life is and that sometimes a home-cooked meal doesn’t make the top of the priority list, no matter how bad you want it. Our dependable, easy-to-use units are here to help you change that. We’re giving you the tools to eat better and healthier without spending hours in the kitchen prepping and cooking.We want you to get the most out of your air fryer oven, which is why our team is available to help with any questions you may have. Whether you have a question with setup or need some guidance on which preset to use, we’re happy to walk you through it. Welcome to the ease of cooking with Gourmia.This manual provides instructions for all of the air fryer oven’s functions and features along with directions for assembling, operating, cleaning, and maintaining the appliance. Please read all safety instructions and directions for safe usage at all times. Keep this manual for future use.Thank you for choosing Gourmia!We love hearing from you! Share your thoughts, recipes, and photos with us.@gourmia
IMPORTANT SAFEGUARDS
When using electric appliances, basic safety precautions should always be followed:
- Read all instructions.
- This appliance is not intended for use by persons (including children younger than 8) with reduced physical, sensory or mental capabilities, or lack of experience and knowledge unless they have supervision
- Check if the voltage indicated on the appliance corresponds to the local main voltage beforeyou connect the appliance.
- Do not use the appliance if the plug, the main cord, or the appliance itself is damaged. Always make sure that the plug is inserted properly into a wall outlet.
- Do not operate any appliance with a damaged cord or plug, after the appliance malfunctions, or has been damaged in any manner. Return appliance to the nearest authorized service facilityfor examination, repair, or adjustment.
- Close supervision is necessary when any appliance is used near children. Children should be supervised to ensure that they do not play with the appliance. Cleaning and user maintenance shall not be done plugs or appliances in water or other liquid. Do not plug in the appliance or operate the control panel with wet hands.
- Do not let the cord hang over the edge of the table or counter or touch hot surfaces.
- To protect against electric shock, do not immerse the cord, plugs, or appliances in water orother liquid. Do not plug in the appliance or operate the control panel with wet hands.
- Never connect this appliance to an external timer switch or separate remote-control systemin order to avoid a hazardous situation. To disconnect, turn off the appliance, then remove the plug from a wall outlet.
- Do not place the appliance on or near combustible materials such as a tablecloth or curtain.The accessible surfaces may become hot during use. Do not place on or near a hot gas orelectric burner, or in a heated oven.
- Do not place the appliance against a wall or against other appliances. Leave at least 4 inches of free space on the back and sides and 4 inches of free space above the appliance. Do not place anything on top of the appliance.
- Do not use the appliance for any other purpose than described in this manual. The use of accessory attachments not recommended by the appliance manufacturer may cause injuries.
- Do not let the appliance operate unattended. Extreme caution must be used when moving anappliance containing hot oil or other hot liquids.
- Do not use outdoors.
- Do not touch the hot surfaces; use a handle. During air frying, hot steam is released throughthe air outlet openings. Keep your hands and face at a safe distance from the steam and from the air outlet openings. Also, be careful of hot steam and air when you remove the pan from the appliance.
- After using the appliance, avoid contact with the hot metal inside. Unplug from outlet whennot in use and before cleaning. Allow cooling before cleaning the appliance.
- Immediately unplug the appliance if you see dark smoke coming out of the appliance. Wait for the smoke emission to stop before you remove the pan from the appliance.
- Do not use appliances other than intended use.
- Use extreme caution when removing the tray or disposing of hot grease.
- Do not clean with metal scouring pads. Pieces can break off the pad and touch electrical parts, creating a risk of electric shock.
- Oversize foods or metal utensils must not be inserted in a toaster oven as they may create a fire or risk of electric shock.
- A fire may occur if the toaster oven is covered or touching flammable material, including curtains, draperies, walls, and the like, when in operation. Do not store any item on top of the appliance when in operation
- Extreme caution should be exercised when using containers constructed of anything other than metal or glass.
- Do not store any materials, other than manufacturers’ recommended accessories, in this oven when not in use.
- Do not place any of the following materials in the oven: paper, cardboard, plastic, and the like.
- Do not cover the crumb tray or any part of the oven with metal foil. This will cause overheating of the oven
- Turn off the appliance by rotating both Timer Dials to theOFF position
- For household use only.
SAVE THESE INSTRUCTIONS
IMPORTANT SAFEGUARDS
CORD SAFETY
- A short power-supply cord is provided to reduce the risk of becoming entangled in or tripping over a longer cord.
- Extension cords may be used if care is exercised in their use.
- If an extension cord is used:a. The marked electrical rating of the extension cord should be at leastequal to the electrical rating of the appliance; andb. The longer cord should be arranged so that it will not drape overthe countertop or tabletop where it can be pulled on by children ortripped over.
 ELECTRICAL POLARIZED PLUG
This unit has a polarized plug (one blade is wider than the other). To reduce the risk of electric shock, the plug is intended to be used by inserting it into the electrical outlet in only one way. If the plug does not fit securely into the outlet, reverse the plug and re-insert. If it still does not fit, contact a qualified electrician for assistance. Do not modify the plugin anyway.
|
Power: |
120V 60HZ 1550W |
KNOW YOUR AIR FRYER OVEN
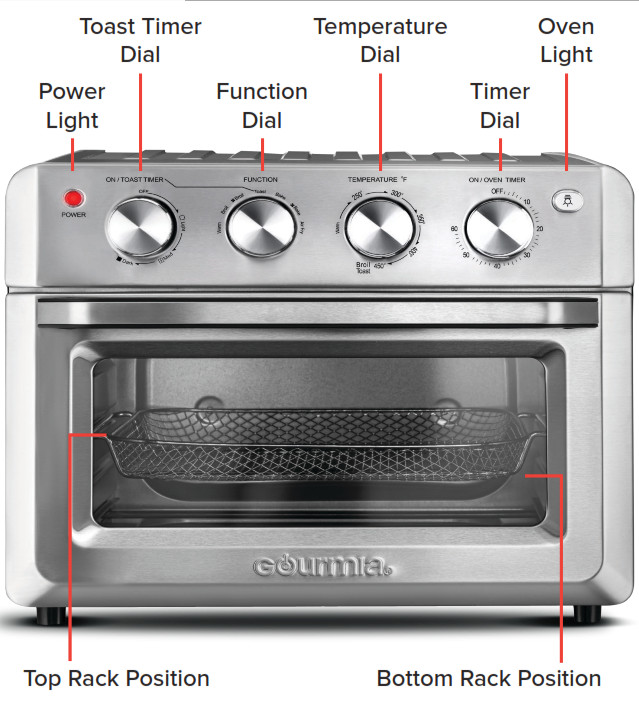
KNOW YOUR AIR FRYER OVEN
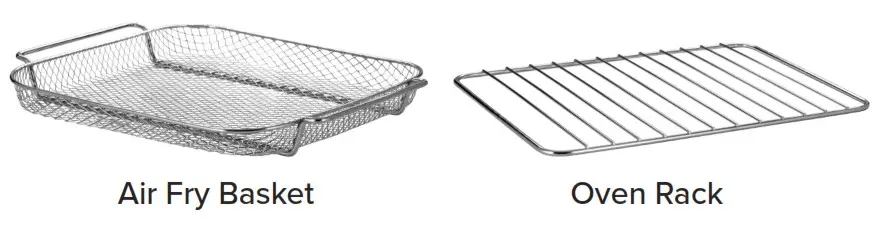
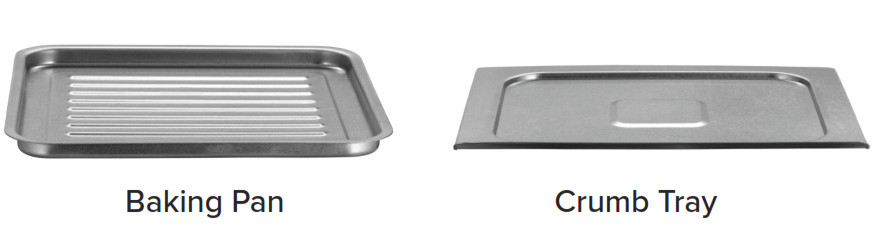
ACCESSORIES
 |
 |
BEFORE USE
BEFORE FIRST USE
- Remove all packaging stickers, and labels from the unit.
- Wash the Fry Basket, Oven Rack, Baking Pan, and Crumb Tray with hot water, some dishwashing liquid, and a non-abrasive sponge. Dry before placing trays into the air fryeroven.
CAUTION:
- Do not place the air fryer oven against a wall or against other appliances. It is important to leave at least 4 inches of free space on the back and sides, and 4 inches of free space above the air fryer oven to allow for proper ventilation.
- Do not put anything on top of the air fryer oven.
BEFORE EACH USE
- Place the air fryer oven on a stable, horizontal, heat-resistant, and leveled surface.
- Ensure the Crumb Tray is at the bottom of the air fryer oven.
USING YOUR AIR FRYER OVEN
AIR FRY
- Place the Air Fry Basket in the top rack position.
- Rotate the Function Dial to Air Fry.
- Rotate the Temperature Dial to the desired temperature.
- Rotate the Timer Dial to the desired cooking time to begin cooking. The Power Light will turn on.
- When the cooking time has elapsed, the timer will ring and the Power Light and air fryer oven will turn off.
- Remove the Air Fry Basket carefully and place it on a heat-resistant surface. WARNING: The Air Fry Basket and food will be hot!
- Always ensure both Timer Dials are set to OFF after each use.
TOAST
- Place the Oven Rack in the top rack position.
- Rotate the Function Dial to Toast.
- Rotate the Temperature Dial to Broil / Toast.
- Rotate the Toast Timer Dial to the desired shade to begin toasting. The Power Light will turn on.
- When the toasting time has elapsed, the timer will ring and the Power Light and air fryer oven will turn off.
- Remove the toast carefully. WARNING: The Oven Rack and food will be hot!
- Always ensure both Timer Dials are set to OFF after each use.
USING YOUR AIR FRYER OVEN
BAKE / CONVECTION BAKE
- Place the Baking Pan onto the Oven Rack and place it in the bottom rack position.
- Rotate the Function Dial to Bake / Convection Bake.
- Rotate the Temperature Dial to the desired temperature.
- Rotate the Timer Dial to the desired cooking time to begin cooking. The Power Light will turn on.
- When the cooking time has elapsed, the timer will ring and the Power Light and air fryer oven will turn off.
- Remove the pan and rack carefully and place it on a heat-resistant surface. WARNING: The pan, rack, and food will be hot!
- Always ensure both Timer Dials are set to OFF after each use.
BROIL / CONVECTION BROIL
- Place the Baking Pan onto the Oven Rack and place in the top rackposition.
- Rotate the Function Dial to Broil / Convection Broil.
- Rotate the Temperature Dial to the desired temperature.
- Rotate the Timer Dial to the desired cooking time to begin cooking. The Power Light will turn on.
- When the cooking time has elapsed, the timer will ring and the Power Light and air fryer oven will turn off.
- Remove the pan and rack carefully and place it on a heat-resistant surface. WARNING: The pan, rack, and food will be hot!
- Always ensure both Timer Dials are set to OFF after each use.
USING YOUR AIR FRYER OVEN
KEEP WARM
- Place the Baking Pan onto the Oven Rack and place it in the bottomrack position.
- Rotate the Function Dial to Warm.
- Rotate the Temperature Dial to Warm.
- Rotate the Timer Dial to the desired warming time to begin warming. The Power Light will turn on.
- When the warming time has elapsed, the timer will ring and the Power Light and air fryer oven will turn off.
- Remove the pan and rack carefully and place it on a heat-resistant surface. WARNING: The pan, rack, and food will be hot!
- Always ensure both Timer Dials are set to OFF after each use.
COOKING TIPS
PREHEATING
- For best results: preheat the air fryer oven for 5 minutes to thedesired temperature.
- When cooking multiple batches, only preheat before the firstbatch.
- Preheating is not required when using Toast and Warm functions. COOKING SETTINGS
- Air fryer ovens perform similar to convection ovens, refer to oven instructions on item packaging or recipe.
AIR FRYING TIPS
- Snacks that can be prepared in an oven can also be prepared in the air fryer oven.
- Smaller ingredients usually require a slightly shorter cook time than larger ingredients.
- Add 1-2 teaspoons of oil to foods for a crispier result.
- Turning or tossing food halfway through cook time will deliver evenly browned and crispy results.

CONVECTION TIPS
- TIPS ON USING THE CONVECTION SETTINGBecause convection cooks foods faster and is hotter, you can reduce the cooking temperature by 25°, and check for doneness three-quarters of the way through the cooking time. Foods that are covered benefit from the convection’s even heat and will cook faster without any moisture loss. The high-temperature air circulation produces roasted foods that are golden brown on the outside and juicy and tender on the inside. Even cooking means that you can use more than one rack and youdo not have to turn foods or rotate baking trays.Below are foods that benefit from the convection setting andwhen to use it:Convection Bake:Pies, pastries, cookies, biscuitsFor Pizza:
- Use the lower rack position and check often so the cheese does not burn.
- Start with no convection and then turn on convection for the last few minutes to brown cheese.Convection Broil:Meat, fish, for melting cheese, for browning the top of casserolesNot recommended for:Custards and flans, souffles, cakes, quick bread, breadAdditional tips:
- Make sure air can circulate around food and pans.
- Use trays, roasting pans, and baking pans with lower sides.
- Do not cover the oven shelves with foil.
FUNCTION CHART
|
FUNCTION |
ACCESSORY |
RACK POSITION |
| AIR FRY
|
 |
TOP |
| TOAST
|
 |
TOP |
| BAKE
|
 |
BOTTOM |
| CONVECTION BAKE
|
|
BOTTOM |
| BROIL
|
|
TOP |
| CONVECTION BROIL
|
|
TOP |
| KEEP WARM
|
|
BOTTOM |


CLEANING & MAINTENANCE
WARNING: Never immerse cord, plugs, or appliance in water or other liquid. Do not plug in the appliance or operate the control panel with wet hands.
- Clean the appliance after every use.
- Always unplug the appliance and let it cool down completely before cleaning.
- Never use abrasive utensils or corrosive products to clean the appliance.
- Apply a cleansing agent to a cloth and wipe down the exterior.
- Apply a mild liquid soap solution to a damp cloth or sponge and wipe down the interior. Remove any residue with a damp cloth.
- Clean accessories in dishwasher, or hand wash with a nylon scouring pad or brush in warm, soapy water.
STORAGE
- Unplug the appliance and let it cool down.
- Make sure all parts are clean and dry.
- Store the appliance in a clean and dry place.ENVIRONMENTDo not throw away the appliance with the normal household waste at the end of its life, but hand it in at an official collection point for recycling. By doing this, you help to preserve the environment.GUARANTEE AND SERVICEIf you need service or information or if you have a problem, please visit our website or contact your distributor.
TROUBLESHOOTING
| Problem | Solution |
| The Air Fryer Oven does not work | Ensure the unit is plugged into a dedicated power outlet. |
| Food is not cooked | Use smaller batches for more even cooking |
| Raise the temperature and continue cooking | |
| Food is not fried evenly | Turn over food halfway through the cooking process |
| Cook similar-sized foods together | |
| White smoke is coming out of the Air Fryer Oven | Clean the Air Fryer Oven and accessories after each use to remove greasy residue |
| French Fries are not cooking evenly | Fry fewer potatoes at a time |
| Blanch potatoes before frying | |
| Use firm, fresh potatoes cut into sticks | |
| Fries are not crispy | Remove excess water from potatoes |
| Cut potatoes into more narrow strips | |
| Mist with a little more oil |
WARRANTY & SERVICE
This Limited Warranty is for one full year from the date of purchase. It is applicable to the original purchaser only and is not transferable to a third-party user. Repair or replacement of defective parts is solely at the seller’s discretion. In the event thatrepair isn’t possible, the seller will replace the product/ part. If product repair/replacement won’t suffice, the seller has the option of refunding the cash value of the product or component returned.Product defects not covered under the Warranty provisions include normal wear and damage incurred from the use or accidentalnegligence, misuse of instruction specifications, or repair by unauthorized parties. The manufacturing company is not liable for any in- incidental or consequential damages incurred by such circumstances. Only valid within the United States.Register your product at www.Gourmia.com/warranty
FOR CUSTOMER SERVICEQUESTIONS OR COMMENTSVISIT WWW.GOURMIA.COMEMAIL [email protected]OR CALL 888.552.0033MON-THU 9:00 AM TO 6:00 PM ETAND FRI 9:00 AM TO 3:00 PM ETLANGUAGES SUPPORTED: ENGLISH, SPANISH
Get cooking with Gourmia
We’d love to hear from you!888.552.0033[email protected]
 report this ad
![]()
References
[xyz-ips snippet=”download-snippet”]