
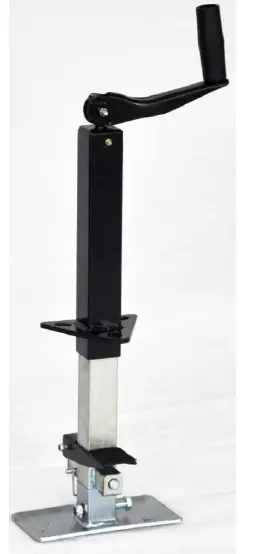
GRAVEL TUFF GTF-20AFTWP Heavy Duty A-Frame Speed Jack
WARNING: Carefully read and understand all ASSEMBLY AND OPERATION INSTRUCTIONS before operating. Failure to follow the safety rules and other basic safety precautions may result in serious personal injury.
Thank you very much for choosing this Product! For future reference, please complete the owner’s record below:Model: _______________ Purchase Date: _______________Save the receipt, the warranty, and these instructions. It is important that you read the entire manual to become familiar with this product before you begin using it.This machine is designed for certain applications only. The distributor cannot be responsible for issues arising from modification. We strongly recommend this machine not be modified and/or used for any application other than that for which it was designed. If you have any questions relative to a particular application, DO NOT use the machine until you have first contacted the distributor to determine if it can, or should be performed on the product.For technical questions, please call 1-218-943-6296.
TECHNICAL SPECIFICATIONS
| Item | Description |
| Capacity | 2000 lbs. |
| Min. Mounting Height | 10-1/4” |
| Crank Lifting Travel | 7-5/8” |
| Fast Adjust Travel | 11-5/8” |
| Working Range | 10-1/4” to 29-1/2” |
| Handle Type | Top Wind |
| Mount Type | Bolt on or Weld on |
GENERAL SAFETY RULES
WARNING:
- Read and understand all instructions. Failure to follow all instructions listed below may result in serious injury.
- CAUTION: Do not allow persons to operate or assemble this speed jack until they have read this manual and have developed a thorough understanding of how the speed jack works.
- The warnings, cautions, and instructions discussed in this instruction manual cannot cover all possible conditions or situations that could occur. It must be understood by the operator that common sense and caution are factors that cannot be built into this product, but must be supplied by the operator.
WORK AREA
- Keep work area clean, free of clutter, and well-lit. Cluttered and dark work areas can cause accidents.
- Keep children and bystanders away while using the jack. Distractions can cause you to lose control, so visitors should remain at a safe distance from the work area.
- Be alert of your surroundings. Using a jack in confined work areas may put you dangerously close to sharp tools and rotating parts.
PERSONAL SAFETY
- Stay alert, watch what you are doing, and use common sense when operating a jack. Do not use while you are tired or under the influence of drugs, alcohol, or medication. A moment of inattention while operating jacks may result in serious personal injury.
- Dress properly. Do not wear loose clothing, dangling objects, or jewelry. Keep your hair, clothing, and gloves away from moving parts. Loose clothes, jewelry, or long hair can be caught in moving parts.
- Use safety apparel and equipment. Use safety goggles or safety glasses with side shields that comply with current national standards or, when needed, a face shield. Use a dust mask if working in dusty work conditions. This applies to all persons in the work area. Also use non-skid, safety shoes, hard hats, gloves, dust collection systems, and hearing protection when appropriate.
- Do not overreach. Keep proper footing and balance at all times. This enables better control of the jack in unexpected situations.
SPEED JACK USE AND CARE
- Do not modify the jack in any way. Unauthorized modification may impair the function and/or safety and could affect the life of the equipment. There are specific applications for which the jack was designed.
- Always check for damaged or worn-out parts before using the jack. Broken parts will affect the operation of the speed jack. Replace or repair damaged or worn parts immediately.
- Do not exceed the jack load capacity.
- Distribute the load evenly. Uneven loads may cause the jack to tip, resulting in personal injury to the operator or others.
- Use the jack on flat and level surfaces capable of supporting the jack and its maximum load. Pulling or pushing a load on a slanted or uneven surface can result in loss of control. Always chock the tires before using the jack.
- Store idle jack. When the jack is not in use, store it in a secure place, out of the reach of children. Inspect it for good working condition prior to storage and before re-use. When not in use, store jack in a dry area.
- Maintain your speed jack. Check for misalignment or binding of moving parts, breakage of parts, and any other conditions. If damaged, have the jack repaired before use.
- The jack is a lifting device only. Do not use the jack for supporting load for long periods of time.
- Lock the jack in vertical position by using the Pin included before applying load.
ADDITIONAL SAFETY WARNINGS
- Prevent trailer wheels from moving using wheel chocks. Also use wheel chocks while moving the jack up or down (if used with wheel).
- Before towing, raise the jack to the highest position and secure it properly in its horizontal position.
- Never put any part of your body under the jack or the trailer while the jack is supporting a load.
- Use in accordance with local D.O.T. regulations.
- Do not use blocks for additional height.
- This jack is NOT designed for use on a round tongue trailer.
- Apply only vertical force to the jack. If force is applied from the side it will compromise the jack. Lower the trailer tongue height as far as possible before rolling the trailer on the jack. Roll slowly on flat, level, hard surfaces only.
- Do not stand or climb on any trailer/vehicle supported by a jack.
- Use extreme caution when using the jack to move a trailer without a vehicle. Loss of control of the trailer due to uneven surfaces can lead to property damage or serious personal injury.
- The jack is not designed to be a transport device. Keep movement of the trailer to a minimum while it’s supported by a jack.
- Always secure the lock pin into position when the jack is in the desired position. NEVER remove the lock pin when the jack is in use.
- DO NOT press or push the release plate when the jack is still positioned under a load. Always return/release the speed jack tube AFTER your jack is fully off the ground.
- Use your foot, not your hand, to press down on the Foot Release Pedal. This will release the Foot Plate and will retract it to the top position. CAUTION: There is a strong force when the jack returns.
ASSEMBLY
The Heavy-Duty A-Frame Mount Speed Jack can be bolted on or welded on.
A- FRAME ASSEMBLY
- Before mounting the Speed Jack, hook the trailer to the tow vehicle to prevent the trailer from moving. Chock the trailer wheels to prevent any movement.
- Remove the Crank Handle (#3) from the jack by removing the Crank Handle Bolt (#4) and the Crank Handle Nut (#5).
- Remove the middle tube assembly from the Outer Tube (#1). Set aside the middle tube assembly.
- Place the Outer Tube (#1) onto the A-frame hitch and align the bolt hole pattern. Secure the Outer Tube to the A-frame using bolts and washers (sold separately). With three 3/8″ x 1″ bolts and nuts (sold separately) secure the jack tightly to the top of the a-frame coupler (Regularly check to ensure that the bolts/nuts are tightened securely).
- Reinstall the middle tube assembly up and into the outer tube assembly. Install the Crank Handle (#3) with one Crank Handle Bolt (4) and one Crank Handle Nut (#5).
- Install the Foot Plate (#13) onto the bottom of the Inner Tube (#11). Use the Foot Plate Bolt (#14) and the Foot Plate Nut (#15) to secure the foot plate in place.
- If you have a plain mount, you can mount it directly to a coupler with a 3/16” fillet weld. Line up the foot with the jack and coupler then, weld the recommended support plate to the bottom of the trailer frame. Use a 3/16” fillet weld. All welding must be performed by an AWS certified welder.
OPERATION
WARNING: Never use a Speed Jack if the mounting hardware is not secure on the tongue of trailer. Regularly inspect hardware for proper mounting assembly.
DISCONNECTING THE TRAILER FROM THE TOWING VEHICLECAUTION: Before disconnecting, chock the trailer wheels to prevent the trailer from rolling. Never leave trailer unattended while in the process of connecting or disconnecting trailer.
- With the trailer on the hitch, pull out the Safety Lock Pin, press down on the Foot Plate until Foot Plate hits the ground and immediately replace the Safety Lock Pin.
- Rotate the Crank Handle until the trailer tongue clears the hitch. Once the trailer is at the desired height, fold the Crank Handle over so that the knob is facing downward. This will help keep the knob out of the way.
- Disconnect any safety chains, electrical connections, and all other connections, if any, between the vehicle and the trailer.
- When the vehicle is completely clear, and it is safe to do so, drive the vehicle away from the trailer.CAUTION: Have a spotter watch this operation to be sure the trailer is clear of the vehicle, and does not roll away.
- Level the trailer by turning the Crank Handle to raise or lower the trailer to the desired height. Flip the Crank Handle up and over when completed to help keep the knob out of the way.
CONNECTING THE TRAILER TO THE TOWING VEHICLECAUTION: If the trailer tongue is too heavy, do not attempt to lift it.
- Before connecting the tow vehicle to trailer, chock the trailer wheels to prevent the trailer from rolling.
- Rotate the Crank Handle to raise the trailer to the level of the towing vehicle’s hitch.
- With the assistance of a spotter, move the vehicle to the trailer, or roll the trailer to the vehicle.
- Connect the trailer onto the towing vehicle’s hitch.
- Once trailer is fully connected to towing vehicle, continue to retract the jack to its uppermost position. Retract the jack fully before towing the trailer. Flip the Crank Handle up and over when completed to help keep the knob out of the way.
- With the trailer coupled to the hitch, pull out the Safety Lock Pin, keep your body and hands away from the area between the Foot Pedal Release and the Foot Plate, carefully press down on the Foot Pedal Release with your foot, the Foot Plate will retract to its uppermost position automatically.
- Immediately replace the Safety Lock Pin.
CAUTION: Do not tow the trailer with the jack in lowered position.
MAINTENANCE
- Maintain your Speed Jack. Before each use, inspect the general condition of the jack. Check for loose hardware, misalignment or binding of moving parts, cracked or broken parts, and any other condition that may affect its safe operation.
- Keep all moving parts lightly lubricated to prevent corrosion.
- After use, wipe external surfaces of the jack with clean cloth.
WARNING: FAILURE TO FOLLOW THESE INSTRUCTIONS COULD RESULT IN LOSS OF LOAD AND/OR PERSONAL INJURY OR DAMAGE TO PROPERTY.
DIAGRAM AND PARTS LIST
| Ref # | Description | Qty | Ref # | Description | Qty |
| 1 | Outer Tube | 1 | 14 | Foot Plate Bolt M10*50 | 1 |
| 2 | Axle Seal | 1 | 15 | Foot Plate Nut M10 | 1 |
| 3 | Crank Handle | 1 | 16 | Foot Pedal Release | 1 |
| 4 | Crank Handle Bolt M6*30 | 1 | 17 | Over Travel Lock Pin Ø 12*43 | 1 |
| 5 | Crank Handle Nut M6 | 1 | 18 | Over Travel Lock Spring | 1 |
| 6 | Ball Bearing Kit | 1 | 19 | Over Travel Lock Cover | 1 |
| 7 | Bearing Washer Ø13 | 1 | 20 | Lock Bolt M6*8 | 4 |
| 8 | Screw M6*12 | 1 | 21 | Travel Lock Cover | 1 |
| 9 | Middle Tube | 1 | 22 | Travel Lock Spring | 1 |
| 10 | Main Spring | 1 | 23 | Travel Lock Pin Ø 12*16 | 1 |
| 11 | Inner Tube | 1 | 24 | Travel Lock Roll Pin Ø 4.5*25 | 1 |
| 12 | Spring roll Pin Ø 6*32 | 1 | 25 | Safety Lock Pin Ø 6*55 | 1 |
| 13 | Foot Plate | 1 |
For replacement parts and technical questions, please call 1-218-943-6296.
WARRANTY
One-year limited parts warranty.
TGPO BOX 203Miltona, MN 56354Made in China
 report this ad
![]()
[xyz-ips snippet=”download-snippet”]