
 greenworks String Trimmer Instruction Manual
greenworks String Trimmer Instruction Manual
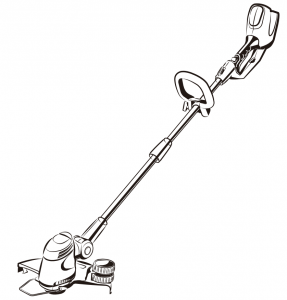
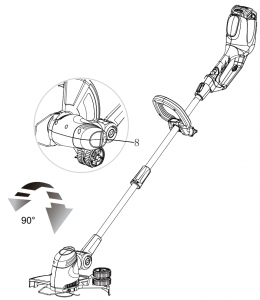
DESCRIPTION
PURPOSE
This machine is used to cut grass, light weeds, and other similar vegetation at or around ground level. The cutting plane must be approximately parallel to the ground surface. You cannot use the machine to cut or chop hedges, shrubs, bushes, flowers and compost.
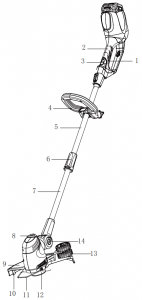
OVERVIEW
- Trigger
- Rear handle
- Lock-out button
- Auxiliary handle
- Upper shaft
- Coupler
- Lower shaft
- Edger button
- Guard
- Cut-off blade
- Edge guide
- Trimmer head
- Edger wheel
- Pivoting button
IMPORTANT SAFETY INSTRUCTIONS
READ ALL INSTRUCTIONS BEFORE USING (THIS POWER TOOL)
|
|
| Read and understand all instructions before using this product. Failure to follow all instructions listed below may result in electric shock, fire, and/or serious personal injury |
- Use only identical manufacturer’s replacement parts and accessories. Use of any other parts may create a hazard or cause product damage.
- Always wear safety glasses with side shields marked to comply with ANSI Z87.1. Everyday glasses have only impact resistant lenses. They are NOT safety glasses.Following this rule will reduce the risk of eye injury. Use face mask if operating in dusty work spaces.
- Avoid Dangerous Environment – Don’t expose power tools to damp or wet conditions. Water entering a power tool will increase the risk of electric shock.
- Don’t use in rain.
- Keep all bystanders, children, and pets at least 50 ft. away.
- Dress Properly – Do not wear loose clothing or jewelry.They can be caught in moving parts. Use of rubber gloves and substantial footwear is recommended when working outdoors. Wear protective hair covering to contain long hair.
- Use right Appliance. Do not use appliance for any job except that for which it is intended.
- Avoid Unintentional Starting – Don’t carry appliance with finger on switch. Be sure switch is off when battery is plugged in.
- Don’t Force Appliance – It will do the job better and with less likelihood of a risk of injury at the rate for which it was designed.
- Don’t overreach – Keep proper footing and balance at all times.
- Stay alert – Watch what you are doing. Use common sense. Do not operate this unit when you are tired, ill or under the influence of alcohol, drugs or medication.
- Always store idle power tools indoors – When not in use, power tools should be stored indoors in a dry and high or locked-up place, out of reach of children.
- Maintain Appliance With Care – Replace string head if cracked, chipped, or damaged in any way. Be sure the string head is properly installed and securely fastened.Keep cutting edge sharp and clean for best performance and to reduce the risk of injury. Follow instructions for lubricating and changing accessories. Inspect appliance cord periodically, and if damaged, have it repaired by an authorized service facility. Inspect extension cords periodically and replace if damaged. Keep handles dry, clean, and free from oil and grease. Failure to do so can cause serious injury.
- Check damaged parts before using the appliance, a guard or other part that is damaged should be carefully checked to determine that it will operate properly and perform its intended function. Check for alignment of moving parts, binding of moving parts, breakage of parts, damaged mountings, and any other condition that may affect its operation. A guard or other part that is damaged should be properly repaired or replaced by an authorized service center unless indicated elsewhere in this manual.
- Remove or disconnect battery before servicing, cleaning or removing material from the gardening appliance.
- Do not modify or attempt to repair the appliance or the battery pack (as applicable) except as indicated in the instructions for use and care. Use appliances only with specifically designated battery packs. Use of any other battery packs may create a risk of injury and fire. Use only Greenworks 29652 battery or other BAF series.
- Recharge only with the charger specified by the manufacturer. A charger that is suitable for one type of battery pack may create a risk of fire when used with another battery pack. Use only Greenworks 29692 charger or other CAF series.
- When battery pack is not in use, keep it away from other metal objects, like paper clips, coins, keys, nails, screws or other small metal objects, that can make a connection from one terminal to another. Shorting the battery terminals together may cause a fire.
- Under abusive conditions, liquid may be ejected from the battery; avoid contact. If contact accidentally occurs, flush with water. If liquid contacts eyes, additionally seek medical help. Liquid ejected from the battery may cause irritation or burns.
- Do not use a battery pack or appliance that is damaged or modified. Damaged or modified batteries may exhibit unpredictable behavior resulting in fire, explosion or risk of injury.
- Do not expose a battery pack or appliance to fire or excessive temperature. Exposure to fire or temperature above 265 °F (130 °C) may cause an explosion.
- Do not dispose of the batteries in a fire. The cells may explode. Check with local codes for possible special disposal instructions.
- Do not open or mutilate the batteries. Released electrolyte is corrosive and may cause damage to the eyes or skin. It may be toxic if swallowed.
- Exercise care in handling batteries in order not to short the battery with conducting materials such as rings, bracelets, and keys. The battery or conductor may overheat and cause burns.
- Follow all charging instructions and do not charge the battery pack or appliance outside of the temperature range specified in the instructions. Charging improperly or at temperatures outside of the specified range may damage the battery and increase the risk of fire.
- Have servicing performed by a qualified repair person using only identical replacement parts. This will ensure that the safety of the product is maintained.
- Keep guards in place and in working order.
- Keep hands and feet away from cutting area.
- Disconnect the battery pack from the appliance before making any adjustments, changing accessories, or storing appliance. Such preventive safety measures reduce the risk of starting the appliance accidentally.
- Use only with the nylon cutting line of 0.065″ (1.65 mm) diameter. Do not use heavier lines than recommended by the manufacturer and line materials of other types – for example, metal wire, rope, and the like.
SAVE THESE INSTRUCTIONS
SYMBOLS ON THE MACHINE
Some of the following symbols can be used on this machine.Please study them and learn their definition. Proper interpretation of these symbols will let you operate the tool better and safer.
| Symbol | Explanation |
|
V |
Voltage |
|
A |
Current |
|
Hz |
Frequency (cycles per second) |
|
W |
Power |
|
min |
Time |
|
/min |
Revolutions, strokes, surface speed, or- bits etc., per minute |
| Direct current | |
 |
Precautions that involve your safety. |
 |
Read and understand all instructions be- fore you operate the machine, and follow all warnings and safety instructions. |
 |
Always wear safety glasses with side shields marked to comply with ANSI Z87.1 when you operate this machine. |
 |
Do not expose the machine to rain or moist conditions. |
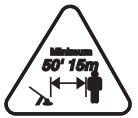 |
Keep all bystanders at least 15m away. |
 |
Do not install or use any type of blade on the machine or displaying this symbol. |
 |
Thrown objects can ricochet and result in personal injury or property damage. |
RISK LEVELS
The following signal words and meanings are intended to explain the levels of risk associated with this product.
| SYM- BOL | SIGNAL | MEANING |
 |
DANGER | Indicates an imminently hazardous situation, which, if not avoided, will result in death or serious injury. |
|
WARNING | Indicates a potentially hazardous situation, which, if not avoided, could result in death or serious injury. |
|
CAUTION | Indicates a potentially hazardous situation, which, if not avoided, may result in minor or moderate injury. |
| CAUTION | (Without Safety Alert Symbol) Indicates a situation that may result in property dam- age. |
SERVICE
Servicing requires extreme care and knowledge and must be performed only by a qualified service technician. For service we suggest you return the machine to your nearest AUTHORIZED SERVICE CENTER for repair. Use only identical manufacturer’s replacement parts and accessories.
ENVIRONMENTALLY SAFE BATTERY DISPO

The toxic and corrosive materials below are in the batteries used in this machine: Lithium-Ion, a toxic material.
|
|
| Discard all toxic materials in a specified manner to prevent contamination of the environment. Before discarding damaged or worn-out Li-ion battery, contact your local waste disposal agency, or the local Environmental Protection Agency for information and specific instructions. Take the batteries to a local recycling and/or disposal center, certified for lithium-ion disposal. |
|
|
| If the battery pack cracks or breaks, with or without leaks, do not recharge it and do not use. Discard it and replace with a new battery pack. DO NOT TRY TO REPAIR IT! To prevent injury and risk of fire, explosion, or electric shock, and to avoid damage to the environment:
|
INSTALLATION
|
|
| Remove the battery pack from the machine before installation. |
|
|
| Do not use accessories that are not recommended for this machine |
UNPACK THE MACHINE
|
|
| Make sure that you correctly assemble the machine before use. |
|
|
|
- Open the package.
- Read the documentation in the box.
- Remove all the unassembled parts from the box.
- Remove the machine from the box.
- Discard the box and package in compliance with local regulations.
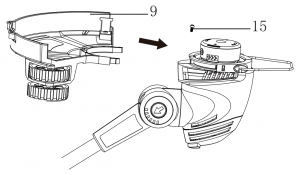
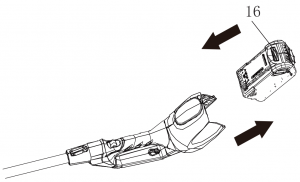
ATTACH THE GUARD
|
|
| Do not touch the cut-off blade. |
- Remove the screw (15) from the trimmer head with a Phillips head screwdriver (not included).
- Put the guard (9) onto the trimmer head.
- Align the screw hole on the guard with the screw hole on the trimmer head.
- Tighten the screw.
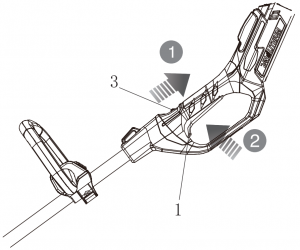
ASSEMBLE THE SHAFT
- Insert the lower shaft into the coupler on the upper shaft.
NOTE
Make sure the upper and lower part of shafts are securely tightened before installing the battery pack again. - Tighten the coupler (6).
INSTALL THE BATTERY PACK
|
|
|
- Align the lift ribs on the battery pack with the grooves in the battery compartment.
- Push the battery pack into the battery compartment until the battery pack locks into place.
- When you hear a click, the battery pack is installed.
REMOVE THE BATTERY PACK
- Push and hold the battery release button (16).
- Remove the battery pack from the machine.
OPERATION
|
IMPORTANT |
| Before you operate the machine, read and understand the safety regulations and the operation instructions. |
|
|
| Be careful when you operate the machine. |
CONTROLS
START THE MACHINE
- Pull back on the lock-out button (3) and pull the trigger (1).
STOP THE MACHINE
- Release the trigger to stop the machine.
ADJUST THE LENGTH OF THE CUTTING LINE
|
NOTE |
| The machine has an auto-feed head. It will damage the machine if you hit the head to try to advance the line. |
|
NOTE |
| If the cutting line does not automatically advance, it can be tangled or empty |
- When the machine is on, release the trigger.
- Wait two seconds, push the trigger again.
- Resume trimming
|
NOTE |
| The line will extend approximately 0.4 in. with each stop and start of the switch trigger until the line reaches the cutoff blade and the cut-off blade cuts the excess length. |
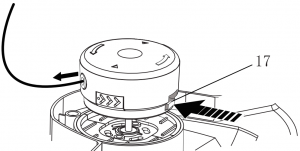
ADJUST THE LENGTH OF THE CUTTING LINE MANUALLY
- Stop the machine.
- Push the spool retainer button (17) and pull on cutting line to manually advance the cutting line.
- After you extend new cutter line, always return the machine to its normal position before you start it again.
OPERATION TIPS
|
|
| Keep clearance between the body and the machine |
|
|
| Do not operate the machine without guard in place. |
Do these tips when you use the machine
- Keep a firm hold with the two hands on the machine while you operate the machine.
- Cut tall grass from the top down.
If grass winds around the trimmer head:
- Remove the battery pack.
- Remove the grass.
CUTTING TIPS
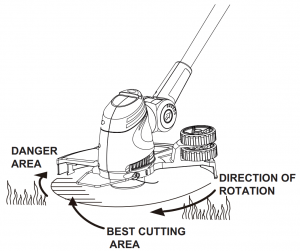
- Tilt the machine toward the area to be cut. Use the tip of the cutting line to cut grass.
- Move the machine from right to left to prevent thrown debris from hitting the operator.
- Do not cut in the danger area.
- Do not force the trimmer head into uncut grass.
- Wire and picket fences cause cutting line wear and breakage. Stone and brick walls, curbs, and wood can wear the cutting line quickly
LINE CUT-OFF BLADE
This trimmer is equipped with a line cut-off blade on the guard. The line cut off blade continuously trims the line to ensure a consistent and efficient cut diameter. Advance line whenever you hear the engine running faster than normal, or when trimming efficiency diminishes. This will maintain best performance and keep line long enough to advance properly.
CHANGE TO THE EDGING MODE
|
NOTE |
| You can change the trimmer to an edger to keep patios, driveways and sidewalks well groomed. |
- Stop the machine.
- Push on the edge button and turn the trimmer head 90 degrees until the trimmer head locks into position.
- Release the edge button (8).
PIVOTING HEAD FUNCTION
|
NOTE |
| Adjust pivoting head to trim areas which are hard to reach and for users to operate comfortably |
- Stop the machine.
- Push on the pivoting button and turn the shaft until the trimmer head locks into required position.
- Release the pivoting button (14).

MAINTENANCE
|
IMPORTANT |
| Read and understand the safety regulations and the maintenance instructions before you clean, repair or do the maintenance work on the machine. |
|
IMPORTANT |
| Make sure that all nuts, bolts and screws are tight. Examine regularly that you install the handles tightly. |
|
IMPORTANT |
| Use only the replacement parts and accessories of the initial manufacturer |
GENERAL INFORMATION
|
IMPORTANT |
| Only your dealer or approved service center can do the maintenance that is not given in this manual. |
Before the maintenance operations:
- Stop the machine.
- Remove the battery pack.
- Cool the motor.
- Store the machine in cool and dry place.
- Use correct clothing, protective gloves and safety glasses.
CLEAN THE MACHINE
- Clean the machine after use with a moist cloth dipped in neutral detergent.
- Do not use aggressive detergents or solvents to clean the plastic parts or handles.
- Keep the trimmer head free of grass, leaves, or excessive grease.
- Keep the air vents clean and free of debris to avoid overheating and damage to the motor or the battery.
- Do not spray water onto the motor and electrical components.
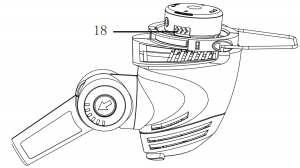
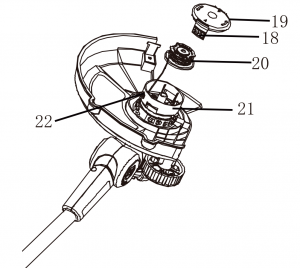
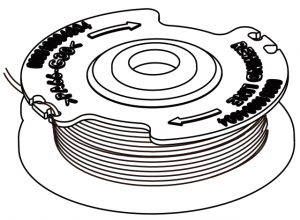
REPLACE THE SPOOL
- Push the tabs (18) on the sides of the trimmer head at the same time.
- Pull and remove the spool cover (19).
- Remove the remaining spool.
- Put the new spool (20) in the spool housing (21).
NOTE
Make sure that you put the cutting line in the slot on the new spool and extend the line approximately 15 cm before you install the new spool. - Put the ends of the cutting lines through the holes (22).
- Extend the cutting line to release it from the guide slot in the spool.
- Push the tabs and install the spool cover onto the spool housing.
- Push the spool cover until it clicks into position.
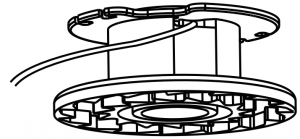
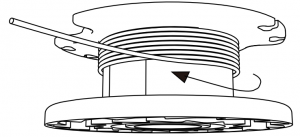
REPLACE THE CUTTING LINE
|
NOTE |
| Remove the remaining cutting line on the spool. |
|
NOTE |
| Use only with the nylon cutting line of 0.065″ (1.65 mm) diameter |
- Cut a piece of cutting line approximately 3m long.
- Bend one end of the line 1/4 of an inch (6.35mm) .
- Insert the line into the anchor hole of the spool.
- Wind the cutting line around the spool tightly in the indicated direction.
- Put the cutting line in the guide slot.
- Do not wind the cutting line beyond the edge of the spool.

TRANSPORTATION AND STORAGE
MOVE THE MACHINE
When you move the machine, you must:
- Wear gloves.
- Stop the machine.
- Remove the battery pack and charge it.
- Assemble the blade guard.
STORE THE MACHINE
- Remove the battery pack from the machine.
- Make sure that children cannot come near the machine.
- Keep the machine away from corrosive agents such as garden chemicals and de-icing salts.
- Secure the machine during transportation to prevent damage or injury. Clean and examine the machine for any damage.
TROUBLESHOOTING
| Problem | Possible Cause | Solution |
| The ma- chine does not start when you push the trigger. | No electrical con- tact between the machine and the battery pack. |
|
| The battery pack is depleted. | Charge the battery pack. | |
| The lock-out but- ton and trigger are not pushed at the same time. |
|
|
| The ma- chine stops when you cut. | The guard is not attached to the ma- chine. | Remove the battery pack and attach the guard to the machine. |
| Heavy cutting line is used. | Use only with the nylon cutting line of 0.065″ (1.65 mm) diameter. | |
| The grass winds around the motor shaft or the trimmer head. |
|
|
| The motor is over- loaded. |
|
|
| The battery pack or machine is too hot. |
|
|
| The battery pack is disconnected from the tool. | Install the battery pack again. | |
| The battery pack is depleted. | Charge the battery pack. | |
| The line does not advance. | Lines are welded to themselves. | Lubricate with silicone spray. |
| Not enough line on spool. | Install more line. | |
| Lines are worn too short. | Advance the cutting line. | |
| Lines are tangled on spool. |
|
|
| The line keeps breaking. | The machine is used incorrectly. |
|
| The grass winds around the trimmer head and motor housing. | Cut tall grass at ground level. |
|
| The line does not cut well. | The cut-off blade becomes dull. | Sharpen the cut-off blade with a file or replace it. |
| Vibration increases obviously. | The line is worn down at one side and not advanced in time. | Make sure that the line on both sides is normal. Advance the line. |
TECHNICAL DATA
| Type | Cordless, battery powered |
| Motor | 40V DC, Brushed |
| No load speed | 8000 RPM |
| Cutting line diameter | 0.065″ (1.65 mm) |
| Cutting path diameter | 13 in. (33 cm) |
| Feed Type | Auto Feed |
| Weight (without battery pack) | 3.07 kg |
| Battery model | 29652 and other BAF series |
| Charger model | 29692 and other CAF series |
The recommended ambient temperature range:
| Item | Temperature |
| String trimmer storage temperature range | -4°F (-20°C) – 158°F (70°C) |
| String trimmer operation temperature range | 6.8°F (-14°C) – 104°F (40°C) |
| Battery charging temperature range | 39°F (4°C) – 104°F (40°C) |
| Charger operation temperature range | 39°F (4°C) – 113°F (45°C) |
| Battery storage temperature range | 1 year: 32°F (0°C) – 73°F (23°C) |
| 3 month: 32°F (0°C) – 113°F (45°C) | |
| 1 month: 32°F (0°C) – 140°F (60°C) | |
| Battery discharging temperature range | 6.8°F (-14°C) – 113°F (45°C) |
LIMITED WARRANTY

Greenworks hereby warranties this product, to the original purchaser with proof of purchase, for a period of three (3) years against defects in materials, parts or workmanship.Greenworks, at its own discretion will repair or replace any and all parts found to be defective, through normal use, free of charge to the customer. This warranty is valid only for units which have been used for personal use that have not been hired or rented for industrial/commercial use, and that have been maintained in accordance with the instructions in the owners’ manual supplied with the product from new.
ITEMS NOT COVERED BY WARRANTY:
- Any part that has become inoperative due to misuse, commercial use, abuse, neglect, accident, improper maintenance, or alteration; or
- The unit, if it has not been operated and/or maintained in accordance with the owner’s manual; or
- Normal wear, except as noted below;
- Routine maintenance items such as lubricants, blade sharpening;
- Normal deterioration of the exterior finish due to use or exposure.
HELPLINE:
Warranty service is available by calling our toll-free helpline, at 1-888-909-6757 .TRANSPORTATION CHARGES:
Transportation charges for the movement of any power equipment unit or attachment are the responsibility of the purchaser. It is the purchaser’s responsibility to pay transportation charges for any part submitted for replacement under this warranty unless such return is requested in writing by Greenworks
CANADIAN ADDRESS:
Greenworks Tools Canada Inc.1110 Stellar Drive Unit 102Newmarket, ON, L3Y 7B7
EXPLODED VIEW
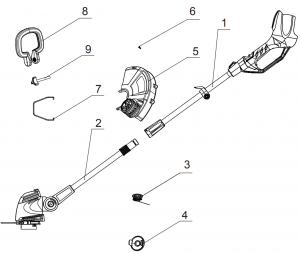
|
No. |
Part No. | Qty |
Description |
| 1 | 31104723 | 1 | Upper shaft / handle assy. |
| 2 | 31103723 | 1 | Lower shaft / motor assy. |
| 3 | 31105710 | 1 | Spool |
| 4 | 3411546A-6 | 1 | Spool cover |
| 5 | 31102723 | 1 | Guard |
| 6 | 3220905 | 1 | Screw |
| 7 | 1210000101 | 1 | Edge guide |
| 8 | 34108884-1 | 1 | Auxiliary handle |
| 9 | 34116884-3 | 1 | Knob |
FAQS
The only difference is that the GT version has a grass blade.
It takes about 60 minutes to fully charge the battery. However, you can use it while it’s charging. You’ll get about 45 minutes of run time on a fully charged battery.
Yes, extra batteries are available for purchase. Here is the link to the compatible G-Max 40v batteries https://www.amazon.com/GreenWorks-29462-G-MAX-Li-Ion-Battery/dp/B00AW72XFQ/ref=sr_1_3?ie=UTF8&qid=1507209379&sr=8-3&keywords=G-Max+40v+batteries. If you have trouble with this process, please feel free to contact us at 1-888-909-6757 for assistance.
The 2.0Ah 40v battery can last around 20-25 minutes depending on the type of weeds you’re using it on.
It came with the string and battery and charger. Ours arrived,we charged the battery,plugged it in thetrimmer and trimmed our whole yard, front and back with power to spare. We don’t mess with cords,gas,or oil anymore and trimming the yard is now a pleasure instead of a curse. The only thing is,it doesn’t have auto feed for the string. The button for it is on the side of the spool instead of the bottom and you have to manually press it to advance the string. It’s a small price to pay for not having to mess around with cords,gas,oil,hard starting, etc
We’re sorry to hear you are having problems with the automatic feed with your unit. So we can assist in addressing this issue, please contact our helpline at 1-888-909-6757.
The simple answer is yes. Mathematically power (the rate of work being done) is volts times current. So the higher the voltage the more work that can be done for the amount of current stored in the battery.
This string trimmer would be approximately 59″ in length.
This string trimmer does not have an adjustable pole.
No, this is a GreenWorks G-Max 40v unit and can only be used with GreenWorks G-Max 40v batteries. We are not affiliated with Sun Joe.
Yes, batteries from the GreenWorks G-Max 40v line will be compatible:2968402ME2934102AZ2909202 / 2909202AZ29472 / 31104975 / 29081022934002AZ2951602ME29462 / 29462AZ2933702AZ29013192938402D2933802AZ2938402ME
Please ensure the battery is properly connected inside the battery compartment on the string trimmer. Here’s a video on how to star the unit:https://www.youtube.com/watch?v=5el khholhk&list=PLlLcNiMNCMn_Qgcl7B3d1ly97pzCRZvjj&index=30If issues persist, please contact us at or by phone to 1-888-909-6757.
No it does not. but you can buy any step-down voltage converter 220VAC to 110VAC with the same or more wattage to resolve the issue.
If it is a 40v Gmax battery you must use in a gmax unit. If you buy a gmax weed trimmer that uses the gmax battery, the chain saw must also be a gmax saw. You can’t use a regular battery in a gmax unit. I bought the gmax lawn mower, weed trimmer and hand held blower. They all are gmax so I have extra batteries and a charger enabling me to have all the battery power i need. I am also very happy with all the gmax units I purchased. It should tell you the batteries needed in the description of unit you are looking to purchase. make sure they all use the same battery and you will have no problem.
Don’t waste your money, you won’t be happy with it. It is awkward, heavy, no balance to get the head level, line does not feed half the time. JUNK not to mention the battery has a full charge but the motor cuts out every 10 seconds. Greenworks support is non existent. buyer beware
This trimmer sucks. Waste of money
Yes, that battery 24252 is a GMax 40V 2Ah battery and will fit this 13-inch 40V cordless string trimmer.
VIDEO
![]()
References
[xyz-ips snippet=”download-snippet”]