
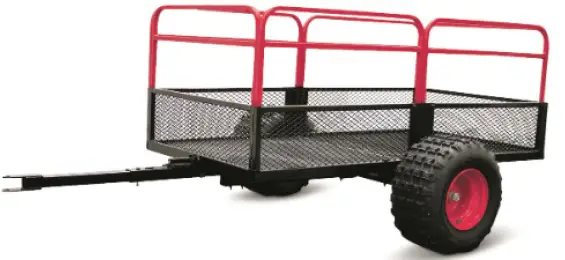
Guide Gear ATV/UTV Utility Trailer 704573
WARNINGS AND CAUTIONS
- Read and understand all warnings, cautions, assembly, installation and use instructions prior to assembling, installing or using this product. Failure to follow all warnings, cautions and instructions may result in serious injury or damage to personal property.
- Confirm all parts are present before assembly. If any part is missing, cracked or damaged, please contact Sportsman’s Guide customer service before assembly.
- WARNING: This package contains small parts and is a choking hazard, keep away from children, persons that have a tendency to place inedible objects in their mouths and pets.
- NEVER allow other persons to assemble, install or use this product until they have read this manual and have developed a thorough understanding of how the product works.
- NEVER attempt to modify this product or subject it to an installation or use for which it was not designed. Doing so may result in damage and/or serious injury.
- NEVER exceed the rated maximum weight capacity of the ATV/UTV on which this trailer is installed. Maximum weight capacity rating applies only to an evenly distributed and properly secured load on a properly installed trailer.
- Trailer weight capacity is 1200 lbs (544 kgs) of evenly distributed weight.
- NEVER attempt to assemble, install, load or unload the rack while you are tired or under the influence of drugs or alcohol.
- ALWAYS be sure latch is engaged before each use. Use caution near trailer tilt latch.
- ALWAYS thoroughly inspect your product for loose parts and/or signs of damage prior to each use, installation or removal. NEVER use until any loose parts have been properly secured or damaged parts have been properly replaced.
- This trailer is designed and intended for ATV/UTV off road use only. NEVER use on public roads.
- NEVER use the trailer for a purpose for which it was not intended.
- NEVER sit or stand on the trailer.
- NEVER use the trailer to transport people, animals or flammable liquids or gases.
- NEVER EXCEED 10 MPH. Reduce vehicle speed when turning or on slopes.
- ALWAYS allow extra stopping distance when towing heavy loads.
- NEVER operate across slopes only up and down slopes, reducing the vehicle’s speed.
- NEVER drive on hilly terrain – excessive weight can cause weight shifts which can lead to loss of control of your ATV/UTV and/or trailer.
- NEVER turn sharply. Use additional caution when turning or operating under adverse conditions.
- Use care when reversing.
- NEVER tow behind a vehicle on a highway or in any high speed application.
- ALWAYS have the correct amount of air pressure in the tires. See wheel rim for details.
- Be aware of dynamic loading! Sudden load movement may briefly create excess load causing product failure.
- The warnings, cautions, and instructions in this manual cannot cover all possible conditions or situations that could occur. Exercise common sense and caution when installing/using this product.
WARNING: NEVER TRANSPORT PEOPLE IN TRAILER AT ANY SPEED FOR ANY REASON! RIDERS CAN BE THROWN OFF THE TRAILER WHEN TURNING, STOPPING AND STARTING AND BE SEVERLY INJURED!
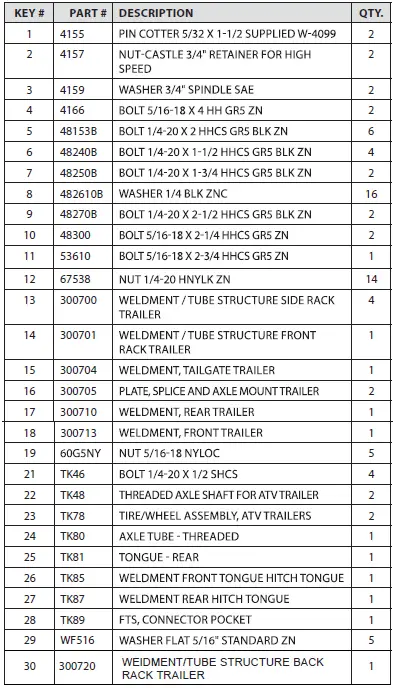
PARTS LIST
ASSEMBLY INSTRUCTIONS
TOOLS NEEDED: two 7/16” wrenches, two 1/2” wrenches, 3/4” socket with ratchet & extension, needle nose pliers and a grease gun with fitting.
IMPORTANT ASSEMBLY TIP: Do not tighten any nut and bolt combinations completely until all parts are assembled together! Finger tighten plus one turn of a wrench only! This will temporarily hold the lock nut on the bolt while helping alignment of all parts! After all parts are assembled together, all nut & bolt combinations must be completely tightened.
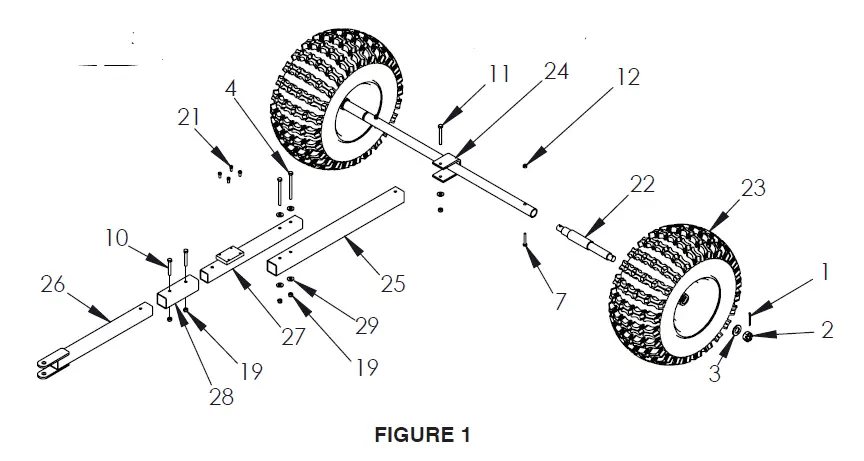
- Insert rear tongue tube (TK81) to the welded-on “U”-bracket located on the axle tube (TK80) using(1) provided 5/16-18 x 2-3/4″ bolt, nyloc nut and 5/16″ washer. SEE FIGURE 1.
- Insert the front hitch tongue (TK85) and the rear hitch tongue (TK87) into the connector pocket(TK89) and secure using (2) provided 5/16-18 x 2-1/4” bolts and nyloc nuts. SEE FIGURE 1 .
- Attach the assembled hitch tongue to the rear tongue tube using (2) provided 5/16-18 x 4” bolts, nyloc nuts and (4) steel washers. Be sure the entire tongue assembly is aligned before tightening. SEE FIGURE 1 .NOTE: Front tongue does not go inside rear tongue. Front tongue bolts on top of rear tongue.
- Slide the axle plate (300705) over the short end of axle spindle (TK48). Thread the short end of axle spindle into the axle tube until tight. Back the axle spindle until holes are aligned and secure using (1) provided 1/4-20 x 1-3/4” bolt and nyloc nut. SEE FIGURE 1 . Repeat this step for the other side.
- Support the trailer far enough off the ground for the assem-bly of the wheels. Slide the wheel onto the threaded axle spindle with grease fitting facing outward. Secure in place following this order: wheel, 3/4” washer, 3/4” crown nut and cotter pin. Back crown nut off just enough so wheel spins freely and crown nut slot aligns with hole in threaded axle spindle. Insert cotter pin. Using a needle nose pliers, bend cotter pin ears around so it will not come off the axle spindle. Repeat this step for remaining wheel. SEE FIGURE 1. IMPORTANT NOTE: You must grease the bearings of each wheel. Using a grease gun, pump high-quality grease into the bearings by attaching to grease fitting located on wheel hub. Check the grease level frequently to prevent bearings from seizing.
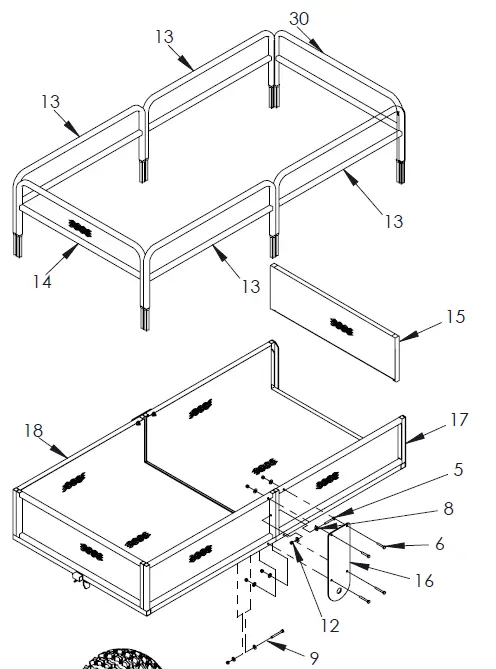
- Attach front trailer frame and the rear trailer frame together using (2) provided 1/4-20 x 2″ bolts, (2) 1/4×20 x2- 1/2″ bolts, (4) nyloc nuts and (8) 1/4″ washers. SEE FIGURE 1.
- Attach the front trailer frame (300713) to the axle plates using (2) provided 1/4-20 x 1-1/2” bolts,(2) 1/4-20 x 2” bolts, (4) nyloc nuts and (4) 1/4” washers. SEE FIGURE 1. Latch the front trailer frame to the latch located on trailer tongue to hold in place.
- Attach the rear trailer frame (300710) to the axle plates using (2) provided 1/4-20 x 1-1/2” bolts, (2) 1/4-20 x 2” bolts, (4) nyloc nuts and (4) 1/4” washers. SEE FIGURE 1. You may now tighten all nut & bolt assemblies. Be sure not to over tighten or crush tubing when tightening.
- Slide the removable tailgate (300704) into the slots of rear trailer frame. Slide the removable side rails(300700 & 300701) into the top side of front and rear trailer frames. SEE FIGURE 1.NOTE: The side rail that goes in the front of trailer frame is narrower than the others.Double check the assembly of your trailer to be sure you assembled it correctly and all nut & bolt assemblies are tight before initial use.
USE/CARE INSTRUCTIONS
- To use the tilt/pivot feature, simply unlatch the latch located on trailer tongue. This will allow you to tilt the trailer frame upward to unload. If pivoting is desired, simply unlatch the latch and turn the trailer frame to the desired location, left or right, and tilt trailer frame upward to unload. This feature works well when in tight areas. Or if backing up your trailer is not an option, simply drive along side desired unloading area, unlatch the trailer frame and turn trailer frame to desired location.
- The wheel bearings are not factory greased. You must grease the bearings before use. Check grease level frequently to prevent bearings from seizing.
- Store is dry location.
- ALWAYS lock up equipment and keep out of reach of children.
 report this ad
![]()
[xyz-ips snippet=”download-snippet”]