
Instruction Manual
![]()
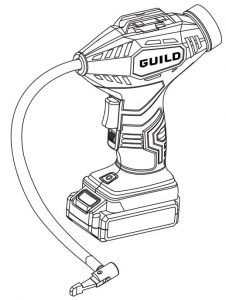
GUILD 12V Cordless Inflator (CAP110D-12)
After Sales Support
UK/Ireland 0345 640 0800
Important – Please read these instructions fully before operating or maintaining your Guild cordless inflator
These instructions contain important information that will help you get the best from your Guild cordless inflator, ensuring it remains safe to operate.
If you need help or have damaged or missing parts, call the Customer Helpline on 0345 640 0800
 Safety Information
Important – Please read these instructions fully before starting assembly
Warning Symbols
The following warning symbols appear throughout this assembly manual and indicate the appropriate safety measures you should take when assembling and operating the cordless inflator.

![]() Safety Information
Safety Information
GENERAL POWER TOOL SAFETY WARNINGS
![]() WARNING: Read all safety warnings and all instructions. Failure to follow the warnings and instructions may result in electric shock, fire and/or serious injury.
WARNING: Read all safety warnings and all instructions. Failure to follow the warnings and instructions may result in electric shock, fire and/or serious injury.
Save all warnings and instructions for future reference.
The term “power tool” in the warnings refers to your mains-operated (corded) power tool or battery operated (cordless) power tool.
![]() GENERAL POWER TOOL SAFETY WARNINGS Work area safety
GENERAL POWER TOOL SAFETY WARNINGS Work area safety
- Keep work area clean and well lit. Cluttered or dark areas invite accidents.
- Do not operate power tools in explosive atmospheres, such as in the presence of flammable liquids, gases or dust. Power tools create sparks which may ignite the dust or fumes.
- Keep children and bystanders away while operating a power tool. Distractions can cause you to lose control.
![]() GENERAL POWER TOOL SAFETY WARNINGS – Electrical safety
GENERAL POWER TOOL SAFETY WARNINGS – Electrical safety
- Power tool plugs must match the outlet. Never modify the plug in any way. Do not use any adaptor plugs with earthed (grounded) power tools. Unmodified plugs and matching outlets will reduce risk of electric shock.
- Avoid body contact with earthed or grounded surfaces, such as pipes, radiators, ranges and refrigerators. There is an increased risk of electric shock if your body is earthed or grounded.
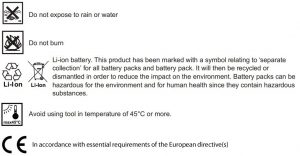
- Do not expose power tools to rain or wet conditions. Water entering a power tool will increase the risk of electric shock.
- Do not abuse the cord. Never use the cord for carrying, pulling or unplugging the power tool. Keep cord away from heat, oil, sharp edges or moving parts. Damaged or entangled cords increase the risk of electric shock.
- When operating a power tool outdoors, use an extension cord suitable for outdoor use. Use of a cord suitable for outdoor use reduces the risk of electric shock.
- If operating a power tool in a damp location is unavoidable, use a residual current device (RCD) protected supply. Use of an RCD reduces the risk of electric shock.
![]() GENERAL POWER TOOL SAFETY WARNINGS – Personal safety
GENERAL POWER TOOL SAFETY WARNINGS – Personal safety
- Stay alert, watch what you are doing and use common sense when operating a power tool. Do not use a power tool while you are tired or under the influence of drugs, alcohol or medication. A moment of inattention while operating power tools may result in serious personal injury.
- Use personal protective equipment. Always wear eye protection. Protective equipment such as dust mask, non-skid safety shoes, hard hat, or hearing protection used for appropriate conditions will reduce personal injuries.
- Prevent unintentional starting. Ensure the switch is in the off-position before connecting to power source and/or battery pack, picking up or carrying the tool. Carrying power tools with your finger on the switch or energising power tools that have the switch on invites accidents.
- Remove any adjusting key or wrench before turning the power tool on. A wrench or a key left attached to a rotating part of the power tool may result in personal injury.
- Do not overreach. Keep proper footing and balance at all times. This enables better control of the power tool in unexpected situations.
- Dress properly. Do not wear loose clothing or jewellery. Keep your hair, clothing and gloves away from moving parts. Loose clothes, jewellery or long hair can be caught in moving parts.
- If devices are provided for the connection of dust extraction and collection facilities, ensure these are connected and properly used. Use of dust collection can reduce dust-related hazards.
![]() GENERAL POWER TOOL SAFETY WARNINGS – Power tool use and care
GENERAL POWER TOOL SAFETY WARNINGS – Power tool use and care
- Do not force the power tool. Use the correct power tool for your application. The correct power tool will do the job better and safer at the rate for which it was designed.
- Do not use the power tool if the switch does not turn it on and off. Any power tool that cannot be controlled with the switch is dangerous and must be repaired.
- Disconnect the plug from the power source and/or the battery pack from the power tool before making any adjustments, changing accessories, or storing power tools. Such preventive safety measures reduce the risk of starting the power tool accidentally.
- Store idle power tools out of the reach of children and do not allow persons unfamiliar with the power tool or these instructions to operate the power tool. Power tools are dangerous in the hands of untrained users.
- Maintain power tools. Check for misalignment or binding of moving parts, breakage of parts and any other condition that may affect the power tools operation. If damaged, have the power tool repaired before use. Many accidents are caused by poorly maintained power tools.
- Keep cutting tools sharp and clean. Properly maintained cutting tools with sharp cutting edges are less likely to bind and are easier to control.
- Use the power tool, accessories and tool bits etc. in accordance with these instructions, taking into account the working conditions and the work to be performed. Use of the power tool for operations different from those intended could result in a hazardous situation.
![]() GENERAL POWER TOOL SAFETY WARNINGS – Battery Tool warnings
GENERAL POWER TOOL SAFETY WARNINGS – Battery Tool warnings
- Recharge only with the charger specified by the manufacturer. A charger that is suitable for one type of battery pack may create a risk of fire when used with another battery pack.
- Use power tools only with specifically designated battery packs. Use of any other battery packs may create a risk of injury and fire.
- When battery pack is not in use, keep it away from other metal objects, like paper clips, coins, keys, nails, screws or other small metal objects, that can make a connection from one terminal to another. Shorting the battery terminals together may cause burns or a fire.
- Under abusive conditions, liquid may be ejected from the battery; avoid contact. If contact accidentally occurs, flush with water. If liquid contacts eyes, additionally seek medical help. Liquid ejected from the battery may cause irritation or burns.
![]() GENERAL POWER TOOL SAFETY WARNINGS – Service
GENERAL POWER TOOL SAFETY WARNINGS – Service
- Have your power tool serviced by a qualified repair person using only identical replacement parts. This will ensure that the safety of the power tool is maintained.
ADDITIONAL SAFETY INSTRUCTIONS
- Know your inflator. Read operator’s manual carefully.
- Learn its applications and limitations, as well as the specific potential hazards related to this tool. Following this rule will reduce the risk of electric shock, fire, or serious injury.
- Risk of bursting. Do not operate inflator to result in output pressure greater than marked maximum pressure of item to be inflated. Do not use at pressure greater than 8Bar (116PSI).
- To reduce the risk of electric shock, do not expose to rain. Store indoors.
- Inspect unit for cracks, pin holes, or other imperfections that could cause inflator to become unsafe.
- Never cut or drill holes in the inflator.
- Make sure the hose is free of obstructions or snags.
- Entangled or snarled hoses can cause loss of balance or footing and may become damaged.
- Use the inflator only for its intended use. Do not alter or modify the unit from the original design or function.
- Always be aware that misuse and improper handling of this inflator can cause injury to yourself and others.
- Do not continue to use an inflator or hose that leaks air or does not function properly.
- Always disconnect the power supply before making adjustments, servicing an inflator, or when an inflator is not in use.
- Do not attempt to pull or carry the inflator by the hoses.
- Always follow all safety rules recommended by the manufacturer of your inflator, in addition to all safety rules for the inflator. Following this rule will reduce the risk of serious personal injury.
- Household use only.
- Do not use inflator as a breathing device.
- Never direct a jet of compressed air toward people or animals. Take care not to blow dust and dirt towards yourself or others. Following this rule will reduce the risk of serious injury.
- Protect your lungs. Wear a face or dust mask if the operation is dusty. Following this rule will reduce the risk of serious personal injury.
- Do not use this inflator to spray chemicals. Your lungs can be damaged by inhaling toxic fumes.
- Check damaged parts. Before further use of the inflator or air tool, a guard or other part that is damaged should be carefully checked to determine that it will operate properly and perform its intended function.
- Check for alignment of moving parts, binding of moving parts, breakage of parts, mounting, and any other conditions that may affect its operation. A guard or other part that is damaged should be properly repaired or replaced by an authorized service centre. Following this rule will reduce the risk of shock, fire, or serious injury.
- If the supply cord of this power tool is damaged, it must be replaced by a specially prepared cord available through the service organization.
- Constantly stay aware of cord location. Following this rule will reduce the risk of electric shock or fire.
- Risk of bursting. Carefully monitor objects during inflation.
- The pressure gauge on the inflator is for reference only and may not reflect exact values. (range /accuracy is 0.2-8bar (3.0-116PSI) +/- 0.05bar (1.OPSI). To reduce the risk of over inflation, use a second pressure gauge during inflation (from time to time).
- Never leave the inflator unattended during inflation.
- Allow Tool to cool for five (5) minutes after each five (5) minutes of continuous use. Never block the inflating or deflating outlets while operating.
- Save these instructions. Refer to them frequently and use them to instruct others who may use this inflator.
- If you loan someone this inflator, loan them these instructions also.
- Do not open the unit. There are no user serviceable parts
ADDITIONAL SAFETY INSTRUCTIONS FOR BATTERIES AND CHARGERS
Battery
- Never attempt to open for any reason.
- Do not store in locations where the temperature may exceed 45°C.
- Charge only at ambient temperatures between 4 °C and 40°C.
- Charge only using the charger provided with the tool.
- When disposing of batteries, follow the instructions given in the section “Environment”.
- Do not cause short circuits. If connection is made between the positive (+) and negative (-) terminal directly or via accidental contact with metallic objects, the battery is short circuited and an intense current will flow causing heat generation which may lead to casing rupture or fire.
- Do not heat. If batteries are heated to above 60°C, sealing and insulating separators and other polymer components may be damaged resulting in electrolyte leakage and/or internal short circuiting leading to heat generation causing rupture or file. Moreover do not dispose of the batteries in fire, explosion and/or intense burning may result.
- Under extreme conditions, battery leakage may occur. When you notice liquid on the battery, proceed as follows: Carefully wipe the liquid off using a cloth. Avoid skin contact. In case of skin or eye contact, follow the instructions below: o Immediately rinse with water. Neutralize with a mild acid such as lemon juice or vinegar. o In case of eye contact, rinse abundantly with clean water for at least 10 minutes. Consult a physician.
 Fire hazard! Avoid short-circuiting the contacts of a detached battery. Do not incinerate the battery.
Battery Charger Warnings
This appliance can be used by children aged from 8 years and above and persons with reduced physical, sensory or mental capabilities or lack of experience and knowledge if they have been given supervision or instruction concerning use of the appliance in a safe way and understand the hazards involved. Children shall not play with the appliance. Cleaning and user maintenance shall not be made by children without supervision.
In The Box
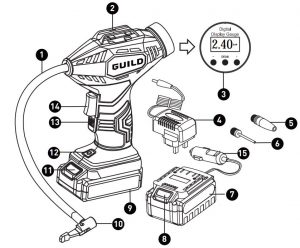
- Pneumatic Hose
- Hose Storage Area
- Digital Pressure Gauge
- Charger
- Airbed Nozzle
- Ball Needle
- 12V Car Power Supply
- Car Power Supply Release Button
- Battery Pack
- Air Chuck
- Battery Pack Release Button
- LED Light
- Lock Button
- On/Off Switch
- 12V Car Power Supply Plug
Accessories
- Battery Pack (1.3 Ah Li-ion): 1 PC
- Charger (3-5 hours): 1 PC
- 12V Car Power Supply: 1 PC
- Airbed nozzle: 1 PC
- Ball needle: 1 PC
Operating Instructions
The appliance is intended for inflating car and bicycle tyres and inflatable items for games, sport and leisure, but not for pumping up inflatable items with a larger volume, such as inflatable boats and very large air beds.
The appliance is not intended for professional use.
Note: Charge at room temperature. The ambient temperature must be between 0°C and 45°C.
Note: Do not charge if the charger’s cord or plug is damaged. Charging with a damaged cord may result in fire or electrical shock. If the charge is damaged in any way, have it repaired by a qualified service man.
Note: Do not short circuit the terminal of the battery. Take care that metal such as paper clips, nail, the sides of metal tools boxes, etc, which cause a short circuit in your battery. Extremely high temperatures and fire can result.
Note: Improperly attached hoses or accessories can become detached under pressure and causeserious injury.Possible air leaks can cause faulty pressure readings. Make sure all connections aretightly secured.
Charge the battery with the charger (4)
 Connect the charger (4) to the household power socket. Connect the outlet socket of the charger to the battery charging port (A) . The battery will start to charge. The battery indicator lights( 3 blue LEDs) at the rear of the battery pack will twinkle while the battery is being charged. They will gradually (from left to right) be lighted.
The three blue LED lights will be lit stably, when the battery is fully charged.

Install and remove battery pack (9)
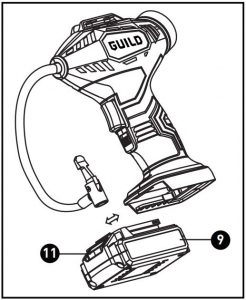 To install: Align the ribs on the battery pack with the grooves in the battery ports. Slide the battery pack (9) in the tools base until in locks (click) in place. Make sure the latch on the battery pack snaps into place and that the battery pack is secured in the tool before operating.
To remove: Pushing the battery pack release button (9) at the front of the battery pack to release the battery pack and remove it from the tool.
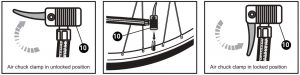
Lock and unlock air chuck (10)Before inflating, make air chuck clamp in unlocked position. Then put on the tire valve and lock the air chuck.
Digital Display Gauge (3)
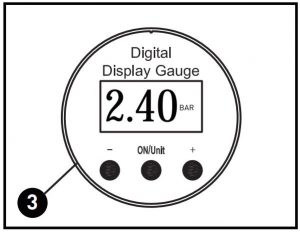 Press the “On/unit” button on the digital display gauge at the rear of the machine to read the current tire pressure Press the “On/unit” button again to select tire pressure measurement unit. (PSI, KPA, BAR & KG/CM.)
Press the “+” or “-” button to adjust the pre-set tire pressure to the required tire pressure.
The pressure gauge on the inflator is for reference only and may not reflect exact values.( range /accuracy is 0.2-8bar (3.0-116.PSI) +/- 0.05bar (1.0PSI). To reduce the risk of over inflation, use a second pressure gauge during inflation (from time to time).
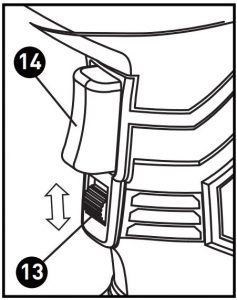
Start inflatingPress the On/Off switch (14) to start inflating. (If the lock button (13) is in upper position, slide it down.)When the pressure reaches the pre-set pressure value, the tool will stop inflating
 Note: To reset the tire pressure measurement unit, press the “On/Unit” button to reselect after setting pre-set pressure value.Note: The digital pressure gauge records the last pre-set measurement unit and value.Note: After the inflator has reached the pre-set pressure valve, the digital gauge will go out after 30 seconds, and the tool will turn off automatically.
Lock button (13): The On/Off switch (14) can be locked in the On position. To do so, slide the lock on upwards, while pressing the On/Off switch, then release the On/Off switch while keeping the lock on button in it’s upper (lock) position. The device can be inflating by continuous mode. This is convenient when inflator has to inflate for an extended period of time.
To stop continuous mode, push the On/Off switch once. The lock button (13) will turn back to its unlock (lower) position.
Install and remove 12V car power supply (7)Unravel cord before use.To install: Make sure the latch on the 12V car power supply (7) snaps into place and that it is secured in the tool before operating, which is same as battery pack installation.Connect the 12V car power supply plug (15) into your car cigarette lighter
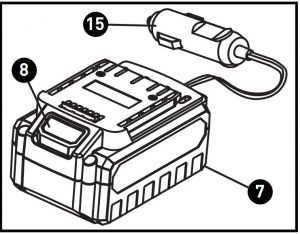
When ready to use, always power your car on to avoid the car battery running low.To remove: Push the release button to release (8) the car power supply and remove it from the tools.Note: Always run a vehicle outdoors.
Install and remove accessories
- Position the air chuck (10) in the unlock position
- Position the rear end of the accessory (airbed nozzle and ball needle) into the opening
- Clamp the end of the air chuck down onto the threaded part of the accessory by pressing the air chuck (10) down until it stops.

Note: The airbed nozzle (5) can be used on smaller pinch valves to inflate small items like children’s toys, which usually require the user to inflate them by blowing air into them. The ball needle (6) can be used to inflate any type of sports ball or any other items that requires an inflation sport all needle. Wet needle with water to aid insertion will be better.Note: When inflating items of 10PSI or less, inflate in short bursts and check after each burst by feel or with a calibrated measuring device to determine accurate pressure.Note: Pressure required for most sports balls is too low for an accurate reading on gauge.
Maintenance
![]() Attention! Before performing any work on the equipment, remove the power plug from the mains.
Attention! Before performing any work on the equipment, remove the power plug from the mains.
Cleaning
- Keep the ventilation slots of the machine free from dust and dirt to prevent overheating of the engine.
- Regularly clean the machine housing with a soft cloth, preferably after each use.
- If the dirt does not come off use a soft cloth moistened with soapy water.
![]() Never use solvents such as petrol, alcohol, ammonia water, etc. These solvents may damage the plastic parts.
Never use solvents such as petrol, alcohol, ammonia water, etc. These solvents may damage the plastic parts.
Trouble Shooting
- If the tool can not work, make sure the battery pack has power. If battery has run out of power, please give enough time for battery pack to recharge properly. If the tool can not work with full charged battery, clean battery contacts on tool, reinsert the battery pack according to its shape (it should only fit one way), and press firmly until the battery pack locks in place.
- If the tool can not work, check the car power supply plug if it’s connect well with car cigarette lighter.
- If a fault can not be rectified return the tool to an authorized dealer for repair.
Technical Data
Technical Data Table

NOISE

VIBRATION

The declared vibration total value may be used for comparing one tool with another, and mayalso be used in a preliminary assessment of exposure.
![]() WARNING: The vibration emission value during actual use of the power tool can differ from the declared value depending on the ways in which the tool is used dependent on the following examples and other variations on how the tool is used:
WARNING: The vibration emission value during actual use of the power tool can differ from the declared value depending on the ways in which the tool is used dependent on the following examples and other variations on how the tool is used:
- How the tool is used and the materials being inflating.
- The tool being in good condition and well maintained
- The use the correct accessory for the tool and ensuring it is sharp and in good condition.
- The tightness of the grip on the handles and if any anti vibration accessories are used.
- And the tool is being used as intended by its design and these instructions.
This tool may cause hand-arm vibration syndrome if its use is not adequately managed.
![]() WARNING: To be accurate, an estimation of exposure level in the actual conditionsof use should also take account of all parts of the operating cycle such as thetimes when the tool is switched off and when it is running idle but not actually doing the job.This may significantly reduce the exposure level over the total working period.Helping to minimize your vibration exposure risk.Maintain this tool in accordance with these instructions and keep well lubricated (where appropriate).If the tool is to be used regularly then invest in anti vibration accessories.Avoid using tools in temperatures of 45℃ or more.Plan your work schedule to spread any high vibration tool use across a number of days.
WARNING: To be accurate, an estimation of exposure level in the actual conditionsof use should also take account of all parts of the operating cycle such as thetimes when the tool is switched off and when it is running idle but not actually doing the job.This may significantly reduce the exposure level over the total working period.Helping to minimize your vibration exposure risk.Maintain this tool in accordance with these instructions and keep well lubricated (where appropriate).If the tool is to be used regularly then invest in anti vibration accessories.Avoid using tools in temperatures of 45℃ or more.Plan your work schedule to spread any high vibration tool use across a number of days.
STORAGE
- Thoroughly clean the whole machine and its accessories.
- Store it out of the reach of children, in a stable and secure position, in a cool and dry place, avoid too high and too low temperatures.
- Protect it from exposure to direct sunlight. Keep it in the dark, if possible.
- Don’t keep it in plastic bags to avoid humidity build-up.
Environment
 Should your appliance need replacement after extended use, do not dispose of it with the household refuse, but in an environmentally safe way.
Electrical or electronic waste should not be passed into the normal household waste stream. Please recycle where recycle facilities exist. Check with your Local Authority or retailer for recycling advice.
Guarantee
This product is selected for DOMESTIC USE ONLY and not for business use.This product is guaranteed against manufacturing defects for a period of 24 months. This does not cover the product where the fault is due to misuse, abuse, use in contravention of the instructions, or where the product has been the subject of unauthorized modi cations or alterations, or has been the subject of commercial use. In the event of a problem with the product within the guarantee period please return it to your nearest store. If the item is shown to have an inherent defect present at the time of sale, the store will provide you with a replacement. Your statutory rights remain unaffected.
[xyz-ips snippet=”download-snippet”]