H A UMP-5 Professional User Manual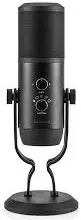
Thank you for selecting the H&A sonic solution.
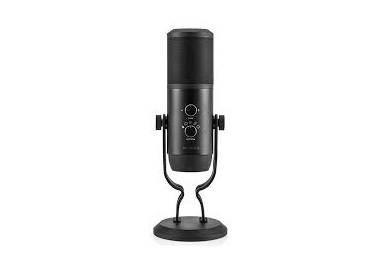
The Hf:tA UMP-5 Professional U513 Multi-Pattern Microphone is an inventive quint-capsule USB microphone capable of five distinct polar patterns, offering recording possibilities that usually require multiple specialty microphones. Stereo, cardioid, super-cardioid, omnidirectional, and bidirectional (figure 8), you got them all in one sweet mic. Capture vocals and instruments, groups for podcasts, solo voiceovers, and full professional broadcast productions with exceptional ease, as you monitor the session live through the built-in headphone port. Name the occasion, and the UMP-5 has the power to capture audio with sparkling accuracy and clarity flawlessly. The versatile multi-polar pattern mic connects directly through phantom power for lightning-fast broadcast quality recording. Add Plug-and-Play to a Mac or Windows USB port, plus an internal A/D converter, 16-bit capture rate, and up to 48kHz resolution for a natural sound delivery to the host computer.
Features
- Five distinct Polar Patterns to select sonic experience: Stereo, Cardioid, Super-Cardioid, Omnidirectional, and Bidirectional (figure 8)
- Vary mic gain directly with analog controls onboard
- Broadcast quality Super-Cardioid element rejects off-axis audio
- Generous 14mm Diaphragm Quint-Capsule provides unheard of dexterity
- Exceptionally clean and natural pick up of both Music and Speech
- 3.5mm Headphone monitor port with volume control
- The mute switch setting instantly controls unwanted wave input
- Optimized for human voice applications from capturing podcasts to smooth, warm vocals
- Shielded, all-aluminum construction for a lifetime of recording pleasure
- Removable desk stand perfectly balanced for prime time.
Assembling the HAUMP5
No assembly is necessary!
The microphone is ready for action right out of the box. Plug into your computer and Play, after your one-time computer setup described below. In case you want to mount the mic on a stand or a boom, read the section, “Mounting on a Microphone Stand.”
Computer Set Up
Windows
Use the included USB-C cable to plug the HAUMP-5 into your computer using any USB A port. Once the connection is made, the power indicator beneath the grill will glow. The computer will automatically detect the HAUMP-5 and load drivers from the internet, if necessary. Each version of Windows has differing procedures for designating the mic as the default audio capture device and configuration details.
Windows 10
Go to the Settings and open the System menu (usually located in the top left corner of the list. Click on Sound in the menu list on the left of the panel. Click on the Input “Choose your input device” dropdown menu and select the “Microphone (HAUMP-5)” in the list.
After the selection, click on the Device Properties line above “Test your microphone” to enter more options for quality and defaults.
Once in the Device Properties window, slide the Volume level bar to set the microphone level to 100% as a starting point. Once this is set, you can adjust the gain level with the gain control knob on the front of the microphone.
Use the Start Test button to conduct a trial. Monitor the microphone for distortion or too loud of a level. You can return to the Device Properties window to decrease the starting point volume.
“Additional Device Properties” offer even more options for Microphone settings, especially the Advanced tab that designates sample rate and bit depth to your personal taste or project recording parameters. Windows 10 offers a plethora of information and fine-tuning to the audio experience using the HAUMP-5.
Return to the Settings window or close to save the changes and exit.
Windows 8, 7, Vista, and Windows XP
A similar procedure for designating the mic as the default audio capture device and configuration details apply to Windows 10, 8, 7, Vista, and Windows XP. The later the operating system, the more robust the options. Basically, it is the same as the Windows 10 instructions, except for the Control Panel as the starting point and find the appropriate selection; the Hardware and Sound icon (Win 8, 7, Vista), Sounds and Audio Devices icon (Win XP). While in the Sound Preferences window, select the HAUMP-5 microphone under the Playback and Recording tabs. After you have selected the HAUMP-5 under the Recording tab, click on the Properties button.
In the Win 8, 7, Vista, Microphone Properties window, select the Levels tab and set your microphone volume to 100%. Once this is set, you can adjust the gain level with the gain control knob on the front of the microphone. Click on the Advanced tab. Select a sample rate and a bit rate for your recording. Click OK to set your selections and exit the Control Panel. For Win XP, click on the Audio tab. Select the HAUMP-5 microphone as the default device in both the Sound playback and Sound recording dropdown menus. Click OK to save the changes and exit.
Mac OS Setup
Plug the HAUMP-5 into your computer, using the supplied USB-C to USB-A cable. Once the connection is established, the power indicator beneath the grill of the microphone will glow.
Open the System Preferences window and double-click on the Sound icon. Within the Sound preferences window, select the HAUMP-5 microphone under the input and output tabs.
Use the sliding volume level offered in the Input screen to set the input and output volumes to 100%. The level adjusts the gain level through the mic gain control knob on the microphone.
Close the Sound Preferences and exit system preferences. Test the results of the settings within your recording software. Designate the sample rate and bit depth for your default recordings.
Mounting on a Microphone Stand
Remove the microphone from the desktop stand, unscrewing the two tightening knobs on either side of the mic body where the adjustable desktop stand is attached. The mic screws directly onto a microphone stand or a boom fish-pole with a standard 5/8″ threaded post.
Audio Capture with the HEM HAUMP-5
The HEtA HAUMP-5 in use.
The spiffy microphone is packed with handy and helpful features to produce dream audio files or go live ‘on-the-air”. Use the Gain Control Knob to adjust the HAUMP-S’s input gain. More significant gain is necessary when recording quiet subjects, limiting unwanted stray sound waves, and room tone. Lower gain is desirable for louder sources and attempting to pick up delicate remote sounds. Your requirements will depend upon your particular situation. Test monitor headphones plugged directly into the HAUMP-5’s 3.5mm headphone jack on the bottom of the microphone. Use the volume control on the front side of the microphone to adjust the headphone output volume. There is no latency using the direct connection as may be experienced on a computer headphone monitor. Press the mute button to silence the transmitting signal.
Pinpoint your Polar Pattern
The polar-pattern selector on the back of the microphone allows you to select one of five patterns: Cardioid, Supercardioid, Bidirectional, Omnidirectional, and Stereo. Its all about rejection control.
- Omnidirectional

- Cardioid
- Supercardioid
- Bidirectional Figure Eight
- Stereo XY
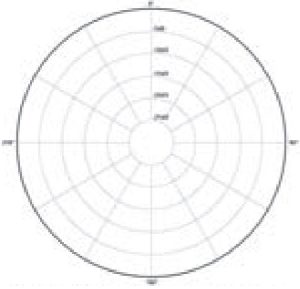


Omnidirectional
The Omnidirectional polar pattern is sensitive to sound from all directions, or from a 360° radius from the mic position. It is unnecessary to point the microphone in any specific orientation, as Omnis captures sound from everywhere equally. This setting is terrific for picking up ambient sounds, such as large room acoustics, or voluminous sound sources such as an orchestra or choir. However, Omnis can also produce a lot of feedback if used in a live situation, as background noise weighs heavily in the pattern. The captured sound can be termed open, airy, and natural. Therefore, the omnidirectional polar pattern is best when recording a large meeting or conversation, band rehearsal, or multiple people sitting around a conference table.
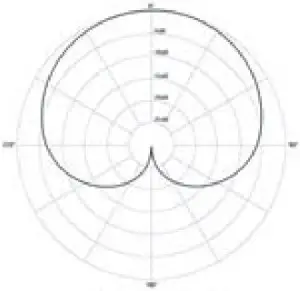
Cardioid
The Cardioid pattern is a heart-shaped microphone polar pattern that is focused unidirectional. This setting ideal for a live situation in which unwanted sound may come from behind the microphone, such as the monitors that may cause feedback. That pattern picks up sound from the front and the sides but is acoustically silent from the rear. Cardioid microphones produce intimate, untainted, and detailed direct sound transmission up close. The cardioid pattern increases the proximity effect, when the bass range rises according to the closeness to the source. This pattern is also excellent for studios, quiet often with guitar instrumentals, vocals, and drums.
SuperCardioid
The Supercardioid pattern is an advanced selection in the focused unidirectional family. Supercardioid microphones cover a slightly narrower angle than standard cardioid white featuring even less sensitivity in the rear. It provides better ambient noise rejection than Cardioid, resisting feedback, and maintaining high directionality from the front. This pattern is also famous for Lectures and conferences, as well as close-miked’ instrumentals such as violins, violas, cellos, and mandolins, as an alternative to pickups.
Bidirectional Figure of Eight
Figure Eight , also known as Bi-directional microphone polar pattern, capture sound waves from the front and back at 0° and 180°. The sides are deadened, and microphone with this pattern are suitable for instrumentalists or vocalists facing each other that would ordinarily require two microphone with this pattern are suitable. The 180° rear angle of the figure Eight selection capture open and natural sounds like Omnidirectional microphone, while technically they roughly pick up the same ambient sound as the Cardiod pattern.
Stereo
Stereo recording is a technique involving the use of two microphone capsules to simultaneously record one sound source. The mono signal patterns from each capsule are assigned to the left and right channels of a stereo track to create sense of width in the recording, and equal signals are transmitted on both channels.
The stereo image is created because of overlapping and the time of arrival for each signal is slightly different. The twin capsules in the microphone are deployed in any XY pattern for a wide stereo spread and a realistic sonic image. This stereo mode is perfect when you”re recording a musical ensemble, dialog, or general ambiance by directing the mic at the sound source for a clean balance or off axis for a skewed recording.
Specification
Microphone
- Transducer: Quint condenser Capsule (×5)
- Diaphragm Capsule: 14mm (×5)
- Polar patterns: Stereo cardiod, super-cardiod Omnidirectional and Bidirectional Figure 8.
- Frequency Response: 20 to 20,000 Hz.
- Sensitivity: -37db ±3db (0db=1VPa at 1kHz)
- Max SPL: 126db (1%THD at 1kz)
- Bit/Simple Rate: 16bit/48kHz
- Controls: Polar pattern, Gain control, Mute Button, Headphone volume control
- Microphone connector: USB C to USB A
- Data Transfer: USB 2.0
- Operating Current : 5V/55mA (USB)
- Output: 130mW
- Current: 150mA
- System Compatibility: MacOS × (10.1.11 or highly); Windows 10,8,7,vista,XP/USB 1.1/2.0
- Stand Socket: 5/8 inch
- Material: Anodized black aluminum
- Dimension: 11.23 ×Ø3.8 in /286 × Ø96 mm.
- Net weight: 32 oz / 910 gramsHeadphone
- Amplifier Impedance: 16ohms
- Power Output: 130mW
- Frequency Response: 15-22,000 kHz
- Signal to noise Ratio: 100db
- THD: 0.009%
The excellent performance and rare five polar pattern characteristics of the Hb-A HAUMP5 make it the ultimate choice for podcasts, broadcast, studio, vocals, narration, instrumentals, and even fish pole use. Whether you are a professional sound shaper or a budding talent seeking recognition, this mic will strut-your-stuff for the appreciative audience, time and time again. Encore!
One Year H and A Limited Warranty
H and A warrants to the original purchaser that your H and A product shall be free from defects in material and workmanship for the period of one (1) year from the date of purchase (or delivery as may be required in certain jurisdictions), or thirty (30) days after replacement, whichever comes later. H&A’s entire liability and your exclusive remedy for any breach of warranty shall be, at H&A’s option, to repair or replace the hardware, provided that the hardware is returned to the point of purchase or such other place as H&A may direct with a copy of the sales receipt or dated itemized receipt. H&A may, at its option, replace your product, offer to provide a functionally equivalent product or repair any product with new, refurbished or used parts as long as such parts are in compliance with the product’s technical specifications. Any replacement hardware product will be warranted for the remainder of the original warranty period or thirty (30) days, whichever is longer, or for any additional period of time that may be applicable in your jurisdiction. If the product has been discontinued, the warranty provider reserves the right to replace it with a model of equivalent quality and function.
This warranty does not cover problems or damage resulting from accident, abuse, misapplication, or any unauthorized repair, modification or disassembly, improper operation or maintenance, normal wear and tear, or usage not in accordance with product instructions or connection to improper voltage supply, use of consumables, such as replacement batteries, not supplied by H&A, except where such restriction is prohibited by applicable law. Except where prohibited by applicable law, this warranty is nontransferable and is limited to the original purchaser and the country in which the product was purchased. This warranty gives you specific legal rights, and you may also have other rights, including a longer warranty duration that may vary under local laws. To start a warranty claim contact the H&A Customer Service Department to obtain a return merchandise authorization (“RMA”) number, and return the defective product to H&A, along with the RMA number and proof of purchase.
Question About Our Product Line? Need Product Support?
We are proud of our products and celebrate our customers.We are with you, from product selection to everyday use.Be secure with your purchase and reach us as you need.
Contact: 212-647-9300
Email: [email protected]
Address: Adorama Brands, 42 West 18th Street, New York, NY 10011
 report this ad
You can always contact us at for personal technical support. Our website contains a wide range of Support and FAQ pages with valuable technical assistance.
[xyz-ips snippet=”download-snippet”]