
HDHP80E1HEAT PUMP DRYER
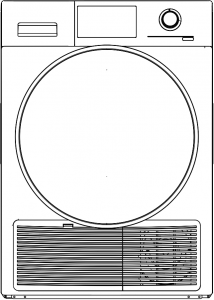
USER MANUAL
DISPOSAL

Do not dispose of electrical appliances as unsorted municipal waste, use separate collection facilities. Contact your local government for information regarding the collection systems available. If electrical appliances are disposed of in landfills or dumps, hazardous substances can leak into the groundwater and get into the food chain damaging your health and well-being. When replacing old appliances with new ones, the retailer is legally obligated to take back your old appliance for disposals at least free of charge.
CONTENTS
Introduction 2Safety instruction 3Installation instructions 5Getting started quickly 11Program modes 13Preparing the dryer 14Preparing the laundry 14Loading the dryer 14Care chart 15Caring for your dryer 16Error codes 19Troubleshooting 20Customer service 21
1
INTRODUCTION
DEAR CUSTOMER
Thank you for your purchase of a Haier product. Please read the manual and safety instructions carefully and keep them for future reference and pass them on to any future owner.
![]() Read the instructions.
Read the instructions.![]() Instructions showing this icon need special attention for safe handling.
Instructions showing this icon need special attention for safe handling.
SCOPE OF DELIVERY
Please check, if the accessories and literature is in accordance with this list.
- User manual
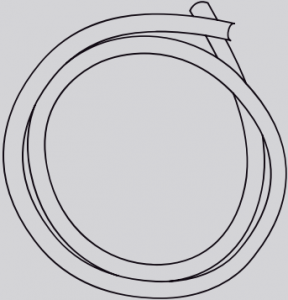
- Drainpipe
1. 2.

INTENDED USE
This heat pump tumble dryer is designed for household use only. It should be used to dry items which have been washed in a water solution and are marked on the manufacturers care label as being suitable for tumble drying.It is not intended for commercial or outdoor use.
Haier cannot be held liable for damage resulting from incorrect or improper use or operation.
This tumble dryer conforms to current safety requirements.
![]() Warning; Risk of fire/ Flammable materialsThis marking on product is a safety symbol. Failure to follow the warning outlined in these user instructions can cause a fire hazard.
Warning; Risk of fire/ Flammable materialsThis marking on product is a safety symbol. Failure to follow the warning outlined in these user instructions can cause a fire hazard.
2
 SAFETY INSTRUCTIONS
- The appliance is not to be used by persons (including children) with reduced physical, sensory or mental capabilities, or lack of experience and knowledge, unless they have been given supervision or instruction.
- This appliance can be used by children aged from 8 years and above and persons with reduced physical, sensory or mental capabilities or lack of experience and knowledge if they have been given supervision or instruction concerning use of the appliance in a safe way and understand the hazards involved. Children shall not play with the appliance. Cleaning and user maintenance shall not be made by children without supervision.
- Children under 3 years of age must be kept away from the tumble dryer unless they are constantly supervised.
- Oil-affected items can ignite spontaneously, especially when exposed to heat sources such as in a tumble dryer. The items become warm, causing an oxidation reaction in the oil. Oxidation creates heat. If the heat cannot escape, the items can become hot enough to catch fire. Piling, stacking or storing oil-affected items can prevent heat from escaping and so create a fire hazard.
- The tumble dryer is not a toy! To prevent the risk of injury, do not allow children to play with it or near it, or to play with the controls.
- Before setting up the tumble dryer, check it for any externally visible damage.
- Do not install or use a damaged tumble dryer.
- Before connecting the tumble dryer, ensure that the connection data match the mains electricity supply If in any doubt, consult a qualified electrician.
- The electrical safety of this tumble dryer can only be guaranteed when correctly earthed.
- Do not connect the tumble dryer to the mains electricity supply by an extension lead.
- If the supply cord is damaged, it must be replaced by the manufacturer, its service agent or silmilarly qualified person.
- Faulty components must be replaced by original spare parts.
- The tumble dryer must be isolated from the mains supply in the event of a fault and during cleaning and maintenance.
- Do not install the tumble dryer in a room where there is a risk of frost occurring. The ambient temperature should be between 5 °C and 35 °C.
- Do not install the tumble dryer behind a lockable door, a sliding door or a door with hinges on the opposite side of the tumble dryer door as this limits the full opening of the tumble dryer door.
- Lint must not to be allowed to accumulate around the tumble dryer, if applicable.
- Always keep the area around the tumble dryer free of dust and lint. Also make sure that the area is dry and well ventilated.
- The tumble dryer must not be used in a non-stationary location (e.g. a ship).
- Do not make any alterations to the tumble dryer, unless authorised to do so by Haier.
- In areas which may be subject to infestation by cockroaches or other vermin, pay particular attention to keeping the tumble dryer and its surroundings in a clean condition at all times.
- Do not dry unwashed items in the tumble dryer.
- Do not load more than Nominal load.
- Items which contain residues of flammable substances such as cooking oil, acetone, alcohol, benzine, petrol, kerosene, spot removers, turpentine, waxes, wax removers or other chemicals should not be dried in the tumble dryer.
- If it is unavoidable to dry items that contain vegetable oil, cooking oil, hair care or cosmetical products, they should be washed using additional detergent and select a high temperature. If in doubt, wash the items several times.
3
SAFETY INSTRUCTIONS
- Items which contain a large proportion of rubber, foam rubber (latex foam) or rubber like materials such as shower caps, waterproof textiles, rubberised articles and items of clothing and pillows with foam rubber filling should not be dried in the tumble dryer. Items which have been cleaned using industrial chemicals such as professional drycleaning agents, should not be dried in the tumble dryer.Do not dry damaged items which contain padding or fillings (e.g. pillows,jackets),as the filling can get out with the risk of igniting in the dryer. Remove all items such as lighters and matches from pockets.
- The end of a dryer cycle runs without heat (cool down cycle) to ensure that the items do not get damaged and are at a handleable temperature.Warning: Do not switch the tumble dryer off before the drying cycle is finished. Afterwards, the laundry must be hung up or spread out to cool it down. Fabric softeners and similar products must be used as specified by the manufacturer’s packaging.The dryer must not be used without the lint filter in place or with damaged filters.The lint filters must be cleaned regularly Close the door once the laundry is removed to prevent children, animals and objects getting into the drum.Do not sit or lean on the door, as this can cause the tumble dryer to tilt.
- Condensed water is not drinking water. It can cause health problems in both people and animals.
![]() NoticeThis appliance contains the fluorinated greenhouse gas HFC-134a (GWP:1430).This gas is hermetically sealed.
NoticeThis appliance contains the fluorinated greenhouse gas HFC-134a (GWP:1430).This gas is hermetically sealed.
4
INSTALLATION INSTRUCTIONS
Please read and follow the `Safety instructions’ and `Installation instructions’ sections carefully before using your dryer!
Moving your appliance
If the dryer needs to be placed at an angle for moving, only tip towards the right hand side (when viewed from the front). If the dryer has not been transported as described, leave it standing upright for at least one hour before turning on.
Accessories
Please check you received the following accessories with your Haier dryer. You will find them inside the drum:
.. 1 x Drain hose.. 1 x Installation instructions and user guide
Unpacking
To ensure the best performance from your new dryer please follow the instructions below.
Removing the packaging1 Remove the outer packaging (including the polystyrene packer and plastic wrapping). All packaging must be removed prior to use.2 Tilt the machine backwards and `walk’ it off the base one foot at a time. Not doing so may cause damage to your floor and dryer.3 Remove all packaging and accessories from inside the drum and ensure you remove protective covers from door and console.
IMPORTANT!.. Ensure packaging materials are kept out of reach of children... Please help protect the environment and dispose of the packaging from around the dryer in an environmentally friendly manner.
LocationIMPORTANT!.. The dryer must be installed in a well-ventilated, dust-free environment... The dryer must not be installed on any textured floor coverings (eg carpet, rugs) to ensure that openings at the base of the machine are not obstructed... Do not install the dryer behind a lockable door, sliding door, or behind a door where the hinge is on the opposite side to that of the dryer in such a way that the full opening of the door is inhibited. Ensure the dryer door can always be opened fully.
Note: this dryer CANNOT BE INVERTED AND MOUNTED ON THE WALL .
5
INSTALLATION INSTRUCTIONS
Installation options
Your dryer can be installed one of two ways, either freestanding, or stacked on top of a Haier front loading washer.
1 Free standingThe dryer stands on the floor and can easily be moved into position.2 StackingYour dryer has been designed to be able to be stacked on top of a Haier front loading washer. A stacking kit MUST BE USED between the products and fitted correctly to the washing machine and dryer, as per the stacking kit instructions.
1 Move the machine into the desired position. Do not lift the dryer by the top panel.2 Have a minimum clearance on all sides of at least 20 mm.3 Install the machine on a stable and level floor (if not stacking on top of a front loading washer).
.. Do not install your dryer in such a way that the dryer door cannot be opened fully... Do not install the dryer outside, in a damp place, where there is a risk of freezing, where it may be rained on, in direct sunlight or close to a source of heat... Do not place your machine on top of its power cable.
Levelling the machine
It is IMPORTANT to level the machine to ensure the machine runs efficiently with minimal noise. The dryer should be levelled in as close to its final position as possible so it stands balanced evenly on all four feet. Ensure the dryer does not rock in any direction.
The dryer comes with four adjustable feet, wind all four feet up or down until the dryer is correctly level. A spirit level can assist with this process. The machine is considered level when the bubble sits in the centre (ie within the two lines or the circle), when the spirit level is placed flat on top of your dryer, in the directions from:1 left to right,2 back to front and3 corner to corner.
Never unscrew the feet completely from their housings.
Note: after levelling, the corners of the dryer cabinet should be clear of the floor and the machine must not rock in any direction.
6
INSTALLATION INSTRUCTIONS
Draining
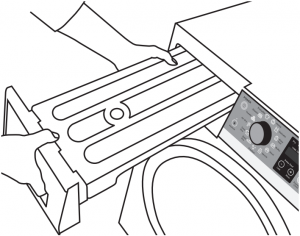
The dryer is equipped with a condenser unit which accumulates water during the drying cycle. This water is collected in the removable water tank located at the top left of the dryer. The accumulated water must be emptied after each drying cycle. However you can also set up your dryer to drain automatically using the drain hose provided.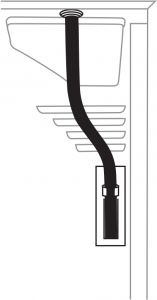
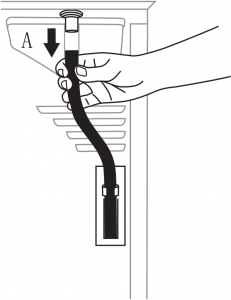
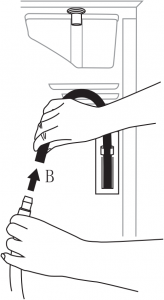
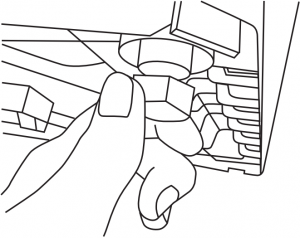
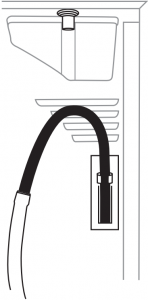 Connecting the drain hose:1 Remove the black hose from the connection at the back of the dryer (A).2 Uncoil the drain hose (included with your dryer) and connect it to the black hose(B)3 Place the other end of the drain hose into a tub or standpipe.
IMPORTANT!If you connect the drain hose onto your dryer and you do not secure the other end in a drain, your dryer will drain water onto the floor. Ensure the drain hose is securely fixed in place to an appropriate drain and is leak-free at the connection to the machine. Check the connection and drain hose regularly.
.. Maximum standpipe height is 1.0 m from ground level... Regularly check that your standpipe or tub is free from lint and other obstructions, which may affect drainage and cause flooding... The drain hose should be checked from time to time and replaced if any damage, eg wear, cuts, bulged, kinks, leaks, etc are found. Do not bend the drain hose sharply as this may cause it to split... The extended length of the provided drain hose is 1.3 m... In multi-storey apartments or any upper floor, the machine should be installed on a floor equipped with a drain... Draining must comply with local by-laws.
7
INSTALLATION INSTRUCTIONS
Electrical connection
1 This appliance must be connected to a 220V – 240V, 50Hz, sinusoidal, 10A electrical supply2 Uncoil the power cord, remove and discard the plastic pin cover and plug into a power socket.3 Connect the appliance to an earthed outlet protected by a fuse of suitable capacity.
- Check the power cord for damage and make sure it is not squashed or twisted when installing the dryer.
- Always remove the power cord from the power socket by the plug, not by the cord.
IMPORTANT!
- Do not touch or operate the machine with wet hands or with bare-feet.
- A damaged power cord must be replaced by a Haier trained and supported service technician, its service agent or similarly qualified persons in order to avoid a hazard. The appliance must not be operated until it is repaired, as there is risk of electric shock.
- Do not operate this machine if it has been damaged during transport. Contact your Haier dealer or Haier trained and supported service technician.
WARNING!The appliance must not be supplied through an external switching device, such as a timer, or connected to a circuit that is regularly switched on and off by a utility.
8
INSTALLATION INSTRUCTIONS
Completing the installation
Installation test cycle
IMPORTANT!Ensure the installation test cycle is completed before you dry any items in your dryer. This is to check that your dryer is installed correctly and that it is functioning properly prior to use.
1 Turn your dryer on by pressing the `POWER’ ![]() button.2 Select the ‘Time Dry’ cycle for 30 minutes. Ensure the drum is empty and the door is closed (you will hear it click shut).3 Touch the
button.2 Select the ‘Time Dry’ cycle for 30 minutes. Ensure the drum is empty and the door is closed (you will hear it click shut).3 Touch the ![]() button. The drum will start rotating.- Observe the machine for any problems.- The dryer will beep and display any faults on the screen if there are any problems.Refer to pages 19 and 20.4 At the completion of the cycle, open the door and check that there is warmth inside the dryer. This indicates the dryer is operating normally.
button. The drum will start rotating.- Observe the machine for any problems.- The dryer will beep and display any faults on the screen if there are any problems.Refer to pages 19 and 20.4 At the completion of the cycle, open the door and check that there is warmth inside the dryer. This indicates the dryer is operating normally.
IMPORTANT!If there are any problems, you must address these before proceeding with normal use. The dryer will automatically turn off at the end of the cycle if there are no problems.
Before you start, it is a good idea to go through the following checklist:
- Has the packaging been removed?
- Is the machine correctly levelled, and the cabinet corners clear of the floor and walls?
- Are the water tank, condenser filter and lint filter correctly in place?
- Has the power cord been connected to an appropriate power supply and the power turned on?
- Have you performed the installation test cycle?
- If external draining is preferred, is the drain hose attached to the correct outlet and hooked into a standpipe or tub?
9
INSTALLATION INSTRUCTIONS
Machine specifications HDHP80E1
Capacity (kg)* 8DIMENSIONS ( mm )Width 595Depth 667Height** 845Length of drain hose 1300ELECTRICALVolts 220 - 240HZ 50Amps (maximum) 10Heating Power (W) 550
* Capacity refers to the maximum dry weight of items the machine can dry at any one time. Note: some cycles have a lower maximum capacity (see the `Drying cycles’ section).** The exact height of your dryer is dependent on how far the feet are extended from the base of the machine.
10
GETTING STARTED QUICKLY

1 Display The display shows the remaining time, the delay time and other related information.Note: The remaining time is a default value, this time will be re-calculated depending on additional program settings and the moisture content of the laundry.
2 Program knobSelect one of the 16 programs using the knob. The indictor of the respective program lights up. See Program Modes section of the manual for further information.
3 Power button Press Power button to switch on/off the tumble dryer.
4 Start/Pause buttonTouch Start/Pause to Start a drying cycle. Touch button again to pause the drying cycle.
5 Anti-CreaseIf you wish to minimise wrinking, touch the Anti-Crease. At the end of the cycle, the drum will rotate periodically and cool air will be circulated through the load to minimise wrinkling and creaseing. This is particularly useful if you cannot remove the items immediately after the cycle ends.
6 Dry levelTouch the Dry Level to sent the final moisture* content of the laundry at the end of cycle.* H-1: Ready to iron H-2: Normal H-3: Extra dry
11
GETTING STARTED QUICKLY
7 TimeTouch the Time to select the timer program. Touch the button to add or substract the time. The shortest time is 10 min and the longest time is 180 min.
8 Child-lock indicatorTo active the Child-lock function after a cycle has been started, touch the Delay&Time for 3 sec. until the indicator icon”LOCI” lights up. To deactive touch both buttons for 3 sec. again.Note:When the cycle ends or the power supply is interrupted, the function will not be can called automatically.
9 DelayDelay function for delay start, touch the button to set time (in 30 mins intervals up to 12 hours). The appliance should be finished in, afterwards touch start/pauser to start the delayed operation.
12
PROGRAM MODES
| PROGRAM | RECOMMENDEDLAUNDRY | MAX.LOAD | |
| TimeDry | Duvet | Duvet/Doona Products | 4Kg |
| Refresh | Items that have not been worn/used for some time | 4Kg | |
| Time Dry | Heavy fabrics, need further drying | 4Kg | |
| Air Dry | Drying items for a specific time period, without heat | 4Kg | |
| Warm 30 | Suitable for all clothing | 4Kg | |
| Warm 60 | Suitable for all clothing | 4Kg | |
| AutoDry | Cotton | Cotton | 8Kg |
| Towels | Towels | 4Kg | |
| Mix | Mixture of cotton and synthetic fibres | 8Kg | |
| Shirts | Shirts | 3Kg | |
| Delicate | For lingerie and nightclothes ect. | 4Kg | |
| Bedding | Sheets, pilowcases and quilt covers | 4Kg | |
| Synthetic | Synthetic items | 4Kg | |
| Sport | Sportswear | 4Kg | |
| Baby Care | Baby Care/Clothing | 4Kg | |
| Underwear | Underwear | 4Kg |
*Cotton cycle is the cycle that we recommend to dry Standard cotton items.
13
PREPARING THE DRYER
- Connect the tumble dryer to a power socket.
- Make sure the water tank is empty and properly installed.
- Make sure that the lint filter is clean and properly installed.
- Make sure that the condenser filter is clean and properly installed.
PREPARING THE LAUNDRY
- Sort clothes according to fabric (cotton, synthetics ) . Only dry lanuary that has been spun.
- Empty pockets of all sharp or flammable objects such as keys, lighters and matches. Removeharder decorative objects such as brooches.
Follow the instructions on the laundry label and dry only machine-dryable garments. – Close zippers and hooks, make sure the buttons are sewn on tightly and place small items such as socks, bras etc. in a wash bag.– Unfold large pieces of fabric such as bed sheets, table cloth etc.
LOADING THE DRYER
- Place the laundry evenly in the drum making sure not to overload the dryer.
- Switch on the tumble dryer by touching the Power button.
Fabric softeners or similar products should be used as specified in the manufacturer’s instructions.
14
CARE CHART
 Resistant material
  Bleachable in cold water
 Delicate fabric
  Do not bleach
 Washable at 95 °C
  Iron at 200 °C
 Washable at 60 °C
  Iron at 150 °C
 Washable at 40 °C
  Iron at 100 °C
 Washable at 30 °C
  Do not iron
 Hand wash
  Dry cleaning (any solvent)
![]() Dry clean only
Dry clean only  Dry cleaning (pericloride)
 Wool seal
  Dry cleaning (aviation fuel)
 Do not dry clean
  Dry flat
 Hang to dry
  Dry on clothes hanger
 Tumble dry (normal heat)
  Tumble dry (reduced heat)
 Do not tumble dry
15
CARING FOR YOUR DRYER
When you have finished using your dryer
.. Unplug the machine from the power socket... Wipe around the door to remove any remaining condensation and foreign matter... Clear the lint filter and empty the water tank (if not set up to automatically drain).
Cleaning your dryer
Before you start cleaning your dryer, ensure that it is disconnected from the power (ie unplug the machine from the power socket).
Cleaning the control panel and outer surfaces of the dryerUse a soft damp cloth to wipe all surfaces, then wipe dry. Avoid using chemical or scouring cleaners, as these will damage the paint and plastic surfaces of your dryer.
Cleaning the inside of your dryerIt is important that you occasionally clean the inside of your dryer. If the drum has any residual dirt or lint stuck to it, remove this and wipe it clean with a damp cloth. Do not leave any metal objects in the drum, as these may cause rust.
Cleaning the lint filter
.. Lint is generally formed during wearing and washing. Fibres (ie lint) released from the clothes during the drying cycle are collected in the lint filter... It is important to clean the lint filter after every load, as the lint produced in the drying process can become a fire hazard if it is allowed to accumulate in or around your dryer... The lint filter is located in the door opening (at the bottom)... There is a warning light that will flash at the beginning of every cycle to remind you to clean the filter. The warning light will also flash on and off during the cycle if the filter becomes blocked. The filter should be cleaned as soon as the `Lint Filter’ light starts flashing. Lint becomes a fire hazard if left to build up, and will reduce the efficiency of your dryer.

To clean the filter:
- Open the dryer door.
- Remove the lint filter by pulling it up and out of the filter slot. Open it out and wipe the surfaces clean with your hand.
- Close the lint filter and place it back in the opening. Ensure the filter is fitted correctly back in place before operating the dryer.
IMPORTANT!If the lint filter becomes damaged, contact your Haier trained and supported service technician to arrange getting a new filter. Do not operate your dryer with a damaged lint filter or without the filter in place, as this will cause damage to your dryer and is a fire hazard.
16
CARING FOR YOUR DRYER
Emptying the water collection tank
During the drying cycle steam condenses into water and is collected in the water tank, located at the top left of the dryer. It is important to empty the water tank after every load.
A user warning will also be displayed on the screen If the water tank becomes full during operation, the dryer will pause and beep to alert you. Empty the tank and touch ![]() to resume the cycle.
to resume the cycle.
Note: you do not need to empty the water tank if you have set up the drain hose to drain the water automatically.
To empty the water tank:
- Remove the water tank by holding onto the handle and pulling outwards gently to remove it. Ensure that you keep the tank level when it is being removed to prevent the water collected from spilling.
- Pour the water down the sink or into a bucket, and then put the tank back in place.
IMPORTANT!.. Do not use the water collected in the water tank for drinking or food processing... Never run the dryer without the water tank in place unless the drain hose has been installed.. If the water tank becomes full, the tumble dryer will pause drying and will sound an alarm. You must empty the water tank before the dryer can continue drying. Empty the tank, replace it in the housing then touch ![]() to resume the cycle.
to resume the cycle.
17
CARING FOR YOUR DRYER
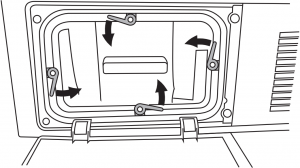
Cleaning the condenser filter
To clean the condenser filter:
- Switch off the power supply and remove the power plug before cleaning the condenser.
- Open the condenser filter cover.
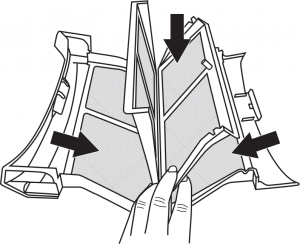
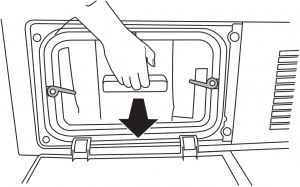
- Turn the four condenser lock levers 90° then pull out the condenser filter.
- Remove rear filter and wipe the surface clean with your hand.
- Replace the condenser filter.
- Turn the four condenser filter lock levers to lock the condenser filter back in place again. Make sure that these locks are engaged securely.
- Close the condenser filter cover.
Note: if the evaporator behind the condenser filter is dirty, it can be cleaned carefully with a vacuum cleaner using a dusting brush or narrow crevice nozzle.
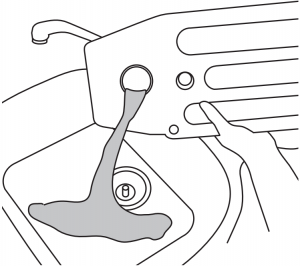
Cleaning the sensors
There are sensors in your dryer that detect whether the laundry is dry or not. These sensors need to be cleaned periodically (we recommend approximately four times a year).

To clean the sensors:
- Open the door of your machine.
- Allow the machine to cool if drying has been carried out.
- Locate the metal sensors just behind the lint filter.
- Wipe the sensors with a soft cloth, dampened with vinegar. Dry the sensors with a soft dry cloth.
18
ERROR CODES
| CODE | CAUSE | SOLUTION |
| F2 | Drain pump error. | Contact the customer service. |
| F32,F33 | The condenser thermal sensor is open-circuited or short-circuited. | Contact the customer service. |
| F4 |
|
Contact the customer service. |
| F5 | Communication failure between PCB and display. | Contact the customer service. |
| clnLint | The filters is clogged. | Clean both filters. |
| H2OFull | The water tank is full. | Clean the water tank. |
19
TROUBLESHOOTING
Before contacting the customer service, please check the following circumstances:
| PROBLEM | CAUSES | SOLUTION |
| Tumble dryer fails to operate. | – Poor connection to the power supply.
– Power failure. – No drying program is set. – Device has not been switched on. – The water tank is full. – The door is not closed properly. |
. Check connection to the power supply.
. Check the power supply. . Set a drying program. . Switch the device on. . Empty the water tank. . Close the door properly. |
| Tumble dryer fails to operate and the display shows END. | – The laundry has reached the condition defined by the program.
– There is no laundry in the drum. |
. Check if the program setting is appropriate.
. Check if there is laundry in the drum. |
| Drying time is too long and the results are not satisfactory. | – The program setting is not correct.
– The evaporator is blocked. – The filter is clogged. – The tumble dryer is overloaded. – The laundry is too wet. – The vent duct is blocked. |
. Make sure the program is set correctly.
. Clean the filter screen. . Clean the evaporator. . Reduce the amount of laundry. . Spin the laundry properly before drying. . Check the vent duct and unblock it. |
| Remaining time on the display stops or skips. | The remaining time will be adjusted continuously based upon the following factors:
– Type of laundy. – Loaded amount. – Moisture degree of the laundry. – Ambient temperature. |
The automatic adjustment is a normal operation. |
20
CUSTOMER SERVICE
If you have a problem with your appliance first see the Troubleshooting section of the manual. If you cannot find a solution, please contact your local dealer or try one of the following numbers.
Free Toll Australia: 1300 729 948Free Toll New Zealand: 0800 242 437
Before contacting the customer service, emsure that you have the following data avaliable. The data can be found on the rating plate.
MODEL _____________________________
SERIAL NUMBER _____________________________
Also check the Warranty Card supplied with the product in case of warranty.
21
![]()
[xyz-ips snippet=”download-snippet”]