![]()
 00054239(DIR3510SCBTX)Digital RadioQUICK GUIDE
Technical Data
| Display | 2.8′ (7.11cm) Color TET, 320x 240px |
| Speaker | 3′ 2x20W (RMS) |
| Power Supply | DC 18.0V / 2.6A, max 46.8W |
| Supported Languages | English, German, Danish, Dutch, Finnish, French, Italian, Norwegian, Polish, Portuguese, Spanish, Swedish, Turkish, Czech, Slovak |
| Packaging Content | Hama DIR3510SCBTX, Power Supply, Remote GB•RC001, 2x AM Batteries, Quick Start Manual, Telescope Antenna Coaxial |
Connectivity
| Ethernet | LAN (10/100) |
| WiFi | 2.4GHz (b/g/n) /5GHz (a/n) |
| Bluetooth | Receiver (RX): 4.2, class 1, A2DP,AVRCPTransmitter (TX): 5.0, class 2, A2DP |
| USB(FAT32 File System) | Charge: 5V /1APlayback: MP3 |
Audio Connectors
| Inputs | AUX-In 3.5mm |
| Outputs | Headphone 3.5mm, Line OUT 3.5mm, Digital Optical |
|
Sources |
Presets |
|
| CD (Drawer Type) |
— |
|
| DAB/DAB+(174.928 – 239.2 MHz) | 30 | |
| FM(87.5 • 108 MHz) | 30 | |
| Internet Radio |
✓ |
30 |
| Spotify Connect |
✓ |
10 |
| Amazon Music |
✓ |
8 |
![]() Further information and features are available on / www.hama.com->00054239
Further information and features are available on / www.hama.com->00054239
 |
 |
 |
 |
Spotify Connect
Use your phone, tablet, or computer as a remote control for Spotify.Gotospotify.com/connect to learn how.
Quick Guide
Controls and Displays
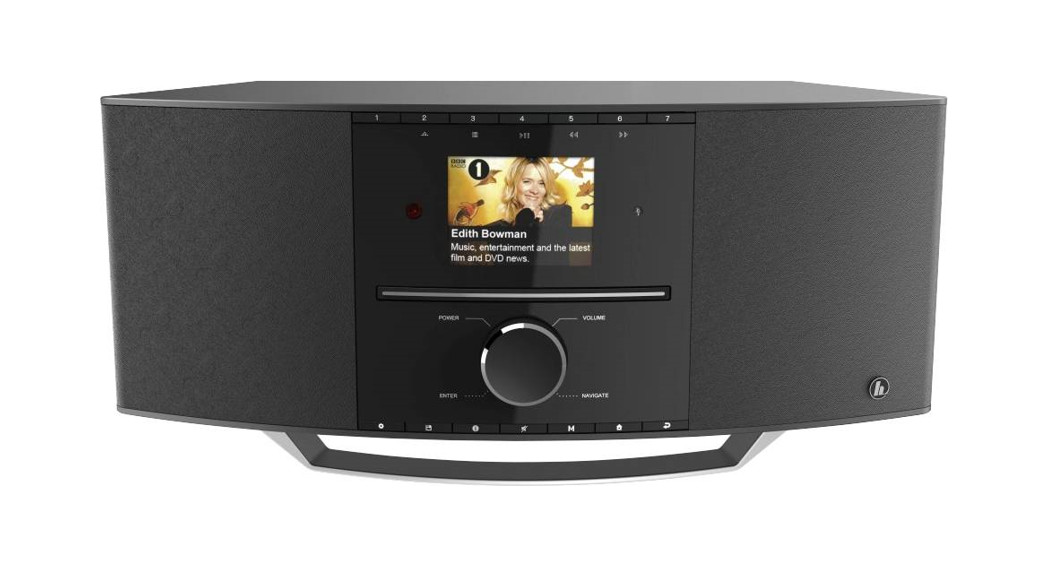
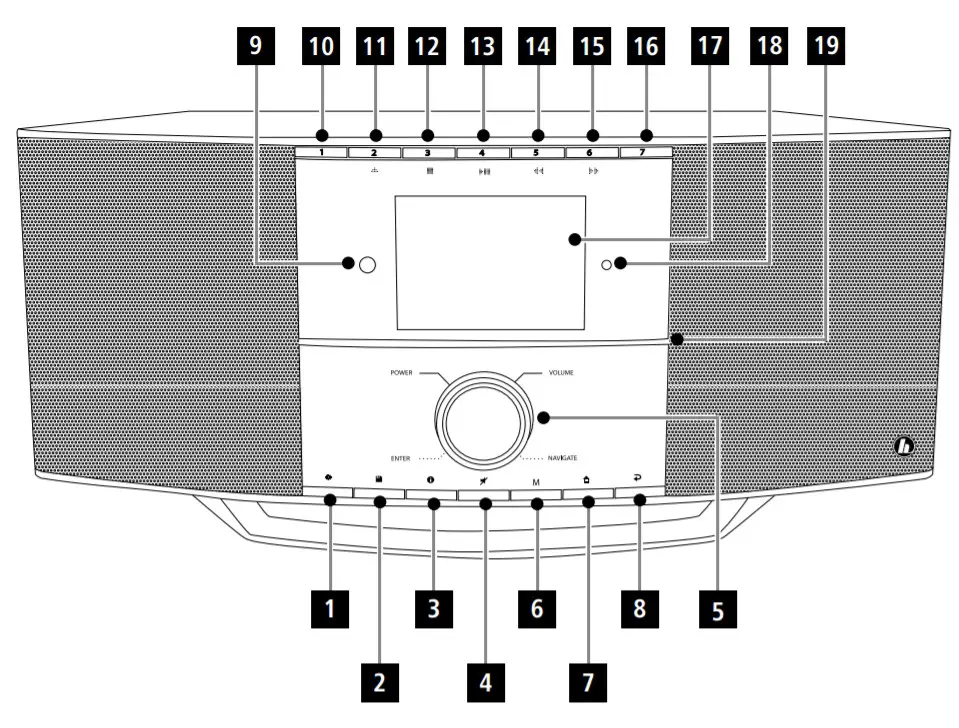
A: Radio Front
| 1 |  |
[MENU/ SETTINGS] Button |
| 2 |  |
[PRESET] Button |
| 3 |  |
[INFO] Button |
| 4 |  |
[MUTE] Button |
| 5 | [POWER/VOLUME/ENTER/NAVIGATE] Button** | |
| 6 | M |
[MODE] Button |
| 7 |  |
[HOME] Button |
| 8 |  |
[BACK] Button |
| 9 | IR Sensor | |
| 10 | [PRESET 1] Button | |
| 11 | [PRESET 2/▲]Button (Eject CD) | |
| 12 |  |
[PRESET 3/ ]Button (Stop Playback) |
| 13 | [PRESET 4/►II] Button (Play/Pause) | |
| 14 |  |
[PRESET 5/◄◄ ]Button (Previous) |
| 15 |  |
[PRESET 6/►►]Button (Forward) |
| 16 | [PRESET 7] Button | |
| 17 | Display | |
| 18 | Light Sensor | |
| 19 | CD Drive |
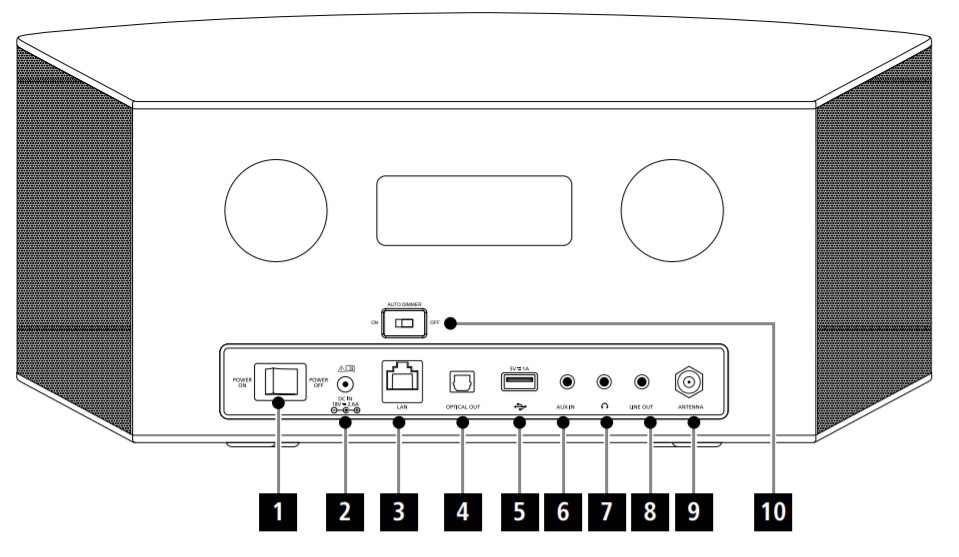
B: Radio Rear
| 1 | Power Switch |
| 2 | Power Connection |
| 3 | Ethernet /LAN |
| 4 | Digital Optical OUT (SPDIF) |
| 5 | USB Socket |
| 6 | Aux IN (3.5mm) |
| 7 | Headphone OUT (3.5mm) |
| 8 | Line OUT (3.5mm) |
| 9 | Antenna Connector |
| 10 | Auto Dimmer ON/OFF |
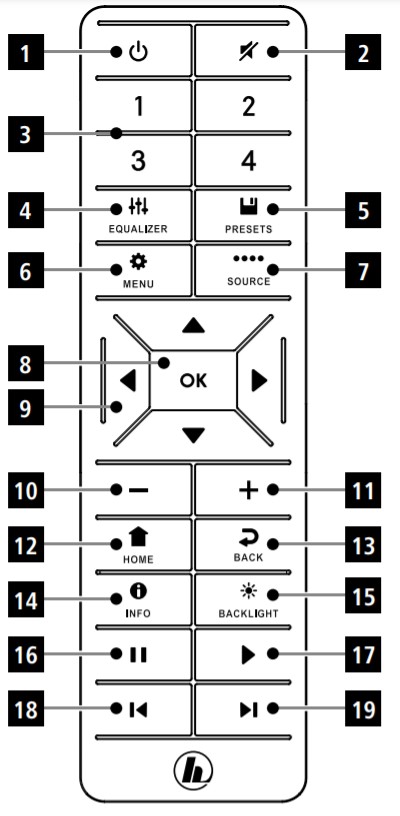
Remote Control
| 1 | [POWER] Button |
| 2 | [MUTE] Button |
| 3 | [PRESET] Direct Button (1-4) |
| 4 | [EQUALIZER] Button |
| 5 | [PRESET] List Button |
| 6 | [MENU] Button |
| 7 | [SOURCE] Button |
| 8 | [OK] Button |
| 9 | [NAVIGATION] Button▲ Up ▼ Down◄ Left ► Right |
| 10 | [VOL-] Button |
| 11 | [VOL+] Button |
| 12 | [HOME] Button |
| 13 | [BACK] Button |
| 14 | [INFO] Button |
| 15 | [BACKLIGHT] Button |
| 16 | [PAUSE] Button |
| 17 | [PLAY] Button |
| 18 | [PREVIOUS] Button |
| 19 | [NEXT] Button |
![]() Note* This radio has a changeable antenna. You can use an active or passive antenna equipped with a coaxial connection.** You can adjust the volume, or navigate through the menu structure by turning the rotary controller. You can switch the device to standby mode by pressing the volume controller, or you can confirm a selection by pressing the navigation controller.
Note* This radio has a changeable antenna. You can use an active or passive antenna equipped with a coaxial connection.** You can adjust the volume, or navigate through the menu structure by turning the rotary controller. You can switch the device to standby mode by pressing the volume controller, or you can confirm a selection by pressing the navigation controller.![]() Important note
Important note
- This is a quick guide to provide you with the most important basic information, such as safety warnings and how to get started using the product.
- For the sake of protecting the environment and saving valuable resources, Hama dispenses with a printed instruction manual and provides this only in the form of a pdf file available for download.
- The complete instruction manual is availableat: www.hama.com->00054239->Downloads
- Save the instruction manual to your computer hard drive for future reference, or print it out if necessary.
Explanation of Warning Symbols and Notes
![]() Risk of electric shockThis symbol indicates a risk of electric shock from touching product parts carrying hazardous voltage.
Risk of electric shockThis symbol indicates a risk of electric shock from touching product parts carrying hazardous voltage.![]() WarningThis symbol is used to indicate safety instructions or to draw your attention to specific hazards and risks.
WarningThis symbol is used to indicate safety instructions or to draw your attention to specific hazards and risks.![]() NoteThis symbol is used to indicate additional information or important notes.
NoteThis symbol is used to indicate additional information or important notes.
Package Contents
- DIR3510SCBTX” Digital /Internet Radio with CD
- Power Supply
- Remote Control
- 2x AAA (micro) Batteries
- These Operating Instructions
- Telescope Antenna
Safety Instructions
- The product is intended for private, non-commercial use only.
- Do not use the product in areas in which electronic products are not permitted.
- Protect the product from dirt, moisture, and overheating and use it in dry rooms only.
- As with all electrical products, this device should be kept out of the reach of children.
- Do not drop the product and do not expose it to any major shocks.
- Do not operate the product outside the power limits specified in the technical data.
- Keep the packaging material out of the reach of children due to the risk of suffocation.
- Dispose of packaging material immediately in accordance with the locally applicable regulations.
- Do not modify the device in any way. Doing so voids the warranty.
- Use the product only for the intended purpose.
- Do not use the product in the immediate vicinity of heaters, other heat sources, or in direct sunlight.
- Do not use the product in a damp environment and avoid splashing water.
- Only use the article under moderate climatic conditions.
![]() Risk of electric shock
Risk of electric shock
- Do not open the device or continue to operate it if it becomes damaged.
- Do not use the product if theAC adapter, the adapter cable, or the mains cable are damaged.
- Do not attempt to service or repair the product yourself. Leave any and all service work to qualified experts.
![]() Warning –Batteries
Warning –Batteries
- When inserting batteries, note the correct polarity (+ and -markings) and insert the batteries accordingly.Failuretodosocould results in the batteries leaking or exploding.
- Only use batteries (or rechargeable batteries) that match the specified type.
- Before you insert the batteries, clean the battery contacts and the polar contacts.
- Do not allow children to change batteries without supervision.
- Do not mix old and new batteries, or batteries of different types, or from different manufacturers.
- Remove the batteries from products that are not being used for an extended period (unless these are being kept ready for an emergency).
- Do not short-circuit batteries.
- Do not charge batteries.
- Do not burn batteries.
- Keep batteries out of the reach of children.
- Never open, damage, or swallow batteries or allow them to enter the environment. They can contain toxic, environmentally harmful heavy metals.
- Remove spent batteries from the product and dispose of them without delay.
- Avoid storing, charging, or using the device in extreme temperatures and extremely low atmospheric pressure (for example, at high altitudes).
Before First Use
![]() NoteA detailed description of the UNDOK app and all of its functions can be found in our UNDOK guide at:www.hama.com->00054239->Downloads
NoteA detailed description of the UNDOK app and all of its functions can be found in our UNDOK guide at:www.hama.com->00054239->Downloads
![]() Notes on use
Notes on use
- The [OK] button and ► on the remote control corresponding to the [POWER/VOLUME/ENTER/ NAVIGATE] button (5) on the front of the radio.
- The ◄ button on the remote control corresponds to the [
 ] button on the front of the radio
 - The ▲▼ buttons on the remote control correspond to turning the navigation controller to the left and right on the front of the radio.
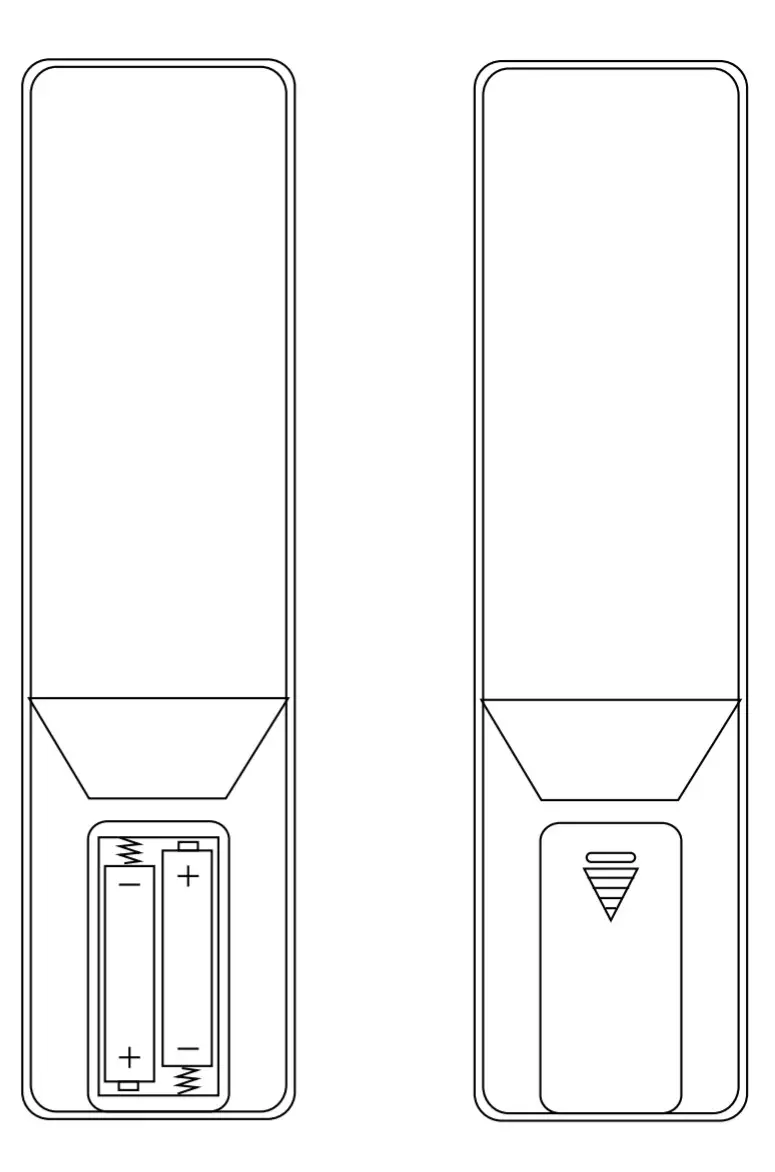
Preparing the remote control for useOpen the cover on the battery compartment. This can be found on the back of the remote control and can be opened by sliding in the direction indicated.The extent of delivery includes two AAA batteries which must be inserted into the battery compartment for the remote control to work. When inserting the batteries, ensure that they are inserted with the correct polarity.The relevant polarity (+ /-)is marked inside the battery compartment.Setting up a network connection4.1 LAN (wired network)
- Connect the LAN connection of your router to the LAN connection on your radio. You will require an ethernet cable, which is not included in the delivery, to do this.
- Make sure that the router is on and working properly, and that you have an Internet connection.
- See the operating instructions for your router regarding a properly functioning LAN connection.
- Then proceed as described in point 5, “Getting Started”.
4.2 WLAN (wireless network)
- Ensure that the router is switched on, is functioning correctly, and that there is a connection to the internet.
- Activate the WLAN function of your router.
- Follow your router‘s operating instructions as regards the correct functioning of the WLAN connection.
- Then proceed directly as described under section 5 ‚Getting started‘.
Getting started
![]() Note -Optimal reception“DIR3510SCBTX” has an antenna connection for external antennas with a coaxial connection. A suitable telescopic antenna that allows DAB, DAB+, and FM reception is included in the extent of delivery.Alternatively, you can use an active or passive antenna to improve the reception or to adapt it to your requirements.Please note:
Note -Optimal reception“DIR3510SCBTX” has an antenna connection for external antennas with a coaxial connection. A suitable telescopic antenna that allows DAB, DAB+, and FM reception is included in the extent of delivery.Alternatively, you can use an active or passive antenna to improve the reception or to adapt it to your requirements.Please note:
- Always pull the antenna out completely.
- We recommend you adjust the antenna vertically to ensure optimal reception.
5.1 General Notes on Use5.1.1 Switch On /Off /Standby
- Press [POWER/VOLUME/ENTER/NAVIGATE](5) to switch on the radio.
- Press and hold [POWER/VOLUME/ENTER/NAVIGATE] (5) for 3seconds to switch the radio off (standby).
- To completely switch off the device, disconnect it from the power supply.
5.1.2 Navigation and Control
- After pressing a shortcut button, navigate through the menu items using.
- Select the individual menu items by turning [POWER/ VOLUME/ENTER/NAVIGATE](5).
- Confirm the selection by pressing [POWER/VOLUME/ ENTER/NAVIGATE](5).
5.1.3 Volume Adjustment
- Turn the volume up (right) or down (left) by turning [POWER/VOLUME/ENTER/NAVIGATE](5) accordingly.
5.2 Switching ON![]() Warning
Warning
- Only operate the product from a socket that has been approved for the device. The socket must be installed close to the product and must be easily accessible.
- Disconnect the product from the power supply using the On/Off switch –if this is not available, unplug the power cord from the socket.
- If using a multi-socket power strip, make sure that the total power consumption of all connected devices does not exceed the power strip’s maximum throughput rating.
- If you will not be using the product for a prolonged period, disconnect it from mains power.
- Connect the power supply to the mains connection (2) on the back of the radio.
- Connect the network cable to a properly installed and easily accessible network socket.
- Wait until the radio has initialized fully.
- Press [POWER/VOLUME/ENTER/NAVIGATE](5) to switch on the radio.
![]() Note –switching on for the first time
Note –switching on for the first time
- The Setup Wizard starts up automatically when the radio is turned on for the first time.
- The default used language is English.
- You can skip the Wizard and start it up again later in German.
5.3 LanguageThe first time it is used, the radio’s default language is English.To change the radio’s menu language, proceed as follows:
- Press [ ](1) to access the Settings menu.
- Use [POWER/VOLUME/ENTER/NAVIGATE](5) to navigate to the “Settings” menu item.
- Confirm the selection by pressing [POWER/VOLUME/ ENTER/NAVIGATE](5).
- Use [POWER/VOLUME/ENTER/NAVIGATE](5) to navigate to the “Language” menu item. Confirm the selection by pressing [POWER/VOLUME/ENTER/ NAVIGATE](5).
- Use [POWER/VOLUME/ENTER/NAVIGATE](5) to select your preferred system language.
- The language setting currently selected is marked with an asterisk (*).
![]() Note
Note
- The following languages are available:English, German, Danish, Dutch, Finnish, French, Italian, Norwegian, Polish, Portuguese, Spanish, Swedish, Turkish, Czech, and Slovak.
Care and Maintenance
- Only clean this product with a slightly damp, lint-free cloth and do not use aggressive cleaning agents.
- If you do not plan to use the product for a prolonged period, turn off the device and disconnect it from the power supply. Storeitinaclean, a dry place away from direct sunlight.
Warranty Disclaimer
Hama GmbH &CoKGassumes no liability and provides no warranty for damage resulting from improper installation/ mounting, improper use of the product, or from failure to observe the operating instructions and/or safety notes.
Service and Support
Please contact Hama Product Consulting if you have any questions about this product.Hotline: +49 9091 502-115 (German/English)Further support information can be found here:www.hama.comThe complete instruction manual is available at: www.hama.com->00054239->Downloads
Recycling Information
Note on environmental protection: After the implementation of the European Directive 2012/19/EU and 2006/66/EU in thethe national legal system, the following applies: Electric and electronic devices, as well as batteries, must not be disposed of with household waste. Consumers are obliged by law to return electrical and electronicdevices as well as batteries at the end of their service lives to the public collecting points set up for this purpose or point of sale. Details to this are defined by the national law of the respective country. This symbol on the product, the instruction manual, or the package indicates that a product is subject to these regulations. By recycling, reusing the materials, or other forms of utilizing old devices/Batteries, you are making an important contribution to protecting our environment.
Declaration of Conformity
 Hereby, Hama GmbH &CoKGdeclares that the radio equipment type [00054239] is in compliance with Directive 2014/53/EU. The full text of the EU declaration of conformity is available at the following internet address:www.hama.com->00054239->Downloads.
| Frequency band(s) | Bluetooth: 2.402 -2.480GHzWiFi: 2.412 -2.472GHzWiFi: 5.150 -5.350 GHzWiFi: 5.470 -5.725 GHz |
| Maximum radio-frequency power transmitted | Bluetooth: 6dBm (EIRP)WiFi: 2.4GHz /17dBm (EIRP)WiFi: 5GHz /16.5dBm (EIRP) |
Restrictions or Requirements inBelgium, Bulgaria, Czech Republic, Denmark, Germany, Estonia, Ireland, Greece, Spain, France, Croatia, Italy, Cyprus, Latvia, Lithuania, Luxembourg, Hungary, Malta, the Netherlands, Austria, Poland, Portugal, Romania, Slovenia, Slovakia, Finland, Sweden, United Kingdom![]() NoteIf channels 36–64 (frequency 5.150–5.350 GHz) are used in an a5-GHz WLAN, the product may only be used in closed rooms.
NoteIf channels 36–64 (frequency 5.150–5.350 GHz) are used in an a5-GHz WLAN, the product may only be used in closed rooms.![]() To limit exposure to electromagnetic fieldsThis device is intended for use at a distance of at least 20 cm from the body of the user or persons nearby.This device must not be worn or carried on the body.
To limit exposure to electromagnetic fieldsThis device is intended for use at a distance of at least 20 cm from the body of the user or persons nearby.This device must not be worn or carried on the body.
Specifications in accordance with Regulation (EU) 2019/1782
| Manufacturer’sname or trademark, commercial registration number, and address | Hama, HRA12159,Dresdner Str. 9, 86653Monheim |
| Model identifier | BQ60A-1802600-D |
| Input voltage | 100 –240 V |
| Input AC frequency | 50 /60Hz |
| Output voltage /Output current /Output power | 18.0 VDC/2.6 A/46.8 W |
| Average active efficiency | 88.7 % |
| Efficiency at low load (10 %) | 85.8 % |
| No-load power consumption | 0.08 W |
Consumption information according to the directive (EU) No. 801/2013 amending the directive (EC) No. 1275/2008
|
Status |
Duration of trigger time |
Energy consumption |
| off-mode 0/I mains switch (only on devices with 0/I mains switch) |
– |
≤ 0.50 W |
| manual standby mode (Ready state (Standby) on devices without information or status indicator (manual)*) |
– |
≤ 0.50 W |
| manual standby mode (Ready state (standby) on devices with information or status indicator (manual)*) |
– |
≤ 1.00 W |
| automatic standby (Standby on devices without information or status indicator**) | ≤ 20 min | ≤ 0.50 W |
| information or status display (Automatic ready state (Standby) on devices with information or status indicator**) | ≤ 20 min | ≤ 1.00 W |
| networked standby*** | ≤ 20 min | ≤ 2.00 W |
* Press the Power button** Not networked -“Maintain network connection -NO”.Not available in FM mode, if present.*** Networked -“Maintain network connection -YES”Please note that the actual power consumption can be dependent on multiple factors. These include the personal settings, the operating mode, the ambient temperature, and the firmware version of the product used.The values set out above represent maximum values.The actual reference values can be found at: www.hama.com->00054239->Downloads->Consumption information
![]() Hama GmbH &CoKG86652 Monheim/Germanywww.hama.com
Hama GmbH &CoKG86652 Monheim/Germanywww.hama.com
The Spotify software is subject to third party licenses found here: https://www.spotify.com/connect/third-party-licensesThe Bluetooth® wordmark and logos are registered trademarks owned by Bluetooth SIG, Inc. and any use of such marks by Hama GmbH &CoKGisunder license. Other trademarks and trade names are those of their respective owners.All listed brands are trademarks of the corresponding companies. Errors and omissions excepted, and subject to technical changes. Our general terms of delivery and payment are applied.
00054239/07.21
References
[xyz-ips snippet=”download-snippet”]