![]() 0018635800075297TH-100LCDThermometer/Hygrometer
0018635800075297TH-100LCDThermometer/Hygrometer Operating instruction
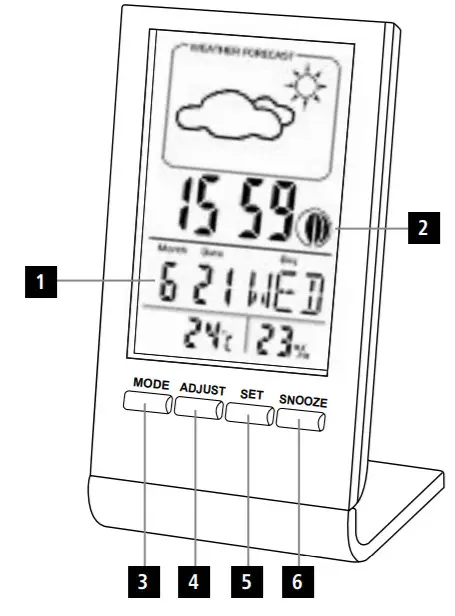
Controls and Displays
 |
 |
- Display
- Moon phase display
- MODE button
- ADJUST button
- SET button
- SNOOZE button
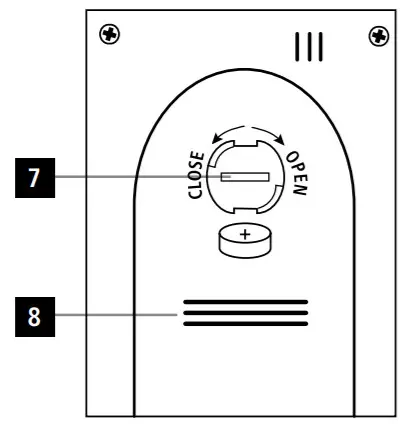
- Battery compartment
- Measurement opening (do not cover)
Explanation of Warning
Symbols and Notes
![]() WarningThis symbol is used to indicate safety instructions or to draw your attention to specific hazards and risks.
WarningThis symbol is used to indicate safety instructions or to draw your attention to specific hazards and risks.
![]() NoteThis symbol is used to indicate additional information or important notes.
NoteThis symbol is used to indicate additional information or important notes.
Package Contents
- TH-100 LCDthermometer/hygrometer
- 1LR1130 button cell battery
- These operating instructions
Safety Notes
- The product is intended for private, non-commercial use only.
- Protect the product from dirt, moisture, and overheating, and only use it in an adry environment.
- Do not use the product in the immediate vicinity of heaters or other heat sources or in direct sunlight.
- Do not operate the product outside the power limits given in the specifications.
- Do not drop the product and do not expose it to any major shocks.
- Do not attempt to service or repair the product yourself. Leave any and all service work to qualified experts.
- Do not modify the product in any way. Doing so voids the warranty.
![]() Warning – Batteries
Warning – Batteries
- Immediately remove and dispose of dead batteries from the product.
- Only use batteries (or rechargeable batteries) that match the specified type.
- When inserting batteries, note the correct polarity (+ and -markings) and insert the batteries accordingly. Failure to do so could result in the batteries leaking or exploding.
- Do not overcharge batteries.
- Keep batteries out of the reach of children.
- Do not short circuit the batteries/ rechargeable batteries and keep them away from uncoated metal objects.
Getting Started
Inserting the battery
- Open the battery compartment (7), remove the contact breaker and then close the battery compartment (7). The thermometer is now ready for use.
Replacing the batteries
- If display (1) becomes dimmer, you must replace the battery.
- When inserting the batteries, ensure that the polarity is correct (+ to the top, –to the bottom).
Operation
- Press the MODE button (3) to switch between the three display modes available. The modes are as follows (in that order): clock, alarm, calendar.
![]() Note
Note
- The product is usually in clock mode. If the product is in another mode, press the MODE button (3) until it is in the mode you want.
- When you adjust the settings, the selected item will flash to indicate that it can be set.
5.1 Setting the time format/time
- In clock mode, press and hold the SET button (5) for about 2 seconds to start setting the time:1. 12/24 hour format2. Hours3. Minutes
- Press the ADJUST button (4) to select the individual values.
- Press the SET button (5) to adopt the set value displayed and skip to the next item.
- Press the MODE button (3) to save the settings and return to the normal display.
5.2 Setting the alarm
- In alarm mode, press, and hold the SET button (5) for about 2 seconds to start setting the alarm:1. Hours2. Minutes
- Press the ADJUST button (4) to select the individual values.
- Press the SET button (5) to adopt the set value displayed and skip to the next item.
- Press the MODE button (3) to save the settings and return to the normal display.
5.3 Setting the calendar
- In calendar mode, press and hold the SET button (5) for about 2seconds to start setting the calendar:1. Year2. Month3. Day
- Press the ADJUST button (4) to select the individual values.
- Press the SET button (5) to adopt the set value displayed and skip to the next item.
- Press the MODE button (3) to save the settings and return to the normal display.
![]() Note
Note
- The weekday is set automatically when setting the date manually.
- In the 12-hour format, PM (from noon to one minute before midnight) appears before the time.
- The settings that were made up to that point are not saved!
5.4 Temperature measurements, maximum/minimum display
- In clock mode, press the SET button (5) to choose between °C (Celsius) and °F (Fahrenheit).
- Press the ADJUST button (4) to display the maximum or minimum values for temperature and humidity recording.
- Press the ADJUST button (4) for about 2seconds to delete these recordings and start recording again.
![]() NoteIf the ambient humidity is less than 20%, LL is shown in the corresponding field on the display
NoteIf the ambient humidity is less than 20%, LL is shown in the corresponding field on the display
5.5 Alarm and hourly chime
- In alarm mode, press the ADJUST button to switch the alarms on or off. The bell symbol stands for the alarm and the propeller symbol stands for the clock hour.If one of these symbols appears on the display, the relevant functions are activated.
- If the alarm is switched on, it will stop going off automatically after about a minute or when the SNOOZE button (6) is pressed.If you press the SNOOZE button (6), the alarm will go off again four times.
5.6 Moon phase display (2)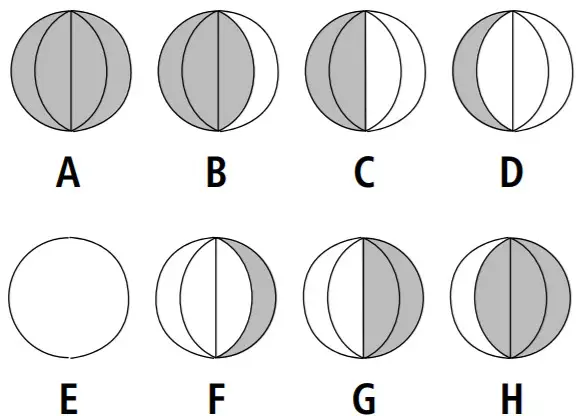
A: New moonB: Waxing crescentC: Half moon (first quarter)D: Waxing half moonE: Full moonF: Waning full moonG: Half moon (last quarter)H: Waning crescent
Care and Maintenance
Only clean this product with a slightly damp, lint-free cloth and do not use aggressive cleaning agents.Make sure that water does not get into the product.
Warranty Disclaimer
Hama GmbH &CoKG assumes no liability and provides no warranty for damage resulting from improper installation/mounting, improper use of the product, or failure to observe the operating instructions and/or safety notes.
Technical Data
| Power supply | 1.5 V, 1xLR1130 battery |
| Measuring range Temperature | 0°C –50°C |
| Temperature accuracy | +/–1°C |
Recycling Information
Note on environmental protection:
![]() After the implementation of the European Directive 2012/19/EU and 2006/66/EU in the national legal system, the following applies:Electric and electronic devices, as well as batteries, must not be disposed of with household waste. Consumers are obliged by law to return electrical and electronic devices as well as batteries at the end of their service lives to the public collecting points set up for this purpose or point of sale. Details to this are defined by the national law of the respective country. This symbol on the product, the instruction manual, or the package indicates that a product is subject to these regulations. By recycling, reusing the materials, or other forms of utilizing old devices/Batteries, you are making an important contribution to protecting our environment.
After the implementation of the European Directive 2012/19/EU and 2006/66/EU in the national legal system, the following applies:Electric and electronic devices, as well as batteries, must not be disposed of with household waste. Consumers are obliged by law to return electrical and electronic devices as well as batteries at the end of their service lives to the public collecting points set up for this purpose or point of sale. Details to this are defined by the national law of the respective country. This symbol on the product, the instruction manual, or the package indicates that a product is subject to these regulations. By recycling, reusing the materials, or other forms of utilizing old devices/Batteries, you are making an important contribution to protecting our environment.
![]() Hama GmbH &CoKG86652 Monheim /GermanyService &Support
Hama GmbH &CoKG86652 Monheim /GermanyService &Support![]() www.hama.com
www.hama.com![]() +49 9091 502-0All listed brands are trademarks of the corresponding companies.Errors and omissions excepted, and subject to technical changes.Our general terms of delivery and payment is applied.00186358_00075297/01.21
+49 9091 502-0All listed brands are trademarks of the corresponding companies.Errors and omissions excepted, and subject to technical changes.Our general terms of delivery and payment is applied.00186358_00075297/01.21![]()
References
[xyz-ips snippet=”download-snippet”]