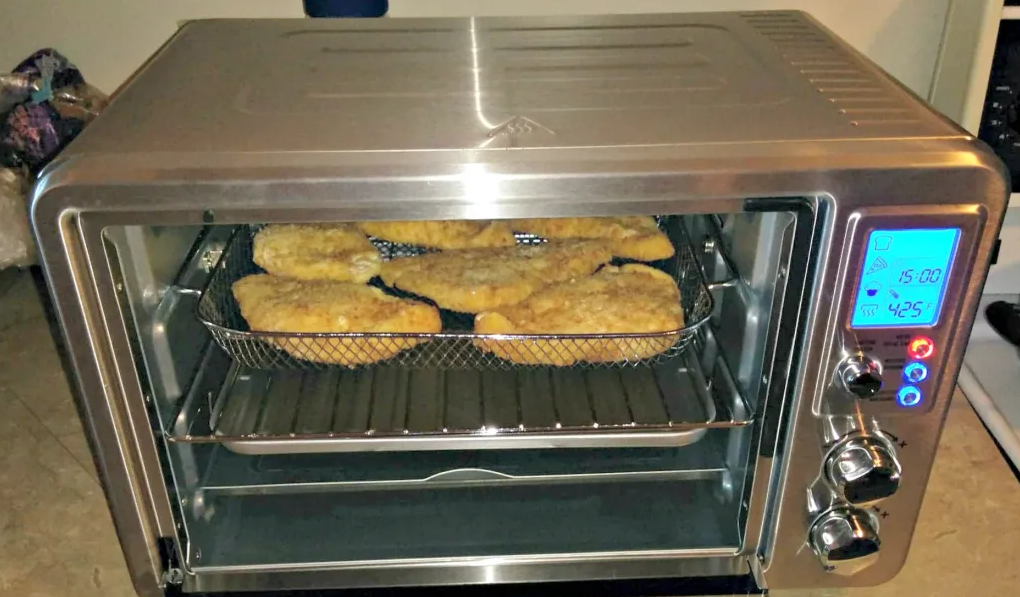
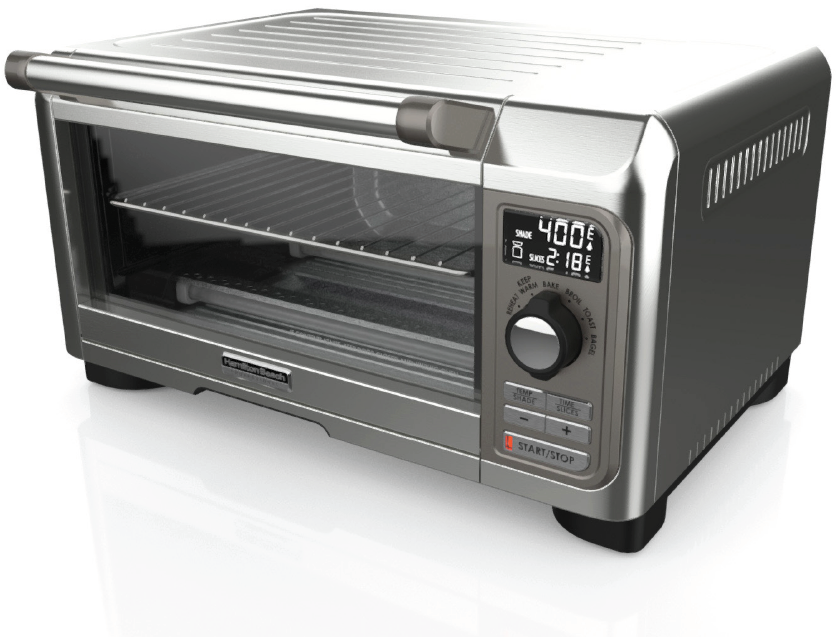
HamiltonBeach Sure-Crisp Digital Air Fryer Toaster Oven
READ BEFORE USE
hamiltonbeach.comFor recipes, tips and product information.

ENTER TO WIN $100 TO SPEND ON WEBSITEScan code or visit register.hamiltonbeach.com
IMPORTANT SAFEGUARDSWhen using electrical appliances, basic safety precautions should always be followed to reduce the risk of fire, electric shock, and/or injury to persons, including the following:
- Read all instructions.
- This appliance is not intended for use by persons (including children) with reduced physical, sensory, or mental capabilities,or lack of experience and knowledge, unless they are closely supervised and instructed concerning use of the appliance by a person responsible for their safety.
- Close supervision is necessary when any appliance is used by or near children. Cleaning and user maintenance shall not be made by children unless they are supervised. Children should be supervised to ensure that they do not play with the appliance.
- Do not touch hot surfaces. Use handles or knobs.
- To protect against electrical shock, do not immerse cord, plug, or oven in water or other liquid.
- Unplug from outlet when not in use and before cleaning. Allow to cool before cleaning appliance and putting on or taking off parts.
- Do not operate any appliance with a damaged supply cord or plug, or after the appliance malfunctions or has been dropped or damaged in any manner. Supply cord replacement and repairs must be conducted by the manufacturer, its service agent, or similarly qualified persons in order to avoid a hazard. Contact Customer Service for information on examination, repair, or adjustment as set forth in the Limited Warranty.
- The use of accessory attachments not recommended by the appliance manufacturer may cause injuries.
- Do not use outdoors.
- Do not let cord hang over edge of table or counter or touch hot surfaces.
- Do not place on or near a hot gas or electric burner or in a heated oven.
- Extreme caution must be used when moving an appliance containing hot oil or other hot liquids.
- To disconnect, turn all controls off by pressing the START/STOP button; then remove plug from wall outlet.
- Use extreme caution when removing pan or disposing of hot grease.
- Do not clean with metal scouring pads. Pieces can break off the pad and touch electrical parts, creating a risk of electrical shock.
- Oversize foods or metal utensils must not be inserted in an oven as they may create a fire or risk of electric shock.
- A fire may occur if toaster oven is covered or touching flammable material, including curtains, draperies, walls, overhead cabinets, paper or plastic products, cloth towels, and the like, when in operation. Do not place any item on top of the appliance when in operation; top is not a food warming surface.
- Extreme caution should be exercised when using containers constructed of materials other than metal or glass.
- Do not store any materials, other than manufacturer-recommended accessories, in this oven when not in use.
- Do not place any of the following materials in the oven: paper, cardboard, plastic, and the like.
- Do not cover crumb tray or any part of the oven with metal foil. This will cause overheating of the oven.
- To turn oven off, press the START/STOP button. See “Parts and Features” section.
- Do not place eyes or face in close proximity with tempered safety glass door, in the event that the safety glass breaks.
- Always use appliance with crumb tray securely in place.
- Do not use appliance for other than intended use.
- Clean oven interior carefully. Do not scratch or damage heating element tube.
- Do not operate unattended.
- Do not operate the appliance by means of an external timer or separate remote-control system.
SAVE THESE INSTRUCTIONS
- If contents ignite, do not open oven door. Unplug oven and allow contents to stop burning and cool before opening door.
- Do not operate oven unattended.
- Do not use with oven cooking bags.
- Do not heat foods in plastic containers.
- Do not heat taco shells in countertop oven. Always use full-size conventional oven.
- Always allow at least 1 inch (2.5 cm) between food and heating element.
- Follow food manufacturer’s instructions.
- Always unplug oven when not in use.
- Regular cleaning reduces risk of fire hazard.
Other Consumer Safety Information
This appliance is intended for household use only.This appliance is only intended for the preparation, cooking, and serving of foods. This appliance is not intended for use with any nonfood materials or products.WARNING Electrical Shock Hazard: This appliance is provided with a polarized plug (one wide blade) to reduce the risk of electric shock. The plug fits only one way into a polarized outlet. Do not defeat the safety purpose of the plug by modifying the plug in any way or by using an adapter. If the plug does not fit fully into the outlet, reverse the plug. If it still does not fit, have an electrician replace the outlet.
The length of the cord used on this appliance was selected to reduce the hazards of becoming tangled in or tripping over a longer cord. If a longer cord is necessary, an approved extension cord may be used. The electrical rating of the extension cord must be equal to or greater than the rating of the appliance. Care must be taken to arrange the extension cord so that it will not drape over the countertop or tabletop where it can be pulled on by children or accidentally tripped over.To avoid an electrical circuit overload, do not use another high-wattage appliance on the same circuit with this appliance.
Parts and Features
To order parts, visit: hamiltonbeach.com/parts
Before first use: Most heating appliances produce an odor and/or smoke when used for first time. Plug into outlet. Turn function dial to BAKE. Press TEMP/SHADE button and use + button to set temperature to 450°F (232°C). Press TIME/SLICES button and use + button to set time to 5 minutes. Odor should not be present after this initial preheating. Wash Oven Rack, Air Fry Basket, Broil Rack, Bake/Broil Pan and Slide-Out Crumb/Drip Tray in hot, soapy water. Rinse and dry.
CAUTION: HOT SURFACE. The temperature of accessible surfaces may be high when the appliance is operating.

Getting to Know Your Display
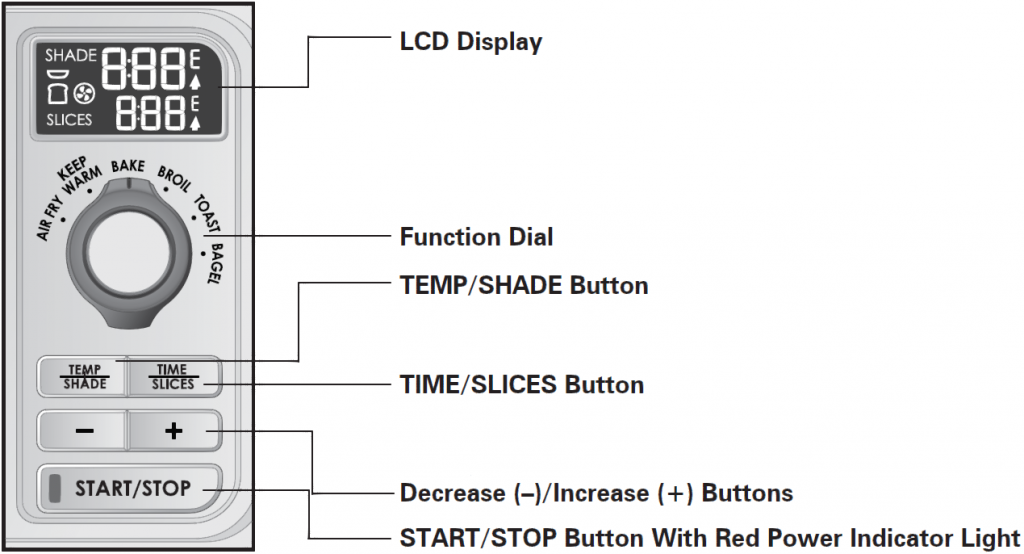
- LCD Display – Easy-to-read digital LCD screen illuminates after any control is pressed. It will go into sleep mode after 30 seconds if START/STOP button is not pressed. In AIR FRY, BAKE, and KEEP WARM modes, temperature and cooking time are displayed. In BROIL, “HI” and time are displayed. For TOAST ( ) and BAGEL ( ), shade setting and number of slices are displayed.
- Function Dial – Use dial to select cooking mode.
- TEMP/SHADE Button – Press when adjusting temperature or shade for TOAST or BAGEL modes. Temperature display can be switched between Fahrenheit and Celsius by pressing and holding for 5 seconds.
- TIME/SLICES Button – Press when adjusting cook time or number of slices. Press +/– buttons to decrease or increase setting. Timer starts counting down immediately after being set. Preheat Oven before setting time.
- Decrease (–)/Increase (+) Buttons
- START/STOP Button With Red Power Indicator Light – Press to illuminate display and to start or end cooking mode.
Special Features
- Display – Toggles between actual oven temperature and set temperature during preheat, and chimes once preheated. Up arrow will show until set temperature is reached.
- Stay On Function – Oven can be set to stay on by pressing decrease (–) button just past 1. Oven will turn off automatically after 4 hours of cooking. If Oven is not turned off after 4 hours of continuous operation, Oven will go to sleep mode and turn off.
- Automatic Shutoff – Oven turns off automatically when Timer reaches 00:00 and chimes 3 times, except when Stay On function is not selected.
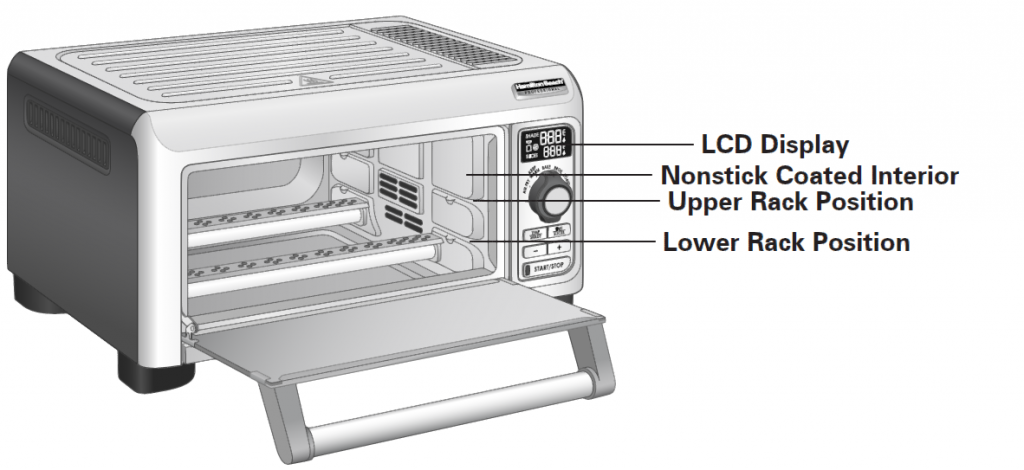
- Flexible Oven Rack Positions – Place Oven Rack in desired position with Crumb Tray in place. Plug into outlet. If display is blank, press any button to illuminate display. Two positions allow for optimal cooking. Slots on both sides of Oven make it easy to slide Oven Rack in and out of position.
- Rack can be in upper or lower position for AIR FRY or BAKE mode, depending on size of food.
- Upper Rack Position is perfect for broiling fish or hamburgers.
- Lower rack is great for roasting meat or poultry.
Sure-Crisp® Air Frying Tips From Our Test Kitchen
- Sure-Crisp® AIR FRY mode may require more cooking time than standalone air fryers.
- Always use Bake/Broil Pan on rack under Air Fry Basket to catch drips.
- Delicate foods such as fish and hand-breaded items should be cooked in a single, even layer.
- Most foods (larger/thicker) may need to be flipped, stirred, or rotated during cooking.
- Breadcrumbs make crunchy air fried coatings. Avoid sauces or batters.
- Rack position used to air fry depends on size of food to be cooked. Use upper rack position for most foods. Keep at least 1 inch (2.5 cm) between food and heating elements.
- Do not line Air Fry Basket; that blocks air flow. Do line Bake/Broil Pan under Basket for easy cleanup.
- Preheat Oven for shorter cook times/improved crispness.
- Cut uniform-sized pieces for even cooking results.
- Arrange foods in a single, even layer in Air Fry Basket.
- A light spritz of cooking oil before cooking provides crispier texture.
- Review food packaging-suggested cook times and adjust time for desired crispness.
- Avoid opening Oven door while cooking frozen French fries or chicken nuggets until cooking cycle is nearly done.
- Check food for desired doneness before end of cooking cycle. Add or reduce cooking time as needed.
- For best results when air frying, set temperature between 400°F-450°F (205°C-232°C).
Cooking Guide
*Sure-Crisp® AIR FRY mode may require more cooking time than standalone air fryers.
|
FOOD |
AMOUNT |
SETTINGS |
TEMPERATURE |
TIME |
| Frozen Fries & Snacks | ||||
| Frozen regular French fries | 8 oz. (227 g) | AIR FRY | 450°F (232°C) | 18–22 minutes |
| Frozen Chicken Nuggets | 12 oz. (340 g)/16 nuggets | AIR FRY | 450°F (232°C) | 15–17 minutes |
| Frozen breaded chicken tenders | 14 oz. (397 g)/8 tenders | AIR FRY | 450°F (232°C) | 18–20 minutes |
| Frozen mozzerella sticks | 8 oz. (227 g)/about 10 sticks | AIR FRY | 400°F (205°C) | 8–10 minutes |
| Frozen tater tots | 8 oz. (227 g) | AIR FRY | 450°F (232°C) | 8–10 minutes |
| Vegetables | ||||
| Cauliflower | 12 oz. (340 g)/1 small head cut into florets | AIR FRY | 450°F (232°C) | 12–14 minutes |
| Fresh potato fries | 10 oz. (283 g)/1 potato cut into fries | AIR FRY | 450°F (232°C) | 26–28 minutes |
| Green beans | 8 oz. (227 g) | AIR FRY | 450°F (232°C) | 10–12 minutes |
| Asparagus spears | 6 oz. (170 g) | AIR FRY | 450°F (232°C) | 8–10 minutes |
| Brussels sprouts, halved | 8 oz. (227 g) | AIR FRY | 450°F (232°C) | 13–15 minutes |
| FOOD | AMOUNT | SETTINGS | TEMPERATURE | TIME |
| Meat & Poultry | ||||
| Fresh whole chicken wings | 6 wings | AIR FRY | 450°F (232°C) | 16–18 minutes |
| Fresh chicken tenders | 1.05 lbs. (476 g) | AIR FRY | 425°F (118°C) | 15–18 minutes |
| Hamburger (3/4-inch [1.9 cm] thick) 80% lean, 20% fat | 4 oz. (113 g) each/4 burgers | AIR FRY | 450°F (232°C) | 15–18 minutes |
| Rib Eye steak (1/2-inch [1.3 cm] thick) | 12 oz. (340 g)/1 steak | AIR FRY | 425°F (118°C) | 10–12 minutes |
| Sheet pan supper
Pork tenderloin and veggies |
1 lbs. pork tenderloin; 2 large carrots sliced 1/2-inch thick; 2 large potatoes cut into cubes; 1/2 small sweet onion cut in thin wedges; 1 tsp steak seasoning; 1 Tbsp olive oil; salt and pepper to taste; 1/2 cup apricot jam; 1 Tbsp balsamic vinegar | AIR FRY or BAKE | 425°F (118°C) | 20 minutes stir; add glaze and cook additional 10 minutes until
pork reaches 145°F (63°C) |
| Broil hamburgers | 4 oz. (113 g) each/4 burgers | BROIL | High | 10–12 minutes |
| Rib Eye steak (1/2-inch [1.3 cm] thick) | 12 oz. (340 g)/1 steak | BROIL | High | 15–18 minutes |
| Fish & Seafood | ||||
| Frozen fish fillets | 6 oz. to 8 oz. (170 g to 227 g)/4 fillets | AIR FRY | 425°F (118°C) | 18–20 minutes |
| Frozen fish sticks | 8 oz. (227 g)/about 10 sticks | AIR FRY | 400°F (205°C) | 8–10 minutes |
| Peeled and breaded fresh shrimp | 8 oz. (227 g)/8 shrimp | AIR FRY | 400°F (205°C) | 10–12 minutes |
| Bakery & Desserts | ||||
| Baked refrigerated biscuits | 4 biscuits | BAKE | 375°F (191°C) | 18–20 minutes |
NOTES:
- Review manufacturer-suggested cook times for foods and adjust time for desired crispness.
- AIR FRY mode may require more cooking time than standalone air fryers.
How to Use
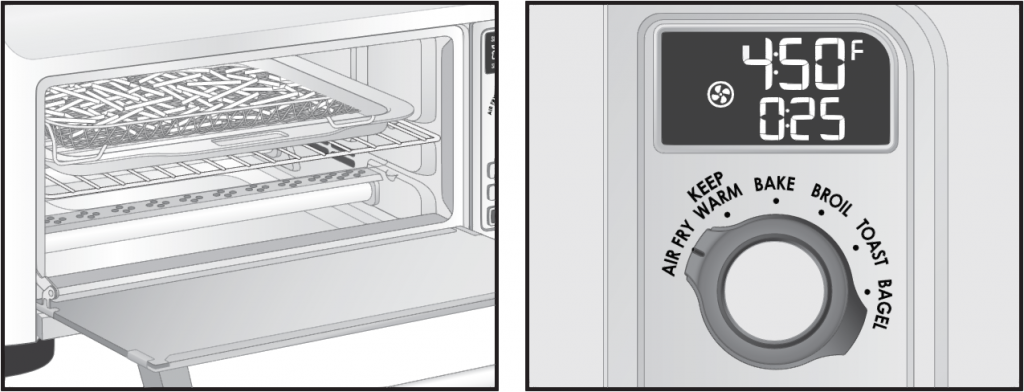
Sure-Crisp® AIR FRY Mode
- Plug into outlet.
- Place Oven Rack in desired position with Slide-Out Crumb Tray in place.
- Turn Function Dial to AIR FRY.
- Air Fry Basket: Place Basket onto Bake/Broil Pan on Oven Rack.
- Fan icon displays. Select temperature between 300°F (149°C) and 450°F (232°C) by pressing TEMP/SHADE button and increasing or decreasing temperature using + or – button. Default temperature is 450°F (232°C). Display toggles between actual temperature and set temperature.
- Preheat Oven. When preheat temperature has been reached, Display will blink until START/STOP button has been pressed for timer to begin countdown. If START/STOP button is not pressed after Oven reaches preset temperature, Display will blink, and Oven will hold desired temperature for 1 hour. After 1 hour Oven will beep 3 times, Display will go blank and enter sleep mode.
- Add food once set temperature is reached. Set time for up to 1 hour by pressing TIME/SLICES button, using + or – button to adjust. Default time is 25 minutes. Once a time is set Oven remembers that time unless unplugged.
- Unplug after cooking is complete.
NOTE: If time is selected, Timer will sound when selected time is complete. If Stay On is selected, press START/STOP button to end cycle at any time.
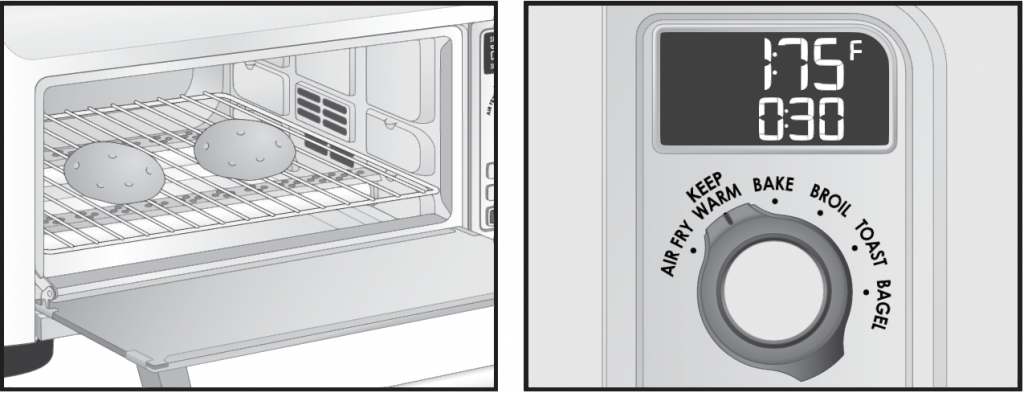
KEEP WARM Mode
Use to hold cooked foods at temperature for up to 2 hours. Place Oven Rack in lower position.
- Plug into outlet.
- Place Oven Rack in desired position with Slide-Out Crumb Tray in place.
- Turn function dial to KEEP WARM. Temperature will default to 175°F (80°C) for 30 minutes but can be changed by pressing TEMP/SHADE button and using + or – button to adjust. Temperature range is 150°F (65°C) to 200°F (93°C).
- When preheat temperature has been reached, Display will blink until START/STOP button has been pressed for timer to begin countdown. If START/STOP button is not pressed after Oven reaches preset temperature, Display will blink, and Oven will hold desired temperature for 2 hours. After 2 hours Oven will beep 3 times, Display will go blank and enter sleep mode.
- Time can be set from 1 minute to 2 hours and can be changed at any time during cycle by pressing TIME/SLICES button, using+ or – button to adjust.
- Unplug after cooking is complete.
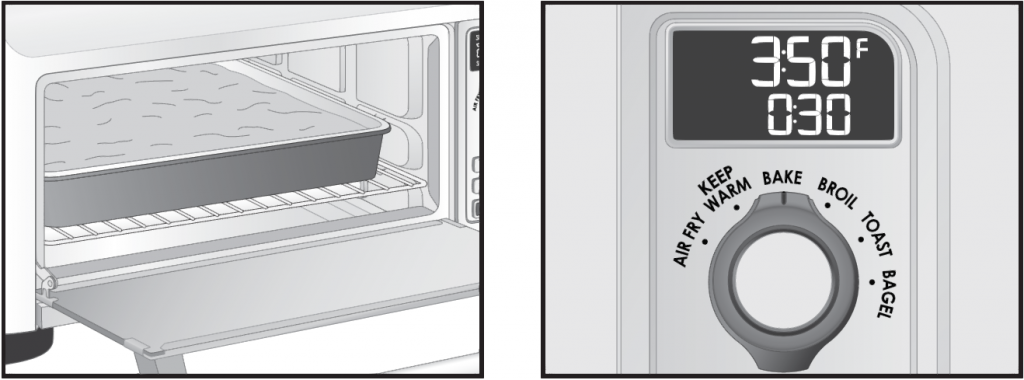
BAKE Mode
Use as a normal kitchen oven and preheat Oven before baking foods such as roasts, potatoes, or cakes.
- Plug into outlet.
- Place Oven Rack in desired position with Slide-Out Crumb Tray in place.
- Turn Function Dial to BAKE. Select temperature between 200°F (93°C) and 450°F (232°C) by pressing TEMP/SHADE button and increasing or decreasing temperature using + or – button. Default temperature is 350°F (177°C).
- Set time for up to 2 hours by pressing TIME/SLICES button, using + or – button to adjust. Default time is 30 minutes. When preheat temperature has been reached, Display will blink until START/STOP button has been pressed for timer to begin countdown. If START/STOP button is not pressed after Oven reaches preset temperature, Display will blink, and Oven will hold desired temperature for 4 hours. After 4 hours Oven will beep 3 times, Display will go blank and enter sleep mode. Stay On Function – Oven can be set to Stay On by pressing decrease (–) button just past 1. Press START/STOP button to turn off Toaster Oven while in BAKE mode. In Stay On Function oven will stay on for a maximum of 4 hours of continuous operation. If START/STOP button isn’t pressed, oven will automatically turn off, screen will go blank and enter sleep mode.
- Unplug after cooking is complete.
NOTES:
- Bake foods, such as whole chicken or pieces or thick pork chops, in a baking pan on Lower Rack Position. Pizza can be baked directly on Lower Rack.
- When cooking heavy foods such as a whole chicken, lift food out of pan using metal forks or tongs.
BROIL Mode
Use to brown foods such as beef, chicken, fish, pork, and casseroles. Broil food on Broil Rack in Bake/Broil Pan in upper or lower rack position. Food must be a minimum of 1 inch (2.5 cm) from heating elements.
- Plug into outlet.
- Place Oven Rack in desired position with Slide-Out Crumb Tray in place.
- Turn Function Dial to BROIL. “HI” shows in display and time default is 30 minutes. Oven broils on high temperature and may not be adjusted.
- Broiling time can be set from 1 minute to 30 minutes. Adjust cooking time by pressing TIME/SLICES button, using + or –button to adjust.
- Special feature allows door to remain open slightly during broiling without shutting off.
- Unplug after cooking is complete.

TOAST Mode
Use for browning and toasting breads. Rack should be in upper position.
- Plug into outlet.
- Place Oven Rack in desired position with Slide-Out Crumb Tray in place.
- Turn Function Dial to TOAST. Toast icon ( ) displays.
- Select one of 7 shades of browning by pressing TEMP/SHADE button and adjust setting using + or – button. Default shade setting is 4.
- Select number of slices by pressing TIME/SLICES button and adjust setting using + or – button. Default number of slices is 4. Adjust for 1 to 4 slices.
- Unplug after cooking is complete.

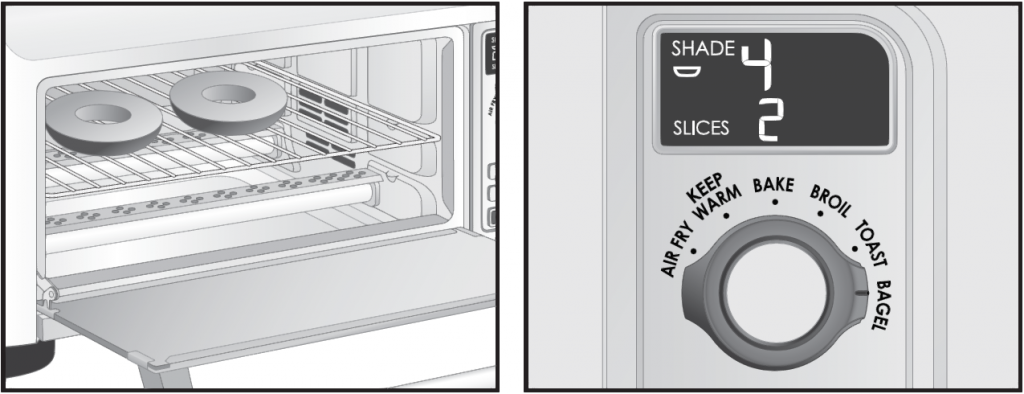
BAGEL Mode
Use for browning and toasting bagels. Bagel mode toasts top cut side and warms round bottom of bagels. Bagels should be placed on rack in upper position with cut side facing up.
- Plug into outlet.
- Place Oven Rack in desired position with Slide-Out Crumb Tray in place.
- Turn Function Dial to BAGEL. Bagel icon ( ) displays.
- Select one of 7 shades of browning by pressing TEMP/SHADE button and adjust setting using + or – button. Default shade setting is 4.
- Select number of slices by pressing TIME/SLICES button and adjust setting using + or – button. Default number of slices is 2. Adjust for 1 to 4 slices.
- Unplug after cooking is complete.
Cleaning Your Oven
- Unplug and let cool completely.
- Wipe Control Panel display with a slightly damp sponge and dry. Protect display when cleaning any other surfaces.
- Use a nonabrasive stainless steel cleaner to clean exterior stainless steel areas. Apply cleaner with a soft, lint-free cloth. To bring out natural luster, lightly wipe surface with a water-dampened, lint-free cloth followed by a dry polishing cloth. Always follow grain of stainless steel. Signature Polish can be ordered via their website atsignaturepolishonline.com.
- Wipe Oven walls and bottom of Oven with a damp, soapy cloth. Repeat with a damp, clean cloth. For stubborn stains, use a plastic scouring pad.
- Carefully use a razor blade to gently lift baked-on foods from glass window. Spray glass cleaner on cloth to clean. Wipe with a damp sponge to rinse and dry.
- Clean Oven Rack with a mild abrasive cleaner and rinse. Dry with clean cloth.
- Slide Out Crumb/Drip Tray. Hand wash Air Fry Basket, Oven Rack, Crumb/Drip Tray, Bake/Broil Pan, and Broil Rack in hot, soapy water. Rinse and dry.
- Wipe control knobs with a damp, soapy cloth. Repeat with a damp, clean cloth and dry.
Troubleshooting
When should I choose AIR FRY, BAKE, or BROIL?
- Choose AIR FRY for foods such as French fries, chicken nuggets, tenders, or wings.
- Choose BAKE for foods such as roasts, potatoes, or cakes.
- Choose BROIL to brown foods such as beef, chicken, fish, pork, and casseroles.
In case of power interruption:
- If power is out for less than 15 seconds, Oven will go back to previous setting. If more than 15 seconds, Oven switches to standby mode once power returns.
How large a bake pan will Oven hold?
- Oven will hold most 9″ x 9″ (23 cm x 23 cm) bake pans without handles.
How big of a whole chicken will Oven handle?
- Oven will hold up to a 5-pound (2.3-kg) whole chicken.
If I want to toast bread, what setting is best?
- TOAST mode is best for toasting both sides of sliced breads, or use BROIL mode for open-faced sandwiches, baguettes, and crostini. BROIL mode activates top heating element and is great when toasting is required on one side only, or breads can be flipped when desired level of browning is reached.
Where is the Slide-Out Crumb/Drip Tray?
- Slide-Out Crumb/Drip Tray is located in front of unit under Oven door.
Toaster Oven will not heat.
- Check to make sure electrical outlet is working and Oven is plugged in. Turn Function Dial to BAKE; leave at default temperature of 350°F (177°C). Set Oven to Stay On by pressing decrease (–) button just past 1. ON will be displayed.
Moisture forms on inside of Toaster Oven door when toasting.
- This is normal when toasting in a toaster oven. Moisture is slower to escape from a toaster oven than from a toaster. Amount of moisture will differ between fresh bread, bagels, and frozen pastries.
Food is not cooked in Sure-Crisp® AIR FRY mode.
- Too much food in basket. Increase cooking time and continue to cook.
- Temperature was set too low. Increase temperature and continue to cook.
Food cooked unevenly in Sure-Crisp® AIR FRY mode.
- Too much food in basket. Turn or stir food halfway through cooking time or more frequently if needed.
Fresh vegetables are not crisp enough.
- Temperature is too low. Increase temperature and continue to cook.
Fresh French fries not crisp.
- Spritz a small amount of vegetable oil, enough to lightly coat potatoes.
- Pieces are too large. Cut potatoes smaller or thinner next batch.
Meat or poultry is not cooked enough.
- Meat and poultry should be cooked in a single layer for even cooking. Refer to USDA website for proper cooking doneness temperatures. Visit foodsafety.gov for more information.
An odor and smoke come from Toaster Oven.
- Smoke and odor are normal during first use of most heating appliances. These will not be present after initial heating period.
- Excessive oil dripped into Pan or splattered onto heating coils. Only use small amounts of oil when air frying.
Toaster Oven will not toast.
- Check to make sure outlet is working and oven is plugged in. Turn Function Dial to TOAST. Press TEMP/SHADE button and use + or –button to select desired shade setting from 1-7.
Some foods burn and some are not done.
- Adjust oven rack position to center food in Oven.
- Adjust Toaster Oven temperature or cooking time for best results with your recipes.
Limited Warranty
This warranty applies to products purchased and used in the U.S. and Canada. This is the only express warranty for this product and is in lieu of any other warranty or condition.This product is warranted to be free from defects in material and workmanship for a period of five (5) years from the date of original purchase in Canada and three (3) years from the date of original purchase in the U.S. During this period, your exclusive remedy is replacement of this product or any component found to be defective, at our option; however, you are responsible for all costs associated with our returning a product or component under this warranty to you. If the product or component is unavailable, we will replace with a similar one of equal or greater value.This warranty does not cover glass, filters, wear from normal use, use not in conformity with the printed directions, or damage to the product resulting from accident, alteration, abuse, or misuse. This warranty extends only to the original consumer purchaser or gift recipient. Keep the original sales receipt, as proof of purchase is required to make a warranty claim. This warranty is void if the product is used for other than single-family household use or subjected to any voltage and waveform other than as specified on the rating label (e.g., 120 V ~ 60 Hz).We exclude all claims for special, incidental, and consequential damages caused by breach of express or implied warranty. All liability is limited to the amount of the purchase price. Every implied warranty, including any statutory warranty or condition of merchantability or fitness for a particular purpose, is disclaimed except to the extent prohibited by law, in which case such warranty or condition is limited to the duration of this written warranty. This warranty gives you specific legal rights. You may have other legal rights that vary depending on where you live. Some states or provinces do not allow limitations on implied warranties or special, incidental, or consequential damages, so the foregoing limitations may not apply to you.To make warranty claim, do not return this appliance to the store. Please write Hamilton Beach Brands, Inc., Customer Service Department, 4421 Waterfront Dr., Glen Allen, VA 23060, or visit hamiltonbeach.com/customer-service in the U.S. or hamiltonbeach.ca/customer-service in Canada. For faster service, locate the model, type, and series numbers on your appliance.
Hamilton Beach Brands, Inc.4421 Waterfront Drive • Glen Allen, VA 23060, USAhamiltonbeach.com1.800.851.8900
![]()
References
Home
Customer Service | HamiltonBeach.com
Home | HamiltonBeach.com
Signature Polish – Multi-Surface Polish American Express Apple Pay Diners Club Discover Elo Google Pay JCB Mastercard PayPal Shop Pay Venmo Visa
Search Now for Replacement Parts & Accessories | HamiltonBeach.com
Home | HamiltonBeach.ca
Product Registration | HamiltonBeach.com
Customer Service | HamiltonBeach.ca
Signature Polish – Multi-Surface Polish American Express Apple Pay Diners Club Discover Elo Facebook Pay Google Pay JCB Mastercard PayPal Shop Pay Venmo Visa
FoodSafety.gov
[xyz-ips snippet=”download-snippet”]