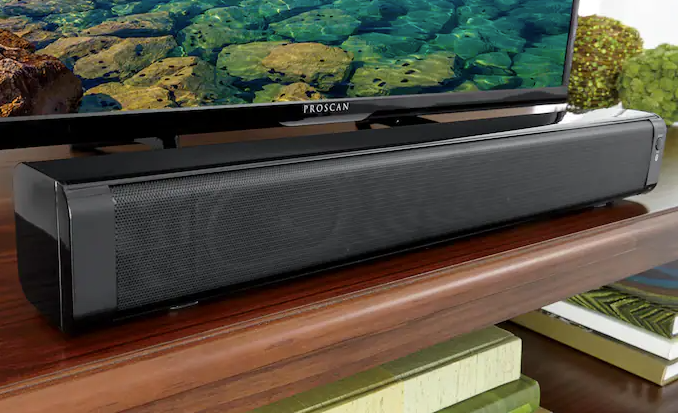
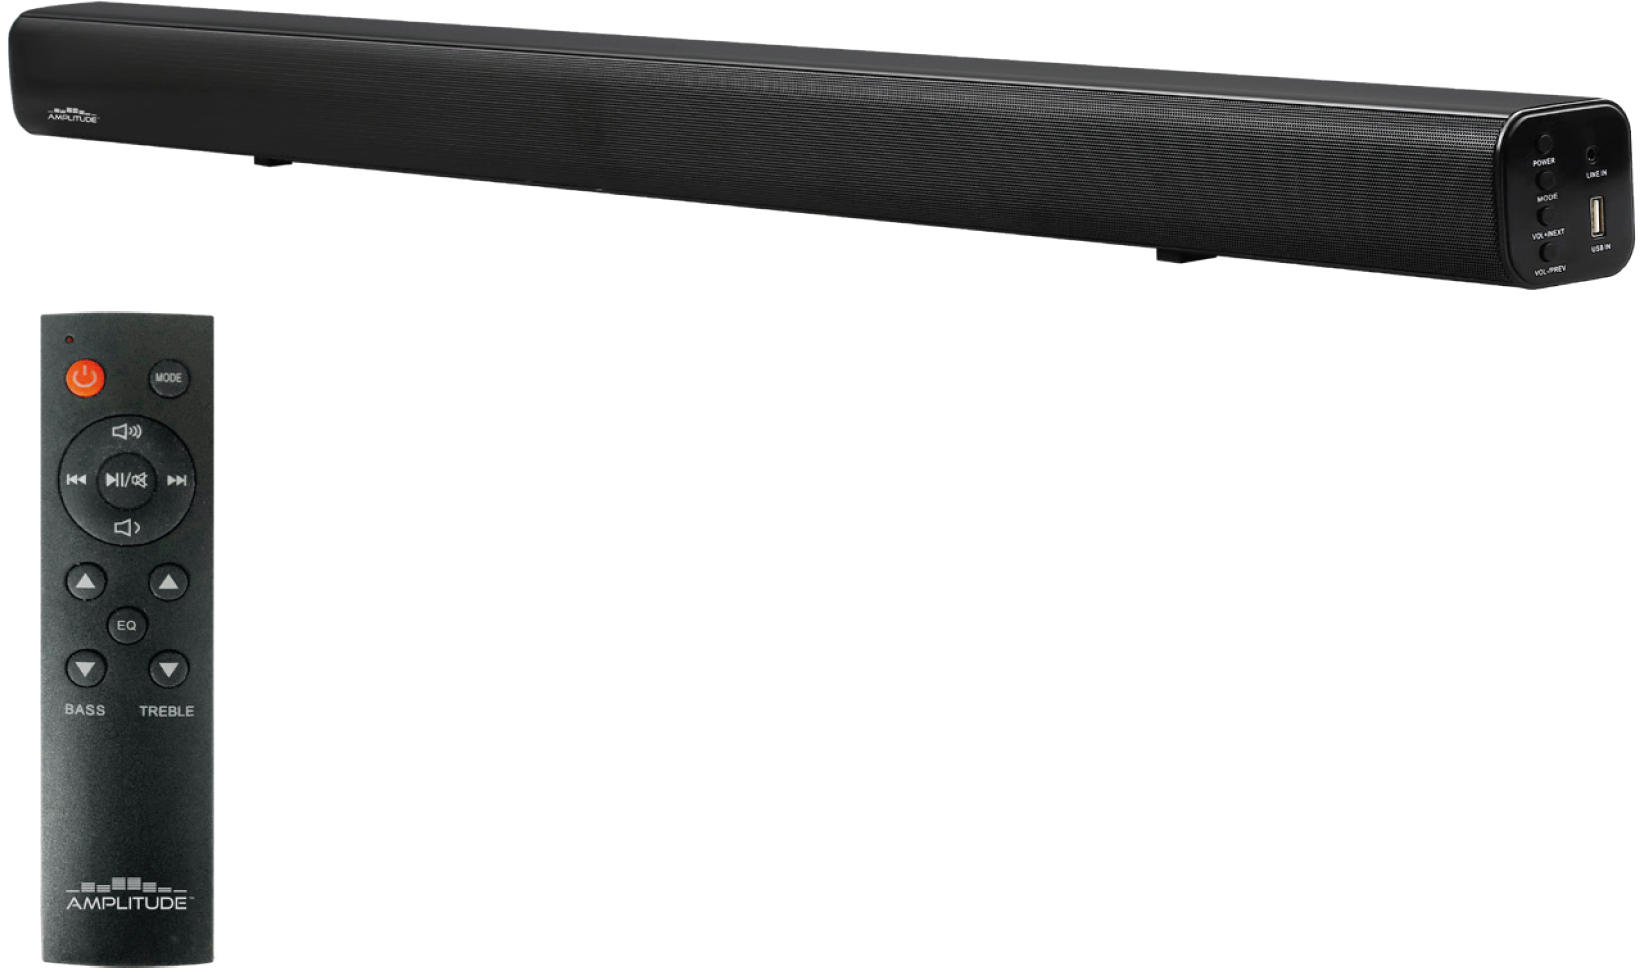
HamiltonBuhl AMPLITUDE AMP37 Slim, Powerful 2.0 Channel Bluetooth Soundbar
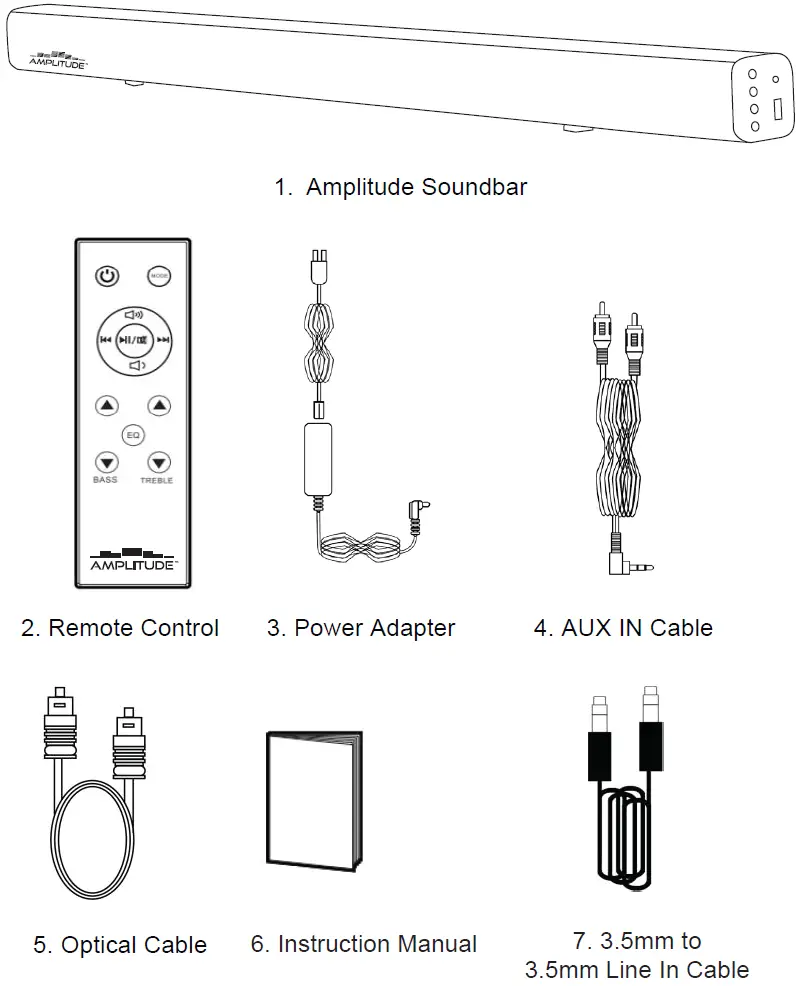
In the Box
- Amplitude™ Soundbar
- Remote Control
- Power Adapter
- AUX IN Cable
- Optical Cable
- Instruction Manual
- 3.5mm to 3.5mm Line In Cable
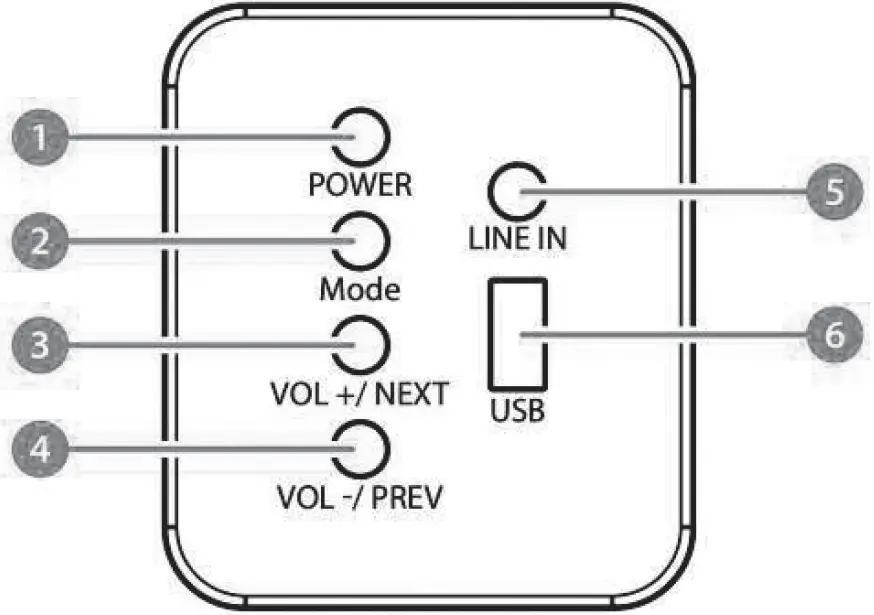
- Power
- Mode
- Volume +/Next
- Volume -/Previous
- Line In
- USB Function
Back View
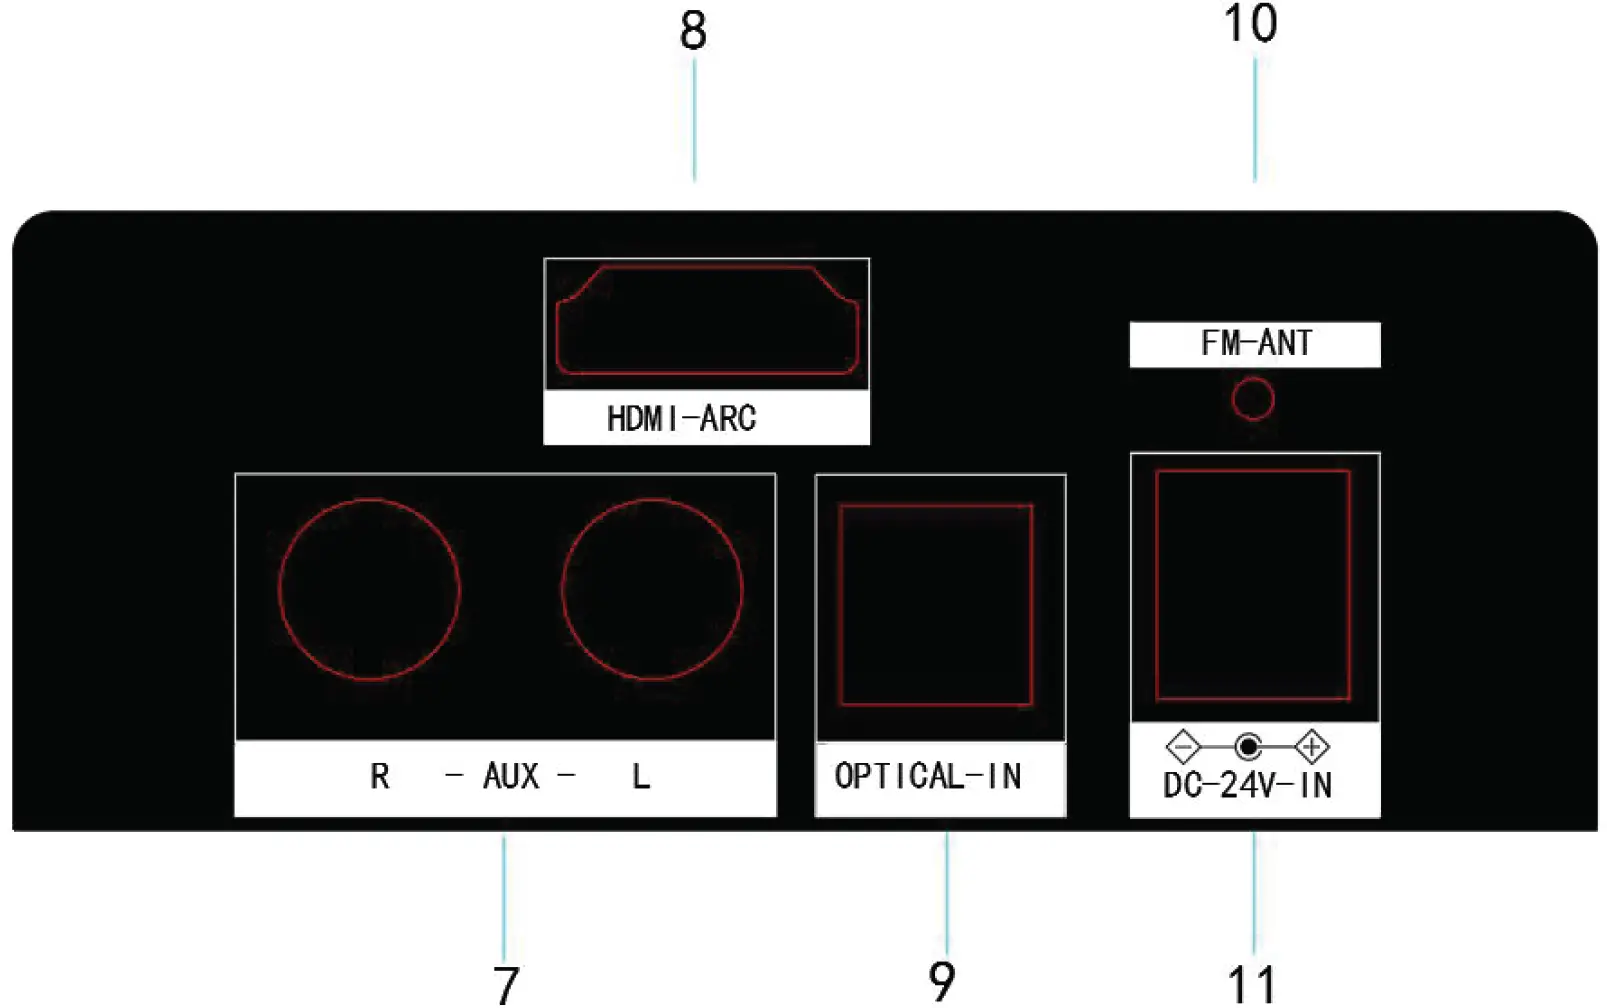
- AUX IN Input
- HDMI (ARC) Input
- Optical Input
- Wired FM Antenna
- DC Power Input
Remote Control
- Power On/Off
- Volume+
- Rewind – In AUX or Bluetooth® Mode
- Play/Pause
- Volume –
- Bass Increase
- EQ – Press repeatedly to switch Preset Equalizers
- Bass Decrease
- Mode – Press repeatedly to switch Modes
- Forward – In AUX or Bluetooth® Mode
- Treble Increase
- Treble Decrease
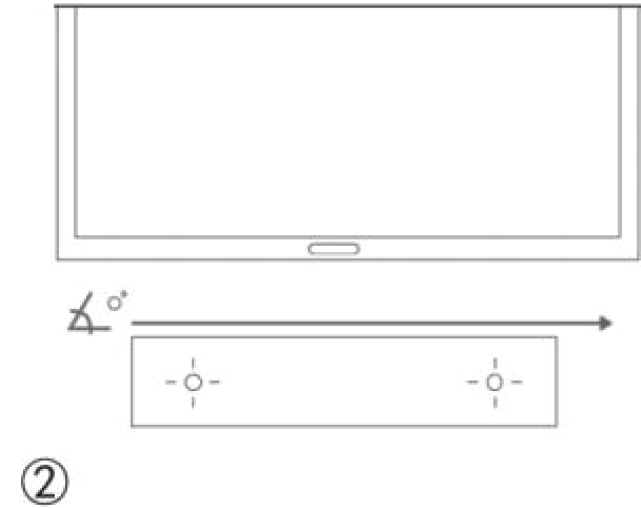
The remote control sensor at the front of the soundbar is sensitive to remote commands up to a maximum of 25′ and within a maximum arc of 30 degrees.
Please Note: Operating distance may vary depending on the brightness of the room.
Preset EQ and Mode Indicators
Reset Bass and Treble Settings: By selecting any preset equalizer setting, all bass and treble levels will be set to the factory default settings.
Preset EQ Settings:
There are three preset sound modes:
- Movie Mode: Provides a surround sound effect.
- Voice Mode: Less bass and more clear vocals – ideal for news, radio, sports programming, etc.
- ADJ (Music) Mode: Deeper bass with more dynamic sound range.

LED Mode Indicators:
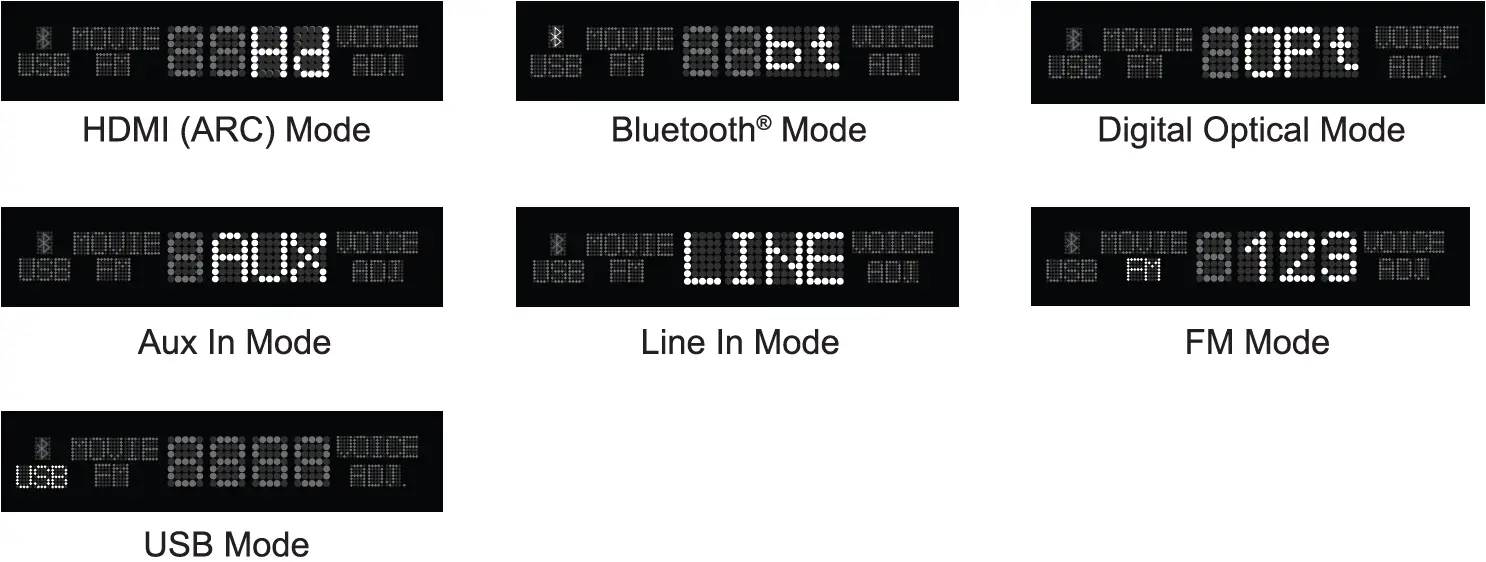
When the unit is plugged in, it will be in Standby mode. Once the power button is pressed, the LED will turn on and the previously selected MODE will be displayed.The desired signal inputs can be selected with remote control by pressing the MODE button (i.e., HDMI-ARC, Line-In, Bluetooth, Optical-In, or FM Radio).When you press the preset Equalizer modes (Movie Noise /ADJ-Music), the LED display will show the selected EQ mode.
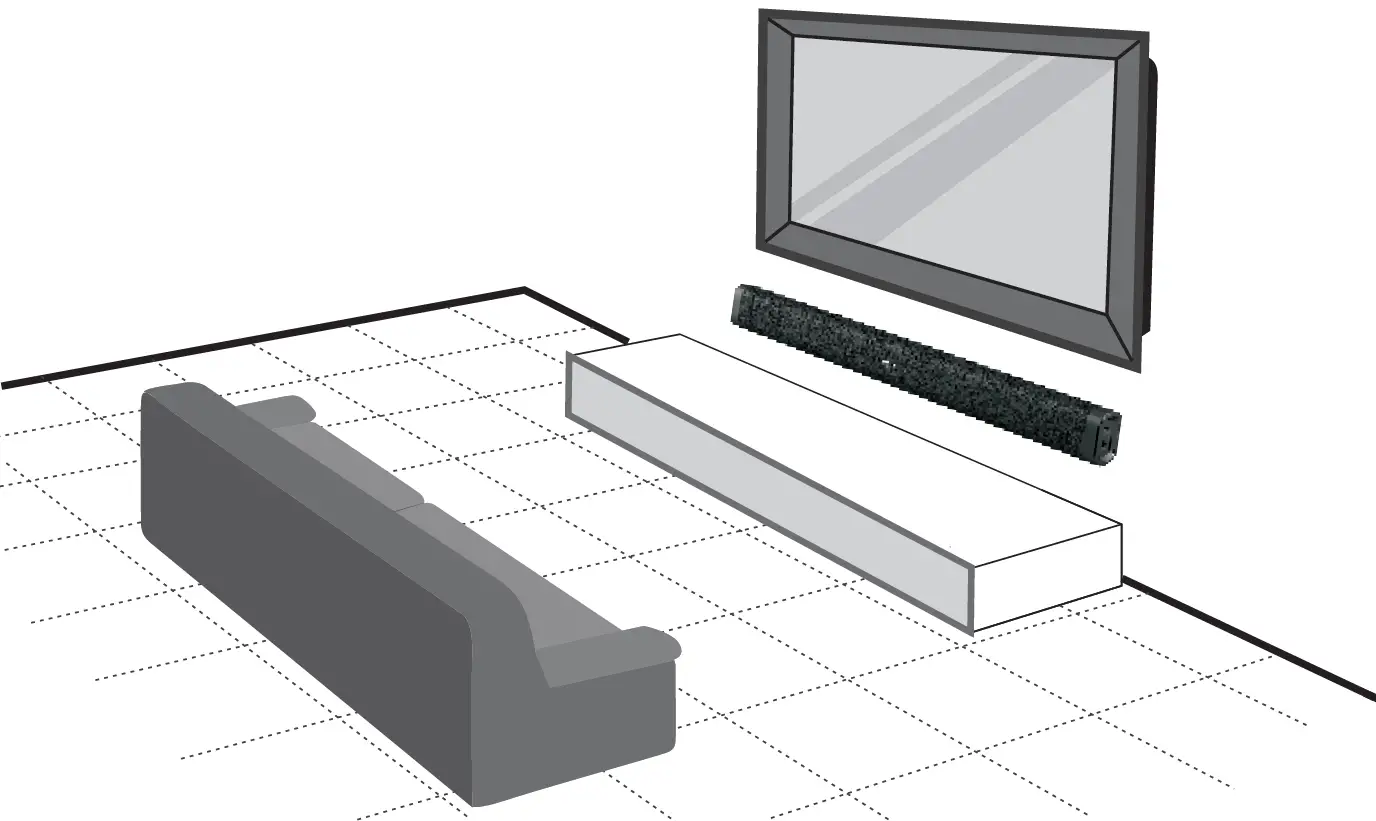
Placement of the Unit
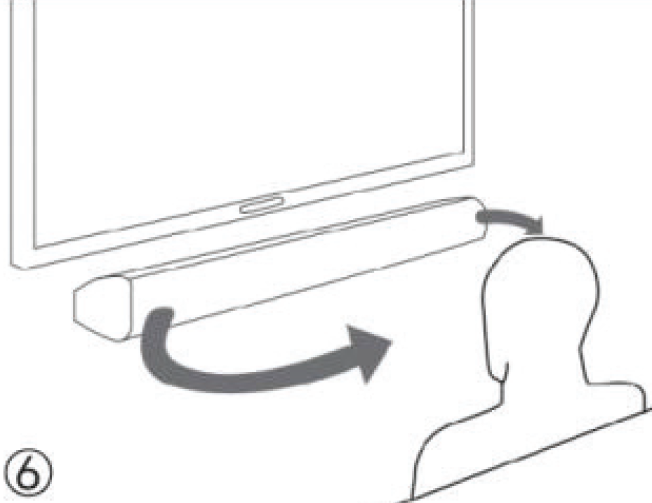
For optimum sound quality, when seated, position soundbar at mid-torso level or at least above the knees.The front of the soundbar should be clear of any objects. If the unit is placed on a table, make sure to position the unit at least 4″ away from a wall.
Using the AUX IN Cable
- Use the AUX Stereo Audio RCA Cable (included) to connect the TV’s stereo AUX (L/R) audio output socket.
- Connect the audio output cable of the soundbar via the ‘AUX’ input sockets of the unit. Then press MODE on the remote control or press the Mode button on the unit to scroll to the AUX IN function.Turn on your television.
Troubleshooting: If you have no picture or encounter interference, please make sure that the AUX cable is connected to the ‘output’ AUX port on your TV set. This will ensure that the sound is exporting correctly.If the TV does not have an ‘output’ AUX port, please use an alternative connection method.

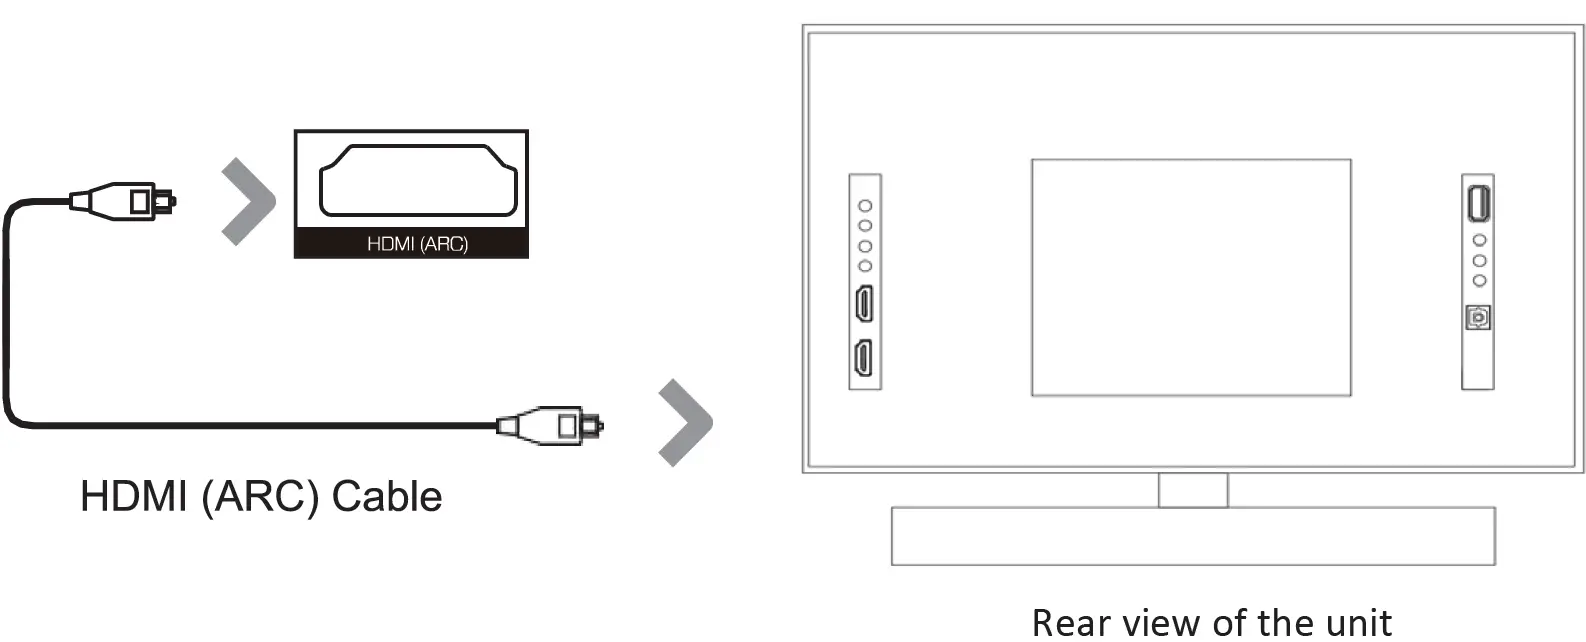
Using the HDMI (ARC) Input
You will need an audio source with an HDMI (ARC) Audio Output and an HDMI (ARC) Audio Cable (not included).
- Connect the HDMI (ARC) Audio cable to the HDMI (ARC) output on the audio source and to the HDMI (ARC) Input on the soundbar.
- Press the POWER button on the soundbar or POWER button directly on the remote control to turn on the soundbar.
- Press the MODE button on the remote control to switch to HDMI (ARC) mode or select the MODE button on main unit repeatedly to select the HDMI (ARC) mode.
- Using the native controls on your connected device, make sure the audio settings are set to HDMI (ARC) or HDMI Audio and are turned on. Audio from the connected audio source should now play through the speakers.
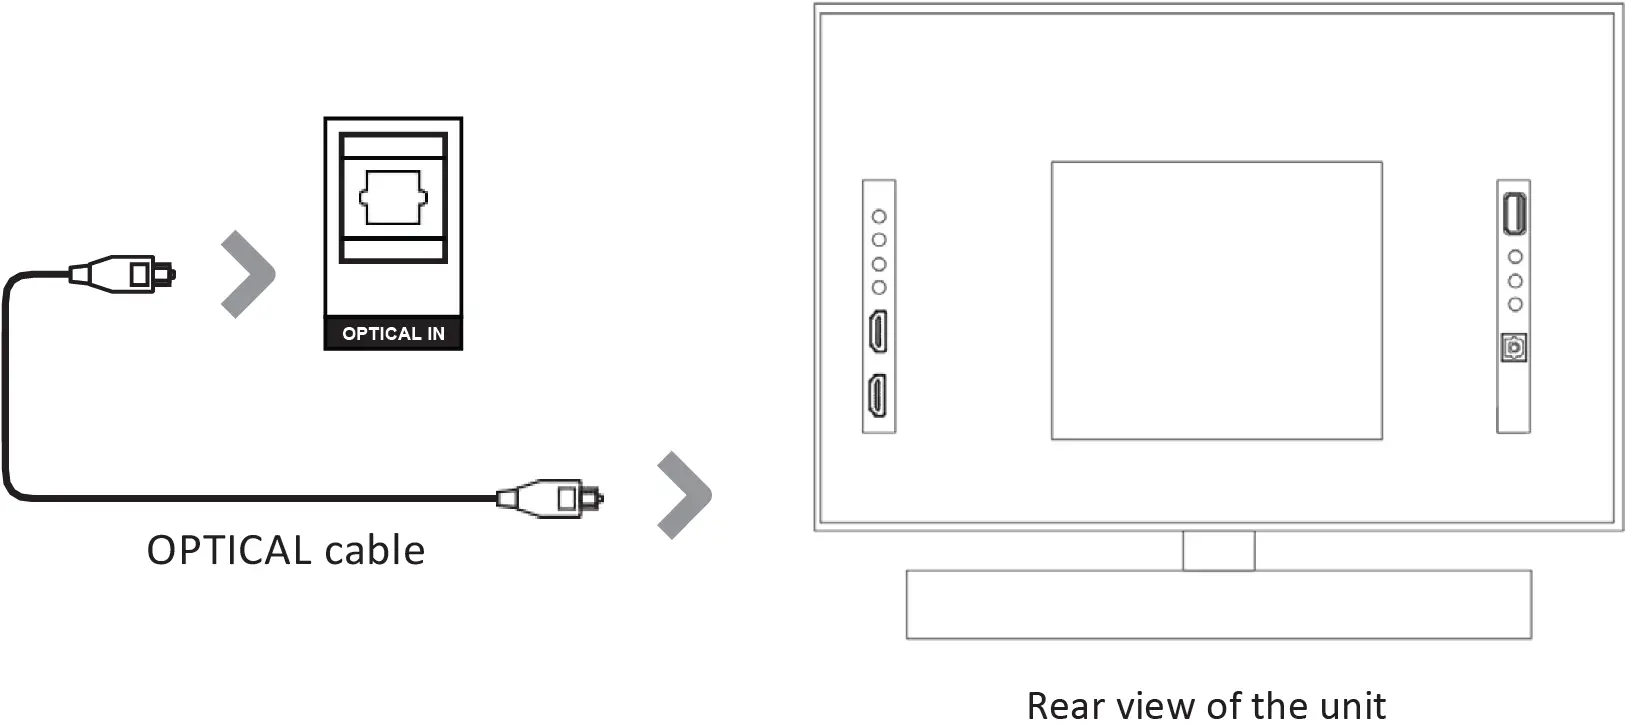
Using the Optical Input
You will need: An audio source with an Optical Audio Output and a Digital Optical Audio cable (included).
- Connect the Digital Optical Audio Cable to the optical output on the audio source and to the Optical Input on the soundbar.
- Press the POWER button on the sound bar or POWER button directly on the remote control to turn on the soundbar.
- Press the MODE button on the remote control to switch to Optical mode or select the MODE button on main unit repeatedly to select the Optical mode.
- Using the native controls on your connected device, make sure the audio settings are set to PCM or Optical Audio and are turned on. Audio from the connected audio source should now play through the speakers.
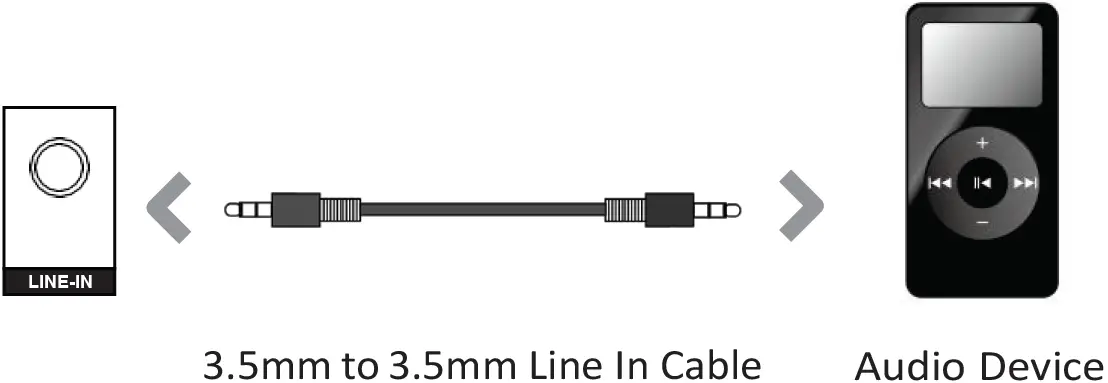
Using the 3.5mm Audio Device Connection (Line-In)
- Before use, disconnect any cables connected to the Stereo RCA Inputs.
- Plug one end of a 3.5mm to 3.5mm Line In cable (included) into the Line In port on the unit.
- Plug the other end of the cable into the audio outpuUheadphone output on an audio device or other audio source.
- Press the POWER button on the soundbar or POWER button directly on the remote control to turn on the soundbar.
- Press the MODE button repeatedly on the soundbar or press the MODE button on remote control repeatedly to enter LINE IN mode.
- Audio played through the connected device will now be heard through the speakers.
Connecting to the Mains Supply
- Make sure the power supply’s is 100V~240V.
- This unit is designed to use the included power adapter. Connecting the unit to any other power source may cause damage to the unit.
- Unwind the mains cable to its full length. Connect the mains plug to a mains socket making sure it is fully inserted.
- Connect the adapter to the unit via the DC input Socket.
CAUTION: Ensure all audio connections of the unit are connected before connecting to the mains power socket. Unplug the power cord from the outlet when the unit is not in use for an extended period of time.
Using the Bluetooth® Operation
Pairing a Bluetooth-Enabled Device for the First Time
- Press the POWER button on the unit or the POWER button on the remote control to turn on the soundbar.
- Select and press the MODE button repeatedly on the remote control until in Bluetooth® mode or press the MODE button repeatedly on the soundbar to enter Bluetooth® mode.
- Using the native controls on your Bluetooth® device, select the “AMP37” in your Bluetooth® settings to pair.
- Refer to the user manual for your specific device for instructions on pairing and connecting Bluetooth® devices.
- When successfully paired and connected, a beep will sound. After initial pairing, the unit will stay paired unless unpaired manually by the user.
- If your device becomes unpaired or you are unable to connect, repeat the steps above.
Playing Audio Wirelessly
- Follow the instructions for pairing a Bluetooth® device.
- Use the native controls on the connected Bluetooth-enabled device or use the remote control to Play/Pause the track or Skip Forward/Backward to a selected track.
- Audio played through the connected Bluetooth® device will be heard through the speakers.
Using the USB Operation
- Insert USB to play music automatically.
- Select and press the MODE button repeatedly on the remote control until in USB mode or press the MODE button repeatedly on the soundbar to enter USB mode.
- To Play/Pause the track or Skip Forward/Backward to a selected track, use the remote control or buttons on the side of soundbar.
- Audio played through the connected USB device will now be heard through the speakers.
Using the FM Mode
- Select and press the MODE button repeatedly on the remote control or press the MODE button on the soundbar repeatedly to enter FM MODE.
- Ensure that the wire antenna on the back panel of the soundbar is extended.
- When in FM MODE, press and hold the ‘PLAY/PAUSE’ button on the remote or on the soundbar to begin searching for available FM stations.
- After the search is complete, the soundbar will save the stations with the best signal. To scroll through these saved stations, press the ‘PREVIOUS/NEXT’ buttons on the remote control.
Please Note: If you are having trouble with receiving stations, try another auto-scan and adjust the wire antenna, if needed.
Troubleshooting
|
Problem |
Possible Causes/Solutions |
| No Power | Ensure power is connected – press the “On/Off” button on the remote control Check that the power adaptor is properly connected to power outlet |
| No Sound | Ensure audio cables are properly connected with correct input mode selected via remote control
Try using an alternative cable for connecting to your TV Check that the unit is out of standby mode |
| No Sound with Bluetooth® Connection | May not be paired with Bluetooth® device Try reconnecting |
| Disturbance | Switch off and unplug the unit Leave it for 2 minutes and switch it on again If a particular mode is causing problems, try an alternative con- nection to your TV, such as Optical or Bluetooth® |
| Remote Control Not Working | Check the battery Replace with a new one if necessary Check there are no obstacles in the front of the remote sensor |
Specifications
| Power Supply |
DC 24V / 2 5A |
| Speaker Power |
100W |
| RMS Power |
60W |
| Speaker Size |
2″ |
| Number of Speakers |
4 |
| Working Environment (Temperature) |
14° ~ +131° F |
| Relative Humidity |
5% ~ 90% |
| Frequency Response |
100Hz-15KHz |
| Bluetooth® |
v5 0 |
| Dimension (LxWxH) |
38″ x 2.5″ x 2.5″ (Soundbar) |
Quick Installation Guide
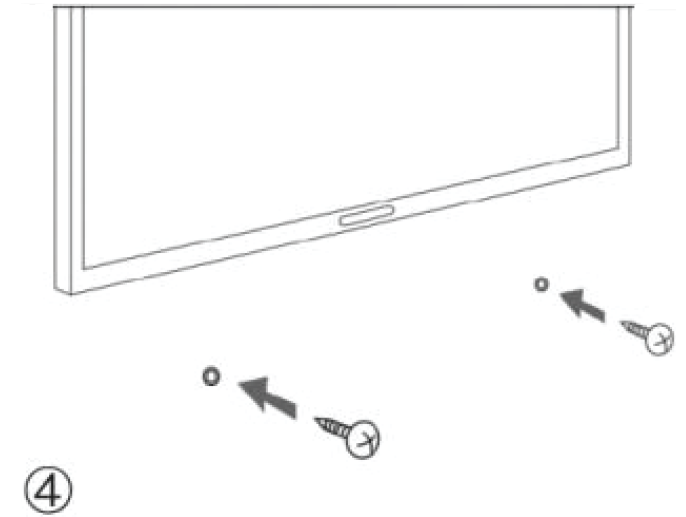
- Place the paper guide on the wall where you want to hand the soundbar.

- Use a level to make sure the soundbar is level.
- Locate the screw holes on the paper guide and mark a point with a pencil.
- Make the holes with the corresponding drill bit according to the type of wall.
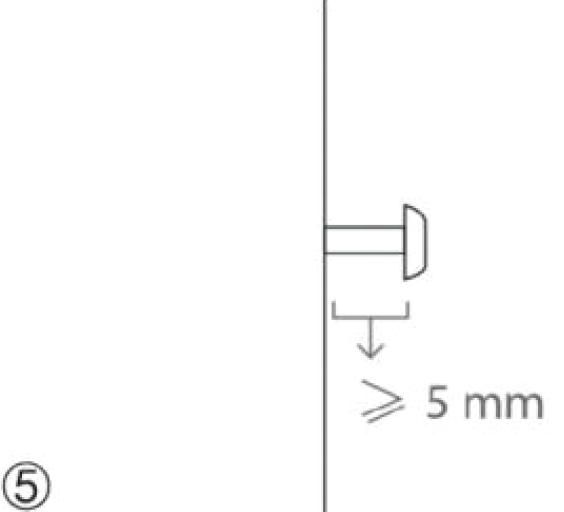
- Leave no more than .20″ (5mm) between the head of the screw and the wall to minimize tilting.
- For better sound, place the soundbar at the same height of the ear.
Product Registration Instructions
Visit: www.HamiltonBuhl.com
- Click on Customer Care
- Click on Product Registration Form
- Please fill out all fields marked with * to register your product

Warranty
Warranty begins the date item ships from our warehouse. All products have a one year warranty from original date of shipment, unless otherwise noted.
80 Little Falls Road, Fairfield, NJ 070041-800-631-0868www.HamiltonBuhl.com
 report this ad
![]()
[xyz-ips snippet=”download-snippet”]