Instruction ManualAudioAceTMPortable Bluetooth® CD Player with Cassette Recorder and FM Radio
Never-Ending Learning Innovation80 Little Falls Road, Fairfield, NJ 07004 · 1-800-631-0868 · www.HamiltonBuhl.com
AudioAce™Portable Bluetooth® CD Player
Warnings and Precautions
Caution:
- TO PREVENT ELECTRIC SHOCK, FULLY INSERT THE PLUG INTO THE OUTLET, ENSURING THE WIDE PRONG IS IN THE CORRECT SLOT.
- Use of any controls or adjustments or performance of procedures other than those herein specified may result in hazardous radiation exposure.
- There is a danger of explosion if batteries are placed incorrectly.
Warning:
- To reduce the risk of fire or electric shock, do not expose this apparatus to rain or moisture.
- Changes or modifications to this unit not expressly approved by the party responsible for compliance could void the user’s authority to operate the equipment.
- Do not place the unit on top of any soft, porous, or sensitive surfaces to avoid damaging the surface. Use a protective barrier between the unit and the surface to protect the surface.
- Use of this unit near fluorescent lighting may cause interference.
- There is a danger of explosion if you attempt to charge standard alkaline batteries in the unit. Only use rechargeable NiMH batteries.
- Shock Hazard – Do Not Open.
- Mains plug is used as a disconnect device and it should remain readily operable during intended use. In order to disconnect the apparatus from the main completely, the main plug should be disconnected from the main socket outlet completely.
- Do not mix old and new batteries. Do not mix alkaline, standard(carbon-zinc), or rechargeable (Ni-Cad, Ni-Mh, etc.) batteries.
WARNING: TO REDUCE THE RISK OF ELECTRIC SHOCK, DO NOT REMOVE COVER (OR BACK). NO USER-SERVICEABLE PARTS INSIDE. THIS UNIT MUST BE SERVICED BY QUALIFIED SERVICE PERSONNEL.
The lightning flash with the arrowhead symbol, within an equilateral triangle, is intended to alert the user to the presence of uninsulated “dangerous voltage” within the product’s enclosure that may be of sufficient magnitude to constitute a risk of electric shock.
The exclamation point within an equilateral triangle is intended to alert theuser to the presence of important operating and maintenance (servicing) instructions in the literature accompanying the appliance.

This product utilizes a Class 1 laser to read compact discs. The laserCompact Disc Player is equipped with safety switches to avoid exposure when the CD door is open and the safety interlocks are defeated. Invisible laser radiation is present when the CD Player’s lid is open and the system’s interlock has failed or been defeated. It is very important that you avoid direct exposure to the laser beam at all times. Please do not attempt to defeat or bypass the safety switches.
Important Safety Instructions
- Please read, follow and keep these instructions and comply with all recommended cautions.
- Do not use this unit near water.
- Clean with a dry cloth only.
- Do not block ventilation openings.
- Do not place the unit near any heat sources such as radiators,heat registers, stoves, or other apparatus (including amplifiers)that produce heat.
- Follow safety precautions and use a polarized or grounded-type plug. A polarized plug has two blades with one prong wider than the other. A grounded-type plug has two prongs and a third grounding prong. The wide blade or the third prongs are provided for your safety. If the provided plug does not fit your outlet, consult an electrician for the replacement of the obsolete outlet.
- Protect the power cord from being walked on or pinched, particularly at plugs, or where they exit the unit.
- Only use attachments and accessories specified by the manufacturer.
- Unplug the unit during lightning storms or when unused for long periods of time.
- Refer all service needs to qualified service personnel. Servicing isrequired if the unit has been damaged in any way, such as power cord (or plug damage) if the liquid has been spilled or objects have fallen into the unit, if exposed to rain or moisture, or if dropped and not working properly.
Note: When placing your unit on a lacquered or natural finish, protect your furniture with a cloth or other protective material.
FCC Warnings
NOTE: This equipment has been tested and found to comply with the limits for a Class B digital device, pursuant to Part 15 of the FCC Rules. These limits are designed to provide reasonable protection against harmful interference in a residential installation. This equipment generates, uses, and can radiate radio frequency energy and, if not installed and used in accordance with the instructions, may cause harmful interference to radio communications. However, there is no guarantee that interference will not occur in a particular installation. If this equipment does cause harmful interference to radio or television reception, which can be determined by turning the equipment off and on, the user is encouraged to try to correctthe interference by one or more of the following measures:
- Reorient or relocate the receiving antenna.
- Increase the separation between the equipment and receiver.
- Connect the equipment into an outlet on a circuit different from that to which the receiver is connected.
- Consult the dealer or an experienced radio / TV technician for help.
Additional WarningsThe apparatus shall not be exposed to dripping or splashing and that no objects filled with liquids, such as vases, shall be placed on the apparatus. Mains plug is used as a disconnect device and it should remain readily operable during intended use. In order to disconnect the apparatus from the mains completely, the mains plug should be disconnected from the mains socket outlet completely. The battery shall not be exposed to excessive heat such as sunshine,fire, or the like. Caution marking is located at the rear or back of the apparatus. The marking information is located at the rear or back of the apparatus.![]() This symbol indicates that this product incorporates double insulation between hazardous mains voltage and user-accessible parts.
This symbol indicates that this product incorporates double insulation between hazardous mains voltage and user-accessible parts.
Technical Specifications
- Mode: MPC5050BT – MPC5050
- Bluetooth® 2.1
- Adapter AC Input: AC100-240V~50/60Hz
- Adapter DC Output: DC 6V 1.2A
- Batteries Power: DC 12V (8×1.5V) “C” size UM-2/LR14Batteries
- Output Power: 2 x 2 Watts
- Speaker: 76mm (3”) Cone Type
- AUX-In: 3.5mm Jack
- Headphone: 3.5mm x 6
- Dimensions: 13.39” L x 10.24” D x 5.31” H
- Weight: 5.07 lbs.
- Operation Temperature: +41°F – +95°F
- General Frequency: FM 88 – 108 MHz
- CD Optical Pick-Up Lens: 3 Beam Semiconductor Laser
In the Box
- AudioAce™
- Power Supply
- Instruction Manual
Feature Controls

- AUX-In Jack (Line-in)
- Power Button
 Tune+ or /Tune- Button
- Play/Pause/Pair Button
- Stop/M+ (Memory Up) Button
- X-BASS Button
- FM Antenna Rod
- Carrying Handle
- Repeat Button
- MEM/PROG Button
- Source Button
- Volume Buttons
- CD Open Button
- Cassette Pause Button
- Cassette Stop/Eject Button
- Cassette F.FWD/REW Button
- Cassette Play Button
- Cassette Rec Button
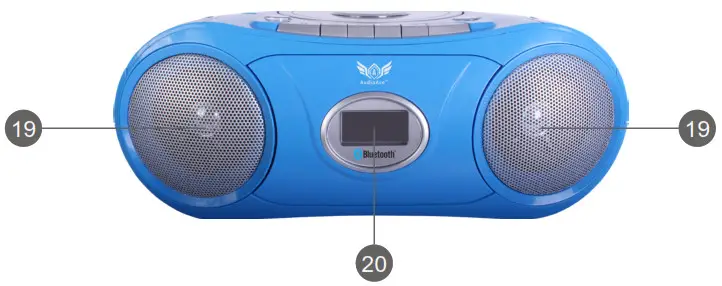
- Speakers
- LCD Display
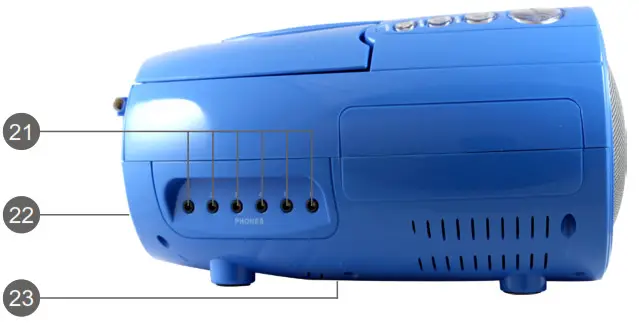
- 6x Headphone Jacks
- DC in (DC-6v)
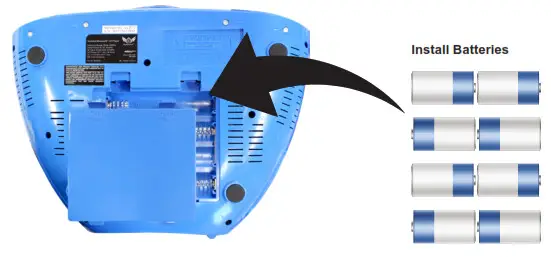
- Battery Compartment (“C” Battery x8)
Getting Started / Main Operation
Power On the Unit:Press the Power button to turn the unit on or off.Adjusting the Volume:Press the Volume buttons to increase or decrease the volume level.Adjusting the Antenna Rod:The antenna should be extended to ensure good reception. It may benecessary to alter the position of the unit and/or antenna to achieve thebest signal.Using Headphones:This unit can support up to 6 headphones connected together. Theheadphone sockets are located on the side of the unit. The headphones must be compatible with a 3.5mm diameter plug.X-BASS (Bass Boost):Press the X-BASS button to turn on or off the X-BASS function.
DC Batteries / AC Power Operation
Battery Operation:Before installing batteries, ensure that the unit is disconnected from themain AC power supply. Remove the battery compartment cover on thebottom of the unit.This unit utilizes (8) 1.5V C-size batteries (not included). Be careful toinsert the batteries according to the correct polarity +/-. Never mix old and new batteries. Re-attach the cover. For battery operation, disconnect the main AC power supply and remove the cable from the power socket. Battery operation will be selected automatically.
AC Operation:Use the 6V adapter (included) by connecting the small end of the adapter cable into the DC hack at the rear of the unit. Insert the adapter plug into a conveniently located AC outlet. Please ensure that your mains supply is compatible before use.
Using the Radio:
- Press the Source button to select FM mode.
- The LCD Display will show the frequency of the radio.
Automatic Radio Tuning:
- In FM mode, press the /Tune+ or /Tune- to manually scan through the frequency band.
- If the reception does not improve, try altering the position/length of the antenna. If the reception is still poor, scan again to determine whether a stronger signal exists for the desired frequency.
Programming Radio Presets:You can preset up to 20 stations.
- Tune to the station you wish to preset (see Using the Radio).
- Press the MEM/PROG button, the preset station number (P01-P20) will appear on the display.
- Use the Stop/M+ button to select the preset position.
- Press the MEM/PROG button again to save the current station into the specified preset.
- Repeat steps 1-4 to store additional radio presets.
Recall a Preset Radio Station:
- Press the Stop/M+ button to search for your preset radio stations.
Listening to CDs
Insert a CD:
- Open the CD door by pressing the Open button.
- Insert a disc into the disc compartment with the title side up.
- Close the CD compartment door.
Removing a CD:Press the Stop/M+ button once, open the CD door by pressing the Open button. Remove the CD when it has stopped spinning.
Playing a CD:
- Press the Source button to select CD mode.
- Insert CD into a player, “—” will appear for a few seconds, and the total track/ file number will appear on the display and the CD will automatically start playing.
- Pres /Tune+ or /Tune- button to jump to next/previoustrack playing.
- Press and hold the /Tune+ or /Tune- button to fast forward/rewind the track playing.
- Press the Play/Pause/Pair button to pause the CD playing. Press again to resume play.
- Press the Stop/M+ button to stop the CD from playing.
- After all, tracks have been played, the CD player will stop automatically.
Programming CD Tracks:You can preset up to 20 program tracks for easy access. “FU” will appear on the LCD display when 20 tracks have been programmed.
- Make sure the CD is not running by pressing the Stop/M+ button.
- Press the MEM/PROG button once, and “P01” will blink on the LCD display, then “00” will appear on the LCD display.
- Press the /Tune+ or /Tune- button until the display shows the desired track number.
- Press the MEM/PROG button to store the selection
- Repeat steps 3-4 to store additional tracks.
- Once the last desired track is programmed, press the MEM/PROG button to complete the programming process.
- To play the stored sequence, press the Play/Pause/Pair button.
- To cancel a program, press the Stop/M+ button twice.
- After all memory tracks have been played, the player will stop automatically.
Using Repeat Function:
- Press the Repeat button once to repeat the current track playing.
- Press the Repeat button twice to repeat all tracks on the CD.
- To cancel the repeat function, press the Repeat button until “1 or ALL” icons disappear or press the Stop/M+ button.
Using a Bluetooth® Device
This unit can connect to any Bluetooth ® -enabled device by following the steps below.Setup Your Unit on Bluetooth® (bt) Mode:
- Press the Source button to select (bt) mode.
- “bt” will be flashing on the LCD display.
- Follow the next step below.
Set your Bluetooth® -Enabled Device to “Discover” Your Unit:
- First, make sure that Bluetooth® is activated on your device.
- Then, set your Bluetooth® -enabled device to search for your unit. This usually involves going to the “setup”, “connect” or Bluetooth®” menu on your device and selecting the option to search/scan/discover a Bluetooth® device.
- Your device will find the unit under the name “MPC5050BT”.
- Your Bluetooth® -enabled device will then ask to pair with the unit.
- Accept by pressing “yes” or “ok” on the Bluetooth® -enabled device.
- When Bluetooth® -enabled device has been successfully paired,the “bt” digits of LCD display will stop flashing and make a sound.Note: These steps must be repeated when pairing any new Bluetooth® -enabled device.
Warning: If the connection is unsuccessful, the “bt” will flash slowly on the LCD display.After Initial Pairing:If the unit has already been paired with a Bluetooth® -enabled device, it will automatically start searching for the previously paired device. Once the previously paired device is found, the “bt” digits will stop flashing and make a sound.
Playing Audio Via Bluetooth®:
- When Bluetooth® has been successfully paired, press the Play/Pause/ Pair button to play or pause music from your unit.
- Press /Tune+/Tune- or button to jump to next/previous music track.
- Music can also be controlled from the Bluetooth® -enabled device.Incoming Call:The volume of the music will automatically lower when you have an incoming call. When the call is complete, the music will resume at the original set volume.
Using AUX-In (line-in)
Requires a 3.5mm cable (not included), and external media player(not included)
- Press the Source button to select AUX mode.
- Plug a 3.5mm audio cable into your external media player(via the headphone jack or AUX out or Line out).
- Plug the other end of the cable to the AUX-In jack of the unit.
- Make sure both units are turned on.
- Use the controls on the connected media player to select and play audio.
- Music can only be controlled from the media player.
Listening to a Cassette
Insert or Remove a Cassette Tape:
- To insert your cassette tape: Press the Stop/Eject button to open the cassette door. Insert your cassette tape into the compartment with the exposed section of the tape facing upward. The side that you wish to listen to record onto should be facing towards you. Push the cassette door unit it locks in place.
- To remove your cassette tape: Press the Stop/Eject button to open the door then lift the cassette out.
Playing Cassettes:
- Press the Source button to select Tape mode.
- When the Tape mode is selected, “TAP” will appear on the LCD display.
- Insert the cassette tape and press the PLAY button.
- The unit will automatically stop playing when it has reached the end of the cassette. If you wish to continue playing the cassette; please press Stop/Eject, remove the cassette, flip the cassette over to the other side, reinsert the cassette, and press Play.
- Press the Stop/Eject button to stop the tape. Press the Stop/Eject button again to open the cassette door.
- Press F.FWD or REW button to fast forward or rewind through the tape.Note: To avoid damage to the unit and your cassette, press the Stop/Eject in between each operation. For example; when fast-forwarding your cassette while playing, always pres Stop/Eject before pressing F.FWD.
Recording to Your Cassette Tape:
- Insert a cassette.
- Select the source you want to record (CD/FM/BT/AUX-In/TAP) and start playing the selected source.
- If you select TAPE mode, you can speak into the unit to record your voice. For best results, make sure you are facing the cassette door.
- Press the Record button to start recording.
- To stop recording, press the Stop/Eject button once.
- To playback, the recording, press the REW button to rewind, then press the Play button to start playing.
Product Registration Instructions
 report this ad
Visit: www.HamiltonBuhl.com
- Click on Customer Care
- Click on the Product Registration Form
- Please fill out all fields marked with * to register your product
Warranty:
Warranty begins the date the item ships from our warehouse. All products have a one-year warranty from the original date of shipment unless otherwise noted.
Never-Ending Learning Innovation80 Little Falls Road, Fairfield, NJ 07004 · 1-800-631-0868 · www.HamiltonBuhl.com
References
[xyz-ips snippet=”download-snippet”]