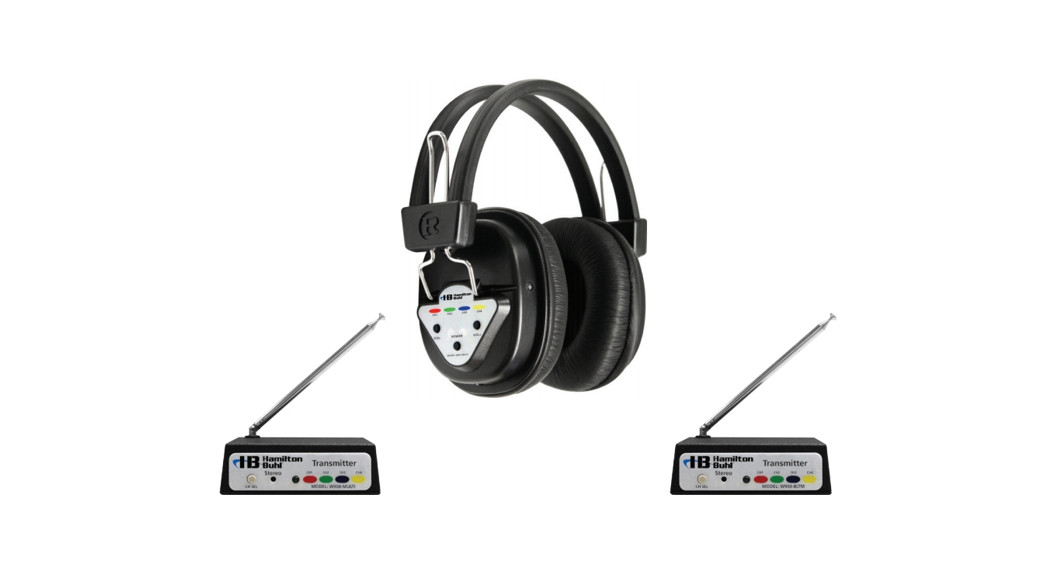
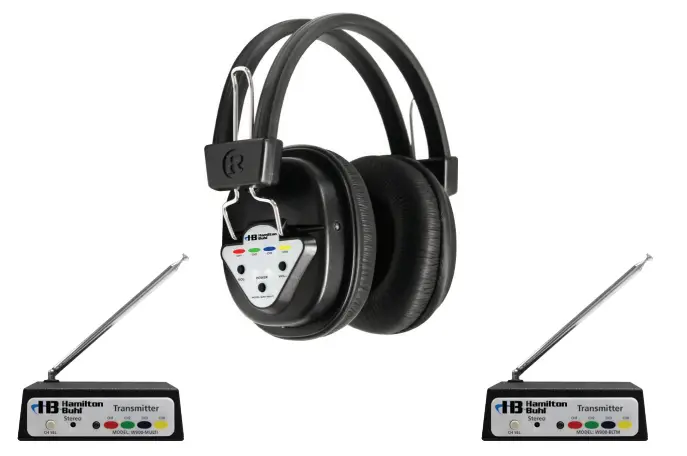
Wireless Headphone SystemWIRELESS HEADPHONE SYSTEM (For W900-MULTI, W900-BLTM, W901-MULTI)INSTRUCTION MANUAL
80 Little Falls Road. Fairfield, NJ 07004 • 1-800-631-0868 • www.HamiltonBuhl.com
W900-BLTM Bluetooth® Transmitter Setup
Extend the antenna vertically to full height.
Plug the 12V/1A power adapter into the “DC12V” socket on the rear of the transmitter, then insert the power adapter into a power outlet.Adjust the switch to the “ON” position for use with a power adapter. Adjust to “BATT” position for use with an internal rechargeable battery. Adjust to “OFF” to turn off the unit.Plug the adapter into the “DC12V” jack to charge the battery. The “CHARGE LED” will be lit. When fully charged, LED will turn off.The “PAIR” button is used to pair with Bluetooth° devices. The device ID is “V001”. Push the “SW” button when pairing and the blue LED will flash when pairing is successful.To select a channel, press “CH SEL” on the front panel of the transmitter (bottom left side). Press again for the next channel.The LED color indicates the selected channel.“Stereo” LED indicates Mono or Stereo mode. ON means stereo mode and OFF means mono. Press and hold “CH SEL” for 3 seconds to toggle mode and the LED will change state.Connect the 3.5mm stereo plug into any stereo mini-jack source to transmit contents wirelessly to W901-MULTI.Adjust the volume control on the sound source to the desired volume level.Using the microphone: Connect mono-type mic jack into marked ![]() mic socket on the rear panel of a transmitter (microphone not included).IMPORTANT: When not using the microphone, remove the microphone plug from the back of the transmitter to resume normal operation.When the battery is low, the “Stereo” LED will flash red and stop all other functions. Plug the power adapter into recharge.
mic socket on the rear panel of a transmitter (microphone not included).IMPORTANT: When not using the microphone, remove the microphone plug from the back of the transmitter to resume normal operation.When the battery is low, the “Stereo” LED will flash red and stop all other functions. Plug the power adapter into recharge.

W900-MULTI Transmitter Setup
Extend the antenna vertically to full height.
Plug the 12V/1A power adapter into the “DC12V” socket on the rear of the transmitter, then insert the power adapter into a power outlet.To select a channel, press “CH SEL” on the front panel of the transmitter (bottom left side). Press again for the next channel.“Stereo” LED indicates Mono or Stereo mode. ON means stereo mode and OFF means mono. Press and hold “CH SEL” for 3 seconds to toggle mode and the LED will change state.Connect the 3.5mm stereo plug into any stereo mini-jack sources of your choice to transmit contents wirelessly to W901-MULTI.Adjust the volume control on the sound source to the desired output level.Using the microphone: Connect mono-type mic jack into marked ![]() mic socket on the rear panel of a transmitter (microphone not included).IMPORTANT: When not using the microphone, remove the microphone plug from the back of the transmitter to resume normal operation.NOTE: The 900-MULTI does not contain built-in rechargeable batteries.
mic socket on the rear panel of a transmitter (microphone not included).IMPORTANT: When not using the microphone, remove the microphone plug from the back of the transmitter to resume normal operation.NOTE: The 900-MULTI does not contain built-in rechargeable batteries.

Using Your W901-MULTI Wireless Headphones
(Compatible with both the W900-MULTI and W900-BLTM models)NOTE: Fully charge headphones before first use.Press and hold the “Power” button for 3 seconds or more to turn on the headphone. The selected channel color will be shown on the side of the ear cup.The channel LED indicator will show five colors: “Yellow — Blue — Flashing Blue — Green — Red”. Blue for Mono mode and Flashing Blue for Stereo mode.Quick-press the “Power” button to change channels to the color that matches the transmitter channel color.Adjust the volume control buttons: “Vol +” or “Vol —” to the desired volume level.When finished using the headphone, press and hold the “Power” button for 3 seconds to turn off.When the battery is low, the “CH LED” indicator will flash red, and the power will turn off automatically. Plug the power adapter into recharge.NOTE: To operate correctly, make sure to select the same color channels for both transmitter and headphone.
Charging Instructions for W901-MULTI and W900-BLTM:
IMPORTANT: Do not charge the headphone battery for longer than 8 hours
The charging lead is designed to charge up to six headphones simultaneously. Disconnect the power adapter plug from the transmitter, and insert it into the socket on the charge lead, as per illustration.
- Fit one of the charger lead plugs into the socket on the headphone as in the illustration
- Check the headphone powered off. Connect the power adapter to the outlet and charge for 5 to 5.5 hours.
The red LED will turn on to indicate charging, and it will turn off when the headphones are fully charged. When fully charged, remove the power adapter from the outlet.
Wireless Headphone/Transmitter Specifications
|
Transmitter |
||
| W900-Multi | W900-BLTM | |
| System Type | VHF-FM | VHF-FM and Bluetooth |
| Channels | 4 | 4 |
| Antenna | Telescopic | Telescopic |
| Range | 100 ft. | 100 ft. |
| Audio Input | -20 to 20dBm | -20 to 20dBm |
| Power Output | 10mW | 10mW |
| Power Supply | 12 volts DC | 12 volts DC |
|
Headphone W901-MULTI |
|
| System Type | VHF-FM |
| Channels | 4 |
| Speaker | 30mm Mylar |
| Batteries | NiNh |
| Run Time | 18-19 hrs |
| Weight | 10 oz |
|
Channel: Color and Frequency |
|||
| Yellow | Blue | Green | Red |
| 72.100 MHz | 72.500 MHz | 72.900 MHz | 74.700 MHz |
In the Box
| W900-MULTIUnitInstruction Manual5072 – 1/4″ PlugW980 – Power Adapter | W900-BLTMUnitInstruction Manual5072 – 1/4″ PlugW980 – Power Adapter | W901-MULTIUnit Instruction Manual |
Accessories (not included)
W990
Replacement 6-way charging cable for 900 series headphones. Do not combine two W990 cables with one AC power adapter (W980).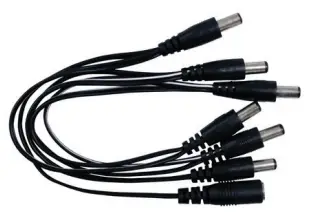
Note: To charge an additional headphone, be sure to purchase an additional AC power Adapter (W980). A single AC power adapter is only capable of charging 6 wireless headphones at one time.
W980
Replacement 12V ACNote: A single AC power adapter is only capable of charging 6 wireless headphones at one time. Do not combine two 6-way charging cables (W990) with one AC power adapter (W980).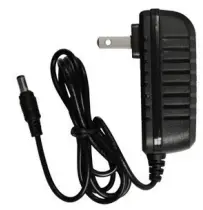
Product Registration Instructions
Visit: www.HamiltonBuhl.com
- Click on Customer Care
- Click on the Product Registration Form
- Please fill out all fields marked with to register your product
 report this ad
 WarrantyWarranty begins the date the item ships from our warehouse. All products have a one-year warranty from the original date of shipment unless otherwise noted.
References
[xyz-ips snippet=”download-snippet”]